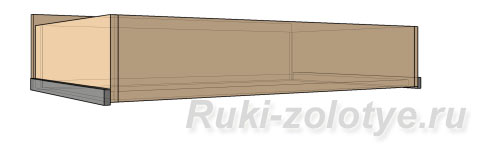
DIY closet box. DIY drawers
Increase the amount of storage space in your kitchen by making your own drawers. This is a small retractable drawer that is attached to the bottom of a cabinet or cabinet.
Our drawer is made for a standard cabinet 60 cm deep and 80 cm wide, but you can make such a model for any size cabinet or cabinet. For its manufacture they used pine boards and 20 mm birch plywood.
DIY Drawer Ideas
Don't worry if you've never made anything with wood, here's a simplified model that's not difficult to make with simple tools.
Tools:
Board saw
Portable circular saw for cutting plywood
Roulette
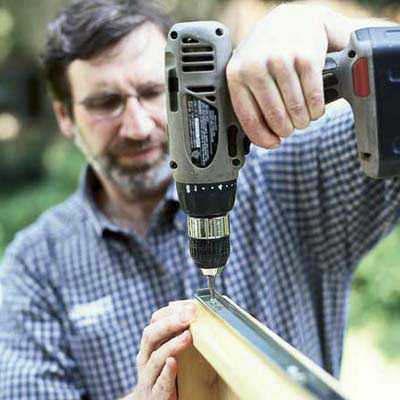
Screwdriver with set of bits
Countersinks for making holes of various diameters
12mm flat head drill bit for drilling holes
Thicknesser for marking boards
Drawer Assembly Clamp
You will need:
Pine boards 25X75 mm for the side walls of the box
20 mm birch plywood for the bottom of the box
Sandpaper P120 and P180
30mm screws for mounting
Guides cost about 600 rubles per pair.
Respirator
Wooden plugs to hide screw heads
40mm screws for shelf assembly
Wood glue
Cardboard spacers
Cotton fabric
Safety glasses.
Review
The drawer is very easy to use, you don't have to reach into the back corner of the shelf to get it. the right thing. Assembly and installation is a breeze, and here we show you how to make it.

Download original >>
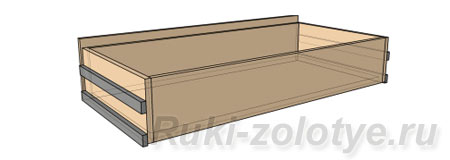
The sides of the box can be easily cut with a saw, and the bottom can be cut with a circular saw. The parts are butted together end to end and secured with screws and glue. The box is then coated with quick-drying varnish.
There are factory made wire baskets and trays that you can buy. But you need to use them carefully, as they can bend under the weight of pots and pans. But don't worry if you make a box using our tips.
Instructions
Step 1
In order for the drawer to slide freely, it is necessary to take accurate measurements.
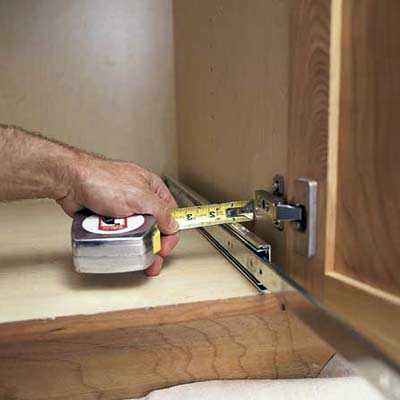
Open the cabinet door and place 2 drawer slides inside, measure the distance between the side of the cabinet and the edge of the drawer slide.
Cut two 5 cm strips from wooden board or plywood, they should be the same length as the guides.
Place two strips on opposite sides of the cabinet, measure the distance between them, and subtract 2.5 cm from the resulting distance, the size of the guides. The resulting value will be the width of the box.
The depth of the drawer is equal to the length of the guide.
Step 2
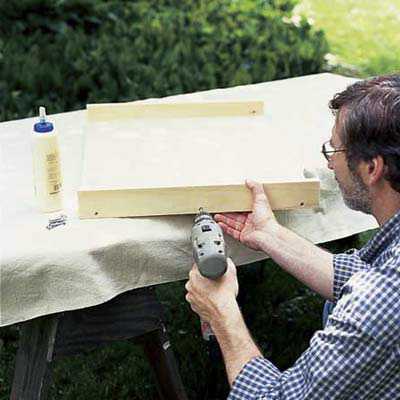
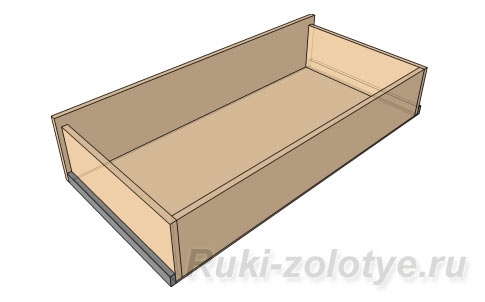
Subtract 3.7 cm from the width of the box and from the depth to determine the size of the bottom of the box. Circular saw cut the bottom out of birch plywood.
Next, using electric or hand saw cut 4 pieces from the board for the walls of the box. The sides should be the same length as the depth of the bottom. The front and back should be 3.7 cm larger than the width of the bottom.
Clamp the back and sides to the bottom of the box, making sure the bottom edge of the sides and bottom are flush. Drill holes for screws through the side walls and bottom plywood, every 20 - 25 cm.
Also drill two holes at the ends back wall.
Attach the sides to the bottom using glue and screws. Then attach the back wall to the bottom.
Step 3
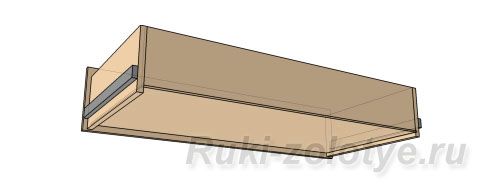
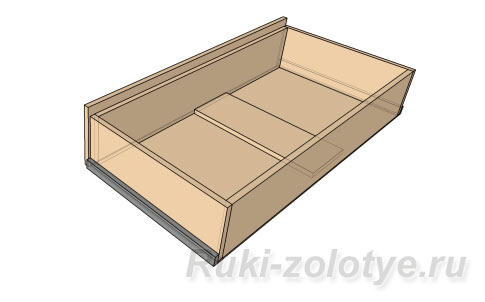
Using a flat head drill bit, drill 6mm deep holes along the bottom and ends of the front wall.
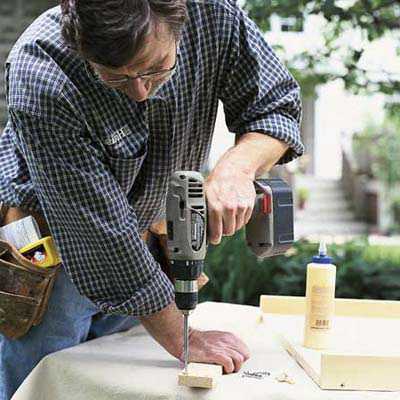
Attach the front wall to the bottom with glue and screws.
Step 4
To hide the screw heads, glue 6mm wooden tacks into the holes.

Advice: match the buttons to the color of your drawer.
Step 5
Sand the box with 120-grit sandpaper. Use a cloth to remove dust after sanding.
Go outside, wear safety glasses and a respirator. Apply a thin coat of varnish to the entire drawer.
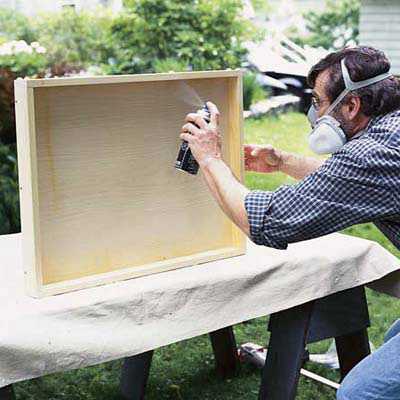
Wait for the varnish to dry, about 30 minutes, then lightly sand with 180-grit sandpaper.
Wipe with a cloth and apply a second coat of varnish.
Advice: When spraying varnish, keep a clean rag nearby to wipe up drips and smudges.
Step 6
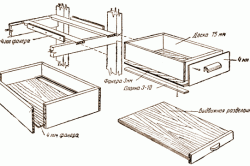
Prepare guides for installation.
Cut two cardboard spacers and place them on the bottom of the cabinet.
Place one strip that you cut in step 1 on top of the spacer. Secure it with screws to the cabinet wall.
Place the internal guide on top of the plank and secure it to the plank with screws.
Install the inner rail on the opposite wall of the cabinet in the same way.

Advice: In most cases, it will be easier to install the slides and drawer by removing the cabinet doors.
Step 7
Take one drawer slide and install it on the side of the drawer.
Align the end of the rail with the front of the drawer. Attach the slide to the drawer with screws.
Install a second rail on the other side of the drawer.
Step 8
Remove the cardboard spacers from under the slats. Keep the drawer level with the cabinet rails.
let's omit it, because they are analyzed separately) their advantages and disadvantages.
Option 1
To be honest, I didn’t notice any particular advantages in assembling this box and I don’t use it myself. With it, the side walls seem to be inserted between the front and back. As a result, we need to edge the ends that protrude from the sides. But instead, we gain the opportunity to make the fittings invisible (screw heads/). separately.
Option 2

It differs from the first option in the location of the walls. This time the side walls prevail, covering the ends of the front ones. As a result, only the visible (top) edges of the drawer can be edged - the front ends are hidden behind the facade, and the rear ends are invisible until the drawer is removed from the niche. Minus - visible fittings, but today they are available huge amount various kinds of plugs and stickers, so this drawback is not critical.
Option 3
It differs from the second one in the absence of a front wall, the function of which is performed by the facade. The facade itself is mounted on (see the last mounting option in the corresponding one). The main advantage this method is material savings + all the advantages of the second option. Disadvantages - the need to mill a groove under the bottom on the facade, difficulties in centering the facade itself in the box (calculation accuracy), difficulties with installing eccentric couplers (see the article about their installation).
Option 4- Common façade

with this option, several individual drawers are combined with one common facade. This technique allows you to kill several birds with one stone: visually it seems that there is only one box - there are no joints; more guides - more load to withstand; the jumper between the boxes increases the overall rigidity of the box, which in some designs is a very important factor.
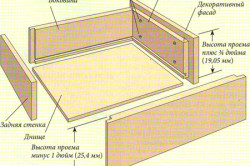
We have dealt with the main options for the location of the walls. Let's move to the bottom. Most often it is made from hardboard (fibreboard).
Option 1 -false bottom,  then its dimensions should be 1-2 mm smaller sizes the box frame - it’s more convenient to attach it this way - there are no protruding ends. The bottom is attached to the walls with self-tapping screws (I use 28 mm)
Option 2 fiberboard bottom fastenings in the groove
It is more labor-intensive, but it allows you to hide the not entirely aesthetic end of the fiberboard (although it is not particularly visible anyway), as well as hide the stiffeners by placing them under the fiberboard (see below). The disadvantages of the method include the need to mill a groove in the side walls and, possibly, the facade. (The back wall is usually made a little smaller so that the bottom can be pushed into the assembled box, after which it is attached to the back wall with self-tapping screws). The groove “eats” at least 10 mm of the depth of the box itself.
Option 3
In large boxes or in boxes that will be loaded with a large load, the fiberboard bottom must be supplemented stiffening rib(s), otherwise it will either bend or simply break out. Such ribs can be either external (see diagram) or internal (in this case you will have to make fiberboard “into the groove”), longitudinal and transverse.
Option 4 Simpler, but more expensive in terms of materials, is making the bottom of a box from laminated chipboard.
 In this case, the bottom is “put” into the box frame and secured to the end with self-tapping screws, or better yet, with confirmations. This bottom is more durable - it will not bend or break out. And it looks much more aesthetically pleasing than the version with a stiffener.
And finally, I’ll give you another way to increase the load capacity of the box several times (it is applicable only for ball guides).
You can equip the box with not one, but two sets of guides, due to which its load capacity will double. But at the same time, he will walk a little more tightly, and he will have to pay closer attention to the markings.
Drawers are an integral part of any closet. Sometimes situations arise when there are not enough of them in order to arrange all the things in convenient location and okay.
Drawers very convenient to use. Even those who have never made anything themselves can make them.
Here it is worth talking about the fact that you can make drawers with your own hands. Some, of course, will want to purchase them, but the size they need may not always be on the market. In this case, retractable elements are the only way out of the deadlock.
Tools and materials
So, to assemble products that extend, you will need the following list of tools and materials:
- drill or powerful screwdriver;
- an electric jigsaw that will allow you to cut the material as efficiently as possible;
- construction angle;
- ruler;
- pencil;
- roulette;
- rag;
- iron.
When everything is assembled, you can proceed directly to installation.
The guides will be an integral element of the design. You simply can’t do without them, because the boxes have to move on something?
Full roll-out guides are the best option. However, roller products can also be used. Some people prefer to install just ordinary pieces of wood instead. However, this is not the best solution.
All guides on the market have a pitch of 50 mm. Thus, if we're talking about For a box whose length is 450 mm, then it will need a guide with a size of 400 mm. In this case, the system will work efficiently and without failure.
It’s one thing to buy, but you also need to deliver it. This is done extremely simply. The design of these elements involves standard fastening using self-tapping screws or other fastening materials.
Detailing the boxes themselves
Now it's time to make the boxes themselves. For blanks, you can use chipboard sheets or purchase ready-made ones furniture panels. Even if they are smaller in size, they are enough for work, but there will be a lot of waste from the chipboard (of course, if you are not arranging a furniture set).
You can cut all the elements yourself using electric jigsaw. Sometimes you can go the other way, for example, order this service at the store where the material was purchased. The front and back walls of the drawers must be secured between the sides. The bottom must be attached to the box.
DIY drawer assembly
All the parts are ready for assembly, it’s time to get started. Before starting work, the edges of the elements are glued. This is done extremely simply - using a not very heated iron and a rag. In this case, the edge is laid with the beautiful side up, and then an iron is passed along it several times (the fastening will be more reliable).
After this, the rag is removed. Next, everything is wiped with a dry cloth, and excess edges are trimmed with a knife. All ribs must be additionally processed using sandpaper. The result should be a very nice picture.
Holes with a diameter of 8 mm are drilled in the product for confirmations, and 5 mm in the end. The marking for the guides on the drawer can be in any convenient position, but it is best if this line runs in the middle of the product.
Some features
We will talk about the full roll-out guides, which were mentioned above. They are the most appropriate in such a situation. The products consist of two components. The wide part must be firmly attached to the side of the cabinet using self-tapping screws of the appropriate size. They should not be too large so that the fasteners do not protrude outward. A small part of them should be attached directly to the boxes. Initially, such elements are sold as a single unit, but must be separated before work begins. This is done quite easily.
Now the guides can be attached to the cabinet and drawer. On the first element this is done with a small indentation, which is approximately 3 mm from the edge. As for the drawers, no gaps are needed here. The guide is mounted flush.
The facades themselves must be secured from the inside using self-tapping screws.

There is one little trick that will help install these elements evenly:
- First, you need to make appropriate holes for handles on the facades.
- Next, you need to attach it to the place, and then attach it from the outside through these holes. Then the drawer is pulled out, the facade is fastened from the inside in the normal mode, and then the fasteners are turned out. A very confusing system, but in practice it is quite easy to understand.
Now you can drill the holes for the handles to the end, and then begin to directly attach them. This is where the work ends.
It can be stated that the drawers are completely ready for use. In this case, you must first check their performance. If something is wrong, then you will have to adjust the elements from the very beginning. And this is highly undesirable. It’s better to make sure at the design stage that everything is done to the highest possible quality. Only in this case the work of everyone structural elements will be correct.
Thus, as is clear, making boxes with your own hands is quite simple. The most important thing is to follow the instructions given above. This will eliminate various modifications and defects that may occur on different stages work and operation of structural elements of this type. Good luck!
/ fromOn modern market Furniture offers include many types and designs of drawers. But what we are interested in now is not their appearance. No matter how high-quality the guides are and no matter how high-quality the assembly is, there are many cases when problems begin to arise over time. Most often this happens
- when the load is exceeded
- incorrect installation of guides
- exceeding the effective service life
- deformation of individual parts during operation
The given problems relate to the operation of mechanics, which is used in modern furniture for pulling out drawers. There are fewer problems with the box itself and its design. Let's look at them first.
Problems with the drawer design
The most common problem is the bottom of the drawer. There are two types of drawer bottom fastening. We can safely say that 90 percent of manufacturers simplify production and make an overhead bottom that is attached to the bottom of the box. Attached along the perimeter to the sidewalls. This greatly simplifies the technology; the bottom becomes another load-bearing part, which also takes on the role of a part that forms the geometry of the box. What to do if there are problems with this type of bottom fastening.
Most often, the reason is insufficiently strong and well thought out fasteners. The bottom is attached with nails to the front and back, and it is held in place by guides on the sides. At first, this scheme works quite well, but over time the nails become loose and the bottom comes off, even if the box is not overloaded. The solution is to replace it.
Nails - forget them right away. Today only the lazy and downright stingy use them. For repairs it is most simple and effective to use furniture staples. A furniture stapler is very inexpensive, staples are even cheaper. If your drawer is not loaded to its maximum capacity, 8 mm staples will be enough for you. They are easier to work without getting used to, they are less deformed and go to a sufficient depth. But if you are ready to practice first and fix the bottom more confidently, take 10 mm long hardened staples. You can use hardened nickel plated ones - they are even stronger and do not rust. Afterwards the procedure is simple. We remove the old fasteners and “shoot” the bottom with staples around the perimeter. Under the guides too. They are easy to remove - they are secured with three screws on each side. In this case, you must not disturb the geometry of the box, so punch the sides sequentially.
You can use screws if you have problems getting a stapler and staples. You will need screws with a diameter of 3.5 mm. There are two generally accepted standards for the length of furniture screws of this diameter - 15 and 30 mm. In principle, 15 is enough. However, it may be that the box is made of chipboard low quality, which is porous inside, so it is better to use 30 mm screws.
Both of the above methods are also suitable for replacing the bottom of the box - you will need to cut out the material the right size and secure it to the box frame.
The second type of bottom fastening is a mortise bottom. Most often this thin plywood, which is glued into the slots on the walls of the box. Such a bottom very rarely causes problems; in most cases they are caused by its destruction. If laminated fiberboard is used, you may encounter a situation where, due to plasticity, the glued zones simply tear out of the grooves. This “disease” can be treated a couple of times by re-coating the groove and gluing the bottom in place, but it’s still better to change it right away. This is not an easy procedure, but with some skills it can be done.
- the box needs to be disassembled;
- clean the grooves without disturbing their shape and thickness;
- order or cut a new bottom part of the required size;
- reassemble the box by gluing in a new bottom;
- give time for the glue to dry thoroughly. Do not load the box.
If the box is assembled using self-tapping screws or confirmations, this can be done easily. However, if used tenon joints, it is better to turn to specialists for disassembly if you are not strong in carpentry. The same actions are performed when you need to replace the plywood bottom. If it is cracked, damaged, deformed or lost its appearance.
Problems with drawer hardware
Several types of slides are used in drawer pull mechanics today. Here we will look at two. Transitional types also exist, but only a few use them. Either as an experiment, or to improve functionality without changing the main design. We will not consider such types of fittings.
Roller guides and their “convenient” brothers – metaboxes
The advantage is simplicity, low cost, ease of installation, the design is such that the box closes under its own weight - the last few centimeters of closing are downhill. Thanks to this, such guides have become very widespread. The photo of the metabox clearly shows which part of the guide is intended for what. One is attached to the furniture wall (small parts in the photo, load-bearing), the second is attached to the drawer structure. In the case of a metabox, the second part of the set forms the entire side wall of the box. A box with roller guides installed looks like this
However, the main disadvantage of this type of guide is incomplete extension. The drawer can be safely pulled out to approximately 75% depth. Let's see what problems most often arise with such guides. Naturally, we will assume that everything was normal in the “freshly purchased” furniture.
Incorrect installation
This problem is usually diagnosed immediately, even before purchase. A box with a roller guide correctly installed according to the technical gaps moves smoothly, it has a fairly small horizontal play. It is easy to check - try to “sway” the almost closed box left and right by the handle. If there is more than three to five millimeters of play, the installation is incorrect. This may be caused by errors in the dimensions of parts during design, or it may be a technological error in the guide itself. It is no secret that in the modern furniture market there is a sea of small firms that save on literally everything. And cheap guides from dubious manufacturers often “walk” along the thickness of the gap.
Over time, this problem may arise due to deformation of the structure. A heavily loaded furniture box will become deformed if it is made from a slab of improper thickness. Again, the manufacturer saved and used the material without thinking about the safety factor.
Problems caused by changes in technical clearance are difficult to cope with. Here you already need to intervene in the design, this can be done in 90% of cases and is not very difficult, but this is another rather voluminous topic.
If the drawer does not close on its own when pushed in under its own weight, this is an incorrect installation of the supporting part of the guide. Most often it is not installed horizontally. There is no need to touch the front part during such repairs - we don’t want to mess with appearance drawer gables. We unscrew the fasteners - except for one point near the very front roller, align them, and screw them into place. We do this with part of the guide, which is located on the furniture wall.
Excess load
This problem is not as rare as it might seem. The reasons can be either banal, like “the manufacturer saved money” or “well, they put a lot of stuff in,” or non-standard - children simply love to climb the handles of dresser drawers as if on a ladder or use them as a support to climb higher. And since the last thing people save on now is the handles, the guide suffers.
The problem can be solved in two ways. The main symptom is that the front wheel of the supporting part of the guide, the one on the furniture wall, “twists” - the plane ceases to be vertical, the metal in the mounting area is deformed and the wheel begins to catch on the second guide. You can return the wheel to its original position. There is no need to hit with a hammer, the roller can simply be split, but using a vice, holding the bushing, you can return the part to its original position.
However, more often this problem is caused by the manufacturer. There are two main applied standards for metal thickness for such guides - 0.5 and 1 mm. The manufacturer could simply save money. Replacing the guides with thicker ones is not a problem - all fastener locations match. Simply remove the old ones and replace them with new ones.
The older brothers of the roller guide – metaboxes – have the same “diseases”. If it seems to you that this will not help, replace the roller guides with telescopic ones. This is quite easy to do. Below we will talk about roller guides.
Exceeding the effective service life
There's nothing you can do about it. The rollers are plastic and will simply wear out over time. Backlash appears, drawers no longer open so confidently. There is only one way out - replace it. You can, of course, use silicone lubricants for a while, but this will not solve the problem.
Deformation of individual parts
This can happen if the guides are installed carelessly. There are not enough attachment points on the load-bearing part of a furniture wall, for example. Then the guide bends, the connections become loose, this can be detected almost immediately. To avoid such a problem out of the blue, ask the seller to pull out the drawer and make sure that the guides are attached at all points provided for by the design.
The same problem can occur if the load is exceeded. In this case, the lack of proper rigid fastening will only aggravate the situation. It is easy to “treat” – most often it is enough for the parts to be returned to their original shape and secured properly.
The second type of guides is ball guides. Or the “telescope” type. And their older brothers are “tandemboxes”. They are more expensive, but free from all the diseases of roller skates. Therefore, they are often used by those manufacturers who value quality over savings. They look like this

The ball guide can withstand many times the mass. In a roller there are two points of support - rollers on the supporting part and part of the box. In a ball bearing, there is a whole block (middle) on which small balls are located according to the principle of a rolling bearing. Plus, the thickness of the metal from which the guide parts are made is much higher. Three more most noticeable advantages are that such guides are almost impossible to install incorrectly; they allow you to pull out the drawer to its full depth and make it possible to firmly fix the drawer when closed. In addition, ball guides can be installed at any height according to the structure.
When making drawers with your own hands, it is very important to ensure that the drawers are strictly rectangular. If the box is not rectangular, it simply will not function. The larger the size of the drawer, the thicker the chipboard should be. To make the boxes described below, the walls can be made from solid boards 19 mm thick or from plywood 9.5–19 mm thick. To make the bottoms of the drawers, it is recommended to use plywood. If light items are stored in the box, it is enough to take 6.4 mm thick plywood for the bottom of the box, but for large boxes or with heavy loads on them, it is better to take 9.5 mm thick plywood. There are many ways to fasten the walls of boxes, but for our purposes a few are sufficient simple options. Do-it-yourself butt joints between the walls of drawers produce the least spectacular impression, however, they are the simplest, and if, in addition, these connections are strengthened with nails or dowels on glue, then their use will be more than justified.
The size of the drawer should match the size of the opening and the slide you intend to use. The following describes standard way making drawers using plywood.
Making the box rectangular
One of the advantages of making boxes from plywood is that you can make a large frame using a small number of parts. However, assembling the box can be a challenge. It happens that you have to deal with the connection long parts and you try to hold them in the desired position long enough to have time to connect the workpieces with a screw or allow the glue to harden. When the parts are connected, it is important that the corners are absolutely straight and remain so in the future. Always check the straightness of the drawer corners immediately after assembly, without waiting for the glue to cure.
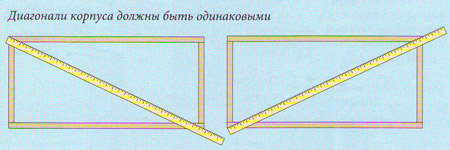 |
 |
To do this, measure both diagonals of the drawer with a tape measure. If they are the same, then the angles are indeed right. If the diagonals are different, move the clamps or change the clamping force along the diagonal to achieve right angles before the glue cures.
Giving a drawer a rectangular shape using the back panel
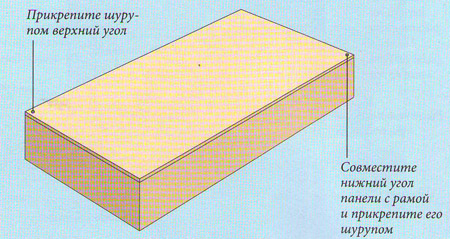
It is quite possible to ensure a rectangular shape for the box without a tape measure or square. If at least one corner of the back wall is perfectly straight (that is, factory-made), it will serve as a template for the entire drawer. The main thing is to attach the back wall immediately after assembling the case, while the glue is still wet and allows you to maintain some freedom of movement.
1. Installing the back wall of the drawer. on the edges of the back wall and lay it on right place. Align a known right corner of the panel with the top corner of the frame and attach it to the frame with a suitable screw or finishing nail.
2. Aligning the drawer frame. Align the diagonal bottom corner of the panel with the corresponding corner of the frame and attach it. Align the edges of the frame with the panel, leveling the frame if necessary. Attach the remaining corners of the panel to the frame. Then use screws to secure the panel around the perimeter of the frame and let the glue harden.
 |
 |
 |
 |
|
Secure decorative facade |
Drawer design
A do-it-yourself drawer can be applied to the front of the frame. The blanks for any drawer project are pre-cut in this order:
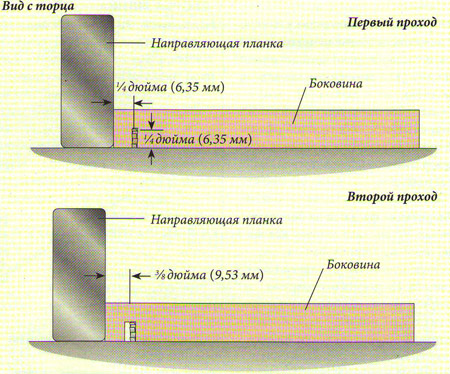
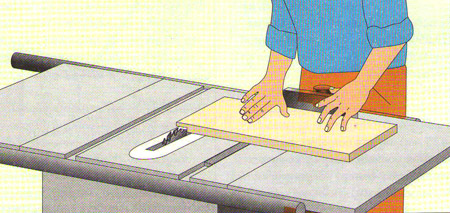
1. Selecting grooves in the walls of the box. Set the wood saw blade 6.4mm above the workbench and 6.4mm from the guide bar. Slide the front panel and both side panels over the disc, selecting a 3.2mm and 19mm wide groove in each panel. Move the guide another 3.2 mm from the disc and feed each piece again to widen the groove to 6.4 mm. Leave the guide in this position for the next step of work.
Note. If you want to make the bottom of the box yourself increased strength and take wood 9.5 mm thick for this, you will have to pass the workpiece over the disk a third time to make a groove 9.5 mm wide. In addition, if you are going to install guide fittings under the bottom of the drawer, writes Infobud, you may have to raise the bottom by 9.5 or 12.7 mm above the lower edges of the side walls. Always buy a slide first and only then start making drawers.
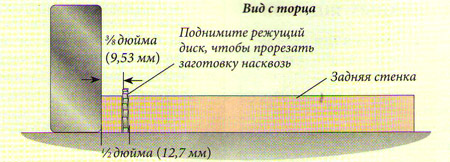
2. Trim the back wall. Without changing the position of the guide, raise the cutting blade 12.7 mm. Trim the back wall to 12.7 mm (be sure to use a pusher when doing this, not with my own hand). Now the height of the back wall will exactly correspond to the specified one.
3. Cutting folds on the side walls of the drawer. Set the groove selector to a rebate width that matches the thickness of the drawer back wall. Raise the head to a height of 6.4 mm from the table surface. Remove the guide bar from the wood cutting machine. Using a miter box, select a rebate with a depth of 6.4 mm and a width that matches the thickness of your workpiece. Select folds at the ends of both walls. If you do not have a special head for making grooves, select the folds by passing the workpiece over the standard cutting disk several times.
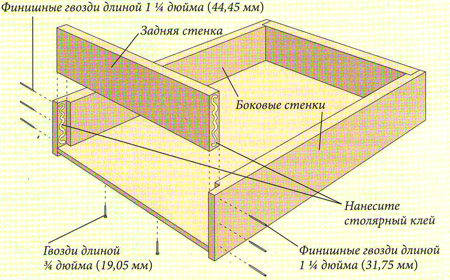
4. Assembling the drawer. Apply glue to the front folds of the side walls and to the ends of the front wall and fasten the side walls to the front three 32 mm finishing nails on each side. Push the bottom into the grooves until it stops. Apply glue to the rear folds of the side walls, the ends and the bottom edge of the back wall. Place the back wall in place flush with the sides and nail it in place. Check the squareness of the drawer, and then fasten the bottom to the back wall with three 20 mm long finishing nails.
5. Fasten the decorative one. If your project is inset doors and you want the drawers to match the doors, choose a 9.5 x 9.5 mm rebate on the back of the decorative front across all. Please note that this will cause the drawer to fit 9.5mm deeper into the opening, so you may need to shorten the drawer sides accordingly. After the decorative front of the drawer is ready for final finishing, attach it to the front wall with four 44 mm screws on the back side, having previously drilled auxiliary holes for them near internal corners box.
If yours does not involve the use of inset doors, there is no need for rebates. Attach the decorative front with four 32mm screws as described above.

|
|
Drawer guides
There are several options for drawer guides, the choice depends on the design of the cabinet. The simplest one is when the drawer is simply inserted into the opening and it is supported from below wooden slats. However, this is not justified with heavily loaded boxes, e.g. kitchen cabinets. It is not recommended to use this option for boxes with plywood walls, since the plywood edges will not withstand the load. Another option involves using wooden guides, which can be made in several ways. However, with any wooden slides, a common problem arises: their dimensions change with changes in air humidity, so that the drawers either get stuck in the openings or dangle in them. In addition, wooden drawer slides wear out quickly with frequent use. In conditions of intensive use, only metal guides can guarantee the smooth movement of drawers. There are many types of drawer guides on sale that you can easily install yourself. Some models can withstand loads of up to 40 kg. Consider the use of side and bottom metal guides. When installing the guides yourself, follow the manufacturer's instructions. Below are some basic guidelines for installing the most common drawer side rails.
Installing Drawer Guides
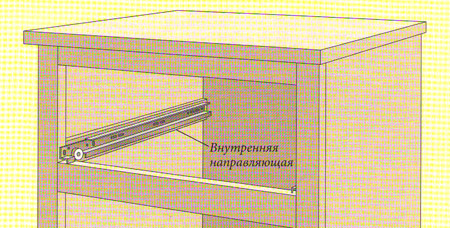
1. Installing the guides on the drawer. To attach the slides to the bottom edges of the side walls, use the screws included with the slides and position the rollers against the back of the drawer. The end of the guide that does not have a roller should rest against the front wall of the drawer.
2. Installation of guides on the cabinet. Place the interior track in the cabinet, perpendicular to the front, with the track roller facing the front. Most rails have both round and long slots for screws. If you mount the slides into the cabinet first using the extended slots, this will allow you to fine-tune them and then secure them permanently using the round slots.