How to make a pretty bottle. DIY bottle decoration
To bring to everyday life bright colors and decorate the interior, just a little imagination and free time. Regular Glass bottle with the help of additional materials that every housewife can easily find, it can turn into a masterpiece of applied art.
Beautiful decor of bottles with a cloth in purple tones
There are many ways to decorate a bottle. And the choice of each of them depends on what goal is set. You can decorate the interior, or you can make a wedding decor for a bottle of champagne, you can store spices in a bottle, or you can use it as a vase. It all depends on the idea of the master and the purpose of the decor in the interior.
There are many directions where bottle decoration is used:
- in the interior of the kitchen;
- in the interior of the living room, children's room;
- as a wedding decor;
- as a birthday / celebration gift.

Decor bottles for the festive table 
Decorating bottles in nautical style
Decorating bottles with gold paint
Decorating bottles for the kitchen interior
The kitchen is the soul of the house. The atmosphere in the kitchen reflects the inner world of the family. To decorate it, decorative dishes and bottles are often used.
Bottles can be used in the interior of the kitchen different forms, materials and sizes. You need to select them depending on the style of the kitchen. The external shape and design of the glass decoration should support and complement it.
Decorating bottles for the kitchen interior
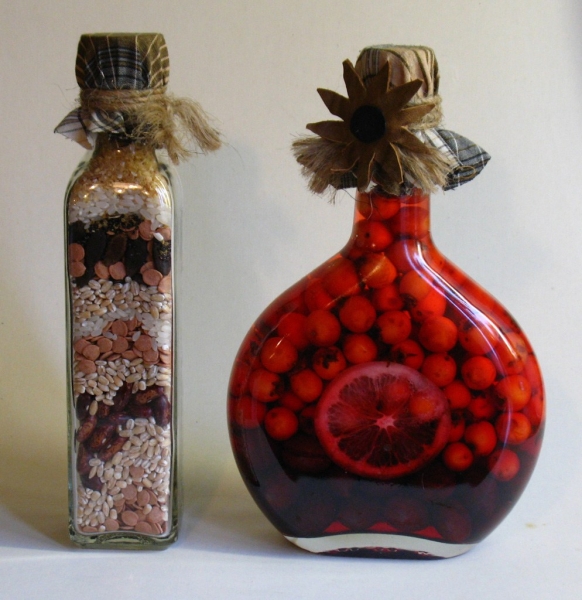
For the Provence style, bright bottles of unusual shapes filled with various seeds, cereals, grains, flowers and leaves are suitable. In this version, most often used natural materials: peas, beans, corn, peppers, lentils, colored curly pasta. Small fruits and vegetables placed inside the jars can remind you of summer in winter. Orange orange circles, yellow lemon slices, unripe carrots, red peppers will create a bright mood in the kitchen and will raise the culinary mood all year round.
Decor made of colored salt or spices will also look spectacular. They are poured into transparent bottles in layers.
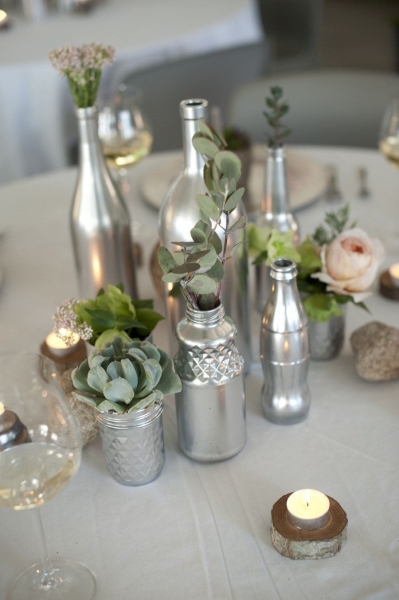
Silver paint bottle decor for kitchen decoration
For classic style clear shapes will do. Glass or plastic rectangular bottles filled with cereals, grains and seeds will look beautiful here. Decorating bottles with coffee beans or nutshells is a do-it-yourself bottle decorating that even a child can do.
In a high-tech style, bottles painted on the outside with silver or gold paints will organically look.
We should not forget about the decoration of the top of the bottles. There can be many options: fill the lid with wax or paraffin, cover with burlap and tie it with twine, rope or ribbons, use a wooden cork.

Decorating bottles with twine 
New Year's decor of bottles for a feast 
Bottle decoration for interior renovation
Decor bottles for the interior of the living room and children's room
For the interior of a living room or children's room, it is best to use outdoor decor. Such items can be used as a separate decorative element, and, for example, as a flower vase.
DIY bottle decor is gaining more and more popularity. The network has many lessons and workshops on creating unique interior items from bottles. They are used as a decoration to create chandeliers, lamps, candlesticks, vases and flowerpots. It is worth wrapping ropes or threads around a bottle of an unusual shape or painting it acrylic paints, she immediately acquires original view and becomes stylish decoration for various interiors.

Halloween bottle decor
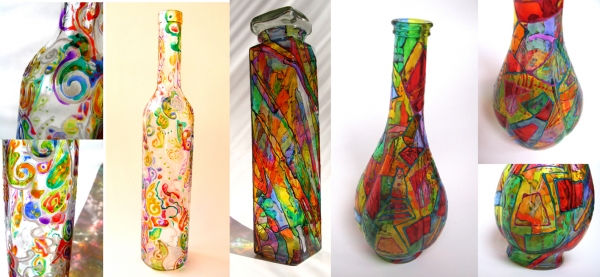
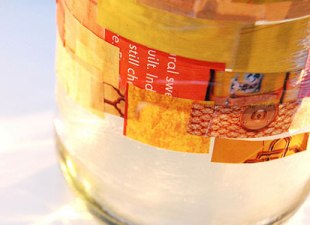
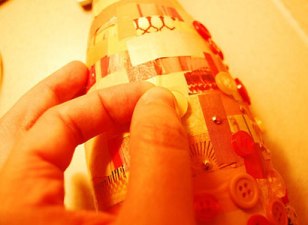
Works made with contour paints using the technique of spot painting also look impressive in interiors. And if you add stained glass paints, then the contour painting turns into stained glass. Mosaic lovers can be invited to decorate bottles using eggshell or pieces of colored magazines.
Bottles decorated with semolina look very elegant in a classic living room. This is not the most easy option decor, training will be required to achieve the accuracy of the pattern. But the end result will surprise you with its openwork and curls.

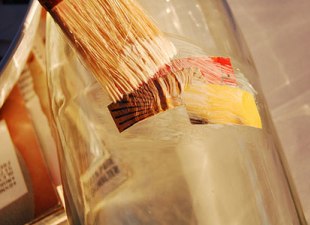
How to decorate bottles with paint and glue
Bottles decorated with multi-colored glass beads or beads from other materials look very stylish and original. Interior in vintage style a bottle with rhinestones and feathers will give a finished look.
They also look interesting transparent bottles, inside which flowers and leaves are placed. Drenched in formalin, they float inside and create a floating impression.
Decor of bottles with stained glass paint
There are also craftsmen who make bottle decor with their own hands, installing models of ships or other fragile elements inside. This is a very delicate, painstaking work, but such a bottle will become indispensable for a nautical-style interior.
White bottles for the interior 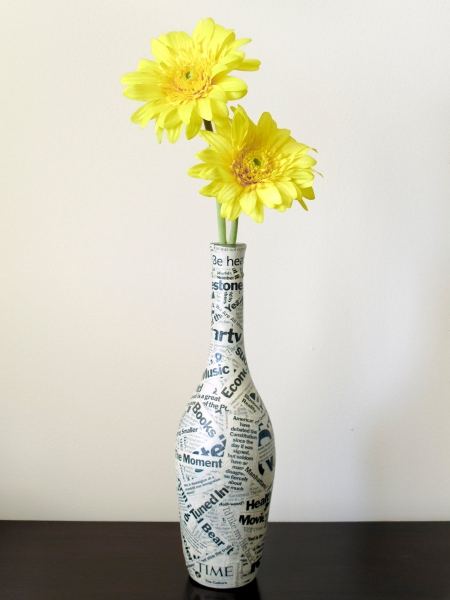
Decoupage bottles with newspapers 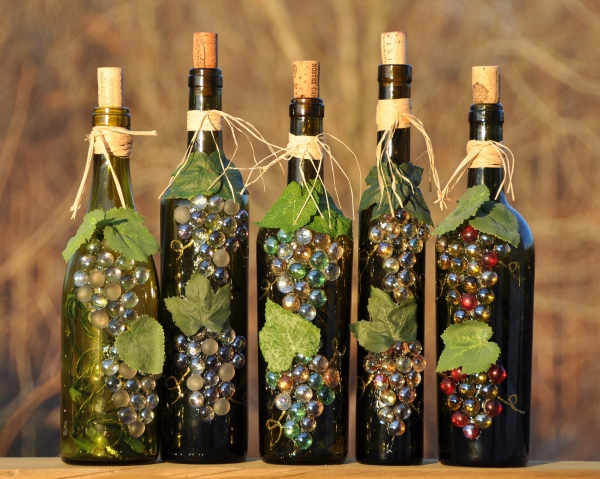
Bottle decor for grape bunches ![]()
Glitter bottles in the living room interior 
Salt bottle decor 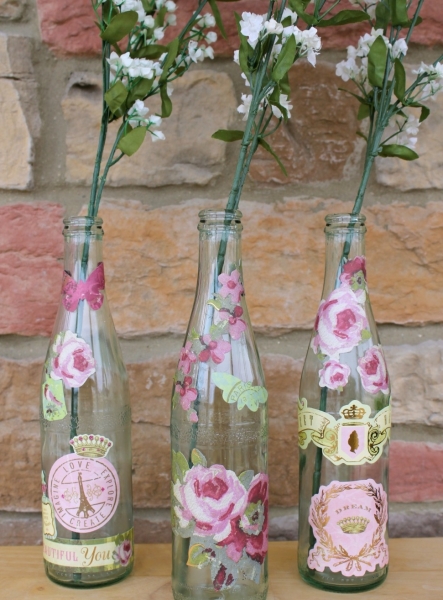
Decoupage bottles 
Decoupage bottles with white napkins 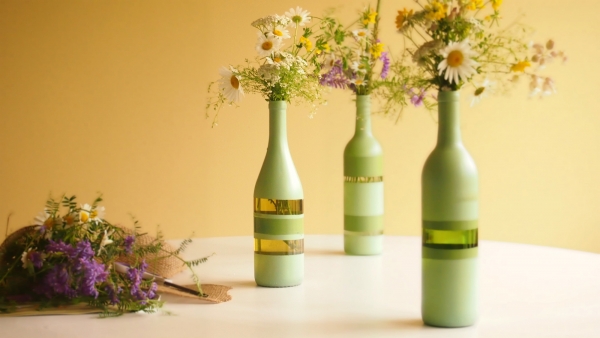
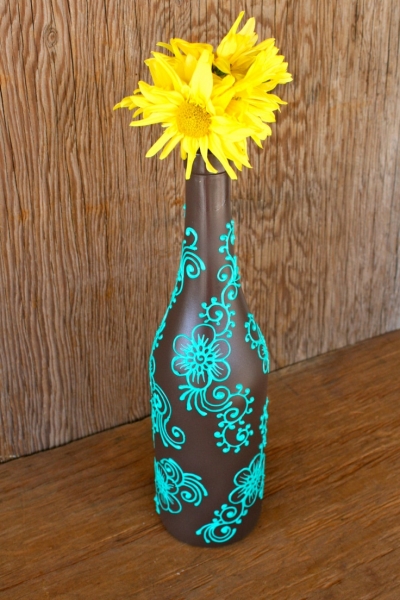
Painting bottles for flowers
Wedding bottle decor
There is a wedding tradition to put two bottles of champagne on the table of the newlyweds. During the celebration, they serve as decor supporting the wedding theme. After the holiday, the first bottle was drunk on the wedding anniversary, and the second after the birth of the child.
Paper, satin ribbons, fabric and lace are commonly used as decorations for wedding bottles. Champagne bottles are decorated in the shape of a bride and groom or in the style of a wedding.

Wedding bottle decor
The decoration of the bottles in the form of the bride and groom is the most popular. Especially if the decor repeats in detail the outfits of the newlyweds. It looks interesting and unusual. You can decorate such bottles using satin ribbons, decoupage using paper, leather, fabric, lace. You can stick images of doves or wedding rings on the bottles.
Lace decor, which symbolizes the tenderness of the relationship between spouses, will also be appropriate. If the bottles are made in the same style and are tied with ribbons or beads, then such a composition indicates the loyalty of the relationship and the unity of the newlyweds.

Gray and white bottle decor for a wedding
In addition, an applique made of paper flowers, ribbons and buttons can be used as a decoration. Applications of important and expensive little things for newlyweds are very popular. These can be movie tickets, wrappers of your favorite sweets, or cute little notes.
In the case of planning a themed wedding, the bottles are designed accordingly. For a wedding in the sea style will fit decor made of small stones, with shells and corals. If the theme of the wedding is, for example, cowboy, then decorating the bottle with leather fit better Total. When themed wedding decoration in the same style, other wedding accessories are also decorated: glasses, candles, albums for wishes.
The best part is that decorated wedding champagne bottles can later serve as an element of decor and be kept by the newlyweds as a wedding symbol along with glasses.
Beautiful decoration of bottles for a wedding 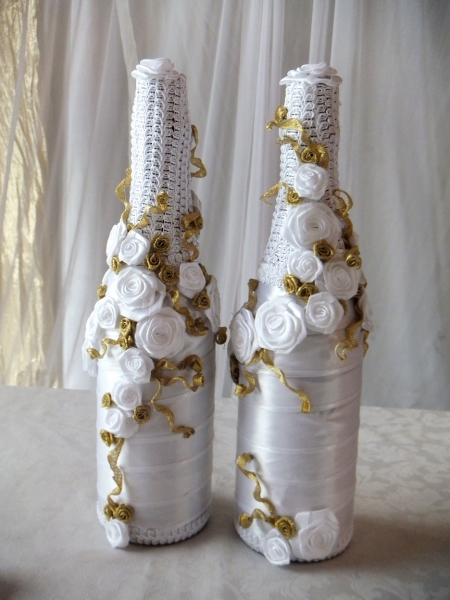
White and gold decor of wedding bottles 
White and pink decorated bottles for a wedding
Decorated bottle as a birthday present
Today, presenting a gift in the form of a bottle of something alcoholic is already boring and uninteresting. But a beautifully designed bottle of wine or cognac can be a unique gift for all occasions.
For example, a man will like a bottle of his favorite cognac with its photo on the label. And women will gladly drink wine from a bottle with beautiful design ribbons, flowers or painted with acrylics.

Bright decor of bottles on New Year
The decoupage technique is most often used to decorate bottles. Pasting paper napkins and fabrics allows you to play up any theme. Whether celebrating a birthday, anniversary, or promotion. There are many ideas for creating a unique gift, which will help make the experience of the holiday unforgettable.
For children or new year holiday you can make a bottle decor with your own hands using sweets, however, for safety reasons, it is better to choose a plastic bottle, not a glass one.
Boho bottle decoration 
Boho bottle decoration 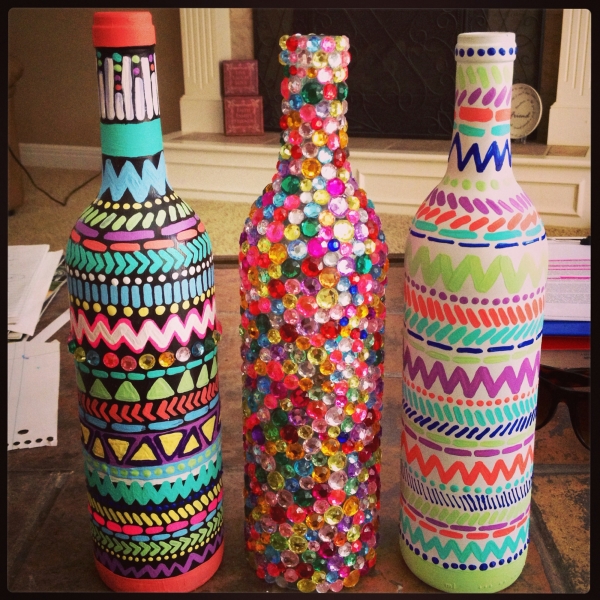
Bright decor of bottles 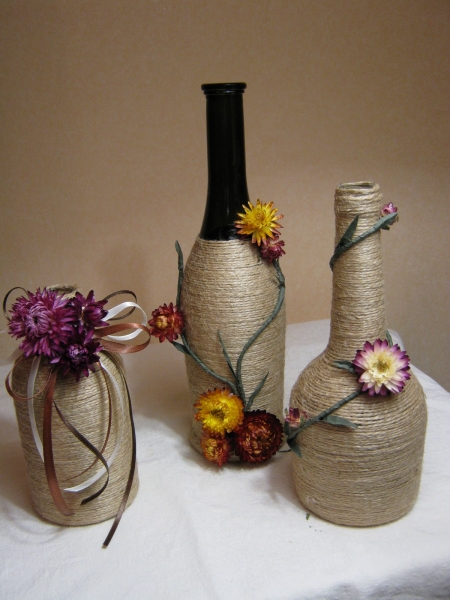
Rustic bottle decor 
Gold paint and sequins in the decor of the bottles 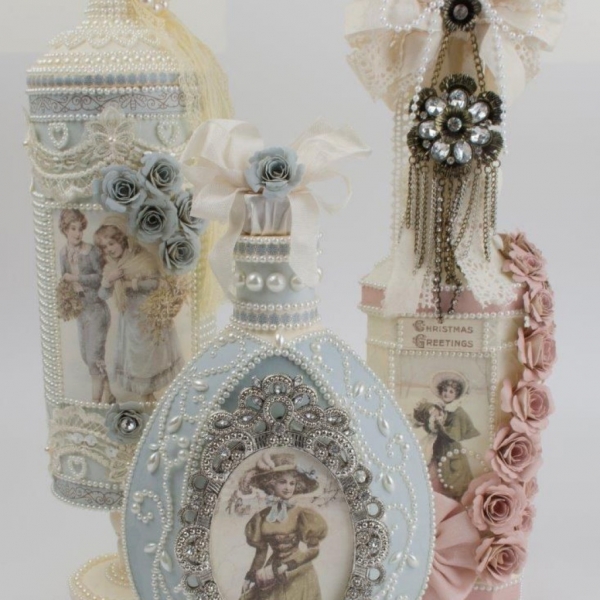
Bottle decoration in vintage style
Plastic bottles in the interior
Among the many bottles, it is worth mentioning separately about plastic bottles. This is a huge platform for creativity and imagination. Carving out plastic bottles different shapes, you can simply and budget decorate a garden or playground. You can also make various crafts with children: pencil holders, vases, candlesticks.
Decorating bottles - interesting activity which allows using simple materials do it yourself original decoration for the interior or a memorable gift for a celebration or holiday.

Unusual bottle decor using drawings and garlands 
White and yellow bottle decor 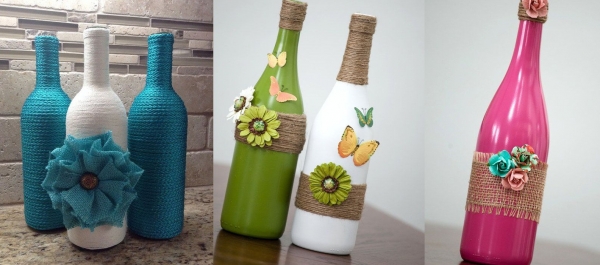
Decorating bottles with rope 
Bottle decor in a nautical style 
Beaded bottles 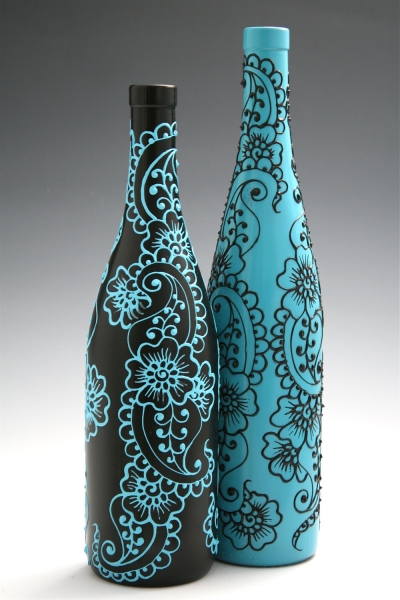
Beautiful patterns on bottles 
Uncomplicated bottle decor 
Beautiful decoration of bottles with sparkles and garlands ![]()
New Year's decoration of bottles 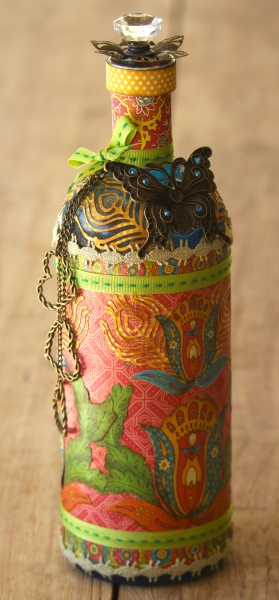
Original decoupage bottle 
Decorating bottles with rope 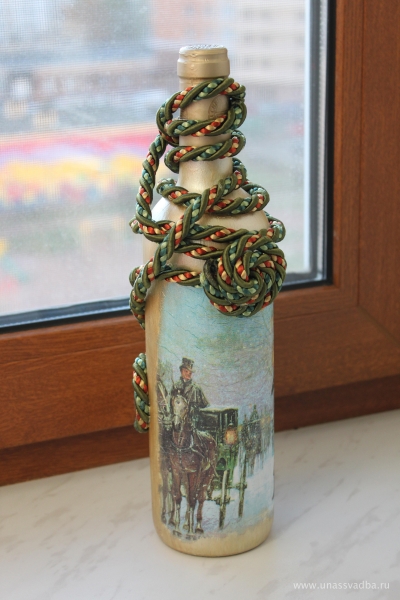
Decoupage and bottle decoration with cord 
Bright bottles in boho style 
Flower vase from a bottle ![]()
Unusual design of white bottles 
Country style bottles 
Knitted bottle decor 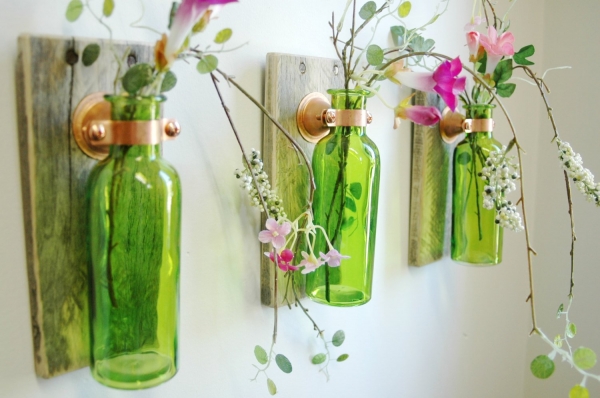
Bottles as wall decorations
Photo gallery (50 photos)
Useful Tips
If you want to make the holiday unforgettable or just want to decorate your home, then one of the most simple recipes- it bottle decoration.
There are many ways to decorate a bottle, and each fits for a specific purpose.
You will learn about several interesting options decorations regular beer or wine bottles, and how you can prepare a bottle for a wedding.
DIY bottle decoration (photo)

Here simple photo instructions with which you can quickly and beautifully decorate any glass bottle.
You will need:
Bottle
PVA glue
Brush
Old magazine with vivid photographs
Decorations (buttons, beads, etc.)


Bottle decor with threads

You will need:
Any shape bottle
Scissors
Threads of any color and thickness
Double-sided tape or PVA glue
Decorations
1. Apply PVA glue to the bottle or glue double-sided tape.


2. Start winding the thread around the bottle, starting at the neck.
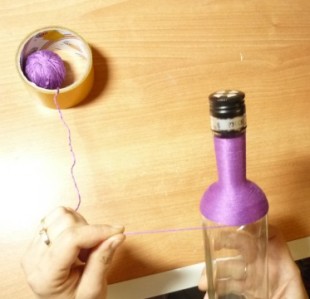

3. Decorate the bottle as you like best. You can use stickers different forms or designs cut from paper or fabric that can be attached with glue.

* You can wrap the bottle with red thread and then decorate it in the shape of Santa Claus - this will christmas decor interior.
* If you decorate the bottle with paper flowers, then you can use it as spring decor, for example on March 8th.
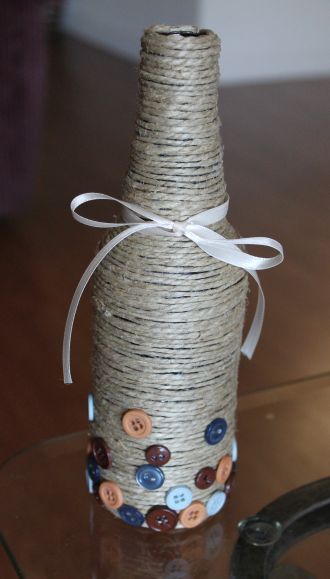
Decorating beer bottles (photo)


You will need:
Empty beer bottles (or any other)
Glue gun
Buttons different color(different size buttons can also be used)
1. First, remove the label from the bottle. You can wet it to make it easier.
2. Start wrapping the bottle with thread, sticking it with PVA glue or a glue gun. Do everything gradually, you do not need to apply glue to the entire bottle at once - a little glue, a little thread, etc.

* Make sure that the thread was glued, evenly and tightly, so that no cracks and glue are visible.
3. The last stage includes decorating the bottle with buttons, pebbles, beads, shells and / or other details. All this is attached with a glue gun or super glue.
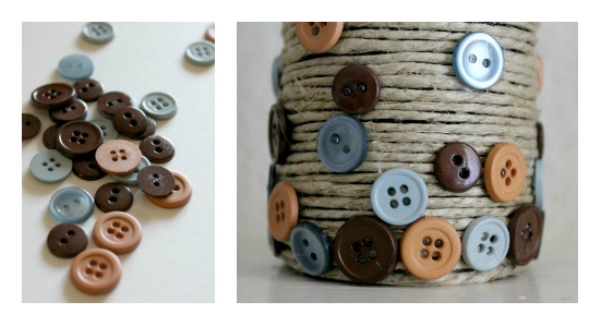
* You can also add braid.
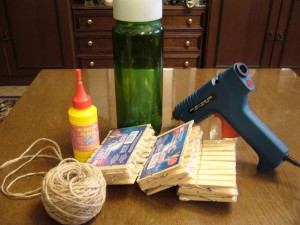
Bottle decoration (master class). Wine keg.
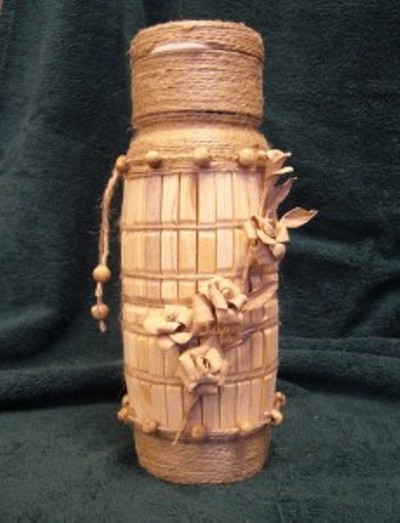
You will need:
Bottle
Wooden clothespins
Wood beads
Artificial flowers (made of paper, plastic, paper string)
PVA glue
Glue gun.
1. Disassemble the wooden clothespins. You will only use wooden parts.
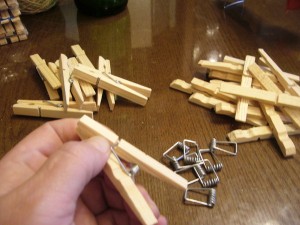
2. Using glue gun(you can just use a brush and PVA glue or superglue from a tube) glue the wooden parts of the clothespins to the bottle in a circle. You need to make 2 rows.
3. Take the twine and wrap it around the bottom and upper part bottles (cap too). Secure everything with PVA glue.

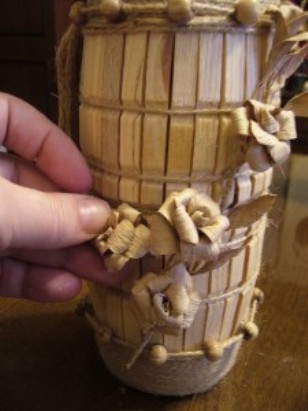
4. Prepare bottle decorations (in this example these are wooden beads and flowers made of paper twine - flowers must be put on twine in advance) and glue them to the bottle.

Champagne bottle decoration. Christmas decorative bottle.
For the New Year, you can decorate not only a Christmas tree and gifts, but also a house with festive table... One of the essential accessories of such a table is a bottle of champagne.
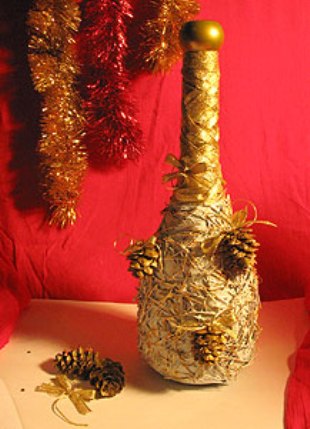

There are two options for the development of events: you can decorate a new, not yet open bottle, or you can use an already empty bottle as an interior decoration.
You will need:
Needles from a natural Christmas tree (pine)
PVA glue
Brush
White spray paint
Gold acrylic paint
Bumps - if desired
Hacksaw - if desired
Gold-colored braid
* When applying spray paint, you need to arm yourself with gloves and a cotton-gauze bandage (you can also use a respirator or gas mask).
* You need to paint in a well-ventilated area, on a balcony or outside.
1. Break the needles randomly into smaller pieces.
2. One side of the bottle should be covered with glue.
3. Pour crushed needles on top of the glue and press them down a little. Wait a couple of hours for the glue to dry and the needles to set.
4. On top of the glued needles, apply another layer of glue with a brush and wait a couple of hours again.
5. When all the needles have adhered well, proceed to the other side of the bottle.
6. Prepare white paint and apply it to the needles.
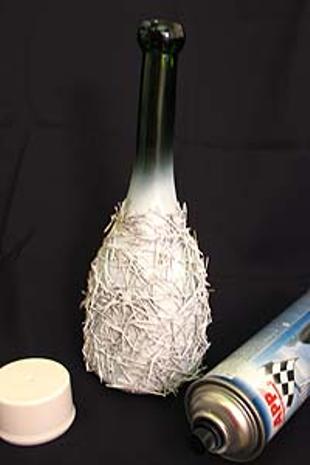
7. After the white paint has dried, apply gold acrylic paint to the needles.
8. Prepare a pine cone. You can simply hang it on a bottle or stick it on. If you chose the second option, then you need to cut one plane of the cone. You can use a hacksaw.

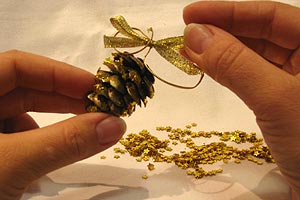
9. Paint the neck of the bottle with gold paint and wrap it with gold-colored tape.
10. It remains to decorate the bottle with cones. Paint them gold and add gold stars and bows. Hang the pine cones on the tree.
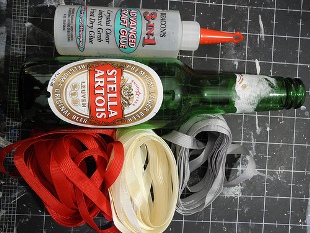
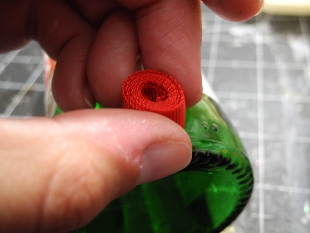
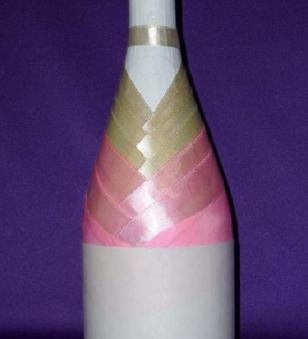
Decorating bottles with ribbons

To decorate the bottle in this way, it took 36 meters of tape.
You will need:
Glue (glue gun)
Bottle
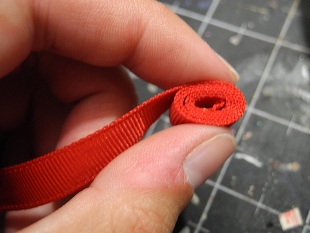
1. Roll the tapes into rolls. Decide how many of these rolls you need to decorate the bottle.
2. Begin gluing each roll to the bottle, starting at the bottom of the bottle and working your way up to the neck.
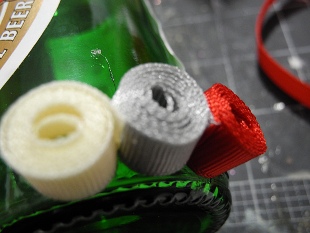
3. After each gluing, you need to tuck in the end of the tape from the inside with knitting needles to make more space for the glass of the bottle to see through. This way you save ribbon and also make the decoration even more attractive.

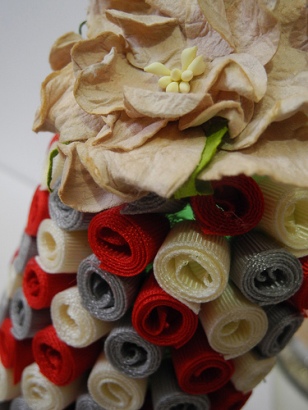
4. You can decorate the neck as you like. In this example, it was covered with a silk ribbon and decorated with an artificial flower.
If you have chosen a New Year theme, then you can use a coniferous ribbon and other details instead of a flower.
Decorating bottles for a wedding
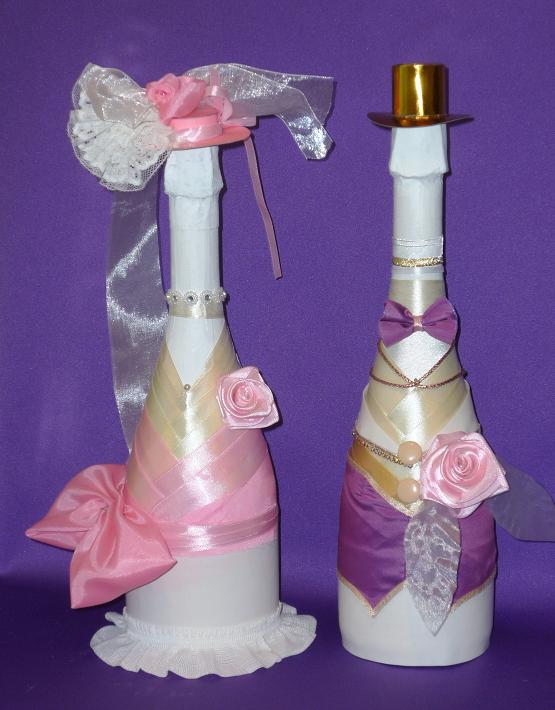
You will need:
Satin ribbon 1-2.5 cm wide
Finished frill 30 cm long
Textile white 3x60
Fabric for bow 25x25 cm
Thick white fabric (two pieces of 7x31 cm)
Glue gun (superglue)
Acrylic or water-based paint white
Brush or sponge
Cardboard pink or and gold
Jewelry (beads, lace, artificial flowers, etc.)
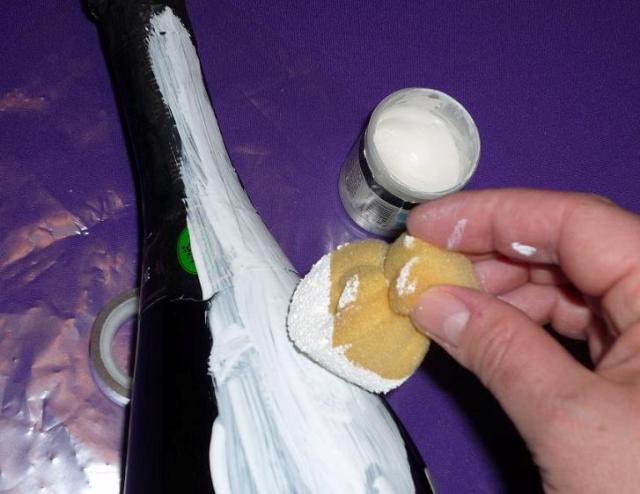
1. Paint the bottle with white water-based paint or acrylic paint. To do this, use a brush or sponge.
Apply the paint 2-3 times to get an even layer.
2. Start decorating the bottle. You can make a bride or groom, or you can make both - for this you need 2 bottles.

Bride
2.1 Making a corset dress
Prepare a light-colored tape, throw it around the neck of the bottle, cross the ends of the tape and secure with glue.
* To make the upper turns, you need 20-22 cm of tape, and where the girth is wider, about 25-28 cm.


In the same style, attach a second tape underneath the first. You need to make 2-3 rows.
Now make 2-3 rows using a different shade of ribbon (in this example, it's soft pink).
* It is worth noting that all ribbons must cross in the same direction. Simply put, as you made the first ribbon, so all the rest must be done - in the end you should have a beautiful weave.

Glue a piece of cloth to the sides of the bottle bright color(in the example this is hot pink), and wrap the bottom with a white cloth.
There should be a white frill at the very bottom of the bottle. You can do it yourself by collecting lace on a thread, but you can buy ready-made.
Decorate the bride's dress with a bow and satin flower.

2.2 Making a hat
To make the top of the hat, you need to cut out a narrow strip of cardboard measuring 1 x 12 cm and glue it into a ring. The diameter of the ring should be slightly larger than the neck of the bottle.

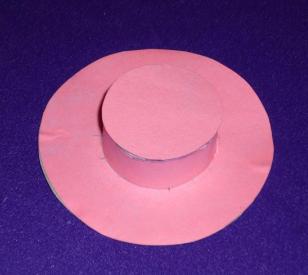
To make the crown, cut a 0.5 cm larger circle out of cardboard. Make cuts along the circle (see picture) to make it easier to glue.
Acrylic paints are easy to use and allow even novice needlewomen to paint decorative plates, glasses or any other glass items on which regular paint will not hold on. A rich selection of color palettes and the convenience of tubes make this kind of creativity truly pleasant and comfortable and allow you to create real paintings.
Types of acrylic paints
When choosing acrylic paints, you should pay attention that they differ in stained glass and topcoats.
Top paints are similar to ordinary gouache, they are dense and opaque. For drawing they require the most minimal skills, they "forgive" inept strokes of beginners. Most often, such paints are made on water based, so they easily chip off or even wash off finished product... To prevent this from happening, after painting, the craft must be covered with a special varnish (usually acrylic water-based), securing the drawing.
Stained glass paints
Stained glass paints give a transparent finish and look very nice on large images. To work with them, it is better to already have experience in the technique of accurate painting of contours. In stores you can find several types of stained glass paints:
- ordinary - to dry you need to wait about a day.
- baked - to fix the image, it must be heated in the oven in accordance with the instructions
- "Sticky" paints. This one is rather children's option but it's very fun to use. To obtain an image, it must be applied to a smooth surface, wait until it dries and then peel off like a film. Then, with the help of this film, you can stick it like a sticker on any surface.
What is needed for painting with acrylic paints on glass
- acrylic paints. A set of top paints of six colors will cost only 150-170 rubles, while stained glass paints are much more expensive - one jar is about 250 rubles.
- special acrylic varnish for fixing finished images. It can be of several types: for application with a brush or for spraying from a spray can. The latter is more convenient, but more expensive than the first option. A regular 50 ml jar of liquid varnish can be bought for 160-180 rubles.
- several good brushes of different thicknesses (from # 1 for writing thin patterns to # 18 for applying varnish) and shapes (round and flat). The cost of one brush is 20-35 rubles.
- palette knife - a special metal spatula for dismounting paints. At the initial stage, you can do without it.
- artistic outlines, especially if you plan to work with stained glass paints.
- toothpicks and cotton swabs to correct the image in case of errors.
- palette (for starters, you can replace it with a regular disposable white plate)
- paper and pencil. They will be useful for preparing sketches of the future drawing, and it is also better to work out the first strokes on a sheet of paper before applying them to the glass.
Glass painting techniques
There are several basic techniques for painting on glass using acrylic paints: spot painting, stencil painting, and hand painting with brushes. Dotted paint application will allow you to create very fashionable images in ethnic style.

Stencil painting is one of the simplest techniques. The greatest care is required when cutting out the template itself, especially if there are small details in it.
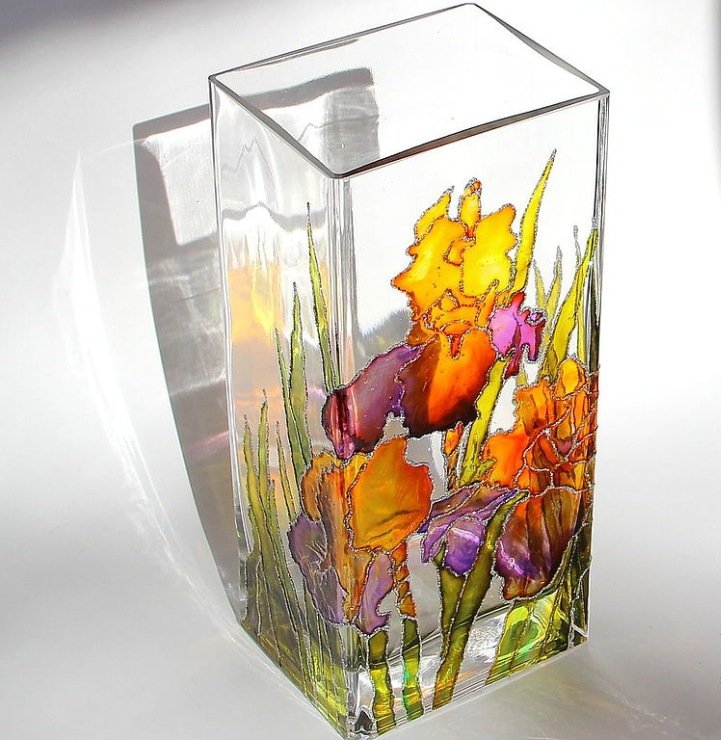
Finally, hand painting is an option for advanced artists. Using this technique, you can create real paintings on the dishes. The photo below shows a few examples.
Below we present step by step description painting with acrylic paints on glass - master class for beginners "Painting a bottle".
Master class "Painting a bottle"
You will need:
- acrylic paints
- contour for glass and ceramics
- brushes
- nail polish remover with cotton pads
- toothpicks
- cotton swabs
- palette
- sequins
- water based acrylic varnish
- sandpaper (needed if the label is heavily behind the bottle)
1) Soak the bottle in hot water with the addition of detergent.
2) Remove all labels from the bottle (if they do not come off well, use sandpaper). Degrease the glass with nail polish.
3) In this example, the bottle already contains an image of flowers, so you don't have to draw them yourself using templates. We outline the flowers with a contour.

4) If necessary, we correct show jumping with a cotton swab and a toothpick.
5) We mix paints on the palette and paint the flowers.
6) After a few hours, the image can be varnished and, if desired, sparkles can be added to the drawings.
Related Videos
For more clarity, we suggest watching the following videos, which demonstrate step by step the painting of glass objects with acrylic paints.