Tools and what you need to install a toilet, stages of work. Do-it-yourself toilet installation: installation video, step-by-step instructions Installing a toilet in a bathroom
Installation work new plumbing Many novice craftsmen have concerns. Diversity constructive solutions plumbing fixtures and methods of connecting them requires the performer to know the intricacies of the process.
We will try to reveal the main ones and analyze how to correctly install a toilet with your own hands without the help of plumbers.
The range of plumbing fixtures on the market is varied. Any owner has the opportunity to choose presentable and functional equipment to suit his own taste and budget.
In addition to traditional floor models Manufacturers offer a wide selection of suspended and built-in devices. The drain tank in them can be attached to the wall or connected to the base of the plumbing fixtures.
Option for the bowl of floor and hanging models can be anything, for example, dish-shaped, funnel-shaped or even visor modification
The latest toilet models also differ in the design of key components.
The output discharge is:
- horizontal;
- vertical;
- oblique.
The type of outlet drain should be taken into account when choosing a model. If your plans do not include reworking the sewer pipe supply, then in the installed model the drain should be arranged according to the same principle as in the dismantled one.
Inconsistent drains and plumbing supply, provided that it is not a toilet with an outlet, are almost impossible to combine as tightly and efficiently as possible.
Fixation of plumbing fixtures to the floor is carried out using specially made two or four fastening points. But you can also find models in which the corners included with the product are used for fastening to the floor.
A new plumbing fixture can be placed in the place of the old one, or you can choose another “corner” for it, making a small redevelopment in the bathroom.
Preparation of tools and materials
To connect the tank to the water supply you will need flexible hose. It usually comes included. For connection to the sewer - a rigid or bendable corrugated cuff.

It is impossible to perform a high-quality toilet installation with your own hands without a minimum set necessary tools that any owner has in their home
To assemble the structure and connect to communications you will need:
- hammer drill or impact drill;
- a set of screwdrivers with flat and Phillips blades;
- set of wrenches;
- building level;
- a simple pencil or marker;
- stationery knife;
- roulette;
- chisel;
- hammer.
If the installation of plumbing fixtures will be carried out on tiles, then it is also necessary to prepare a “ballerina” or a spear-shaped drill for working on tiles. To make holes for installing fasteners, you will also need an 8 or 10 mm drill.

From auxiliary materials You will also need:
- metallized tape;
- silicone sealant;
- FUM tape;
- polyethylene film;
- moisture-absorbing piece of fabric;
- container for collecting liquid.
Depending on the type of model being connected and the installation method, cement mortar may also be required.
Removing an old toilet
Removing an old toilet is one of the most time-consuming operations.
The work is carried out in several stages:
- Turn off the tap.
- Disconnect the hose going to the tank from the water supply and drain the water from it.
- The empty tank is removed from its mounts.
- Unscrew the nuts located on the back of the toilet and disconnect it from the sewer. To loosen the drain, the toilet needs to be rocked from side to side.
- Drain the remaining water from the toilet by tilting the bowl forward.
- The sewer hole closer to heaven is cleared of dirt and temporarily blocked with a rag gag or a wooden plug of suitable diameter.
The easiest way to remove the bolts is to hold the head with an open-end wrench and unscrew the nut with an adjustable wrench. If threaded connections heavily slagged with salt deposits or rusted.
To make the task easier, use universal lubricant “WD-40”, which can loosen deposits in a matter of minutes. In the absence of one, you can use vinegar or kerosene.

The sewer hole must be closed so that toxic hot gases do not spread beyond the pipeline
If rotten taffeta or any other support is found under the dismantled toilet, it must be removed. This can be done with a hammer drill, nail puller or chisel.
In houses old building drains on sewer pipes are often secured with cement coating. The easiest way to knock down dried mortar is with a chisel, pricking it in several places. Detailed instructions Read about dismantling an old toilet.
Image gallery
Option #2 – with horizontal outlet
Plumbing fixtures with horizontal outlet have become one of the most popular in our country. The relevance of installing such equipment is explained by the specifics of the wiring of the sewerage system in Russian apartments.

The main feature of toilets with a straight horizontal outlet is for correct installation a strictly fixed point of connection to communications is required
The horizontal outlet is located at the back of the bowl or base and is directed backwards. Models with this design are installed end-to-end with the wall, connecting to any type of sewer riser location.
The connection is made using pipes of the appropriate size. The connection is sealed by placing a sealing rubber inside the pipe.
Direct connection is made only if the sewer system is made of plastic. To connect to cast iron pipes, whose circumference rarely has an ideal shape, use cuffs and eccentrics.
Option #3 – with oblique release
The socket in models with an oblique outlet is located at an angle of 45° relative to the floor surface. Models with an inclined outlet are superior to their counterparts in that they are less likely to become clogged, since this design makes it possible to create less resistance when moving solid waste.

The weak point of devices with oblique outlets is the connection points between the product and the sewer pipe, which can become covered with cracks if installed incorrectly
Connecting a device with an oblique outlet to the sewerage system can be done in one of three ways:
- By direct connection through the sewer branch socket. They are chosen when there is no need to move the plumbing fixture, and the direction of all elements clearly coincides. The toilet outlet is treated with soapy water and buried in a socket equipped with a cuff.
- Connection via eccentric. A socket with a center offset of 5 cm, equipped with a sealing gasket, is mounted in the sewer outlet and by rotating the toilet is shifted to the right or left side.
- By installing a corrugated outlet. The use of corrugation makes it possible to deploy the relative oblique sewer outlet device even at an angle of 90°.
Flexible outlet - although convenient, it is far from the best remedy for connecting toilets with oblique outlet. It should be used only in extreme cases, when other methods are not possible.
To find out in more detail how to install a toilet with an oblique outlet, go to.
Image gallery
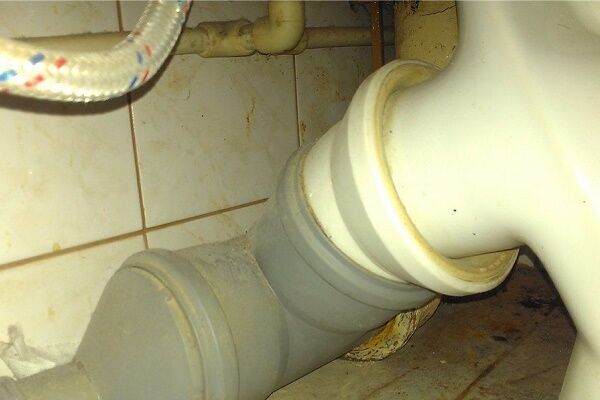
The most simple option connecting a toilet with an oblique outlet is the use of corrugation, which ensures perfect tightness
If a long-term connection is not made with the help of corrugation, then you need to use a reinforced version of the corrugated pipe
Using a corrugation, a toilet with an inclined outlet can be connected to a drain located in the floor or wall
If it is possible to reduce the distance between the toilet and the sewer system, instead of corrugation, it is recommended to use a sealed cuff and a plastic outlet
Use of corrugation in connection to the sewerage system
Reinforced corrugation for reliable operation
Toilet connection with side outlet
Cuff in the connection to the sewerage
Features of installation of compact models
The technology for correct installation of floor-standing toilets of compact models includes seven main stages:
- The toilet bowl is moved as tightly as possible to the drain hole and checked whether the outlet coincides with the sewer pipe.
- If there are small displacements, the device is connected to the sewerage outlet using a corrugated pipe.
- The plumbing fixture with the connected corrugated pipe is moved towards the wall, making sure that strong creases and bends do not form on the pipe.
- The ends of the connecting element are covered with a thin layer of silicone sealant.
- Having adjusted the position of the device, use a pencil to mark the outline of the boundaries of the base of the device and the points where it is planned to drill holes for deepening the dowels.
- The toilet is moved to the side. At the designated points, holes are made with a diamond drill with a diameter equal to the size of the dowels used.
- Plastic plugs are inserted into the holes. The toilet is “reinstalled” in its original place. Bolts are screwed into the prepared holes.
Tip: to make it easier to put the corrugated pipe on the outlet, its end must be coated with liquid soap on the inner walls.
If holes have to be made in tiles to minimize damage to the surface, first slowly drill the top layer by hand, and only then turn on the hammer drill with impact drill mode
To ensure the tightest possible fit of the toilet sole to the floor covering, silicone is applied along the intended installation counter of the device. The toilet itself is then placed in its original place, following the intended contour.
To fix the plumbing fixture, washers and screws threaded through the holes in the heel are tightened extremely carefully. Under no circumstances should they be driven in!
Photo guide for assembling and installing the compact
Let's look at the process of installing a toilet using the example of assembling and fastening Chinese PORTA plumbing fixtures. An excellent product with a 25-year manufacturer's warranty and a very attractive price.
Image gallery
Before installing a new toilet, we dismantle the old plumbing, clean the floor under it, repair it and fill it with semi-dry cement mortar
We install a new plastic adapter into the sewer outlet, to which we will connect either a corrugation or a rigid plastic elbow
If necessary, we change the cold water supply pipes in the area behind the toilet. Most often this has to be done so as not to change the pipeline a year or two after installing new plumbing
According to the completed connection from the toilet to the sewer, we set up the plumbing fixtures for fitting in order to mark the attachment points and outline the leg
Step 1: Preparing the floor for the new toilet
Step 2: Replacement of pipes and pipes connecting to the sewerage system
The process of installing plumbing is the same in a house, apartment or bathhouse. Once you figure out how to connect the toilet to the sewer, you can do it in any necessary place. Agree, in the end you will be able to save a lot of money, especially if you have to install more than one plumbing unit.
We will help you understand the issue. Below are basic diagrams and step-by-step instructions for connecting a toilet to a sewer system, which it is advisable to study before purchasing plumbing fixtures.
Visual photo instructions and explanatory videos will help you better understand the intricacies of the process and determine the sequence of actions in a given situation.
The process of connecting a toilet to a sewer requires preliminary assessment necessary materials. The choice of plumbing and connecting fittings depends on the type of sewer riser supply, the intended installation location of the toilet and its type.
In addition to the equipment itself, when doing it yourself you may need:
- Sewer corrugation.
- Plastic corners and adapters.
- Eccentric cuff.
- Silicone.
- Rubber seals and adapters.
- Saw for plastic pipes or a regular hacksaw for metal.
- Tape measure, pencil, hammer.
- Tools for dismantling old sewer elements and fixing the toilet to the floor.
To remove old cast iron pipes, you may need a professional hammer drill and grinder, but in such advanced cases it is better to invite specialists with their own tools for dismantling.
Options for toilet and sewer connections
The size of the toilet outlet is standardized, but it may not coincide with the diameter of the sewer pipe. In addition, the connecting pipes may additionally include sewer lines from other parts of the house various sizes. Therefore, it is important to find out in advance what adapters, cuffs and fittings will be needed.
Types of toilet releases
The range of plumbing products in stores is represented by hundreds various models, but their outlet design can only be of three types:
- Vertical.
- Horizontal.
- Oblique.
Depending on design features, the outlet pipe is connected to the toilet bowl perpendicularly, parallel or at an angle to the floor.
The vertical type of toilet is common in the EU countries and the USA. However, in our new buildings we are increasingly using a vertical connection scheme, as it is less problematic.
Image gallery
Step three: sewer connection
After installing the toilet, it is necessary to lubricate inner surface corrugated rubber bands with silicone and pull it onto the toilet pipe.

It is necessary to stretch the corrugation evenly along its entire length so that the slope is maximum and there is no sagging anywhere
After installing the corrugation, you must wait 2 hours until the silicone hardens and only then proceed to the next step.
Step Four: Testing
After the sealant has dried, you can test the toilet by sitting on it and performing 2-3 full flushes. If after 5 minutes nothing has leaked, then you can screw on the tank and toilet seat and use the plumbing fixtures.
In case of a small drop-shaped leak, you should completely remove the water from the toilet bowl and remove the corrugation from it. After this, re-lubricate the rubber band of the corrugated pipe with silicone and pull it onto the toilet pipe. You can also additionally lubricate the joint with sealant from the outside.
At this point, connecting the toilet to the sewer using a corrugated pipe can be considered complete.
Connecting the toilet with plastic elbows
Unlike corrugated pipe, plastic elbows do not have flexibility. But if the sewer distribution was originally planned for specific model toilet, then rigid outlets are more preferable due to their durability and problem-free performance.

When connecting the toilet to the sewer with plastic elbows, they dictate the location of the plumbing fixtures, because the slightest displacement threatens leakage
The main steps for connecting a toilet to a sewer with plastic elbows are similar to those for installation using corrugation.
Basic rules for using rigid connection elements:
- All connecting pipes are lubricated with silicone before installation in the holes.
- Excessively long pipes can be cut with a hacksaw.
- It is necessary to exclude any distortions.
- Horizontal 90 degree bends should be avoided due to the possibility of clogging.
The disadvantage of budget plastic bends is their gray, which does not at all harmonize with the snow-white toilet. White models are much more expensive, but they are appearance worth it.
Direct connection of the toilet to the sewer
If the toilet pipes fit perfectly into the sewer pipe, or it was installed from scratch specifically for the existing plumbing, then there is no best option, how to insert the outlet pipe directly into the sewer riser.
#1: Stand-up toilets
Toilets with a vertical outlet can be installed in own home or new buildings in which sewer lines run under the floor, and not in wall niches. This design eliminates clogging and minimizes the likelihood of water leakage when draining.

The advantage of a vertical flush is that it saves space, because due to the lack of connecting elements, the toilet can be placed close to the wall
Installation of a toilet with a vertical outlet begins with attaching a special flange to sewer pipe. To do this, it is first measured against the floor, holes for the dowels are marked and drilled. After this, the flange is mounted in place and screwed.

When attaching the flange, remember that the axis of the fixing bolts must be strictly perpendicular to the axis of the toilet bowl
The O-ring can be lubricated with silicone to prevent unpleasant odor from the sewer to the bathroom. Then the toilet is placed on top of the flange and fixed using nuts, which are put on top decorative caps. Installation is complete.
Today it is difficult to imagine a bathroom without such an important and necessary plumbing fixture, like a toilet. Many people have already had to install it, or at least watch a professional do it. If you just have to do this work, then you should familiarize yourself with all the intricacies and learn the technology correct installation. It is also very important to know what is needed - what materials and devices may be needed. The final result and the lifespan of the device will depend on how well you prepare.
Necessary materials for installing a toilet
At first it may seem that installing a toilet to communications is a fairly simple process that anyone can perform. However, it is very easy to make a mistake in this matter, which can be costly. If you do not read the instructions and act inattentively, the equipment may be damaged. This should under no circumstances be allowed to happen. Let's take a closer look at what tools and materials you will need for your work:
- Corrugated pipe, which is used to connect the toilet to the sewer system.
- Flexible hose of a certain length. Through it, cold water will be supplied to the tank.
- Ball valve, with which the water supply will be adjusted.
- Silicone sealant. All joints and joints are treated with it.
- A sealing tape required to seal the inlet pipe of the water supply system if it has an internal thread.
- Cement for leveling bathroom floors, if necessary.
- Toilet fasteners, which most often come with the product. It usually comes with bolts, plastic dowels, spacers and bolt caps, and screws.
If the toilet package does not include all these devices, you will need to purchase them yourself.

List of tools for plumbing installation
But installing a toilet on a tile slab cannot be done without the following tools:
- Hammer or drill;
- Drills of two types – for concrete and for ceramics;
- An adjustable wrench, which is used to install the hose;
- Core for chipping on ceramic tiles, it will reduce the sliding of the drill;
- Hammer for driving dowels;
- Rubber spatula to remove excess silicone sealant;
- A pencil, which will have to outline the contour of the base of the toilet, and also mark the places where the bolts are attached;
- The screwdriver you will use to tighten the fasteners.
If you don't just install new toilet, and make a replacement, you will also have to dismantle the old device. And in this case, you may also need to level the damaged floor surface. Be that as it may, before starting work, be sure to disconnect the plumbing fixture from the water supply system.
How is a toilet installed?
After everything finishing work were finished and floor surface has been aligned, proceed with installation. In order to connect a plumbing fixture to sewer system, a corrugated pipe is required. One end of it is put on the toilet drain pipe, and the other on the sewer outlet pipe.
It’s good if the pipe outlet coincides with the drain, then you can do without a corrugated pipe. Here the connecting element is a rubber seal with edging. If you want to use a sealant, then under no circumstances cement the place where the drain goes into the sewer.
How to ensure water flow to the cistern? You will need a flexible hose. It is screwed onto a water tap that supplies water to the inlet of the tank. Then you need to make sure that the diameter of the fasteners on both ends of the hose is the same.
Once the connection is made, you can begin to mount the device to the floor or wall. This depends on the type of plumbing fixture. Of course, the toilet needs to be assembled first. When the base is securely mounted into the floor, a tank is attached to it and a pipe is supplied from the hanging tank, which is fixed to the wall.

After this work is completed, you need to test the operation of the device and also adjust the tank. To do this, turn on the water, which should fill the tank. By adjusting the float, adjust the water level that you need. Then water can constantly be collected in a certain amount. The lid is attached. To do this, in the upper area of the bowl on the side from the wall, fasteners are mounted in the holes provided by the manufacturer.
Features and methods of fixing the toilet
Now we know what is needed to install a toilet and it’s time to consider the process of installing the plumbing fixture in its rightful place. There are three main ways to install a toilet to the floor:
- Fastening using dowels or anchors that are poured into the screed;
- Fastening to a wooden base, which was mounted in a screed using screws;
- Fastening to the floor with epoxy resin.
Professionals offer the following tips for installing a toilet in all these cases. Let's consider the mounting option using anchor bolts, as well as on a wooden base. It is very convenient if at the same time a major renovation of the bathroom floor is being carried out. Then these two procedures can be combined while the screed is being formed on the floor.
Anchors are placed in the place where the device should be placed and where it is supposed to be fastened. They should protrude 5-6 cm above the surface of the screed. It will be better if you have to cut off the excess than the length of the anchors is not enough. Then it will be impossible to fasten the nut to it.
The wooden stand must fully correspond to the size and contours of the base. Following a checkerboard pattern, nails are driven into it over the entire area. They should come out from the other side. Now the board can be turned over and installed where the toilet will be located.

The screed is poured with concrete so that only the outer side of the stand is visible on the surface. The toilet is placed on the base and screws are inserted into the holes. If you need to fix the toilet on a tiled floor, then resort to the following technique. To prevent cracking of the tiles, rubber washers are placed on the dowels and anchors. This will also help against unsightly rust stains on the floor. In this case, it is best to choose anchors or bolts with a nickel plated finish. This way, it will be easy for you to remove the fasteners when they fail and need to be replaced.
If you are not changing the tiled floor, and there is no way to mount the device in the screed, then what is required to install the toilet in this case? It would be ideal to install it using dowels or epoxy resin. In this case, the coating will not be damaged.
In order to use dowels, you must first make holes through the tiles and screed, where you will screw the screws. To ensure that the waterproofing of the floor is not compromised, it is important to correctly calculate the depth of the holes. If the screed is too thin, you need to pour a little silicone sealant into these holes. It is better that the screws are “dressed” in rubber washers, then they will not scratch the floor during the tightening process.
It is better if the base of the toilet and the floor are separated by a layer of sealant. It must be applied before tightening the bolts. If you don't want to use any fasteners, then resin will help you out. This method is also suitable if the installation will be carried out on a wall.
Before applying the resin, the floor must be sanded using sandpaper. This will roughen the surface and help the two surfaces bond better. Adhesive base Apply to the toilet and floor in a thin layer, just a couple of millimeters. Do not touch the toilet until the resin has completely dried.
Installation of a wall-hung toilet
Lately it has been gaining more and more popularity. It is easy to install it yourself. The advantage of this installation is that there are no unsightly marks from the fastenings or any marks at all on the floor. The toilet is mounted on a frame made of metal profiles. It is installed on a load-bearing wall. The tank and pipes can easily be hidden behind a false plasterboard wall.
If the frame is not provided by the design, then the toilet can be attached directly to the wall. But then, most likely, you will have to move the sewer pipe inside the wall. The device is mounted using anchors.
In cases where there is a desire to save on the services of specialists or simply learn a new construction skill, information on how to properly install a toilet will be useful.
What you need for installation
Before installing a toilet with your own hands, you need to make sure you have a number of tools:
- hammer drill or impact drill;
- a drill with a diameter of 8-10 mm (depending on the diameter of the toilet dowel);
- tile drill (if installation is carried out on a tile or ceramic slab);
- adjustable wrench;
- set of wrenches;
- hammer;
- sealant (either in a special tube or together with a sealant gun);
- screwdrivers (flat or Phillips, depending on the design of the toilet);
- adapter sleeve made of rubber 123x100 (if you need to connect to a cast iron socket);
- a set of fasteners for installing a toilet (if it is not included in the kit);
- rags and a container to drain the remaining water from the old toilet.

Before installing the toilet, you need to do some preparatory work. For example, you need to decide how exactly to connect the new toilet to the sewer pipe. The following options are possible:
- Pleated cuff. This method is the most economical, but in this case it is impossible to attach the toilet close to the socket. This matters if the bathroom is small.
- Straight cuff. Firmly and hermetically connects the bowl of the structure with the socket of the sewer system.
- Eccentric cuff. Convenient if the connection centers of the system and the socket are shifted.
Next, it is advisable to replace the old one flexible liner for water. The choice of liner is based on the distance from the connections on the pipe with cold water before connecting the toilet filler mechanism. 15-20 cm should be added to this length.
If necessary, you need to purchase adapters in advance for threads at the connection points made of flax or FUM tape.
In the case where it is preserved under the old toilet wooden stand, it must be removed. A nail puller or hammer drill will help with this. You can fill the resulting void cement composition, preferably quick hardening, and a spatula.
Video - Self-installation of a toilet
DIY toilet installation
- First you need to turn off the water. Disconnect the flexible hose and flush the toilet.
- Then you need to unfasten the drain tank. You can carefully, or you can use a hammer (if old toilet no longer needed).
- You can quickly remove the toilet using a hammer and a hammer drill.

Carefully, so that fragments do not fall into the sewer system, use tools at the place where the toilet is attached to the floor and where the device meets the sewer. Then you need to remove the old bowl by pouring out the remaining water.
Removing the wood plank and leveling the floor
- After the old toilet is removed, you need to thoroughly clean the sewer pipe from dirt and rust. Install a rubber adapter sleeve 123x100 into the socket, having previously covered it with sanitary sealant.
- Then plug the hole with a rag so that odors do not interfere with further work.
- Next you need to delete wooden board and fill the resulting void with repair composition.
- Level with the floor using a spatula.
Marking and installation of dowels
- Place the bowl of the new toilet in the planned location. Make markings through the holes in the bowl on the floor so you can see where to drill. The holes in the toilet bowl are located at an angle, in which case you also need to drill at an angle.
- Once the markings have been made, the toilet can be removed. Next, you need to drill holes in the previously marked locations and insert dowels.
Securing the toilet cistern

- In accordance with the instructions supplied with the toilet, you need to install the cistern fittings. There are some peculiarities in this procedure.
- The drain and fill valve nuts must be tightened by hand, while at the same time holding the valve itself, thereby protecting it from turning and possibly damaging the gasket.
- The valves must be installed so that during operation the moving elements do not touch each other or the walls of the tank.
- If you are unsure about the quality of the tank walls and gaskets, sanitary sealant should be used.
The drain mechanism is available in a collapsible type to facilitate the installation process.
Installing a toilet bowl
- The connecting cuff is attached with the petal part to the transition cuff 123x100, inserted into the socket pre-treated with sealant. The outlet of the toilet bowl is inserted into the transition collar until it stops.
- You should turn the cuff so that the toilet bowl is in a level position and all the mounting holes are aligned.
- The bowl is secured to the floor surface with screws and plastic washers. In cases where the floor surface is uneven, you need to use shims made from pieces of plastic to level the toilet before finally tightening it.

Connection between bowl and drain tank
Before you install cistern on the bowl of the structure, you need to put a gasket between them. For reliability and to avoid displacement of the gasket, it is better to glue it to the bowl with sealant in advance.
After securing the tank to the bowl, tighten the screws evenly. After this, install the tank lid and the drain button. Then secure the flexible liner.
Checking the functioning of the system
At the end of all work, you need to carry out a check - fill the tank with water and do a test drain. The amount of water drained can be adjusted; how to do this is written in the instructions.
Inspect all elements for any leaks. If they occur, check the tension strength and, if necessary, disassemble the assembly, re-treat it with sealant, then tighten it properly.
If the reason is a faulty part, purchase a new part and replace it.
Final stage
Install the toilet seat and fill the gaps between the toilet and the floor surface with sealant.
It is not possible to do such work with your own hands. special labor, if you adhere to the above recommendations and rules. Good luck!
During overhaul or due to the failure of plumbing, most often it is necessary to replace the toilet. In order for everything to go smoothly, you should take into account a number of features of this process and correctly approach the choice of a new toilet. To carry out all the work, you can seek help from the plumbers of your housing office or from private craftsmen who will perform all the necessary operations. However, installing a toilet with your own hands will save you considerable money, and understanding the whole process will help you choose the most suitable one. best option and mounting method.
A complete toilet replacement is part of a major overhaul and includes the following items:
- – choose a new toilet according to the mounting method and flushing method;
- – dismantle the old toilet;
- – repair the room (replacement of cladding, screed, sewer pipes, etc.);
- – installation and connection of a new toilet.
It is very important to select and purchase a new toilet in advance. In this case, a number of features and nuances are taken into account.
Choosing a new toilet
By design floor standing toilets are divided into several types, differing in the shape of their main nodes.
So, there are the following models according to the shape of the outlet drain:
- horizontal
- oblique (at an angle of 45 degrees)
- vertical
Based on the shape of the bowl, they are distinguished:
- disc-shaped
- visor
- funnel-shaped
The flush cistern can be combined with the base of the toilet or mounted separately on the wall, raising it to a sufficient height, and sometimes even to the ceiling.
The attachments of toilets to the floor are also different. Mostly, there are options with two and four direct fastening points; in addition, you may come across designs in which special corners are attached to the floor, and the toilet itself is attached to them.
Choosing a toilet should start with selecting the type of flush. If it is not intended to change the sewer pipe supply, then the same type of drain must be selected as was installed before. No amount of adapters or pipes will allow you to connect a high-quality toilet, for example, with a direct outlet and a vertical one.
The method of connecting the tank affects the tiling work in the toilet. After all, if you choose a wall mounting method, you will need to prepare a place and anchors for installation.
Before changing the toilet, you should take into account the dimensions of the toilet so that the structure after installation does not interfere with closing the door and installing other equipment, if all this is done in a combined bathroom.
Removing an old toilet
- Turn off the water supply to the cistern. Drain all the water from it and unscrew the hose that goes to it. After this, you can unscrew the fastenings of the tank. Most likely, the bolts holding it on are rusty or caked with deposits. In order to tear them off, you will need to hold the bolt head on one side with a screwdriver or open-end wrench, and unscrew the nut on the other side with an adjustable wrench. You can use WD-40 spray lubricant or a little kerosene to soak the bolt. Then he will succumb to efforts more easily.
- Next, after removing the tank, the fastenings of the toilet itself are unscrewed. These can be nuts screwed onto anchors or dowels.
- The next stage involves disconnecting the drain from the sewer pipe. In older houses, the drain was secured using cement plastering. For the work you will need a chisel and a hammer. Carefully chop the cement with a chisel, placing it across the coating in two places. Next, you can forcefully rock the toilet until the drain turns and becomes loose. After this, without disconnecting the toilet, tilt it to drain all remaining water from it.
- When dismantling the toilet is completed, the hole in the sewer pipe is closed using a fabric stopper or a wooden plug. It should be remembered that gases from sewers are not only poisonous and smell unpleasant, but are also flammable.
You don’t have to worry too much about dismantling the toilet, because it’s unlikely to be reused. In this case, to make it easier to work with chipping the cement coating, it is better to beat off most of the toilet with a sledgehammer. To make it easier to twist and loosen the drain after this, make a transverse hole in the pipe and insert a metal rod or wooden stick as a lever.
If the apartment has cast iron drain pipes, it’s best to change them all to plastic at the same time. Usage PVC pipes for sewerage greatly simplifies the process of operation and initial wiring, as well as connecting all drain points.

Procedure for installing a new toilet
- When all the finishing work has been completed or the old toilet has been dismantled and the surface for the new one has been leveled and prepared, you can begin installation. To do this, either a corrugated pipe is attached to the toilet drain to connect with the sewer outlet pipe, or a rigid pipe. It is best when the toilet flush enters the pipe outlet perfectly and without the use of corrugated pipes. In this case, you just need to use a rubber seal with a border. When using rubber seals The transition between the drain and the sewer inlet cannot be sealed with cement.
- The water supply is being prepared. The easiest way is to use a flexible hose that is screwed onto the water supply tap and to the inlet of the tank. You should carefully select the required diameter of the fasteners at both ends of the hose. Thus, outlets for 1/8” pipe are often used, but 3/4” pipe can also be installed.
- After connecting, you can begin fixing the toilet to the floor or wall. More details about connection methods will be discussed below.
- The toilet is being assembled. A tank is mounted on a fixed base or a pipe is supplied from a hanging barrel mounted on the wall. After this, you can check the functionality of the toilet and the settings of the tank. To do this, turn on the feed cold water and wait until the tank is full. By adjusting, you can adjust the level to which water will be drawn. Each locking mechanism or tank comes with instructions on how to set it up.
- The final step will be attaching the toilet seat. For its fastening, there are holes on the far upper part of the toilet bowl, and bolted or anchor fastenings are included with the toilet seat.
Methods of fixing the toilet and their features
There are three main options for attaching a toilet to the floor:
- strengthening using anchors embedded in the screed, or using dowels;
- installing the toilet on a wooden base pre-installed in the screed using screws;
- fixed with epoxy resin.
What is the best way to fasten during a major floor renovation?
If replacing the toilet is carried out during a major overhaul, then it is better to use the option with anchorage or with prepared wooden base. In this option, at the stage of forming the screed, anchors are placed on the floor strictly in accordance with the placement of the toilet bowl and mounting holes. As a result, they should protrude above the surface by about 5-6 cm. It is better to cut off the excess later than to face the problem when there is not enough anchor to secure the nut on it.
The wooden board (taffeta) is selected according to the size of the toilet base. Nails are driven into it checkerboard pattern over the entire surface so that they protrude from the other side. After this, the board is turned over and installed in the future location of the toilet. Concrete is poured into the screed along with taffeta along its upper edge. After this, you can install the toilet in place and secure it with screws.
Mounting a toilet on a tile
When securing the toilet under the nuts for anchors and on the dowels, it is imperative to wear rubber gaskets, which will protect the toilet from cracking when tightened and prevent the formation of rusty streaks on the ceramics. It is best to use nickel-plated bolts and anchors so that after their service life has expired, they will still be easy to unscrew.
For installation on an already finished surface, such as a tiled floor would be better suited fastening with dowels or epoxy resin so as not to spoil the appearance of the coating.
In this case, holes are made for the dowels through the tiles and screed for their installation, into which screws are screwed. It is important not to make the holes too deep so as not to damage the waterproofing layer. If the screed is too thin, then it is best to pour a little sealant into the hole before installing the dowel. Must be worn on the screw rubber gasket. The toilet itself is best placed on a sealant cushion and then pressed down with screws.

You can completely dispense with the use of screws, dowels and anchors. To do this, just take epoxy resin and properly prepare the surface of the floor and the base of the toilet. This option is best suited if the barrel is installed on a wall, because it makes up half the weight of the entire structure. First of all, you should go over the floor surface with an abrasive stone or sandpaper so that later epoxy resin stayed on the surface normally. After this, a layer of a few millimeters of glue is applied to the floor and toilet. Having installed everything in its place, you should wait until the glue dries completely.
Suspended solutions
It is gaining more and more popularity. Installation wall hung toilet It is made on the wall without fastenings or contacts with the floor. In order to secure it, it is necessary to build a metal frame that is attached directly to load-bearing wall, and then the toilet itself in case it is intended to hide the tank and pipes behind plasterboard wall. In some cases, a wall-mounted toilet with an open cistern can be attached directly to the wall, but then you will need to move the sewer pipe into the thickness of the wall. The fastening itself is done using anchors mounted into the wall or frame.
How much will it cost to hire a specialist?
So, having familiarized yourself with the process of replacing a toilet, you can compare the options for installing it yourself and paying a plumber for the work. On average, installing a toilet costs from 400 to 1,200 rubles if you contact private specialists. However, the cost of installation can increase significantly depending on the high cost of plumbing and the complexity of its installation.
Video: DIY toilet installation