Ceiling made of PVC (plastic) panels: step-by-step instructions. Installation instructions for plastic ceiling panels Making a ceiling from plastic
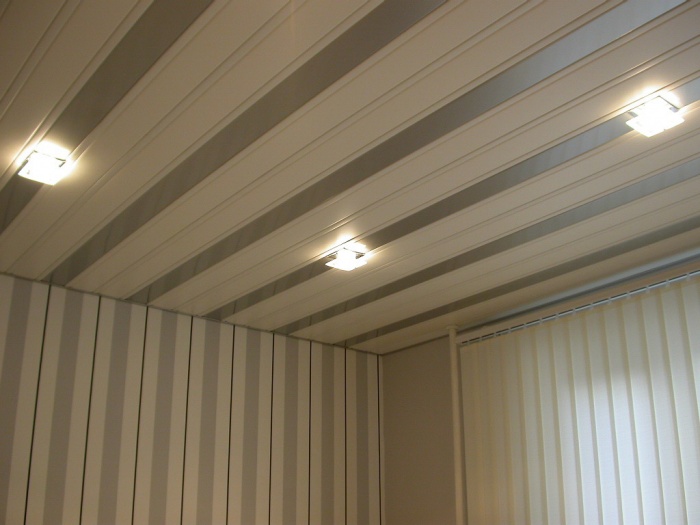
From time to time it becomes necessary to repair the ceilings in an apartment. Inexpensive and practical option- PVC panels for the ceiling. This type of design is ideal for rooms with high humidity(kitchen, bathroom, hallway). Installation is quite simple and can be easily carried out even by someone far from construction, if they have the right tools.
The costs of installing a suspended ceiling made of PVC panels with your own hands, compared to other types of ceiling surface finishing, are significantly lower. Ceiling finishing process PVC panels includes several stages, some of which can be divided into several more points. Let's take a closer look at each of them.

Preparatory stage
It can be roughly divided into three points:

Purchasing the necessary materials
The selection of panels is a rather serious process, since there are many types of these products and they all differ in size, design, and texture. When choosing, you should pay attention special attention to the width of the product. For small rooms, panels with a width of no more than 250 mm are suitable; for large rooms, it is advisable to choose options with a width of more than 250 mm.

It is better to contact the sellers for advice. specialty store As a rule, they are well prepared and can provide high-quality advice on the choice of materials for installing ceilings made of PVC panels.

The bars must have a cross-section of at least 30*30 mm.
As a ceiling plinth in a structure PVC ceiling You can use plastic, specially made for this purpose, which has a groove for installing panels into it. It is worth taking skirting boards with a small margin of about 1 m more than the perimeter of the ceiling, because during the installation process it will have to be cut at an angle and a mistake may be made.
If you plan to make a metal frame, you will need to purchase:

Tool
When working with PVC ceilings you will need:
- Roulette
- Pencil or thin marker
- Construction level
- Construction corner
- Lace
- Metal scissors
- Miter box
- Electric jigsaw or wood saw
- Grinder with a disc no more than 2 mm.
- Impact drill or hammer drill with drilling function (for concrete ceiling)
- Screwdriver
- Extension

Tip: For ease of use, the extension cord should have several sockets, this will allow you not to switch the power tool during operation.
Preparing the surface for installation
For installation, it is necessary to free the ceiling from anything that could interfere with its implementation. Remove old lamps and chandeliers. It is worth determining in advance where they are taking place. electrical wires and mark these places with a marker or pencil. Clean the surface from dirt and dust.
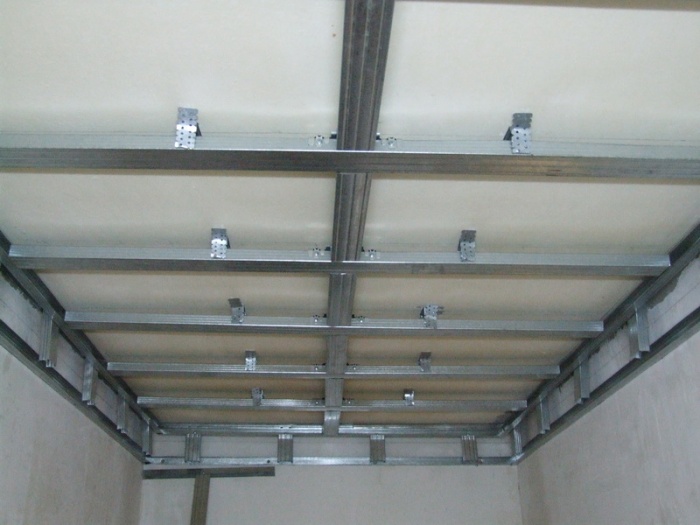
Frame making
The frame can be made of wooden blocks or metal profiles 60*27 mm. For wet areas It is advisable to use a metal structure, since it is less susceptible to corrosion under the influence of moisture. Also, the metal frame installation system is ideal for leveling the ceiling, because it uses hangers that allow you to lower the frame by 3 - 4 cm.

It is advisable to use wooden blocks in a dry room and with a fairly even rough ceiling. A combination of these two methods is also possible; for this, fastening with metal hangers is used in a system of wooden blocks. The method is impractical, because you have to use bars with a cross-section of at least 5*5 cm and perfectly flat.
Metal frame
The metal profile frame must be installed at a distance of no more than 4 cm from the rough ceiling.
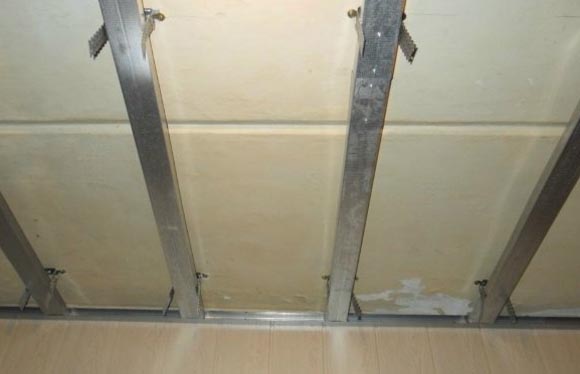
It is convenient to hide the wiring in the resulting gap.

First, it is attached to the wall along the perimeter of the entire ceiling, at a distance of 3 - 4 cm. starting profile 27*28 in such a way that in the future the main profile 60*27 can be inserted into it. Depending on the material of the walls, fastening is carried out using self-tapping screws or dowels - nails. When installing on a dowel - nails, you will need to drill a hole in the profile and in the wall and, pressing tightly, hammer the dowel into the nail.
Important: Dowel - nails used to install the starting profile must have a cylindrical skirt. Only in this case is it possible to use through-mounting technology.
The starting profile is mounted strictly level, starting from any corner of the room and moving along the entire perimeter. If the profile is installed accurately, the starting and ending points should converge and thereby close the perimeter.
The next stage is the placement of metal hangers. To do this, you need to mark the places where the main profiles will pass. It is convenient to use a cord for marking. The main profile is attached at a distance of 40 - 60 cm from each other, strictly parallel. Suspensions should be installed at a distance of 80 cm from each other. The hangers are mounted using self-tapping screws or dowels - nails in the holes provided for this purpose, and are immediately bent to facilitate installation of the main profile in them.
The last stage is installing the main profile. To do this, the profile is cut to required length with a gap of 5 mm on each side, is inserted into the starting profile and fastened with self-tapping screws with a press washer to the hangers. The level controls its horizontal position, as well as its strictly rectilinear position.
Advice: When attaching the starting profile, do not neglect its horizontal position, since in the future this will lead to incorrect positioning of the main profile and, as a result, you will have to start the installation again from the very beginning.
Frame made of wooden blocks
It is installed by analogy with metal, with the difference that the bars are fastened using the method of through installation without the use of hangers. To level the plane, it is permissible to place wood chips under the bars. First of all, the outer bars are installed, then the middle is filled at a distance of 40 - 60 cm from each other.

Panel installation
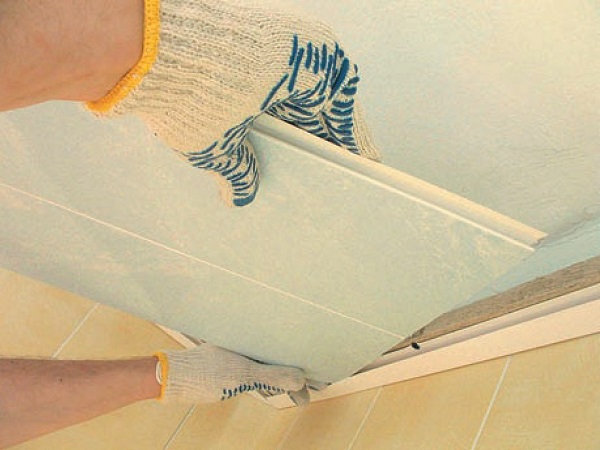
First of all, the ceiling plinths are measured and sawn at an angle of 45 degrees. Their fastening can be carried out using 13 mm PSh self-tapping screws or using liquid nails. Skirting boards are installed around the entire perimeter in such a way that subsequently installed panels fit exactly into their groove.

Installation of PVC panels on the ceiling begins with determining the length of the workpiece. To do this, measure the distance from one wall to another, then subtract 2 cm from this distance and draw a strictly perpendicular line on the panel using a pencil and a construction corner.

Then they cut it using a grinder. Next, install the first panel into the grooves of the ceiling plinth and push it all the way to the wall. As a result, it should turn out that the first panel fits into the grooves of the ceiling plinth on three sides. Only after this can the panel be attached to the bars or profile.

Tip: There are two ways to attach PVC panels to the ceiling when making a wooden frame. The first is with self-tapping screws and a press washer, the second is with a stapler and with staples. Both methods are equally effective, but fastening with a stapler is more convenient and faster.
Subsequent panels are cut to size and installed so that the ends are in the grooves of the baseboards and each subsequent panel fits into the lock of the previous one. The last panel must be cut to length and then, having measured the required distance, cut to width and then installed.
You can learn more about the installation process by watching a video description of the process.
More and more people prefer to improve their interiors with a suspended ceiling. It is better to do gypsum plasterboard ceilings in rooms with a low percentage of humidity. Moisture-resistant material is used to cover the suspended ceiling in the bathroom and kitchen. For such purposes it is best plastic will do, since a suspended ceiling made of PVC panels is characterized by a number of positive properties compared to other finishing options.
Pros of PVC panels
Plastic is a common material used directly in furnishings. This trend is not surprising, since plastic has the following positive properties:
- PVC panels are inexpensive compared to other building materials.
- Relatively simple installation.
- High moisture resistance. Plastic does not absorb moisture.
- The material retains its properties when using cleaning agents.
- Plastic endures chemicals and without losing its properties.
- Covering a suspended ceiling with PVC panels allows you to hide the details of the ceiling, improving the appearance of the room.
- Good sound insulation.
- Easy installation, allowing you to do the work yourself.
- Extensive color palette makes it possible to choose best option suspended ceiling.

Flaws
Like anyone building material, along with the advantages of plastic, it also has negative qualities. The main disadvantages are:
- Specific smell. After installing the suspended ceiling, the smell of plastic persists for some time.
- There is a possibility of deformation due to sudden temperature changes.
- Impact may damage the plastic.
- Plastic is not classified as natural materials, therefore this kind of material is not recommended for mounting on the ceiling in residential premises.
Important! Plastic is no longer as prestigious as when it first appeared on the market, since there are many better materials available.
Types of material
According to their characteristics, plastic comes in three types.
- White. This type includes unpainted material.
- Color.
- Textured. A special feature of this type is that a special texture is applied to the surface, giving the material a natural effect. This type of plastic is much more expensive. The ceiling, finished with textured plastic, looks presentable and expensive.
Tools for installation work
To install the ceiling, you need to prepare materials and tools.
You will need:
- Profile or beams for the future frame.
- Skirting board. Its immediate purpose is to fasten the panels.
- Dowels, screws.
- Screwdriver.
- Hacksaw.
- Corners.
Preparatory work
Before installation, you need to complete preparatory work. Without them, the following situations are possible:
- If a new builder does not check the surface, unnecessary materials may be purchased.
- If ceiling covering uneven and there has been no preparation, it is unlikely that the ceiling will be installed correctly.
Important! It is necessary to follow the rules of preparatory work in order to avoid additional expenses and in order to save time and effort.
Frame installation

Stages installation work:
- Install the frame (wooden or metal).
- The PVC skirting board should be attached to the sheathing.
- Install the panels into the baseboard and secure them.
Important! If a collapsible plinth is chosen, then the decorative part of the baguette should be attached last, after attaching the panel.
"Skeleton" device
Covering the floor is impossible without fastening the frame. The best option is a metal frame. For the design, it is best to take the ud and cd profile. These types of profiles help to quickly create a frame and level it.
To install the “skeleton”, metal is used, since wood is not as durable compared to metal. Wood becomes deformed due to temperature changes. When choosing a material for the frame, the selection rules are followed, since the durability of the structure depends on the selected material.
Before installing the suspended frame on the ceiling, markings are made. A level is used for these purposes. Marks are placed on the wall under the ceiling along which the guide profile is installed.
It must be secured with dowels or self-tapping screws, depending on the wall material. (Attachment pitch – 400 mm).
The next stage is the installation of stiffeners. To carry out such manipulations, the following steps are followed:
- Stiffening ribs are placed in the guide profile. Subsequently, panels will be attached to them. Create the frame perpendicular to the direction of installation of the panels.
Important! You need to determine in advance the direction of laying the panels. To make the seams less visible, follow the installation rules (you should start laying the panel along the wall with the window).
- The supporting profile is cut based on the dimensions of the room. The installation step of such a profile is 500-700 mm.
- It is impossible to flawlessly sheathe the ceiling with PVC panels if the frame is not given rigidity.
- After the frame is assembled, it is fixed. If a metal profile is used, then the first element is installed at a distance of 350 mm from the wall. This rule must be followed strictly, since this important nuance allows you to give the frame stability.
Panel installation

Correct device design depends on the direct installation of the first sheet of plastic panel. Before directly installing the panel on the frame suspended structure carefully check all parameters to avoid errors. The panel should be secured with staples or self-tapping screws. All subsequent panels must be fastened parallel to the first.
 Fastening PVC panels with screws
 Installation of plastic skirting boards, pros and cons
A meticulous job is the installation of plastic skirting boards around the entire circumference of the room. Sometimes there is a detachable baseboard. Its peculiarity is that the decorative edging and the part into which the panel is inserted are supplied separately. After installation of the plinth is completed, these parts are connected with a latch. If you follow the installation rules, installing the baseboard will not take much time and effort.
Important! If you have no experience in installing skirting boards, then you should choose detachable models.
 Ceiling plinth made of plastic
 Application of plastic for interior decoration premises is becoming widespread. It is used for both walls and ceilings. will solve many problems associated with the quality of the ceiling.
Plastic panels have excellent performance characteristics and attractive appearance.
Plastic panels have many positive qualities. They are quite technologically advanced and beautiful. From huge assortment you can always choose what you like. A do-it-yourself suspended ceiling made of plastic is convenient, fast and practical.
Features of material selection
The suspended ceiling can be made from different materials(wood, chipboard, foam, etc.). One of the most common designs is a suspended ceiling made of plastic. Such a surface has a number of advantages: ease of installation, light weight, wide range of colors, low cost. The most important - plastic ceiling has high moisture resistance. It can be easily washed with water. Plastic does not deform due to changes in humidity and temperature.
Most optimal material for plastic ceilings is polyvinyl chloride. It can be used in the form of tiles or panels. Long PVC panels are most widely used. They are made in two types - seamless and embossed. Seamless panels have a continuous flat surface, and smooth edges allow you to seamlessly join the panels together.

U relief panel the edge on one side ends with a groove, and the other edge has a longitudinal tenon. When joining the panels, the tenon fits into the groove, and an even rectangular groove is formed along the joint.
The panel is made in the form of two layers of plastic, between which stiffening ribs are formed, which ensures sufficient mechanical strength. The front surface of the panel is polished (varnished). Standard PVC panels are sold in widths of 25 cm and lengths of 2.7 or 3 m.
Return to contents
Choosing a ceiling design
A plastic ceiling can have two main designs - suspended and suspended. Stretch plastic ceilings are made from vinyl film. During installation of such a ceiling, the film must be heated to 70º, which requires the use of special heat guns. Installation suspended ceilings, as a rule, are produced by professionals.
For installing a plastic ceiling with your own hands, a suspended structure made of PVC panels is most suitable. The suspended ceiling is horizontal surface, formed from a glossy layer of PVC panels, installed on metal frame. In this case, the frame is fixed to the wall and ceiling, at a certain distance from the surface of the ceiling.

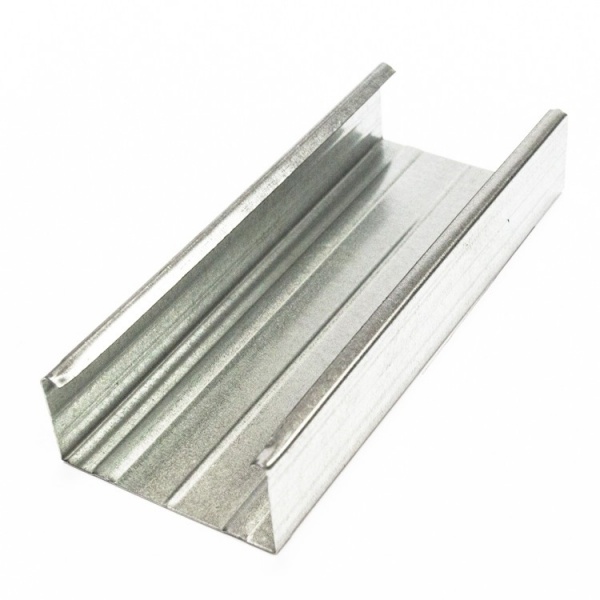
The frame is a firmly connected mounting structure in the form of a lattice. The frame is made from metal profiles. The frame is attached to the wall using a U-shaped guide profile. Typically, a profile of type PN 28x27 is used, with a width of 28 mm and a height of 27 mm. The main one is the ceiling profile, which has a C-shape. The profile type PS60x27 is used. A lattice frame structure is created from this profile.
The frame is attached to the ceiling using hangers, which secure the profiles to the ceiling. For cross-shaped connection of profiles, a “crab” fastening is used. The ceiling profiles are connected to each other using a U-shaped connector with a length of 30-40 mm.
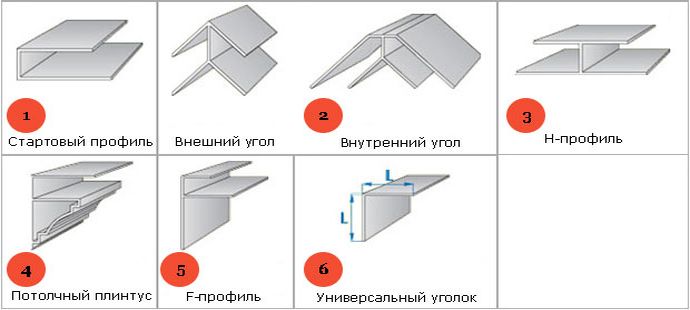
At PVC installation The panels are connected along the length using a plastic joining profile (H-shaped molding). In addition, when completing the installation of plastic, they can be used to hide the initial gaps. plastic skirting boards, starting profiles, cornice profiles, corners (external and internal), clamps.
Return to contents
Preparatory work

After installing the suspended ceiling, the main ceiling will be hidden from prying eyes, so no increased demands are placed on its surface. However, it must not be allowed to crumble, and most importantly, traces of mold or mildew remain on it after flooding. The surface of the ceiling should be primed and plastered so that there are no cracks or chips left on it. Areas with mold must first be treated with an antiseptic, for example, a solution of copper sulfate.
Return to contents
Surface marking
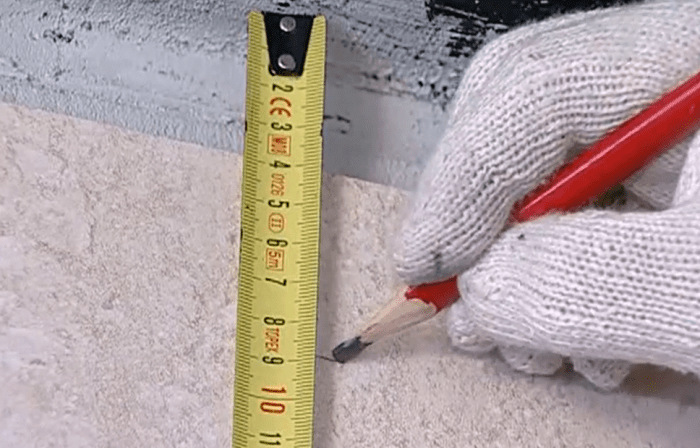
Important preparatory stage The marking that affects the quality of the entire suspended ceiling is the marking. First, the true height of the main ceiling at different points in the room is clarified. To do this, the height of the wall is measured with a tape measure at at least three points - in the corners and in the center. In the corner with the lowest wall height, a mark is made at the height of the frame profile suspension, that is, at a distance of 5-10 cm from the ceiling. The distance is determined by the need for communications.
If it is planned to install built-in (spot) lamps or run pipes along the ceiling, then this distance is 8-10 cm; if nothing extra is planned, then 5-6 cm is enough. Then a mark is made on the wall in another corner, but taking into account the actual height of the wall. The suspended ceiling should be parallel to the floor. A straight line is struck through the marks in the corners using a well-stretched and pre-painted construction cord. The opposite wall is marked in the same way. The lines are connected to each other by marking other walls. Thus, a line is drawn along the entire perimeter of the room - it is the lower boundary of the frame guide profile.

Marking of ceiling profiles is carried out on the ceiling surface. To do this, first, parallel lines are broken off in the longitudinal direction with a cord. The first and last lines are drawn at a distance of 15-20 cm from the wall. Parallel lines are drawn between them in increments of 30-40 cm. Lines are marked in the transverse direction in the same way. A grid must be applied to the ceiling, which indicates the location of the center line of the ceiling profiles. The installation of hangers is marked along these lines. The first marks are made at a distance of 25-30 cm from each wall, and all subsequent marks are made in increments of 50-60 cm. The marks should not coincide with the crosshairs of the lines - they must be offset by at least 5 cm from the crosshairs.
Return to contents
Installation of the guide profile
Installation of the suspended ceiling frame begins with the installation of a U-shaped profile on the wall along the marking line. First, holes are drilled at the base of the profiles for fastening to the wall: the first at a distance of 10-15 cm from the edge, the subsequent ones at 30-40 cm from each other. Then it is applied to the wall and marks are made on it. Using the marks, holes with a diameter of 8 mm are made in the wall using a hammer drill or electric drill. Plastic dowels are inserted into the holes. The PN profile is attached to dowels with screws. In this way, guides are installed around the entire perimeter of the room. The horizontal installation should be checked with a level.
Return to contents
Installation of ceiling profiles and installation of communications

First, profiles are installed that are directed along the short wall. These profiles should extend from wall to wall. If it is not possible to choose a profile of the required length, then it is joined from two segments. The connection must be reliable and rigid - using a U-shaped standard fastener or a metal strip. Installation of PS profiles is carried out in accordance with the markings on the ceiling. The ends are attached inside a guide profile fixed to the wall. The profiles are positioned bottom down. PS profiles in the perpendicular direction are mounted from segments, the length of which is equal to the distance between the installed PS profiles. They are attached using a “crab” fastening.
The PS profiles are secured to the ceiling using hangers. The pendants bend to form a U-shape. The height of the side rack must strictly correspond to the distance from the ceiling to the PS profile. The suspension platform is fastened with screws into dowels on the main ceiling in the marked places. The suspension legs are attached to the sides of the profile with self-tapping screws.
Before fastening plastic panels, it is necessary to place the entire communication system inside the frame (if necessary). First of all, this concerns electrical wires - for a chandelier or a system of spotlights. The wires must be collected into a bundle and placed inside corrugated hose. Wiring is carried out to the mounting location of the lighting equipment. The wires are carefully attached to the frame profiles.
A suspended plastic ceiling is one of the most practical and hygienic room decorations. The material from which plastic panels are made, PVC has glossy surface, where microbes and harmful bacteria have virtually no opportunity to multiply. In addition, this material is environmentally friendly and does not emit an unpleasant odor.
The listed qualities of plastic often determine the areas of their application. As a rule, these are kitchens, bathrooms, balconies and loggias. Plastic is practically not afraid of moisture and frost. Installing a plastic suspended ceiling with your own hands is very simple and this work will not cause any difficulties even for a beginner.
Before you begin to familiarize yourself with the installation secrets, familiarize yourself with the sequence of operations. The list is simple, but you cannot rearrange the items. It looks like this:
- Calculation of materials for suspended structures
- Marking the level of the future ceiling
- Installation of lathing and embedded parts for lighting devices
- Setting the starting profile
- Ceiling cladding with PVC panels

Installing plastic ceilings will require a simple set of tools, which every household craftsman probably has: an impact drill or hammer drill, a level for marking the horizontal plane of the ceiling (water or laser), a tape measure, a pencil, a ruler, a painting chopper, a metal saw and hammer.
Important to remember! To speed up the cladding process, it is recommended to use an electric screwdriver with a magnetic cross-head bit.

Calculation of materials for the ceiling
To calculate a plastic suspended ceiling, you need to calculate the area of the existing ceiling. To do this, multiply the width of the room by its length. You can measure with a tape measure with the help of one partner, which will also be needed for other operations.
To the resulting figure you need to add 5-10% of total area. This is the necessary reserve to compensate for the costs of pruning. PVC plates. The most popular size is width 25 cm, length 3 m. However, other sizes can be found on sale.

As a lathing, you can use a wooden beam 40 x 40 mm or 40 x 60 mm. If the climate is quite humid, then you can use a wall or guide profile for a plasterboard ceiling UD-27 and a load-bearing ceiling profile CD-60. They are made of galvanized metal and are not afraid of corrosion and deformation from excess moisture.
The number of UD-27 profiles is equal to the perimeter of the room. The load-bearing ceiling profile TsD-60 is placed at intervals of 600 mm from each other. 300 mm are retreated from the edge of the wall and the number of pieces is calculated. Usually the width of the room in meters is divided by 0.6. The length of the profiles is 2.5-3m.
To make suspended plastic ceilings look beautiful, you can use them as a guide or starting profile PVC profile With decorative plinth. It can be made in monolithic form, or the plinth can be attached separately to the groove of the profile. Its amount is also equal to the perimeter of the ceiling plus 3-5%.
In order for the joining of the plinth in the corners to look aesthetically beautiful, the plinth can be trimmed in carpenter's miter box at an angle of 45 degrees or buy ready-made ones plastic corners. The frame is fastened to the ceiling using dowels at intervals of 50-60 cm. To fix PVC plates to the ceiling, galvanized self-tapping screws with a press washer 25 mm long are used.

Installation of a ceiling made of plastic panels
Installing plastic on the ceiling begins with markings. First, determine the horizontal plane of the future ceiling. To do this, use a laser or hydraulic level. The minimum ceiling height can be lowered by the thickness of the timber or metal profile.
If more is required, then the galvanized TsD-60 ceiling profile is suspended on straight or U-shaped hangers for plasterboard ceilings. Wooden dies can be placed under the timber.
The laser level is fixed to the wall with a dowel, departing the required distance from the existing ceiling. The device is installed into the horizon using its standard bubble levels. When turned on, the laser beam will mark the horizontal plane of the future ceiling on the walls.

Using painting thread with blue, you need to “beat off” this level on the walls. After this, the axes of the ceiling profiles are marked on the ceiling. To do this, you can use a ruler, chalk and a 90 degree corner.
Along the line marked on the walls with dowels at intervals of 0.5 m, the wall profile UD-27 is installed. P-hangers are attached to the ceiling with dowels at intervals of 60 cm. Their perforated legs are lowered down at an angle of 90 degrees. The supporting profiles are attached to them with 12 mm galvanized self-tapping screws.
If you plan to install an overhead chandelier, an embedded part is mounted on the plastic ceiling on the existing ceiling.
It can be made from a piece of plywood and straight hangers, securing them in the corners. Having bent the legs to the required height, the part is attached to the part with dowels. Don't forget to drill a hole in the center of the board and run the lighting wire through it.
A guide profile along the perimeter is attached to the wall-mounted UD-27 profile with self-tapping screws and a press washer. The plate for plastic ceilings is made in such a way that there is a tenon on one side and a groove on the other. The first plate is cut to size and the tenon is cut off. After this, it is inserted into the guide grooves of the starting profile with the cut tenon towards the wall and pushed in until it stops.

Using self-tapping screws with a press washer, the first one is attached to the ceiling profiles in the upper wall of the groove. The second trimmed plate is inserted with a tenon into the groove of the first. In order to reduce the joint between the second panel, tap the heel of the palm. It is also convenient to do this with a hammer through a wooden die.
The whole process is repeated until the last panel is laid in the plastic ceilings. It may have to be cut not only in length, but also in width. At a distance of 1-1.5 cm from the cut, it is necessary to drill holes in the front layer of the plate. It should be the diameter of the screw head.
The screws will go in and secure the last plastic ceiling panel. Don't forget to drill a hole for the wire in the plate on which the surface-mounted light will be located. The plastic ceiling is ready and if you still have questions, the video on installing plastic ceilings will help answer them.
If desired, even a person without experience can sheathe the ceiling in the bathroom with plastic. Especially if he has assistants detailed instructions on how to make a ceiling from plastic panels with your own hands. The main stages and nuances can be seen in the video.
There is nothing complicated in installing a suspended ceiling covered with plastic panels, so many homeowners are thinking about doing all the work on our own. But even experienced builders sometimes do not know all the nuances of working with plastic, and for craftsmen without experience it will be even more useful step by step guide.

Every owner can make a plastic ceiling in his bathroom if desired.
Why is the ceiling made of plastic panels?
Polyvinyl chloride, also known as PVC, is a practical and fairly reliable finishing material that is excellent for rooms with high humidity. The ceiling made of plastic panels is easy to care for; it is not afraid of mold. A variety of colors and textures allows you to decorate your bathroom in the most suitable way. color scheme.
Of course, plastic is inferior to the aesthetics of suspended ceilings, but it allows you to quickly and, most importantly, inexpensively update the room.

PVC ceiling panels can be of different colors
Design features of suspended ceilings
The design of a suspended ceiling is quite simple - it is a frame that is attached to the base ceiling and sheathed with a suitable finishing material. If we're talking about about the bathroom, then it is better to make the frame not from wooden beams, but from metal profiles for drywall.
When the profile extensions are attached directly to the ceiling, the structure is called a suspended structure, but if they are lowered on suspensions, it is called suspended. The ceiling frame consists of thin wall profiles (UD), screwed around the perimeter of the room and wide guides (CD), which are attached perpendicular to the plastic strips.

Suspended ceiling mounting
How to choose plastic panels
To really choose quality material Be sure to pay attention to the stiffeners; the more of them, the stronger and more reliable the panel will be and the lower the risk that after a few years it will deform under its own weight and from exposure to moisture. The painting should be uniform, without smudging, smudges, and especially without unpainted areas. The back side of the panel should be uniformly colored and smooth.

Types of plastic panels
Calculation of the required number of panels
PVC panels are sold in widths of 10, 25 and 50 cm, and lengths from 2.5 to 4 or 6 meters. To accurately calculate the amount of material, you need to select the panels in advance, determine their direction in the room and measure the length of all sides of the sheathed ceiling. For example, the dimensions of a room are 2.5 * 2.7 meters, panels (0.5 * 3 m) will be laid lengthwise larger wall. That is, their length of 3 meters will be just enough, there will be a small trimming left.
Width: 2.5 m/0.5 m = 5 pieces. Of course, it’s unlikely that anyone will want to buy an extra three-meter panel for reinsurance, but you need to at least make sure that the store still has material from this particular batch (others may differ in color) and if the panel is damaged, there will be somewhere to buy the same one.

Adjusting the size of the plastic ceiling panel
PVC profiles and cornices
There are several types of various components, in particular profiles and cornices for installing polyvinyl chloride, in stores, but not all of them may be needed, so you need to familiarize yourself with the main ones in advance and decide which ones are needed and in what quantity.
- Starting profile - is fixed around the perimeter of the room and serves to fix the panels and hide their ends.
- An H-shaped profile is needed to join the two ends of the panel if one strip is not enough for the entire length of the room.
- PVC ceiling plinth is essentially the same starting profile, but with a decorative border.
- A universal corner - you can use it to cover any joints. It is practically not used in ceiling installation, except in multi-level structures.

Types of fastenings for suspended ceilings
Purchasing material for lathing
For the lathing you will need profile guides (CD) and wall guides (UD), their standard length is 3 or 4 meters. The required length of wall profiles is equal to the perimeter of the room; if possible, a solid profile is attached along one wall. Wide profile guides are attached in increments of 60 cm. You will also need straight or anchor hangers, dowels " quick installation" and flea screws.
Preparatory work
Lovely suspended ceilings is that basic foundation no need to prime, putty or specially prepare it at all. Only deleted old finish, and it is recommended to treat the surface with an antifungal compound. But sometimes they don't even do that, old whitewash or the paint is simply hiding under the new ceiling.
It is worth considering how high the ceiling will be lowered. The minimum indentation is equal to the thickness of the sheathing, but if they are installed spotlights or ventilation is hidden under the ceiling, then they push away from them maximum height. Lowering the ceiling by more than 40 cm is not recommended.

Ceiling prepared for installation of a suspended structure
Frame installation
Start work by marking the perimeter. A line is drawn on the walls strictly according to the level, and it will begin on it. new ceiling. If the walls are tiled, you can simply draw a line along the seam between the tiles.
When the markings are made, cut the guide wall profile and drill holes in it in increments of 50 cm. You can drill directly on the wall if you have an assistant, but if you don’t have one, it will be difficult to make the first pair of fastenings. When the drill rotates, the profile moves a little and can loosen the previous fastening; this especially often happens in old buildings, where a thick layer of plaster or the ceiling line coincides with the masonry seam.

Installation of lathing under a plastic ceiling
To install guide profiles, it is more convenient to use “quick installation” dowels. They are inserted into drilled hole and hammered in with a hammer. Next, measure and cut a wide guide profile. If the bathtub is perfectly flat, you can cut all the strips at once, but if the walls are located at an angle, as is often the case in Khrushchev-era buildings, it is better to take individual measurements for each profile and cut it separately.
The profiles are lowered to the required height using straight or anchor hangers in increments of about 60 cm. The ends of the CD profile are inserted into the UD and secured together with flea couplings.
Wiring

Diagram: electrical wiring arrangement
After installing the frame, wires are brought to the points where the lamps will be and fixed. There is no need to skimp on the “tails”; a long wire can always be cut off, but it is undesirable to extend it, especially in the bathroom. If a chandelier will hang on the ceiling, the structure at the place of its installation is strengthened, an additional suspension is installed, and the profile is placed in advance in such a way that the chandelier is attached specifically to the metal base. If this is not possible, attach a transverse jumper.
Advice! The functionality of the electrical wiring should be checked in advance.
Installation of plastic panels
The starting profile, in which the panels will be fixed, is attached from below to the wall profile with self-tapping screws. It can also be glued directly to the tiles " liquid nails».
Using a hacksaw, jigsaw or construction knife, cut the panel to the required length, insert one end into a U-shaped plastic guide, bend it slightly and insert the other end of the panel into the opposite U-shaped profile. The panel is leveled and inserted into the longitudinal starting profile.
Advice! If spotlights will be mounted in the ceiling, it is more convenient to cut holes for them before installing the panel, manually or using a bit attachment on a drill. But in this case, the panel becomes more fragile and may crack if it bends too much.
There are fastening locks on both sides of the panel. After installing the first panel, the lock on one side will be hidden in the starting profile, and on the other it is screwed to the guide profile with screws and a press washer. The next panel is mounted in the same way.

Scheme: installation of plastic panels
It is trimmed, the ends are inserted one by one into the profile guides, the canvas is aligned and pressed tightly against the lock of the previous panel until it clicks lightly. There should be no gaps left between the panels along the entire length.
Last panel rarely extends to its full width, so it is trimmed with a construction knife. To simplify installation, it is made somewhat shorter than the distance from one wall to another, so that it extends literally a few millimeters into the profile on each side.
First, the panel is placed in one of the corners and from there it is inserted into the longitudinal starting profile; when the panel is fully inserted, it is aligned and pulled to the lock of the previous panel.
If it sits too tightly and you can’t pull it up with your palm, you can glue a piece of regular tape on each side and pull the free edge of the tape.
Advice! Interesting solution It is possible to fasten plastic panels diagonally, but this method is used extremely rarely, since it is quite labor-intensive. In addition, you can create multi-level suspended ceilings.
Installation of panels without U-shaped plastic profiles

Installation of plastic panels to the frame
When in the bathroom smooth walls and the frame is properly constructed, the panels can be screwed directly to the profiles. This method is simpler, especially considering the difficulties with installing the edge panel, but no less reliable. The joint between the walls and the ceiling is covered with an ordinary baguette, which is secured with “liquid nails”.
Installation of plastic panels on the ceiling in the bathroom: video
Plastic ceiling in the bathroom: photo


