Volumetric rooster made from plastic cups. A cocky rooster made from plastic bottles
A rooster is made from plastic bottles easy with your own hands, step by step instructions is proof of this. The first version of the craft is perfect for working with children, and the resulting souvenir will look great at home or on the site. The second craft made from this material is already more complex manufacturing crafts that require certain additional materials and knowledge.
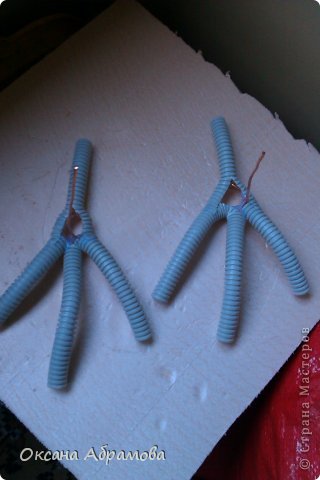
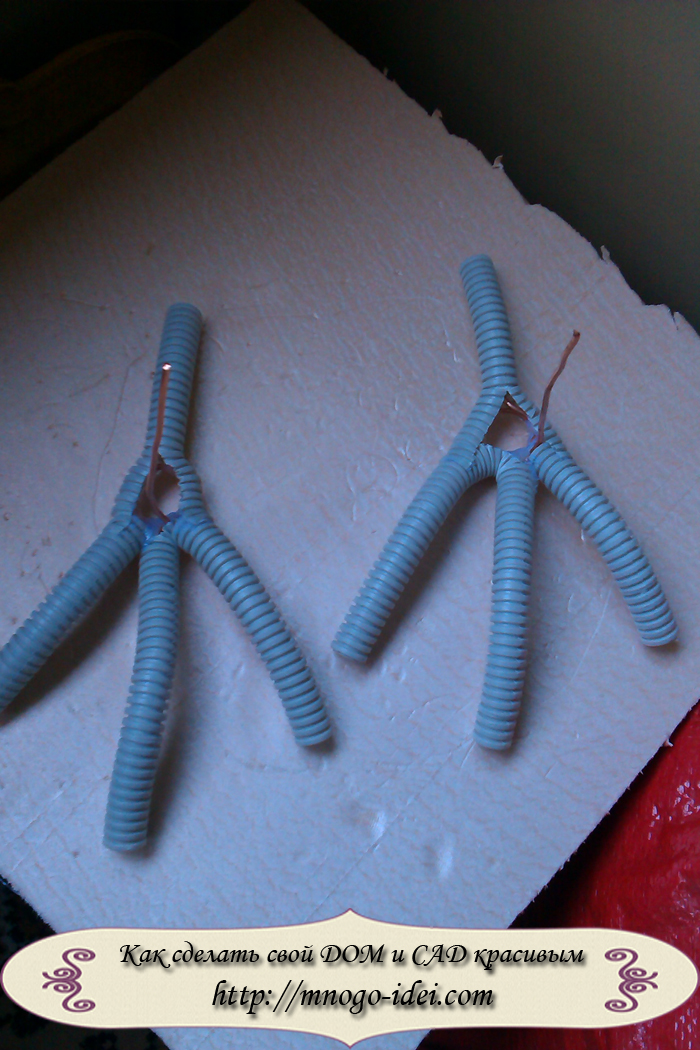
Now you can start making the paws, for which you will need copper wire. You need to bend the shape of the legs, and then create the desired effect from the corrugated tube. Insert the tail between the two tubes and secure everything with glue for strength. Cut the claws from the bottom of the bottle, they must be long and narrow, and attach using glue. Using a can of spray paint, paint the existing parts of the cockerel.


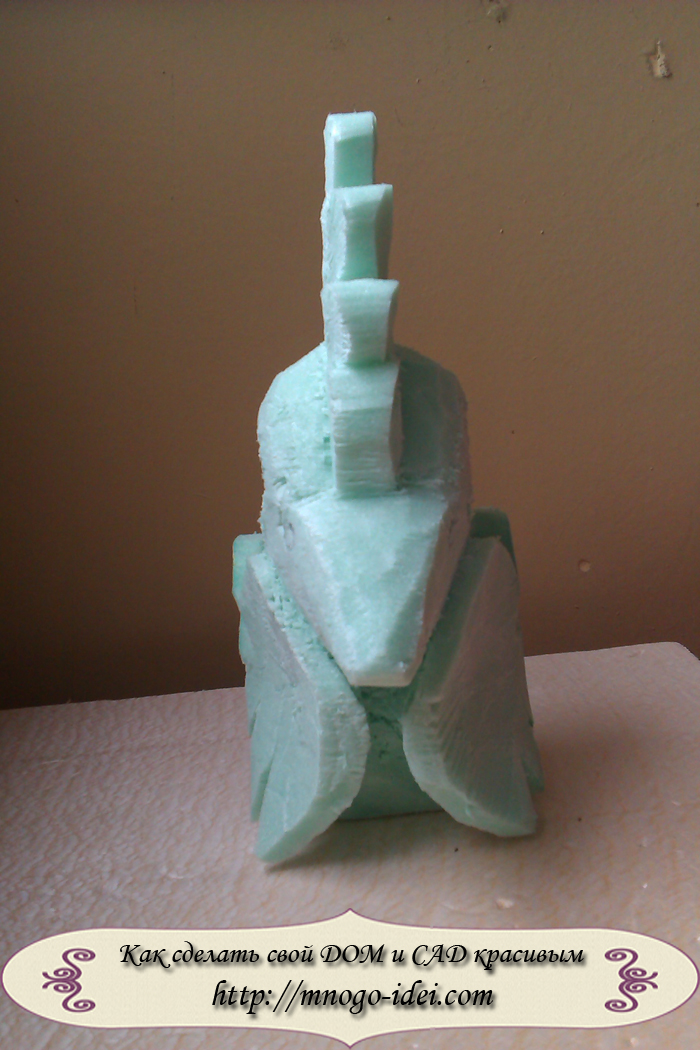
While the body and legs are drying, you can start creating the head. First, it should be cut out of foam plastic using a stationery leg. The cuts should be sharp, but in no case torn. If it is difficult to cut out the head at once, you can cut out its parts separately and then fasten them with glue. Sandpaper will help remove unevenness, and then treat the surface with acrylic lubricant. Then apply a layer regular glue and when it is completely dry, paint the bird’s head with acrylic paints and make eyes.
Now fit the head to the body. Prepare a mold for the wings and attach the long wings to the back, leaving it open. Color everything, make a tail. To do this, cut long feathers from a two-liter bottle, paint them on both sides and attach them to the body, again using wire. To finish the feathers on the back, cut out short 2 cm feathers from bottles and attach them to the back; you will need self-tapping screws for this.


Step-by-step instructions first or second will help you make a rooster out of plastic bottles with your own hands. The first version of the craft is easy, requires a minimum of raw materials, and such a cockerel can be made even by children. The second bird turns out to be large, serious and delightfully appearance. If you want to build it, it should also work out without any special problems. A simple and quick craft -
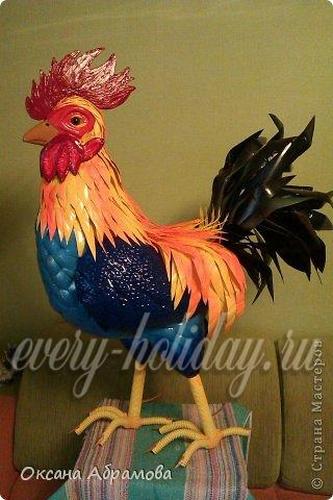
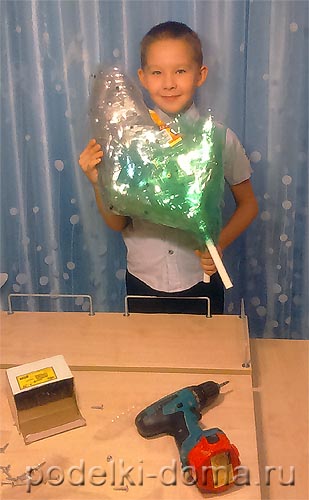
I would like to introduce you to the cockerel Petrunya.
Not a single yard in a village or village can do without this magnificent bird. So I made myself a friend, a bright and majestic owner of the yard!
I will be happy to share with you the stages of its production (based on the idea of making birds from plastic bottles by Alena Zinovieva).
To make the mold we need:
1) 5l. canister (I use it from under liquid soap),
2) 5l plastic bottle,
3) metal-plastic pipe (leg height approximately 30-35 cm),
4) two 1.5 l. plastic bottles for thighs,
5) screws, scissors, stationery knife, screwdriver.

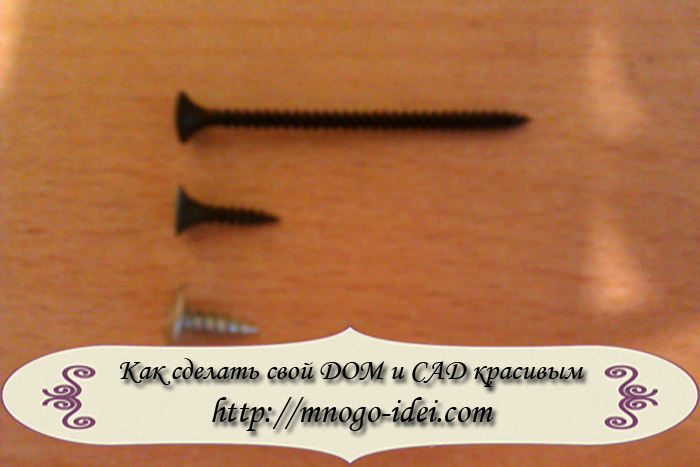
For fastenings, I use these self-tapping screws (I buy them by weight at hardware stores).
Small (about 1.5-1.6 cm) - for attaching feathers and component parts to each other.
Large ones (about 5-6 cm) - for attaching the head to the neck.

1) Move top part canisters approximately 3cm.
2) We bend the metal-plastic pipe (shape the legs), in my case, the rooster walks ( right leg pushed forward), and fasten it to the canister with self-tapping screws.
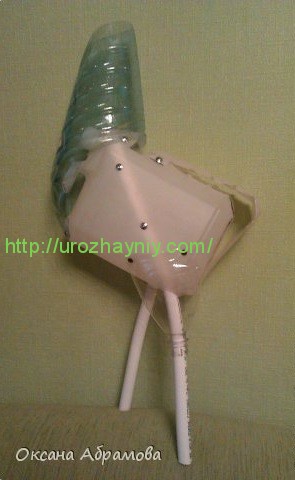
3) For the neck, from 5l. bottles, fold the envelope, attach it to the canister with self-tapping screws.
4) From 1.5 liter bottles we cut out two “thighs”, which we attach to the canister with self-tapping screws.

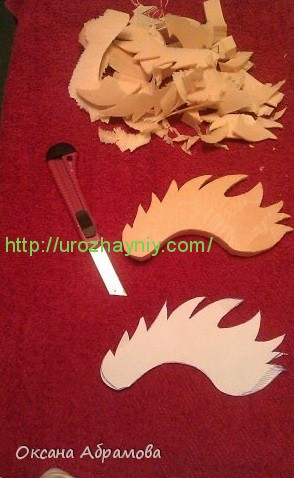
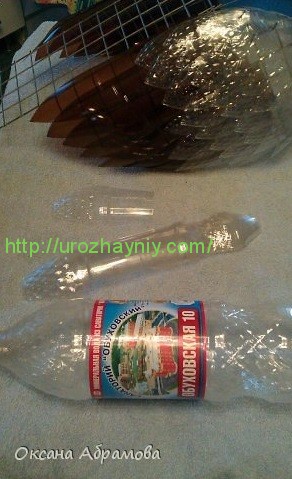
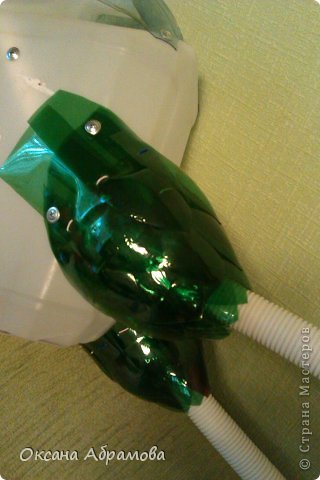
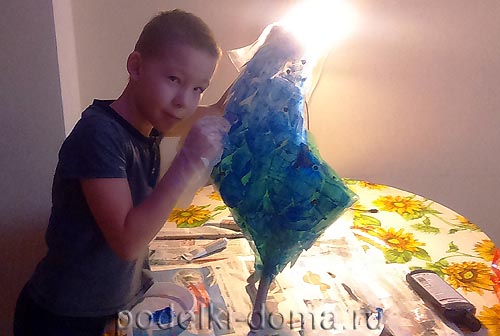
For the feathers, I used bottles of this shape. We cut off the long neck, cut the bottle into 5 feathers (we are guided by the protrusions on the bottom of the bottle), and use the upper part of the feathers.

We begin to cover the body from the “thighs”. Disconnect them from the canister for convenience.
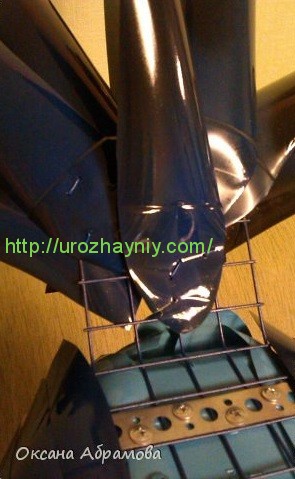
1) attach the corrugated tube to the neck of the bottle,
2) attach the feathers using wire.
We attach the finished legs back to the canister.

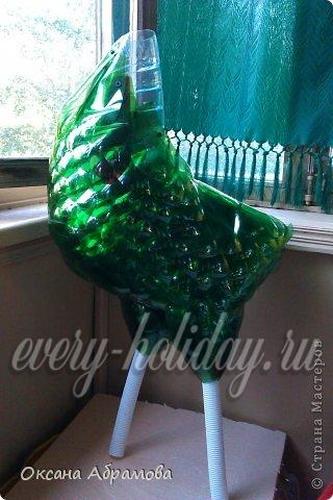
Starting from the back, we cover the entire body, except the back, with feathers (we attach it to the canister with self-tapping screws). We leave the back of the neck open because there will be other feathers there.

The next step is to start making the paws. From 2.5mm copper wire (or any other wire, preferably rigid, but not steel, which bends), we bend the shape of the legs (you can see more details in MK Filin). We create the effect of paws from a corrugated tube. We insert the remaining tail between metal plastic pipe and corrugated tube. You can also fill the bottom with glue for strength.
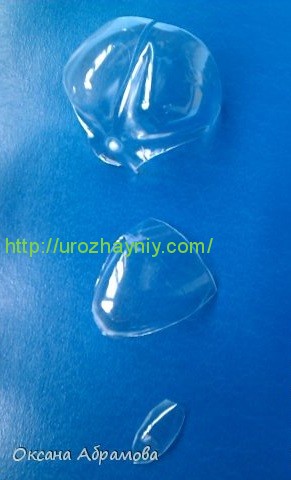
We cut out claws from the bottom of the bottle (photo). They should be narrow and long. We fasten them with glue (I use “Moment of installation - liquid nails”).

We paint the body and legs using spray paint (I use universal enamel from KUDO).

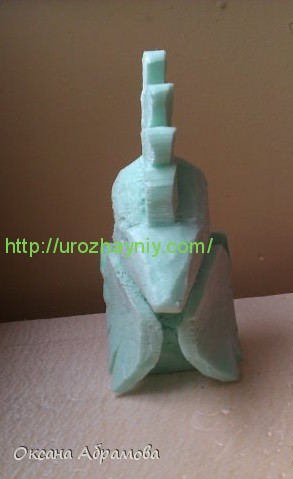
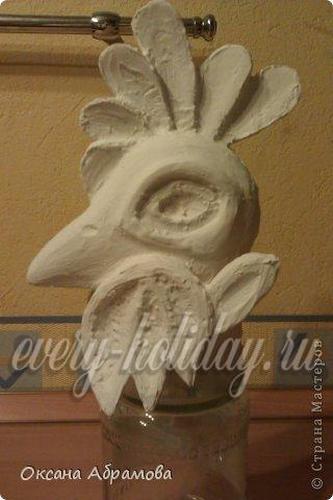
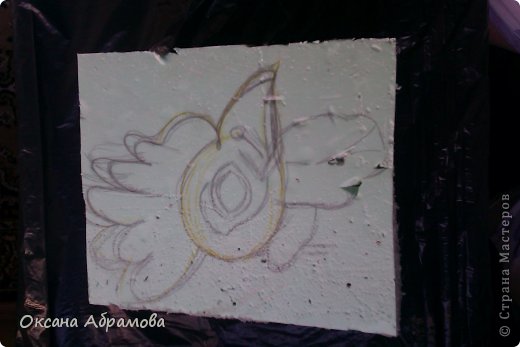
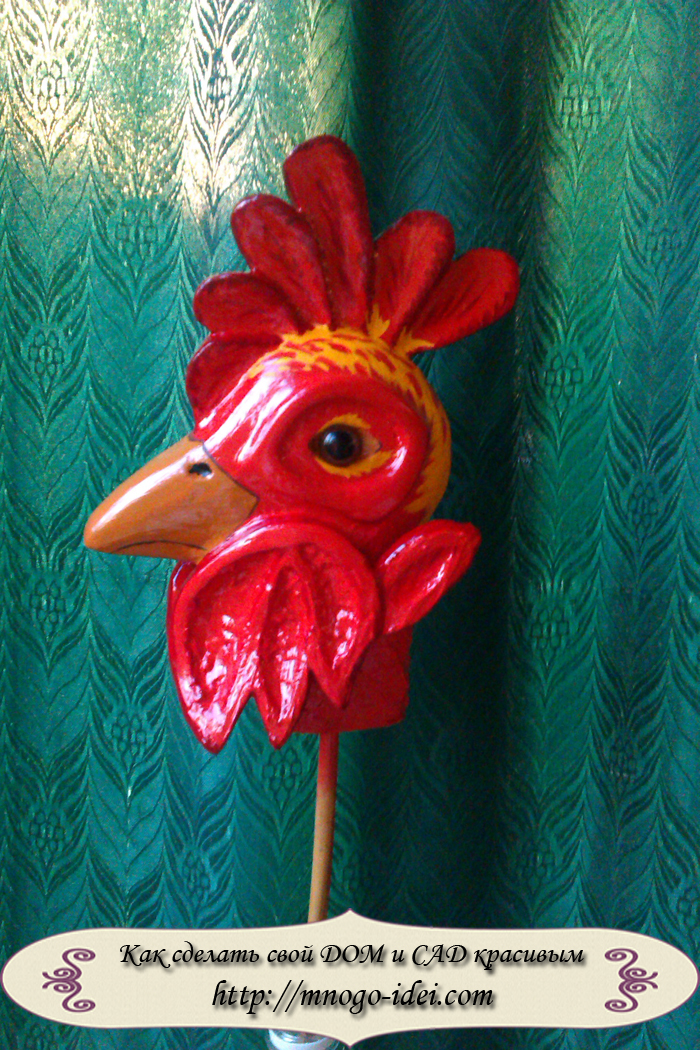
We cut out the head from construction foam using a stationery knife, it is very sharp and the cuts are smooth and not torn. If the cutting process seems complicated to you, cut out all the parts separately! Then they can be glued together with glue.


Using sandpaper (medium), we bring it to the shape we need.
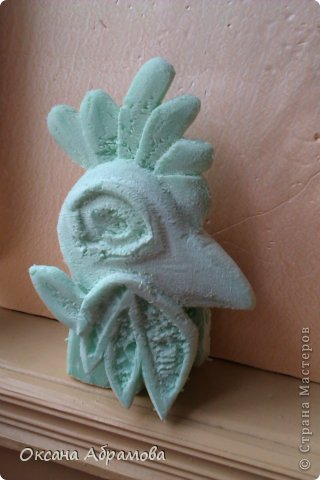
We treat the surface with acrylic putty, wait for it to dry completely and sand it again until smooth. After that, we treat it with ordinary PVA glue, so the paint adheres very well.

We begin to paint the head (you can use acrylic paints, it’s more convenient). Glue on the eyes (I bought them at a fabric store).

After fitting the head to the body, the husband said that the comb turned out not like a rooster’s, but more suitable for a chicken. I decided to redo it. I made a pattern out of paper (I tried it on for a long time to make it larger). I transferred it to foam plastic, cut it out and glued it in place of the previous one.

Using wire, we begin to attach the long wing feathers. The back remains open.

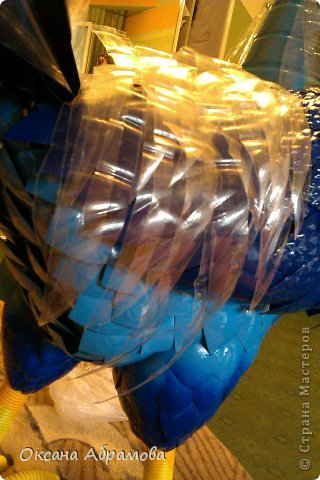
I cover the top of the wings with these feathers from 1.5 liter corrugated feathers. bottles The last row goes to the bend, into the inside of the wing.

We paint it with paint, let it dry well and attach it using perforated tape (sold in any hardware store) and self-tapping screws to the body. We bend the mesh for attaching the tail (you can increase its length and the tail will turn out richer).

Let's start making the tail.
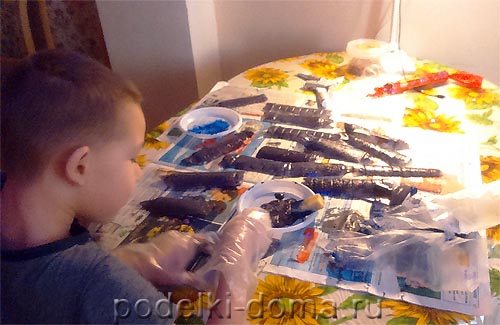
We cut feathers from 2l or 2.5l. bottles into 5 parts. We paint separately on both sides (first we applied black, after drying a little blue)

We attach it to the mesh using wire. After coloring, I cut the feathers in half again, so the tail turned out to be more magnificent.

For the feathers on the back, I cut the feathers different lengths, from transparent bottles(it's easier to paint this way) yellow), approximately 2-2.5 cm wide. I attached it to the back using self-tapping screws, 3-4 pieces at a time.

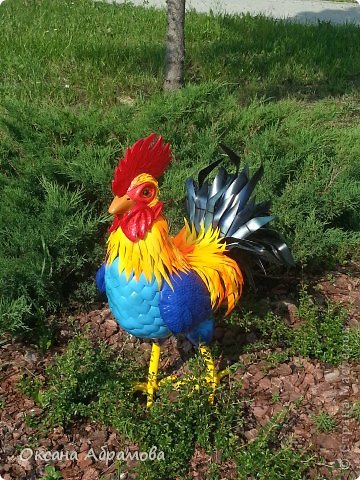
A bright, beautiful rooster made from plastic bottles will decorate your garden or plot, and can also become a wonderful gift. But the costs for it are not as much as it seems at first glance. The main thing is to stock up on plastic bottles, this will be your main material.
The author of this work is Oksana Abramova. Previously, you could already see her wonderful works on our website. A magnificent bright rooster made from plastic bottles will take its rightful place in your yard. Later we will look at other master classes on making a rooster from bottles, but now watch and learn
For production you will need:
1. 5 liter canister, (in in this case from liquid soap)
2. 5 liter plastic bottle
3. metal-plastic tube for legs 30-35 centimeters high
4. corrugated tube for legs
5. a pair of 1.5 liter bottles for “hips”
6. 1,5 liter bottles for wings
7. 2 and 2.5 liter bottles for the tail
8. super glue
9. glue P V A
10. foam
11. wire
12. reinforcement mesh
13. fine sandpaper
14. acrylic putty
15. spray paint
16. acrylic paints
17. cellophane and masking tape
18. screws 1.5 1.6 centimeters for attaching the wings
19. self-tapping screws 5 and 6 centimeters for fastening large parts
20. scissors
21. stationery knife
22. screwdriver
23. side cutters
24. perforated tape
Oksana uses self-tapping screws for fastenings like the ones in the photo.
Having prepared everything you need, we begin making the rooster. Move the top of the canister approximately 2-4 centimeters. Using metal-plastic tubes, we outline where the legs will be and screw them to the canister with self-tapping screws. Cutting five liter bottle Let's give it the shape of a neck and also fasten it to the canister with self-tapping screws. From the two upper parts of one and a half liter bottles, we cut out two hips and also connect them to the canister with self-tapping screws.


For feathers we will use 1.5 liters. Bottles with long necks are best for making them. Having cut off the neck, focusing on the edges on the bottom, cut the bottle into 5 parts. It turned out to be five feathers.

We start attaching the feathers from the hip. You can detach them from the body for convenience. Attach the corrugated tube to the rooster's thigh. We fasten the feathers with wire.

We attach the legs to the body.

We cover the body of the cockerel with feathers (everything except the back). Attach it to the canister with self-tapping screws. The back and back of the neck remain not covered with feathers, since there will be feathers of a different shape.

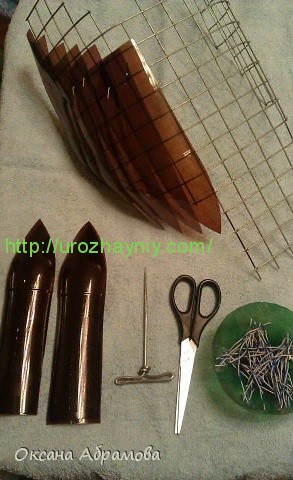
Next we start making the paws. The base is copper wire with a diameter of 2.5 millimeters. Next, we put a corrugated tube on the wire, and fasten the tip of the wire with a metal-plastic tube and a corrugated tube. For greater strength, you can glue the bottom of the foot.
We cut out nails, narrow and long, from the bottom of the bottle and glue them to the paws with glue.

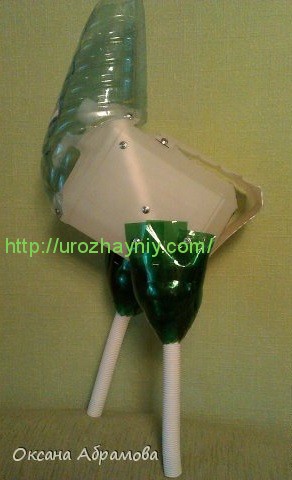
We paint the body and legs of the rooster with spray paint.

Now let's start making the head. Let's cut it out using a stationery knife from construction foam. A stationery knife produces smoother cuts. To simplify the process, you can cut out all the parts separately and then glue them together with glue.


![]()
Use sandpaper to smooth out the head.
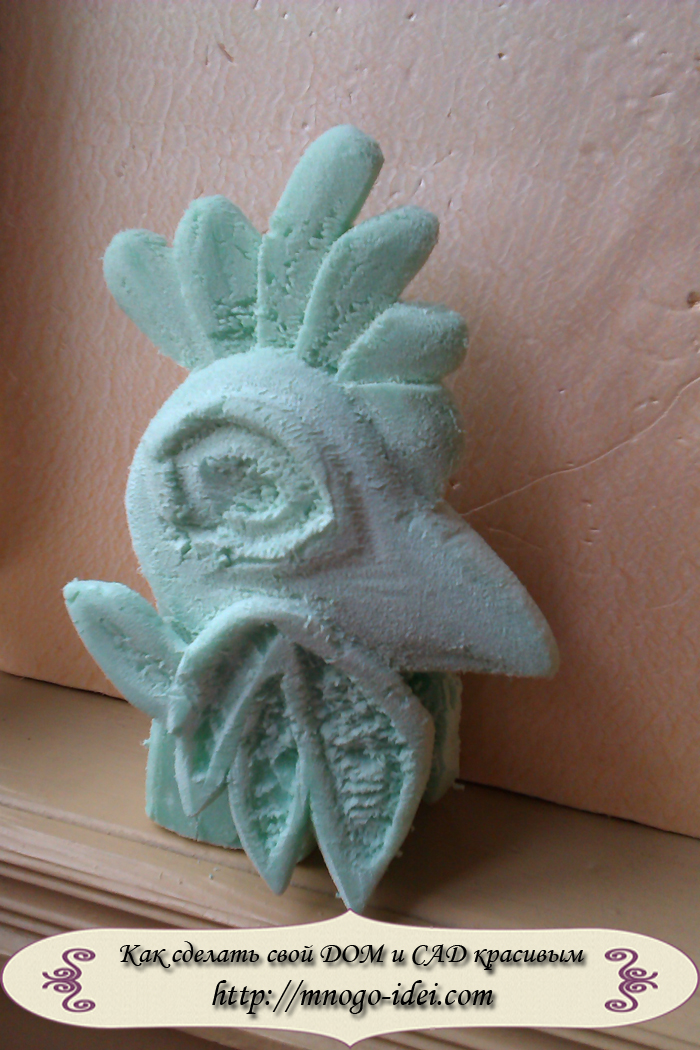
Coat the entire head with acrylic putty. When it is completely dry, sand it again with sandpaper. Then we coat it with glue so that the paint adheres better.

Once completely dry, we begin painting; acrylic paints are best suited. We also glue on purchased eyes or make our own.
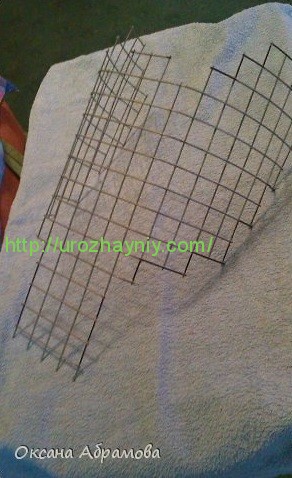
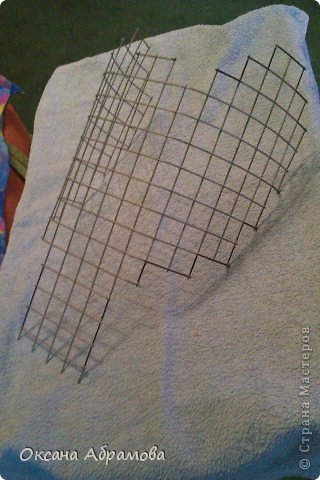
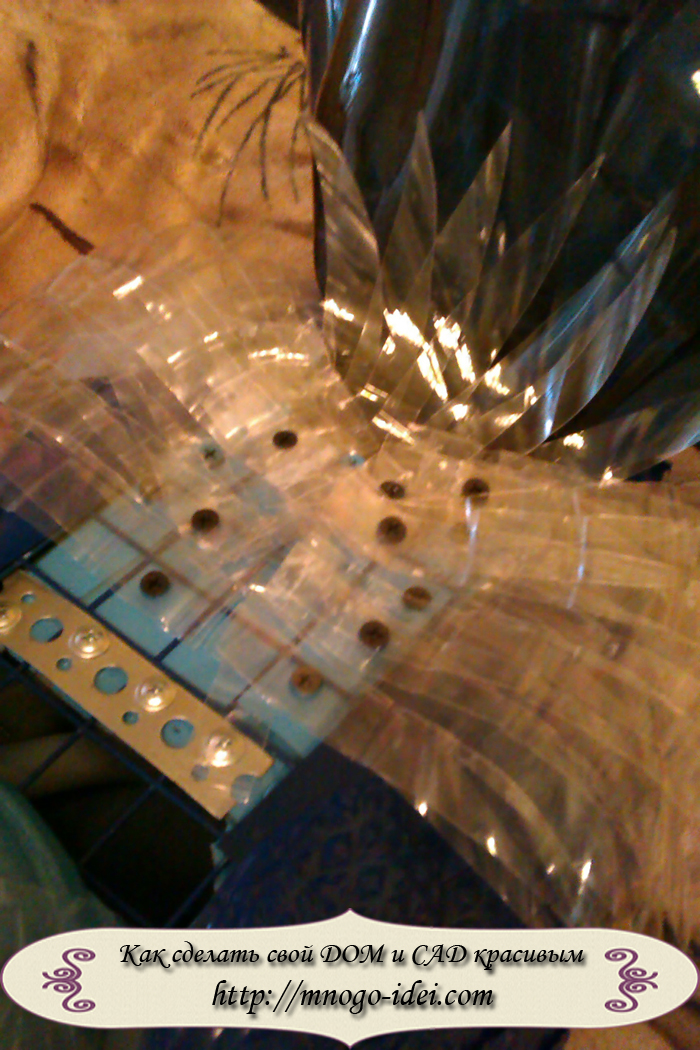
We cut out the shape for the wings from the reinforcing mesh using side cutters.

We first attach the long wing feathers with wire, all except the back.

For the upper wings we will make feathers from embossed one and a half liter bottles. We bend the wings inward.

We paint the wings with acrylic paint, and after they are completely dry, we attach them to the body with perforated tape and self-tapping screws.

Now let's make the tail. We make feathers in the same way as wings, but only from 2, 2.5 liter bottles.

We attach it to the reinforcing mesh with wire.

The feathers on the back can be made of different lengths, preferably from light plastic (easier to paint). The width of the feathers is no more than 3 centimeters. We attach the cockerel to the back with self-tapping screws, several feathers, 3-4 pieces each.

When attaching feathers to the neck, the excess at the top must be cut off. We place the topmost row of feathers on glue to close the screws. We attach the head to the body with long self-tapping screws. We glue small feathers on the sides of the crest and on the back of the head.

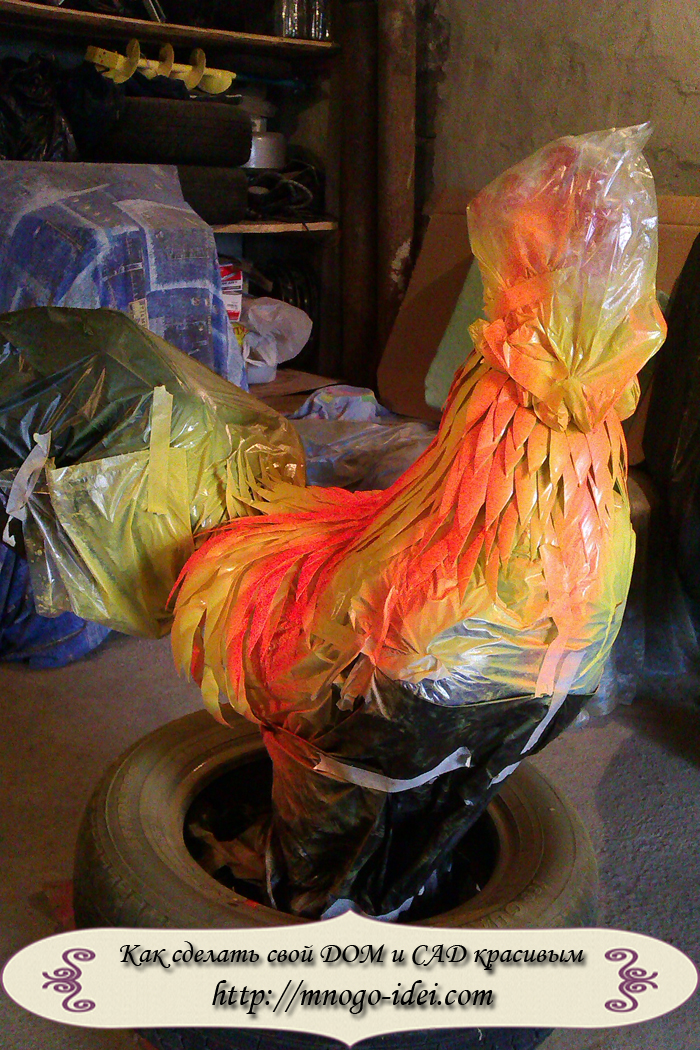
Cover previously painted feathers with polyethylene and masking tape. Apply yellow paint and wait until it dries completely.

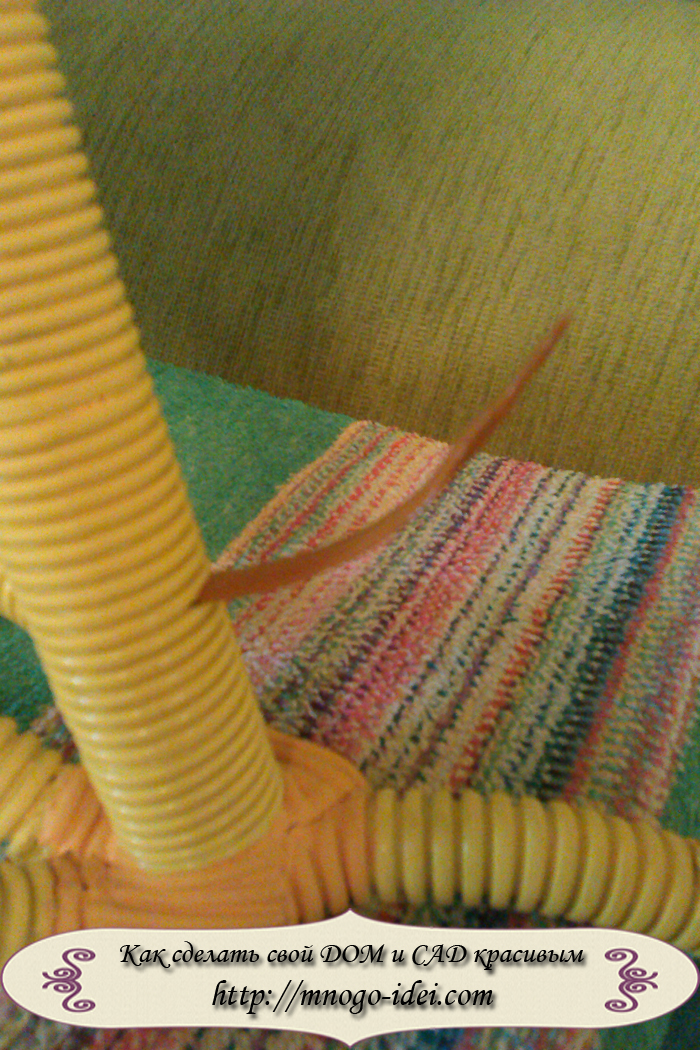
And of course, the rooster must have spurs. We cut out two strips of plastic using a stationery knife. Then carefully insert it between the corrugated and metal-plastic tube.
That's all, our rooster made from plastic bottles is ready. You can coat the rooster with varnish and place it in the yard to the delight of you and those around you.


The rooster made from plastic bottles turned out to be simply stunningly beautiful and important. Now the main thing is to find him a worthy place)


Copyright © Attention!. Copying text and photographs can only be used with the permission of the site administration and indicating an active link to the site. 2016 All rights reserved.
For manufacturing we will need the following tools:
1) 5 liter canister (in this case, liquid soap)
2) 5 liter plastic bottle
3) metal-plastic tube for legs 30-35 centimeters high
4) corrugated tube for legs and paws
5) 1.5 and 1 liter bottles for wings
6) 2 liter bottles for the tail
7) super glue “Moment”
8) PVA glue
9) foam plastic
10) wire
11) awl
12) reinforcement mesh
13) acrylic paints different colors
14) cellophane package
15) self-tapping screws 1.5 1.6 centimeters for attaching the wings
16) self-tapping screws 5 and 6 centimeters for fastening large parts 15) scissors
17) stationery knife
18) screwdriver (to speed up the process)
Having prepared everything you need, we begin making the cockerel.

We take a 5 liter canister, make a 1-2 cm slit, insert metal-plastic tubes - these are our legs. We attach our legs to the canister with self-tapping screws. We got the body of a rooster with legs.

From the two upper parts of one and a half liter bottles, we cut out two hips and also connect them to the canister with self-tapping screws. We make feathers: take 1 and 1.5 liter ones, cut off the neck and bottom from the bottle, cut the bottles lengthwise into 5 parts, make a sharp corner on one side - these are our feathers.

Having cut a five-liter bottle, we give it the shape of a neck and also fasten it to the canister with self-tapping screws. We begin to attach the feathers with self-tapping screws from the legs to the neck, i.e. from bottom to top.

Now that the body is ready, we will paint it. Using a sponge and acrylic paint, we applied 2 layers of paint. We painted the body blue. The corrugated tube was cut, put on the legs and painted yellow.
While our rooster is drying, we begin to prepare the feathers for the wings and tail. We cut out long feathers from 2-liter bottles, paint some of the feathers and leave them to dry.
Next we proceed to making the back and tail. We give the mesh the shape of wings. We use an awl to make punctures in the feathers and secure them to the mesh with wire.

Having finished securing all the feathers, we paint the rooster in different cheerful colors.

While the entire body and tail are drying, let's move on to the head. First, draw the head of a rooster on paper. Then we transfer the drawing onto foam plastic and carefully cut out the head using a stationery knife.

We treat the finished head with PVA glue, then apply paint. Glue on the eyes.
We connect all the parts using self-tapping screws, attach the wings and tail to the body. Use “Moment” glue to glue the head to the neck.
This is what we got Cockerel "Vasunya".
If you find an error, please select a piece of text and press the keys Ctrl+Enter. Thank you for helping to make our portal better!
What can be made from disks?
Crafts from old CDs Surely every home already has a fair amount of old compact discs...
Palm tree and other tire crafts for the garden
We already have master classes on garden crafts made from plastic bottles (for example, peacock, dragonfly...
Bouquet of napkins
A new master class by Elena Ermasheva on how to make a bouquet of napkins with your own hands. For so...
And now I want to introduce you to my new creation - “Rooster from plastic bottles”.
Not a single yard in a village or village can do without this magnificent bird. So I made myself a friend, a bright and majestic owner of the yard!Master class by Oksana Abramova
"Garden figures made from plastic bottles"
To make the mold we need:
1) 5 l. canister (I use liquid soap),
2)5 l plastic bottle,
3) metal plastic pipe (leg height approximately 30-35 cm),
4) two 1.5 l. plastic bottles for thighs,
5) screws, scissors, stationery knife, screwdriver.
For fastenings, I use these self-tapping screws (I buy them by weight at hardware stores).
Small (about 1.5-1.6 cm) - for attaching feathers and component parts to each other.
Large ones (about 5-6 cm) - for attaching the head to the neck.
1) Move the top of the canister about 3 cm.
2) We bend the metal plastic pipe (shape the legs), in my case, the rooster is walking (the right leg is pushed forward), and attach it to the canister with self-tapping screws.
3) For the neck, from 5 l. bottles, fold the envelope, attach it to the canister with self-tapping screws.
4) From 1.5 liter bottles we cut out two “thighs”, which we attach to the canister with self-tapping screws.
For the feathers, I used bottles of this shape. We cut off the long neck, cut the bottle into 5 feathers (we are guided by the protrusions on the bottom of the bottle), and use the upper part of the feathers.
We begin to cover the body from the “thighs”. Disconnect them from the canister for convenience.
1) attach the corrugated tube to the neck of the bottle,
2) attach the feathers using wire.
We attach the finished legs back to the canister.
Starting from the back, we cover the entire body, except the back, with feathers (we attach it to the canister with self-tapping screws). We leave the back of the neck open because there will be other feathers there.
The next step is to start making the paws. From 2.5mm copper wire (or any other wire, preferably rigid, but not steel, which bends), we bend the shape of the legs (you can see in more detail). We create the effect of paws from a corrugated tube. We insert the remaining tail between the metal-plastic pipe and the corrugated tube. You can also fill the bottom with glue for strength.
We cut out claws from the bottom of the bottle (photo). They should be narrow and long. We fasten them with glue (I use “Moment of installation - liquid nails”).
We paint the body and legs using spray paint (I use universal enamel from KUDO).
We cut out the head from construction foam using a stationery knife, it is very sharp and the cuts are smooth and not torn. If the cutting process seems complicated to you, cut out all the parts separately! Then they can be glued together with glue.
Using sandpaper (medium), we bring it to the shape we need.
We treat the surface with acrylic putty, wait for it to dry completely and sand it again until smooth. After that, we treat it with ordinary PVA glue, so the paint adheres very well.
We begin to paint the head (you can use acrylic paints, it’s more convenient). Glue on the eyes (I bought them at a fabric store).
After fitting the head to the body, the husband said that the comb turned out not like a rooster’s, but more suitable for a chicken. I decided to redo it. I made a pattern out of paper (I tried it on for a long time to make it larger). I transferred it to foam plastic, cut it out and glued it in place of the previous one.
Using wire, we begin to attach the long wing feathers. The back remains open.
I cover the top of the wings with these feathers from 1.5 liter corrugated feathers. bottles The last row goes to the bend, into the inside of the wing.
We paint it with paint, let it dry well and attach it to the body using perforated tape (sold at any hardware store) and self-tapping screws. We bend the mesh for attaching the tail (you can increase its length and the tail will turn out richer).
Let's start making the tail.
We cut feathers from 2l or 2.5l. bottles into 5 parts. We paint separately on both sides (first we applied black, after drying a little blue)
We attach it to the mesh using wire. After coloring, I cut the feathers in half again, so the tail turned out to be more magnificent.
For the feathers on the back, I cut feathers of different lengths, from transparent bottles (this makes it easier to paint yellow), approximately 2-2.5 cm wide. I attached them to the back using self-tapping screws, 3-4 pieces at a time.