Picket fence. A fence made of a metal picket fence (euro fence) with your own hands How to make a fence from a picket fence
In Russia, wood has long been widely used as a building material. It is used to build log houses, window frames, interior items, and kitchen utensils. This natural material allows you to create an atmosphere of inner comfort and coziness. A wooden picket fence is one of the most popular types of fences in suburban construction, which is simply irreplaceable when arranging a site in a rustic style. Such a fence, on the one hand, outlines the boundaries of the site for us, and on the other, its territory is not shaded.
Picket fences can be given any height, shape, color, and even clearance distance, thanks to which they acquire an original look and complement the design of a suburban area with their appearance.
A wooden picket fence is used as a reliable fence for a personal plot, an element of territory zoning, decorative framing of beds and flower beds
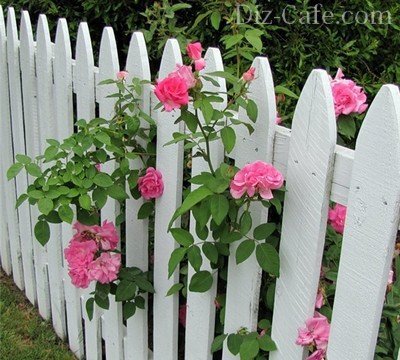
Stems with flowers, filling the gaps in the gaps between the vertical bars, give the fence a more attractive look
The invariable popularity of this type of fencing is explained by a number of its parameters and properties, the main ones of which are:
- Versatility. Wooden fences fit perfectly into any terrain. They go well with any other foundations, organically fit into an interior made of stone or brick, concrete or metal.
- Ease of installation. The installation of a fence made of a picket fence can be done independently by any summer resident and owner of a country house, without resorting to the services of professional craftsmen.
- Convenience of care. Caring for the fence consists only in the timely painting of the surface and the elimination of defects that may arise during operation as a result of mechanical stress and seasonal precipitation.
- Reliability. A high wooden fence will act not only as a decorative element of landscape design, but also as a reliable protection for the owners of the site.
One of the advantages of a picket fence, in comparison with a traditional solid fence, is the ability to plant plants right at its base.
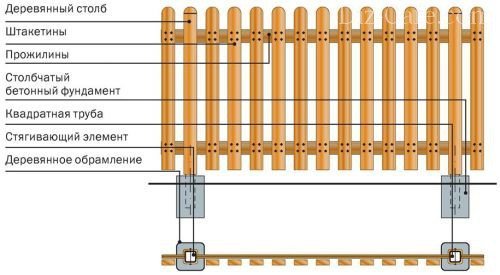
- Support pillars. They can be made from metal pipes or thick beams.
- Picket fences. Narrow slats are made from edged or planed boards.
- Veins. Cross bars, placed horizontally between the support posts, 2-2.5 meters long, are made of bars with a cross section of 40 mm.
When choosing a material to make a picket fence, you can go in two ways: buy a ready-made picket fence or make it yourself from boards. The first method saves time. The finished fence can be installed on the day of purchase. But a significant drawback may be low-quality raw wood, which serves as the basis for a picket fence, which, during operation, will "lead" the fence. Choosing the second way, the owner will need to make an effort to spend several days on the manufacture of all elements of the fence. But as a result, he will have a picket fence that fully corresponds to his ideas and wishes.

If the material is not sufficiently dried, it is necessary to use special dryers for the forest, because under natural conditions drying can take several seasons
The wood drying service, as well as the cutting of cross-beams and picket fences, can be ordered at the place where wood products are made. When preparing the material yourself, you must carefully grind and sand all the tops.

Design options for the tops of a wooden picket fence
The lower part of the wooden support pillars must be coated with hot water. This will prevent wood rotting and extend the life of the structure.
Installation and assembly of the fence
Arrangement of a picket fence is carried out according to the same principle as the construction of other types of fences. First of all, the direction of the future fence is determined. It must be freed from weeds, bushes and tree branches that will interfere with construction. Then, on the cleared area, beacons are stretched and along the stretched cord they mark a place under the pillars. The distance between the posts should not exceed three meters. Otherwise, long spans between the supports can cause the crossbars to sag under the weight of the picket fences.
Support pillars can be installed directly into the ground, but to create a more durable structure, it is better to erect them using cement-sand mortar.
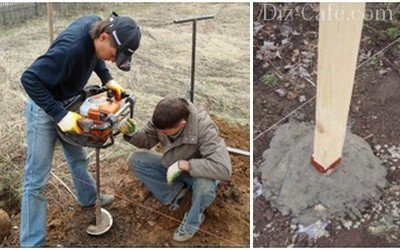
To install the posts, you will need to use a drill to dig a hole, the depth of which is determined by the height of the fence. On average, 1.3 m is sufficient
Install the columns on a 20 cm gravel pad, which allows you to prevent the support from being squeezed out when the soil freezes. The vertically fixed columns are covered with alternating layers of concrete and soil mortar.
Having completed the installation of the posts along the path of the fence, you can install veins between them. In principle, a fence can be installed in two ways: at first, the crossbars are attached between the posts, and then a picket fence is nailed to them, and at the second, the spans are assembled separately and fixed to the supports already in blocks.
The first picket fence is fixed vertically, and the rest are aligned according to a T-shaped pattern, in which the width of the leg of the letter "t" is equal to the step of the picket fence, and nailed
On average, the distance between the pickets is equal to the width of the planks themselves. You can fix the transverse strips to wooden support posts using self-tapping screws, bolts or ordinary nails. The veins are attached to the metal posts on a specially welded corner for attaching the timber.
Finishing and decorating the fence
The finished fence remains only and other negatively influencing factors.

It is necessary to seal up all cracks and chips with putty compounds, soak the picket fence with an antiseptic, and then cover it with varnish, stain or paint
Film-forming agents do not fit well on freshly planed boards and do not last long. To “roughen up” the surface of the wood, you can sand it with medium-grained sandpaper.

Stain is an excellent preservative that protects wood from the development of microorganisms and mold
The varnish will protect the wood from moisture. Using wood stain and clear varnish, you can also imitate different types of wood.
(18
estimates, average: 4,36
out of 5)
 All owners of summer cottages or household plots come a time when it is necessary to decide on one or another type of fencing of the territory. There are a lot of design options: wooden fence; metal; concrete; brick. Each fence has its own advantages and disadvantages. We will not dwell on them, but we will choose the simplest and most affordable wooden picket fence for the implementation of our project.
How to make a picket fence with your own hands
Wooden fencing is quite common. Not least due to its advantages:

Preparation of materials
 Before proceeding with the manufacture and subsequent installation of a wooden picket fence, it is necessary to decide on the final design of the fence.
The final decision must be made taking into account the requirements of the general design of the site... The appearance of the fence should overlap with the exterior of the house.
- The house, built of red brick, will initially look spectacular as an organic architectural ensemble, with a fence, where the posts are made of the same material, and the inserts are made of wooden picket fences.
- A timber dwelling from a bar usually involves the use of a completely wooden fence.
- A building with a stone foundation based on buta looks good with a fence that has a similar foundation.
The choice can be made from the following options:
- completely wooden fencing;
- metal posts and logs in combination with a wooden picket fence;
- stone or brick pillars with a wooden picket fence.
Having decided on the preference, you can calculate accurately the number of required building material. Knowing the outer perimeter of the site, we take the distance between the posts 3 meters. Based on the chosen design, we calculate the need for the number of components.
Regardless of what the pillars will be in the structure, the length is considered as follows. Add the desired distance between the bottom end of the picket fence and the ground to the height of the fence and plus 1.3 meters, on which supports will be buried. Typically, such a recess is necessary to ensure high strength of the entire structure. Preparing wooden poles for installation usually comes down to treating them with antiseptics, especially the underground part.
The total length of the lags, to which the picket fence is usually attached, for a wooden fence is equal to two spans between the posts. The veins may not have a rectangular profile, but a round transverse diameter ranging from 6 to 10 centimeters.
All wooden products before installation is inevitable planed... Treated surfaces are easier to finish impregnation, painting, varnishing. Rust is removed from metal parts and a penetrating primer is applied to the outer surface.
Installation of the fence
 Installation of the fence usually begins with a breakdown of the location of the structure. With the help of a cord, we hang the dimensions of the site, marking the points for installing the pillars. With a manual or mechanical drill we pass holes with a diameter of about 20 centimeters to a depth of 1.3 meters.
Wooden or metal we put the pillars in the pits, align the straightness along the cord. We adjust the level vertically. We throw in the empty space between the pillars and the pit with a sand-cement mixture with the addition of granite crushed stone or broken red brick.
If in a given area freezing of the soil is noticed, then to exclude the extrusion of the main supports in frost, pillars instead of mortar, filled with small fraction and rammed.
Before installation, wooden poles for the entire length of the underground part are wrapped from below with a wide layer of roofing material with an overlap of at least 15 cm for waterproofing.
After the mortar has set, installation of veins... Rectangular or round wooden logs are attached to the posts with nails or self-tapping screws. Splicing them is done by filing half the thickness. Splicing seams did not interfere with placing them so that they are in different places.
In the case of using metal posts and veins rigid mount applied welding or through special brackets with galvanized hardware. The lags are spliced by welding or using metal plates using fastening bolts with union nuts. Now the load-bearing structure of the fence is considered completely finished.
Moving on to no less responsible the stage of installing the picket fence... Various ways of placing it determine the uniqueness of the fence. Instead of the usual constant pitch inline, it can be used with increasing or decreasing clearance.
Corner plank placement will add variety to your fence style. The use of a carved picket fence will add individual originality to the appearance of the estate. A semicircular top or bottom, alternation of different board sizes and many completely different variations are available for implementation.
In order not to see the courtyard, you can apply staggered installation... One board has veins in front, and the second one with or without a gap relative to it, at the back. By independently adjusting the gap, they achieve the transformation of the line of sight of the land plot and the ventilation of the fence.
Fastening the picket fence to wooden logs is done the old fashioned way iron nails or galvanized self-tapping screws... The boards are screwed to the metal veins with self-tapping screws.
Finishing work
 In order for a picket fence to serve for more than a dozen years, the tree must be immediately treated with antiseptic materials, and then paint or varnish... This operation will have to be done systematically. Once every 5-10 years, the board is checked for damage from fungus and mold. Spoiled picket fence are replaced with new ones... The whole structure is again treated with impregnations and opened with varnish.
Picket fences are a timeless classic. Due to the low cost and ease of installation, the installation of such a fence is available to any summer resident. In the article, we will tell you how the installation of a fence from a wooden picket fence goes, talk about the choice of materials, their preparation, the stages of creating a fence.
Advantages and disadvantages of picket fences
A picket fence allows sunlight to pass through and does not provide strong shading.Today's construction market abounds in materials for fences: corrugated board, concrete type-setting sections, polycarbonate and much more. Wooden picket fence in comparison with them may seem rustic, "rustic". But this material has a number of undeniable advantages:
- it fits harmoniously into the countryside landscape;
- allows you to create an airy and delicate, but at the same time durable structure;
- shades the area a little;
- is inexpensive;
- easy and quick to install.
Choosing a picket fence
In order for the fence to serve for a long time and be strong enough, the choice of material must be approached responsibly. When buying, you need to pay attention to the following points:

It is very important to avoid the following mistakes when choosing a picket fence:
- Buy material from low-quality wood. Any defects - black spots, knots, mold - will affect the strength and life of the fence. It is necessary to discard the pickets with signs of cross-layer - a defect in wood, in which the fibers deviate from the longitudinal axis.
- Buy dyed material. Unscrupulous manufacturers often hide the above-described defects under the paint.
- Buy material without taking into account the features of the terrain. Wood of different species behaves differently in high humidity conditions. If the summer cottage is located in a lowland or in an area where it often rains, you should pay special attention to this moment.
For operation in such conditions, it is better to choose a picket fence from the following types of wood:
| Breed | Characteristic |
| Spruce or pine | Light wood shade. High resistance to decay and splitting. There may be resin pockets that reduce the strength of the picket fence. |
| Aspen | A popular wood species for baths and well logs. It is practically not subject to rotting from moisture. Easy to process, resistant to splitting, slightly greenish. May be affected by a fungus, requires treatment with fungicides. |
| Larch | The breed is exceptionally resistant to decay; it turns to stone in water. The wood is durable, very durable, with a beautiful reddish tint. It is difficult to process. |
Tip # 1. When buying a picket fence, you can ask the manufacturer when the wood was harvested. Practice shows that winter harvesting materials are of a higher quality than spring or summer materials.
Preparation of tools and materials
 If you are thinking of a carved decorative fence, at the stage of preparing materials, pickets give the desired shape.
 When starting to build a wooden fence, you need to acquire the following tools:
- jigsaw or hacksaw;
- screwdriver or hammer;
- screws or nails;
- rope and stakes for marking;
- plumb line;
- shovel.
You should also prepare the support posts and veins to which the picket fence will be attached. For concreting the pillars, a certain amount of cement mortar will be required. All wooden elements of the future fence are pre-treated with special compounds that prevent decay and mold:
| Composition | Characteristic |
| "Aquatex Ground Antiseptic" | Non-washable alkyd coating with enhanced biodegradation protection. Does not change the color of the wood, it can be covered with paint on top, retaining its properties. |
| "Euro Eko Wood" | Finnish glazing antiseptic from the Tikkurila company. Provides protection of wood from moisture, fungus and ultraviolet radiation for up to 5 years. Does not change the color of the wood. |
| "KSD" | A unique impregnation that provides not only bio-protection, but also the resistance of wood to fire. Does not wash out, does not change the color of the wood, can be covered with paint on top. |
Tip # 2. The lower part of the support pillars will be useful to treat with liquid bitumen. This will provide reliable protection against rotting, even if the supports are not concreted, but simply dug into the ground.
Installation of the base for fastening the pickets
 As an alternative to concreting, support rails can be anchored to metal U-flange piles.
 Having cleared the area on which the fence will be installed, markings are made with the help of stakes and rope. Then they act according to the following plan:
- With an interval of 2 m, holes are dug for the support pillars. Depth - not less than 100 cm.
- Drainage from sand and gravel is poured into the pits, supports are installed and their strictly vertical position is checked with a plumb line.
- The pillars are being concreted.
- The supports are connected by horizontal veins.
Two veins are made as standard: the lower one is at a height of 20 cm from the ground, the upper one is 20 cm below the support pillar.
Installation of a picket fence "Duga"

A picket fence isn't necessarily a boring rural option with a flat top cut. You can give the fence an interesting look by mounting the pickets with an arc:
- Prepare shtaketins, making out a rounded top cut.
- By adjusting the length of the pickets, they are mounted between the supports of the section in the form of a wave.
 The horizontal laying of the planks successfully imitates expensive fences made of metal europieces.
 The difference in this design is that the pickets are not stacked vertically, but horizontally. If this type of installation is chosen, the distance between the support posts must be reduced to the length of the picket fences. Another option is to dig in additional ones between the main supports. Horizontal veins are not required in this case.
 The Jalousie fence is especially suitable for wet areas, providing good airflow.
 Quite a complex, but very effective type of picket stacking - in the form of blinds. However, wooden supports are less suitable for creating such a fence. It is better to take a metal channel and tie it in pairs with "backs" to each other for each pillar. Horizontal veins, as well as for the "Rancho" fence, are not required.
Installation of pickets is carried out in such a way that they are located horizontally, but at a slight angle. The finished canvas resembles half-covered Mediterranean blinds. This design is good in that it provides ventilation and light transmission, but at the same time it perfectly protects the inner space of the site from prying eyes.
Installation of a fence from a picket fence "Lattice"
Another non-standard solution is the installation of a picket fence in the form of a lattice. It is more convenient to tie such a fence to the supports with ready-made sections, so the installation takes place “on the ground”.
 The fence "Lattice" does not create a feeling of isolation and is in harmony not only with wooden, but also with brick buildings.
 - To make a lattice section from a picket fence, you will need a wooden or metal frame. The strips are cut to the required length and attached to the frame crosswise.
- If metal elements are used to create the "Lattice" fence, it is better to paint them to match the color of the picket fences. This will ensure the visual integrity of the structure.
Topical questions about picket fences
There is a special construction formula for this: N = L / (S + d). The value L here shows the length of the fence, S - the width of each fence, d - the spacing between them. If there is a picket fence with a standard width of 5 cm, which needs to be laid in one layer with an interval of 3 cm, then 125 pickets will be required for 10 meters of the fence.
Question number 2. How to care for a picket fence?
A wooden fence, assembled from well-prepared material, needs minimal maintenance. Once a year in the spring, it must be carefully inspected and replaced with pickets that have become unusable. Fences over five years old may need to be stripped of old paint and re-treated with an antiseptic.

Question number 3. Which picket fence is better - wooden or metal?
A metal picket fence (it is called a euro picket fence) is more profitable than a wooden one, since its service life is practically unlimited. It is easier to care for it - the polymer coating is reliable, and you will have to paint a fence made of this material no earlier than 10 years later. Its disadvantage in comparison with the classic wooden fencing is the laboriousness of installation.
Question number 4. How to paint a wooden fence correctly?
First, you need to clean the wood from all dirt and sand it. If it is not impregnated with an antiseptic, or the duration of the impregnation has expired, a protective compound is applied to the surface and left to dry. After that, the wood is covered with a layer of primer. You can skip this step, but remember that the primer will save the base coat. For a perfectly even painting, sand the dried primer layer and apply paint with a roller.
Question number 5. Is it possible to make a picket fence with your own hands from boards?
Of course. To keep the material consumption to a minimum, you need to take six-meter boards 20 mm thick. From the tools you will need a jigsaw, a grinder with a grinding disc and an electric plane. The boards are marked along the length - usually in four pieces of 1.5 m each - and sawn with a jigsaw. If the width of the board is large, each workpiece is dissolved longitudinally. The same tool can be used to shape the upper cuts - at an angle, spear-shaped or rounded. The edges of the workpiece are processed with an electric plane, after which the entire surface of the picket is carefully polished.
Every owner wants his section of a country house or cottage to be surrounded by a beautiful fence. Now there are many options for fences, you just have to choose which one suits you best both in appearance and in your pocket.
The golden mean in the choice can be a wooden picket fence, which can be easily made with your own hands, without using the expensive help of a specialist. With the help of a picket fence, you can beautifully outline the territory of a country house or cottage and at the same time save a lot. Making a wooden picket fence with your own hands is quite simple, you just need to know a few basic rules and features, which we will consider point by point.
A country house or cottage is the place that you want to make it especially beautiful and cozy. This is an area for rest, privacy and relaxation. You can achieve the necessary harmony with the help of small details: plant beautiful flowers, make a gazebo, swing, build a good decorative fence. And if you do all this with your own hands, then it will be many times more pleasant to admire all this beauty later.
Why picket fence?
A do-it-yourself wooden picket fence has so many advantages that it’s probably impossible to count all of them, but making a wooden picket fence with your own hands and installing it is quite simple.
Here are the main advantages of such a fence:
- Such a fence is universal. A wooden picket fence just fits perfectly into almost any design and can become a color for the landscape of the area.
- The picket fence is pretty reliable. Everything, of course, depends on the wood you choose, the height of the fence and the width of the picket fence.
- Cheap materials and their availability.
- Such a fence is very easy to maintain. One has only to periodically cover the surface with paint or varnish to prevent the possibility of defects.
It is also equally important that the wooden picket fence does not shade the area near the fence, which means that beautiful flowers or other plants can be planted near the fence. And such a fence will perfectly emphasize the rustic style of the territory or the country style that is no less popular now.
It is very easy to work with a picket fence, and various original options for the appearance of the structure are possible - in the form of a wave, semicircles, triangles and other patterns.
Types of picket structures

Wooden picket fence can be of two types - with or without a base. In order to make a do-it-yourself wooden picket fence with a base, you need to make a foundation for the support posts and a strip foundation for the fence itself. The foundation for a wooden fence, a picket fence is made in the form of a trench using an ordinary shovel with your own hands, and it is better to make grooves under the posts using a hand drill.
The depth of the foundation should be about one meter. At the bottom, you need to fill and tamp a pillow of sand or gravel. Support pillars are concreted strictly vertically into the recesses, and formwork must be installed in place of the foundation under the fence. After pouring the foundation, you must wait about 7 days for the solution to dry out and set. After the confluence of this line, you can proceed to the next work.
Such a fence is more durable than a picket fence without a foundation, since the base of the picket fence is additionally protected from moisture from the ground. The foundation of such a fence can be overlaid with torn stone or other material.
A fence without a base is simpler in its design. For its construction, it is only necessary to make holes for the support pillars and, after their installation, tamp the soil tightly. The pillar should enter the ground by more than a meter.
If the fence is high and heavy, then a metal plate must be attached to the posts, which will additionally ensure the stability of the post. The plates are firmly supported on the ground.
Required materials and tools
To build a wooden picket fence with your own hands, you need the following materials and tools:
- Wooden pickets. They can be from different tree species - pine, cedar, larch and others. Picket fences are made from narrow edged boards.
- Support pillars. Usually these are metal or asbestos pipes, as well as thick beams.
- Crossbars. Do-it-yourself wooden pickets use metal or wooden bars as crossbars for the fence.
- Hammer.
- Nails or screws.
- Screwdriver or screwdriver.
- Level.
- Wood treatment agent (paint, varnish, stain).
The bottom of the support pillars (if they are wooden) must be treated with a special protective agent against decay. This will extend the lines of the fence service.
Picket fences can be purchased ready-made in special stores, or you can make yourself. This process does not require special knowledge and skills. The surface of the wooden slats must be well cleaned, filed and sanded tops. Decorative tops on the fence look beautiful. It can be semicircles, rectangles, triangles, you can also make decorative figures with a pattern.
The wood must be of a certain moisture content. If you use raw wood for the construction of a wooden picket fence, then the fence will not stand for a long time, soon after installation defects and curvatures will appear.
In order to start the installation of a wooden picket fence, you need to prepare and clean the area through which it will pass with your own hands, cut the grass. Next, you need to mark the perimeter. To do this, along the line of the future fence, it is worth hammering in wooden stakes and pulling the cord. Do-it-yourself wooden picket fence will be installed according to this marking.
The next stage will be earthworks. With the help of a hand drill or a shovel, the required type of foundation is made, as described above. The foundation for the pillars must be done after accurately measuring the distance between the future support pillars. After completing the development of the foundation, support pillars can be installed. The post is installed on a prepared cushion of sand or gravel and concreted (a ball of concrete can be alternated with a ball of soil). Metal poles must be painted before installation to protect against corrosion.
During the installation of the support pillars, it is necessary to adhere to strict verticality, since violation of this rule can lead to the collapse of the fence. The building level will help you with this.
Next, crossbars are attached to the support pillars. If the pillars or crossbars are wooden, then they can be fastened with bolts, self-tapping screws or ordinary nails, and if they are metal, then you can use electric welding. Usually, two crossbars are designed, at a distance of about 20 cm from the bottom and top of the fence. Good fastening of the crossbars is very important for the stability and durability of the fence, since they are the ones that take the load from the fence. During the selection of crossbars, it is necessary to take into account the weight of one span of a wooden picket fence.
After all the crossbars are attached, you can proceed directly to the installation of the fence pickets. Pickets are attached to the crossbars with self-tapping screws and a screwdriver or simple nails and a hammer. In order for the pickets to be attached at the same level, you can pull a cord over their top after mounting the extreme pickets. The distance between the pickets is usually equal to the width of one picket. In order for the distance to be equal, you can install another picket between the nailed and nailed pickets, which will act as a distance template.
It is better to nail one shtaketine with 4 nails (self-tapping screws), 2 for each cross-piece from above and below. This will ensure a tight fit.
The wooden picket fence is ready! It remains only to cover it with a protective agent. As such, you can use paint, varnish, stain, lime. The wood covered with wood stain and varnish looks very nice. With this processing method, you can simulate different types of wood. It is imperative to process a wooden fence periodically. This will ensure its durability and strength.
- Materials and tools
- Manufacturing technology
A picket fence is one of the most popular types of fencing, with the help of which a summer cottage is ennobled. The main thing is to implement it correctly. Such a fence has gained popularity due to a number of advantages, the main of which are the low cost of construction and appearance.
Materials and tools
Installation of a wooden fence does not require special devices, if we are not talking about combined structures consisting of several different types of materials, such as stone or brick. Bearing vertical and horizontal supports for the fence can be made of wood or metal.
To install a picket fence you will need:
- wooden beam 50x50 mm;
- wooden beam 20x40 mm;
- nails or screws;
- antiseptic;
- paint and varnish material.
A square beam is needed for the manufacture of vertical supports, and its length is planned in accordance with personal wishes: everyone determines the height of the future fence for himself.
The support is pointed into the ground by at least half a meter, therefore, 50 cm must be added to the desired height of the element for the fence.
A beam of a smaller section (20x40 mm) is intended for horizontal reinforcement of the spans of the picket. Its amount will directly depend on the length of the fence being installed. Nails or self-tapping screws are suitable as fasteners. The second option is more preferable, because the self-tapping screws do not loosen during the operation of the structure.
Fasteners must be purchased from galvanized metal, which does not rust from the effects of atmospheric agents.
There are many antiseptics and paints and varnishes on the market. You need to choose products intended for outdoor use. From tools you will need a hacksaw for wood or a jigsaw. If you nail the planks with nails, you will need a hammer, and it is better to fasten the screws with a screwdriver. A shovel will come in handy for mounting support posts.

Manufacturing technology
A step-by-step diagram for assembling a picket fence with your own hands will help you organize and complete the work from start to finish.
- At the first stage, it is necessary to properly prepare the wood: all natural material must be impregnated with an antiseptic several times using a regular paint brush. The process is quite time consuming, but it cannot be ignored. Such a measure will help to ensure the protection of the tree from environmental influences, protect it from rotting, extending its service life.
- Now you can start installing the supports. We start by marking the places for their installation. In places where the fence changes direction (at the corners), set the pegs and pull a strong rope between them. Then you need to calculate the number of supports. To do this, we measure the distance between the pegs and divide it into equal intervals, the length of which does not exceed 2 meters. The resulting value will be the step between the bearing pillars, and at the place of their installation, it is necessary to dig holes, taking into account that the support must go into the ground at least half a meter, below the freezing point. For a long and reliable service, the support structures are wedged with coarse gravel and compacted with earth. The laying of roofing material in the holes dug out for the posts helps to increase the life of wooden supports, and the supports themselves are wrapped with the same roofing material in places where they are buried in the ground.
- In the third stage, transverse fence guides are usually mounted. The main thing is that each vein is located strictly horizontally. It is easy to control with a building level. Horizontal supports are mounted in two places (at the top and bottom of the fence), however, in the case of a high fence, an intermediate rail will have to be installed. The veins are fixed to the vertical supports of the picket fence with self-tapping screws or nailed.
- The final step is to install the wooden picket strips directly onto the fence. The most time-consuming but very simple process is that each fence is screwed strictly vertically at regular intervals. If you pull the thread on the bottom edge of the pickets, this will provide one level of their placement.

At the fourth stage, the assembly process ends - the wooden picket fence is now ready for use. It remains to paint it in any chosen color, however, many craftsmen additionally decorate the hedge using simple techniques. This concerns the design of the upper edge of the picket fences, which are given a certain shape.
Fence sections can be made in the form of a wave or an arc. To do this, markings are applied to the fence, a trimming is made according to the template. The picket fences are sharpened on both sides in the form of a sharpened pencil - this will protect the courtyard from unauthorized access.
Often there are picket fences with carved planks - we are talking about the creative approach of the carpenter. Such work cannot be called simple.
Alternative to wooden poles
No matter how prepared and processed the future supports, wood is inferior in durability to metal. If you want a wooden picket fence to last a long time, and its service life is not limited to 15 years, it is better to use a metal base, which is mounted in the same way, except for a few moments. The pillars are made of a metal pipe with a cross section of 40 mm, and are fixed in the ground with concrete mortar.
To ensure optimal adhesion of the supporting element to the concrete, pieces of reinforcement or metal plates are welded to the bottom of the vertical supports.

Horizontal veins are made from a metal pipe of a smaller diameter and welded between vertical support elements, keeping an eye on the horizontal placement using a level. Then each shtaketin is fixed on the previously built metal frame with pointed self-tapping screws. You will get a wooden picket fence, but reinforced with a metal base.
Even if the pickets become unusable over time, they can be replaced, the supports will remain the same, and this is a cost saving.

There are many options for a wooden picket fence, and brickwork can be used as a basis here, which in combination with natural wood gives a special effect. Instead of bricks, if funds permit, they lay out spans of stone. For such a massive structure, a foundation is required. And this is a more laborious process.