How to make a woodshed from metal. How to make a firewood rack with your own hands? Calculation of approximate costs
– a place of unity with nature. On the street the real one is complicated open hearth It is heated a little to the side, it warms the soul in the house, and in the kitchen it helps to cook. Therefore, firewood is vital on your own site.
They need to be stored somewhere, placed, transported somewhere. Firewood racks for the dacha help in solving these problems. This is not a simple stationary structure that serves to store a general supply of fuel. But also special devices that allow you to neatly and aesthetically organize a firewood storage area near each firebox.
For each type of firewood you need to use different materials. Their choice depends on the size of the structure, capacity, mobility, as well as where it will be located.

Anyone who is at least a little familiar with construction, carpentry or knows how to use can make a firewood rack with their own hands. welding machine. The main thing here, as in any business, is desire.
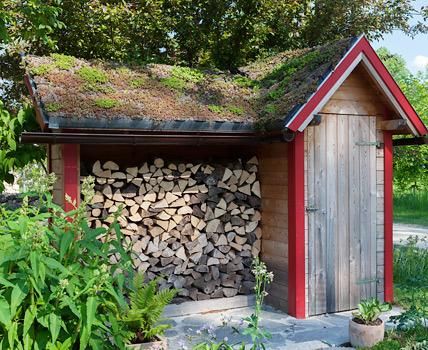
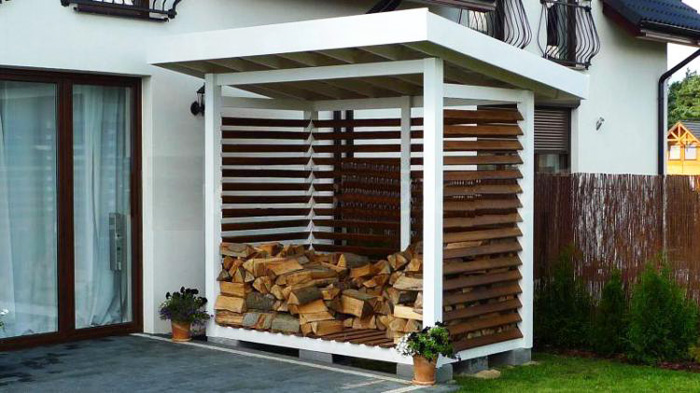
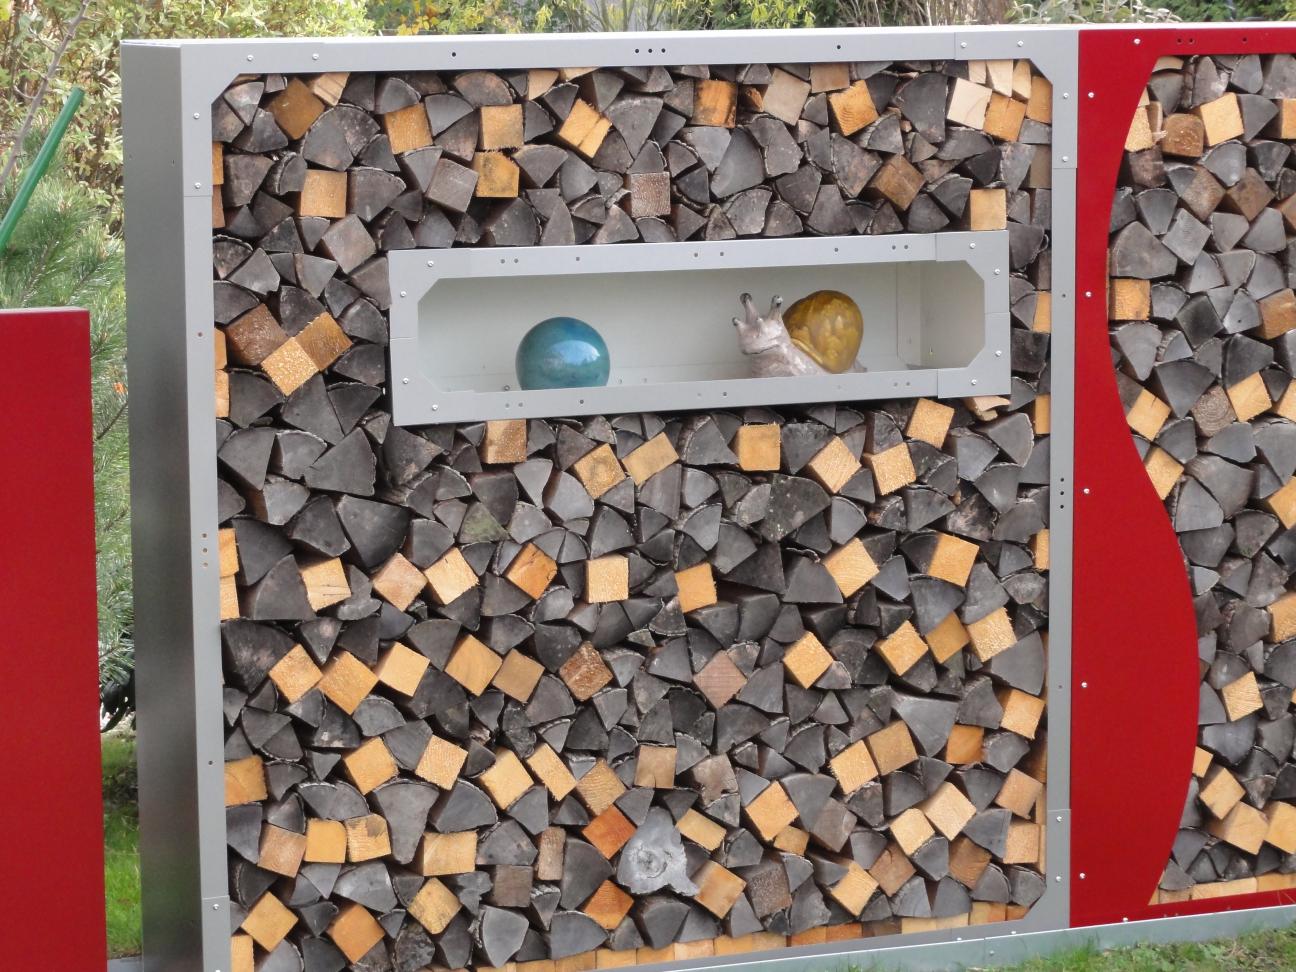
 An example of a combined firewood box
 Street firewood
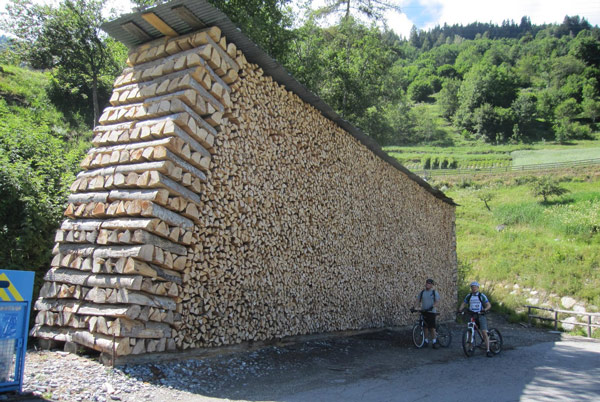
The largest of all existing structures. Its main task is to create optimal conditions for storing large quantities of firewood. This means protecting them from precipitation and the harmful effects of moisture, creating a well-ventilated space, as well as ensuring neat storage of firewood and easy access to it at any time.
Most often, an outdoor firewood shed is a small free-standing shed. But it is also possible creativity to the design of the woodpile.
To create a simple wooden firewood box, you will need to perform the following steps.
The firewood itself is ready. However, before you start using it, you need to figure out on what basis the firewood will be stacked. Their direct contact with the ground is very undesirable. Construction pallets can be used as a layer. Or build a similar structure from scrap materials. For the manufacture of metal firewood great solution there will be a lattice base welded from reinforcement.
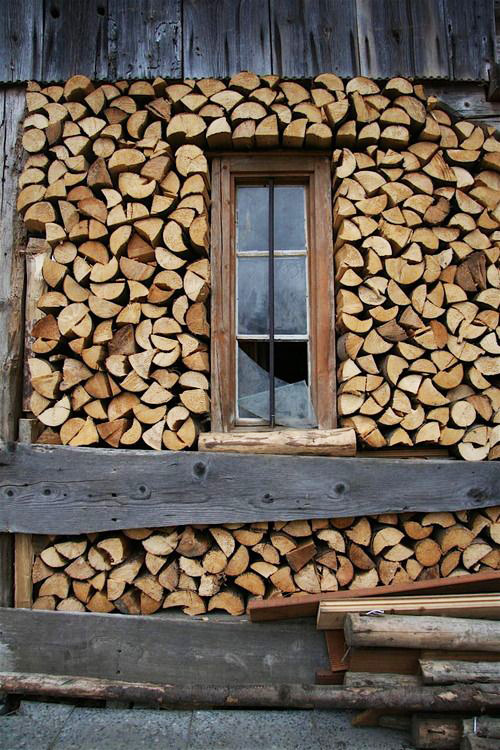
Now you can start laying firewood. There is more than one way to correctly place logs, which not only gives the firewood box an aesthetic appearance, but also allows the firewood to dry, which means it will burn better later. In addition, a blank wall of firewood can be decorated by creating a whole picture or scene out of logs.
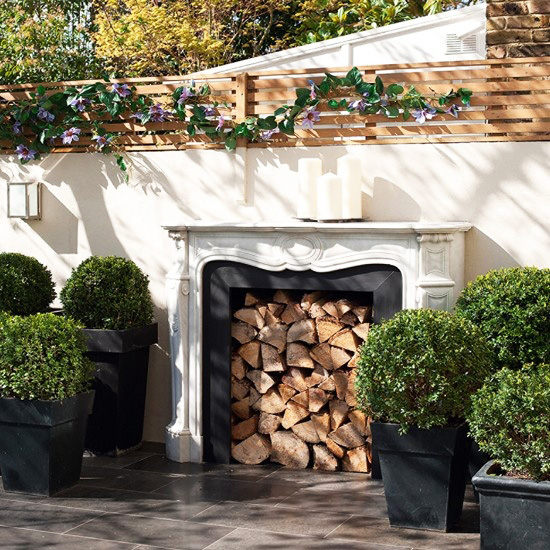
 Original firewood box in the shape of an owl
 Firewood for a bath
Most often this is also an outdoor stationary structure. But unlike the general storage, the firewood rack for the bathhouse is much smaller and is located in close proximity to the entrance. There is no point in building the same massive barn. The local shed should accommodate as many logs as necessary for several full-fledged fires, just so as not to have to run around with armfuls of firewood from the remote storage to the bathhouse and back.
You can make a firewood shed at your dacha in the form of a small wall-mounted canopy. It should accommodate logs arranged in one row, to a height no greater than human height. And the length should be whatever the wall of the bathhouse convenient for its location allows.
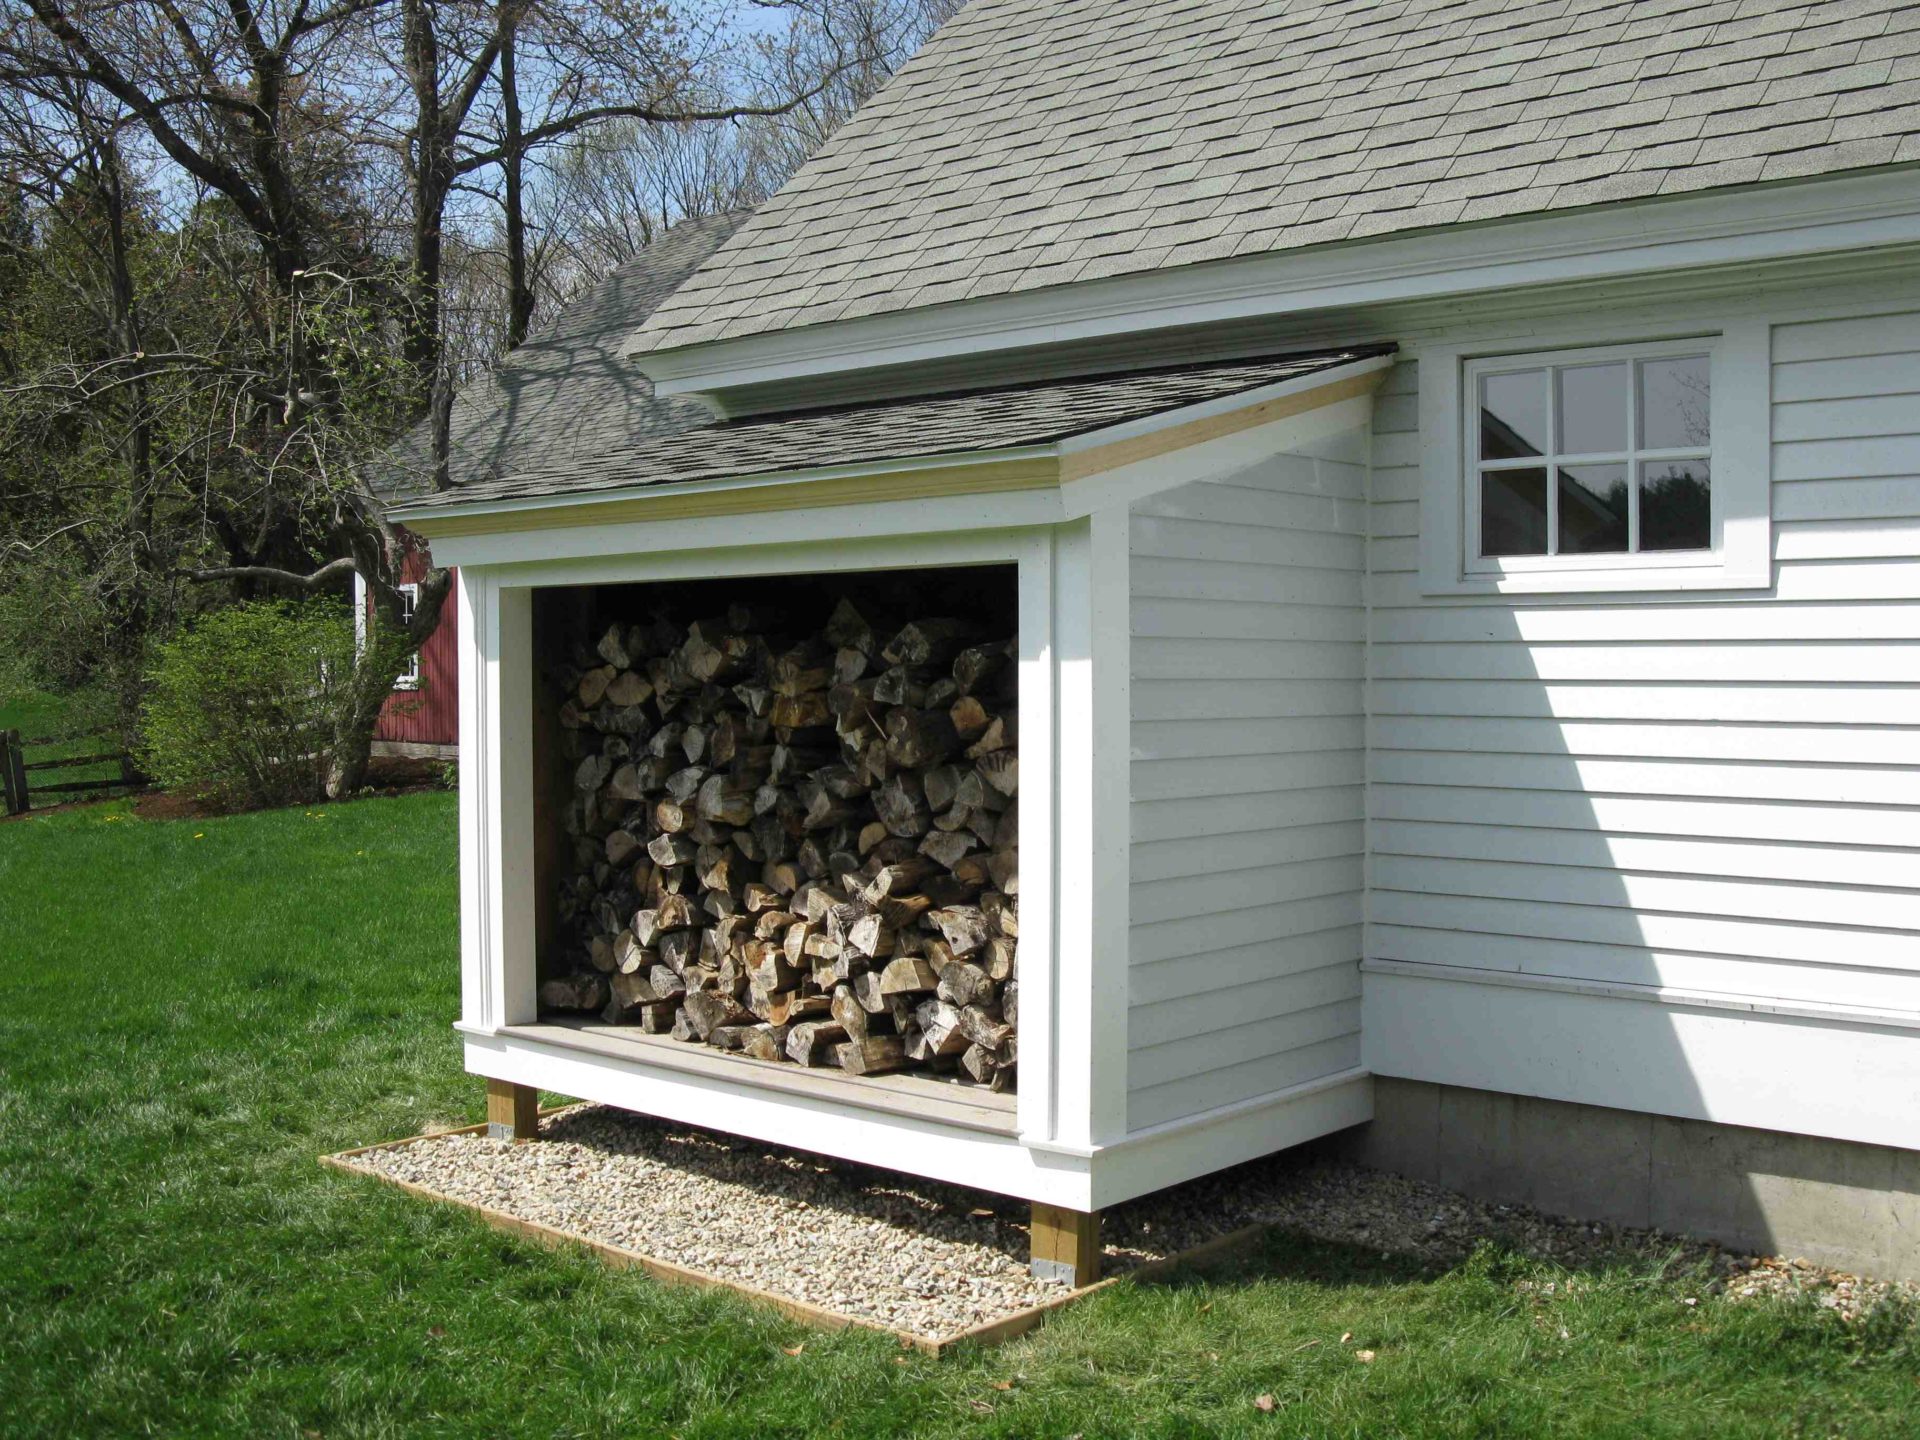
 An example of a firewood rack built along the wall of the main building
 There is no need to prepare a massive base, but you need to mark the corners of the firewood box with bars or metal rods by driving them into the ground. Fill the sides with boards, slats or secure a chain-link mesh. If you wish, you can get by with just two corners of the base, and instead of two more, use the wall of the bathhouse and attach it directly to it.
When the walls are ready, move on to. It will also have a single slope, but this time the water will flow onto the front wall. To do this, you need to attach or metal corner or wooden block. Fix the second similar element on the racks - it should be located lower. Now we assemble the symbolic sheathing and install any roofing material.
 Shed roof at the woodshed
 Despite the fact that the firewood will not be under such a canopy for long, you should not stack it directly on the ground. To do this, you should put construction pallets on the bottom or assemble a bottom sheathing, where you can place the logs.
Firewood for a bathhouse or heating a house, stored for the winter, is not allowed to be stored in the open air. They will provide maximum warmth only in dry form, and in order to bring freshly cut wood to the desired condition, it must be dried for a year. Stacked logs must be protected from the elements and air movement must be ensured inside, so that the wood will gradually dry out. For this purpose, homeowners build various homemade firewood sheds. How best to do this will be discussed in this article.
Firewood options to choose from
It should be noted that there are countless ways to build a firewood shed from materials available in household, it is simply unrealistic to list them all. Therefore, we will offer several options using various materials, and you can choose the appropriate one or take any of them as a basis and come up with your own design.
So, you can make a firewood rack with your own hands from:
- wooden beams covered with clapboard or slab;
- steel pipes of any profile, sheathed with corrugated sheets or ordinary metal;
- wooden euro pallets;
- different materials in any combination.

When country house or the dacha is located far away and there is not enough time to build anything, then you can beautifully stack the finished logs in an improvised firewood box, be sure to cover it from precipitation with plastic wrap. To prevent it from being blown away by the wind, the corners of the film must be fixed to pegs driven into the ground or simply tied plastic bottles filled with water.

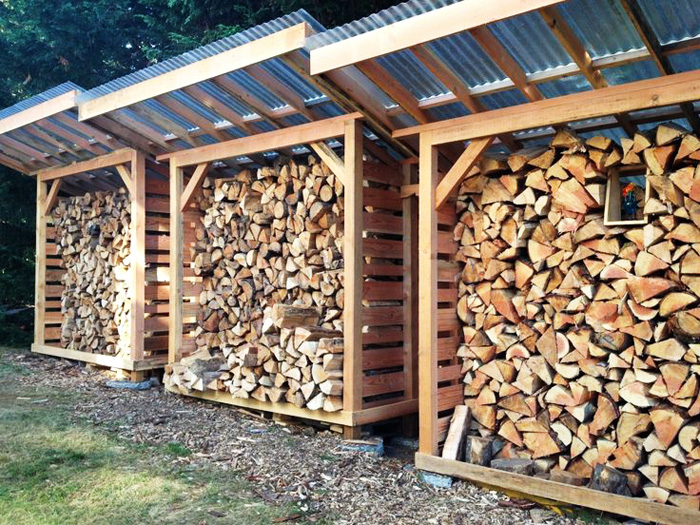
The most common option is a canopy made of wooden beams. Similar projects of firewood sheds are presented in huge numbers on the Internet, there is plenty to choose from. The structure can be made free-standing or attached to the wall of the house - as is convenient for you. Regardless of what material the woodshed is planned to be made from, the following requirements must be met during its construction:
- stacked logs must be isolated from the ground so that they do not become saturated with moisture from it. This means that the woodshed for firewood should have a flooring raised above ground level by about 10 cm.
- a roof with a slope for protection from precipitation is a mandatory attribute of any canopy, that’s why it is built.
- the walls of the structure are also needed to protect against rain blown by side winds. At the same time, the walls should provide ventilation to the woodpile for better drying of the wood.

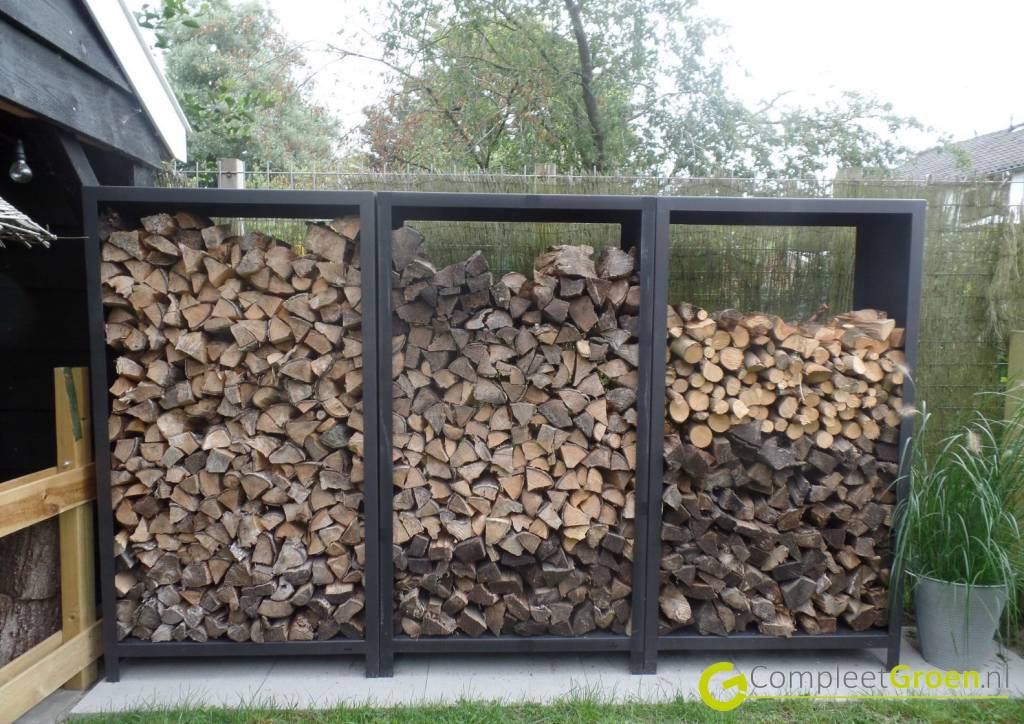
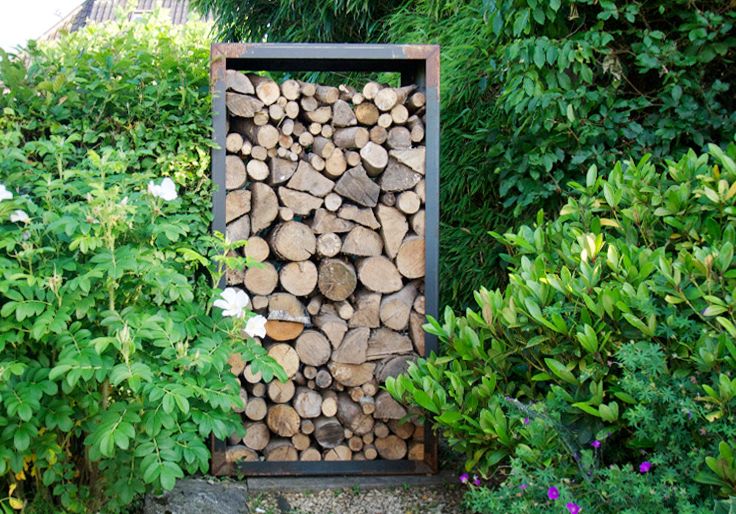
If you wish and have the skills, outdoor firewood cans can be made of metal. Round or rectangular pipes are suitable for assembling the frame; the walls and covering are made of sheet metal, and if available - from profiled sheet. Examples of such structures are shown in the photo:

Note. In the first photo, the design clearly requires improvement, namely additional cladding back wall, the wind will blow snow and rain through it.

As you can see in the second photo, the outdoor firewood box has a combined design with a polycarbonate coating. Utility of this material in its transparency, which promotes direct sunlight on the stack of wood and its rapid drying. You can also cook lightweight design from the corners and attach it to the wall of a house or barn, covering it with a sheet of metal on top, as shown in the photo:

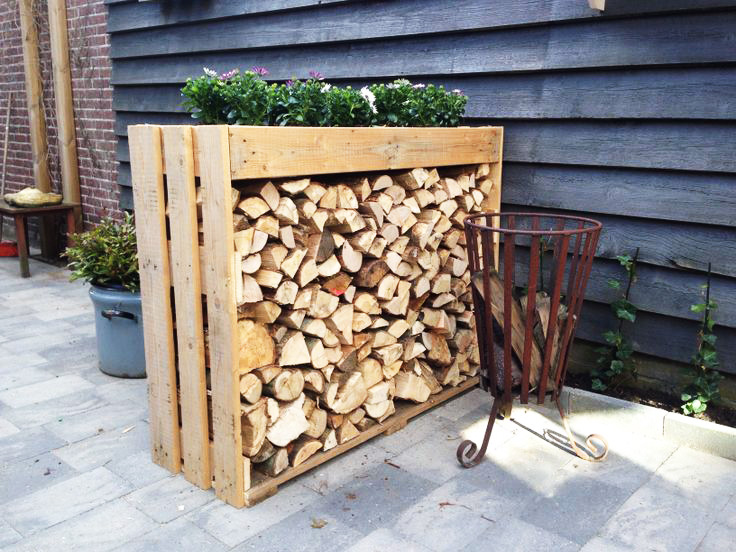
Another real option- build a firewood shed from pallets used in warehouses to move products.

It's practically ready-made modules for the flooring, walls and roof, they just need to be assembled into one whole in any suitable way.

How to build a firewood shed?
When the canopy design has been chosen, the location for its construction has been determined and all materials have been found, you can begin to work. Regardless of whether the firewood shed is built at the dacha or near the house, whether it is wooden or metal, the sequence of actions will remain the same in any case. Therefore, we will give a number of recommendations without reference to one project or specific conditions.

To begin with, a homemade firewood box made of wood or other material is applied to paper in the form of a sketch with dimensions. Then, using this sketch, the structure is marked on site and it is determined where the frame supports should be placed.

The structure must stand firmly on the ground, and the flooring must be able to withstand the load of a stack of firewood. This means that we need to take care of constructing a small foundation. It is better to make it in the form of pillars using the following methods:
- wooden beams are dug into the ground to a depth of 1 m. The underground part of the beam is pre-coated with resin or bitumen, then it will stand quietly for up to 20 years.
- It is recommended that steel pipes be concreted in the ground. To do this, a hole 60-70 cm deep is dug, a pipe is inserted into it and jammed with stone fragments. Then the hole is filled with liquid concrete.
- concrete pillars can be made without formwork. The hole is made with a hand drill, the soil is selected, and before pouring concrete, a plastic film is laid inside. It will serve as a waterproofing barrier between concrete and soil.

The simplest firewood maker wooden pillars is being built immediately, but concrete foundation It takes time to completely harden. Construction begins with the installation of a deck with intermediate joists, followed by the assembly of the wall and roof frame. Last stage– wall covering, installation roofing and hanging doors, if provided.

Homemade firewood holders for the fireplace
Anyone who lights a stove or fireplace knows that garbage and dirt are brought into the house along with firewood, and therefore storing them directly on the floor is unacceptable. It is much more convenient when they are placed near the stove in a small firewood box. The easiest way is to purchase finished product. There are various metal firewood holders for sale, including forged ones, for fireplaces; their choice is extremely wide.

Although such products look great, sometimes they are too heavy and bulky, and besides, they cost a lot of money. Instead of buying, it is better to make a firewood maker yourself according to your own understanding. If you have several meters of steel wire with a diameter of 5-8 mm on your farm, you can make something light and delicate. This DIY firewood holder is shown in the photo:

You need to bend 2 rings from the wire, joining the ends by welding. Then weld the rings together at one point, move them apart and install several jumpers. The lower distance between the rings is based on the shortest logs. How is this made? portable firewood, shown in detail in the video:
There is also an interesting welded metal structure that takes up little space in the room. It is a square stand on legs, to which are vertically welded small pipes rectangular cross-section, connected to each other by a frame at the top. Instead of pipes, corners will also work, but then you will probably have to weld the stiffeners, since the structure will be flimsy. The finished vertical firewood box is shown in the photo:

Wooden options cannot be ruled out, given that it is easier to make such a firewood stove than a metal one. But both require refining, that is, processing and painting in the desired color.

Conclusion
Ideally, a DIY outdoor firewood shed should be sized for a winter supply of wood. Accordingly, a firewood burner located in the house must rely on a daily supply of fuel, although this is not always possible. Then you will have to fill it out twice a day.
In villages and neighborhoods with cottage buildings, houses are heated with wood and coal. Even if the boiler or stove is fired with coal, it is still necessary to store wood for ignition. When purchased, regular firewood has high level humidity, so they need to be dried. For storing and drying logs, special sheds or entire rooms called woodsheds or woodsheds are equipped. The design is very simple, so any homeowner can build a woodshed with their own hands.
Types of wood burners
Sheds for storing firewood, regardless of material and size, can be attached to a house or bathhouse or stand-alone. The first type of woodsheds is built much faster, but it is not possible to build such a building in all areas. And most importantly, attaching woodsheds to wooden buildings is dangerous. This is explained not only by the increased fire hazard of the entire complex of buildings, but also by the attraction of wood-boring beetles to the woodshed, which can begin to penetrate the walls and frame of the house. Often wooden buildings With such an extension, impregnation does not protect against pests, therefore, if you still plan to build such a woodshed, protect the wall connecting the house and the woodshed with a metal sheet. The steel layer must be larger than the size of the woodshed, this guarantees high-quality protection housing from pests.

Free-standing woodsheds can be open or with a roof. The roof is laid on pillars or a frame with walls. The roof of the structure is made sloping so that water drains immediately without penetrating inside the woodshed. The rest of the work is done by the sun and wind. The firewood is dried naturally. After this process, the wood dries no worse than in closed dryers. For regions with heavy snow and rain, the walls of the woodshed are covered with plywood and other particle boards. In the spring they are removed to dry the firewood.
Construction of woodshed walls
To ensure that the walls of the woodshed do not interfere with the ventilation and drying of wood, they are made of slotted or latticework. The dies are stuffed onto the frame of the woodshed at an angle or overlapping, like blinds. This technique protects the firewood from getting wet during slanting rain and wind. Even when packed tightly, firewood stored in a grated woodshed dries efficiently.

Boards are attached to the poles or frame of the woodshed, most often horizontally, stuffed at an angle. With any fastening method, it is imperative to leave frequent gaps. Sometimes the boards are attached vertically, along the pillars, but such structures are less common.
It is impossible to say exactly which method of fastening boards (vertical or horizontal) is more effective, because no comparisons have been made in this regard. Usually the master uses the type of fastener that is convenient for him. Some builders believe that it is more effective to fill the dies obliquely. So for boards 10 cm wide, make 1.5-2 cm gaps. In addition, with this method of building a woodshed, you need to make different direction bevel boards for each wall. The creators and admirers of this method claim that under favorable conditions weather conditions The wood under the woodshed with such partitions dries out within a month.

The gaps in different woodsheds range from 1.5 to 10 cm. The size of the gaps largely depends on the width of the board. For snowy regions, it is not recommended to make too large gaps, as snow will blow into the woodshed. This will negatively affect the condition of the firewood. IN middle lane You can fill the slats rarely, this promotes drying and saves material when building a woodshed.
Many woodsheds are made without a door. Structures with a door are already considered a shed for storing firewood. Some craftsmen do not block the front wall of the woodshed with boards, but leave it open for active airflow. If in your region theft at dachas and in private homes is a common occurrence, then you cannot do without doors when building a woodshed for firewood.

Pay attention! When constructing an opening for the woodshed and a fence, make sure in advance that you can enter the room with an armful of firewood.
Stacking firewood
If the firewood in the woodshed is stacked in small batches in one or two rows, there are no problems with airflow and access to logs. Inexperienced homeowners do not know how to properly store large amounts of firewood. In such cases, woodsheds are erected, divided into sectors by partitions. In woodsheds made using this method, fresh firewood will not block the passage to the old ones, and most importantly, uniform airflow of the wood is ensured.
For square-shaped rooms, the sections are placed so that you can walk through and get the driest firewood. In such structures, a passage is arranged in the middle, which must always be free. It is recommended to make the length of the passage from the entrance to the other wall. Only one row of firewood can be placed on the wall opposite the entrance to the woodshed; they will be able to dry and will not block the passage.

It is much easier to store firewood in rectangular open woodsheds. The woodpiles are fenced off between each other with partitions made of posts or planks so that they can accommodate from 2 to 4 woodpiles.
Extended woodsheds can accommodate from 4 to 8 cubic meters of firewood. In large woodsheds, the back wall must be ventilated.
The woodshed at the dacha is usually made small. If you do not live in a dacha year-round, then a couple of cubes are enough to heat an average house in the off-season. However, to heat a house with a bathhouse, you need an impressive wood burner. In such cases, the height saves - it is made up to 2 meters. Firewood is never stacked close to the ceiling; a gap is always left for airflow from above. Therefore, if all household members can reach a height of 170-180 cm, the woodshed is made up to 210-220 cm in height. For a person of average height, such a canopy is optimal.

Building a woodshed with your own hands
The process of constructing a woodshed for firewood near the house will be described below. Installation of the structure takes from 2 to 4 days at a leisurely pace (this period includes painting of the woodshed). The design, the diagram of which is discussed in the article, is of a frame type.
Materials for woodshed
Before you understand how to build a woodshed with your own hands, you need to understand the dimensions of the structure. Below we will describe the construction of a woodshed with dimensions of 180 by 370 cm. The height of the front supports is 245 cm, the rear ones are 220 cm. The capacity of the woodshed is 13 cubic meters of firewood, it is recommended to load no more than 10. It is not necessary to load firewood into such a storage to capacity. Leave 15-20 cm on top, if the family is short - 30-40 cm. If the firewood is stacked end to end, be sure to install jibs so that they do not break the wall dies.

The frame of the woodshed is assembled from timber. For the bottom and top harness use material 10 by 10 cm. Before work, it is recommended to saturate the wood with machine oil or other protective compounds. Assembly is carried out end-to-end, fastening the parts with nails. For greater strength of the frame, corners with screws are used. Ordinary wood is used as supports for the woodshed. foundation block with dimensions 20x20x60 cm, for the entire woodshed you will need 6 blocks.
Preparatory stage
A drawing of a woodshed is needed if, in addition to firewood, it is planned to store tools and gardening tools. In this case, the woodshed also serves as a barn.

By making a drawing of the woodshed, you can determine the size of the canopy. When calculating the dimensions, take into account how much firewood is spent on heating the house during one season. It is recommended to stack firewood with a small reserve (in case severe frosts). So, on average, for a house of 100 square meters, about 2.5 cubic meters of pine material or 1.8 birch material will be required for heating from autumn to the end of winter. Firewood with a moisture content of no more than 20 percent is considered dry; this level is reached after a year of drying in the woodshed. When heating with freshly cut firewood, more logs will be required, since their calorific value is 1.5-2 times lower. It is recommended to stock up on firewood for approximately 2 seasons.
Everyone has heating device your efficiency. Thus, modern hearths can boast of an efficiency mark of 80 percent. To heat a house with such a stove, one stack of firewood is enough for 7-10 hours. This number of logs is only enough to heat a residential building. To these supplies you need to add firewood for the bathhouse, barbecue and fireplace (if there is one in the house).
In addition to wood, you will need:
- drill (for digging supports into the ground);
- hacksaw;
- hammer;
- pliers;
- plumb line and rope;
- stepladder.
Advice! Wood for the woodshed is purchased based on the type of buildings on the site. The firewood can be assembled from leftover material after building a house or bathhouse. Often, timber and boards remain on the site after dismantling old buildings.

Installation of the frame and base of the woodshed
Before building a woodshed, it is necessary to prepare the site. To do this, the soil is leveled around the perimeter of the building. On viscous and soft soils, a cushion of sand and crushed stone is installed. It is not necessary to fill gravel and sand around the entire perimeter of the building; it is enough to fill it under the supports. To do this, make small pits up to 25 cm deep and pour sand and crushed stone there at the same level. Support blocks are installed on top of the pillow.
Pay attention! The blocks must be wrapped in a couple of layers of roofing felt. The harness does not need to be fastened to the support with anything, but if you want to make the woodshed monumental, you need to drill holes in the supports and attach the harness to them using pins.

Assembling the woodshed frame includes the following steps:

There is no need to skimp on fasteners when installing the housing, especially in snowy regions. If there is a heavy load on the roof, the supports and fasteners may simply not be able to withstand it.
Roof installation
After installing the supports, you can begin assembling the roof. The construction of a firewood storage begins with two support boards on the front and back walls. Then two more boards are nailed on the side walls. They are placed on the same level as the pillars of the rear wall. These boards are 5 cm thick and 10 cm wide. To sheath the roof of the firewood storage, use a board 10 cm wide and 3 cm thick.

Once the firewood storage sheathing is assembled, the roofing material can be laid. Corrugated sheets, slate, soft tiles and so on. The installation technology depends on the type of roofing material. To protect from rain, overhangs and projections of approximately 30-35 cm are made.
If metal materials are used to cover the roof of the firewood storage, it is necessary to lay waterproofing, for example, roofing felt, on the sheathing. This will protect the logs and the ceiling from condensation. Roofing felt is laid on the sheathing from below with an overlap.
Once the firewood storage roof is assembled, the floor can be assembled. Floor boards are used from 30 cm thick, any width, but the wider the better. For fastening, use 2-3 nails for each board.

The final stage of construction is painting. To cover wooden buildings use any protective paint or impregnation against pests.
After painting, the woodshed is ready for use. The construction of such a woodshed does not require specific skills. It is enough to be able to hammer nails and saw material. Even the roof structure of such a woodshed is very simple.
Woodsheds of other designs
There are many types of firewood burners for the garden and home. Below are the simplest and most popular types of canopies

Extension to the house
To assemble such a woodshed you will need a minimum of lumber, but you will have to mix concrete. The supports that are nailed to the house are made high. Square or metal profiles are used as front supports. round section. Pipe posts are driven into the ground and filled with concrete. Two beams are already attached to them. The floor is made of brick and plywood. A couple of bricks are laid, and a sheet of fiberboard or plywood is laid on top. Boards are nailed to the posts nailed to the walls of the house and attached to the pipes. The dies are attached in steps of 2-5 cm (depending on the size of the boards).

Large extension
Using the same principle as the design above, you can make a large storage for firewood. They make it using exactly the same technology, the only difference is in size. The width of the woodshed is made from 2 to 8 meters (depending on the size of the house). To ensure that the roof does not sag and it is convenient to store firewood, supports are installed every 90-100 cm. You can make partitions slightly larger than the width of the logs so that each log is stored in a separate compartment.

If there is not very heavy rain and snow in the region, it is not necessary to build a foundation. It is enough to fill the bottom of the woodshed with sand and compact it. A wood floor or paving slabs are laid on top of the pillow.
Portable woodcutter
Such devices are relevant for houses with a fireplace or barbecue. You can buy a lot of varieties of such products in the store. Forged wood burners look very interesting. If you don’t know how to make a woodshed with your own hands, read the instructions described below.

Instructions for manufacturing a portable structure include the following steps:

This product will fit perfectly into a traditional interior with a fireplace.
Proper placement of a round woodpile
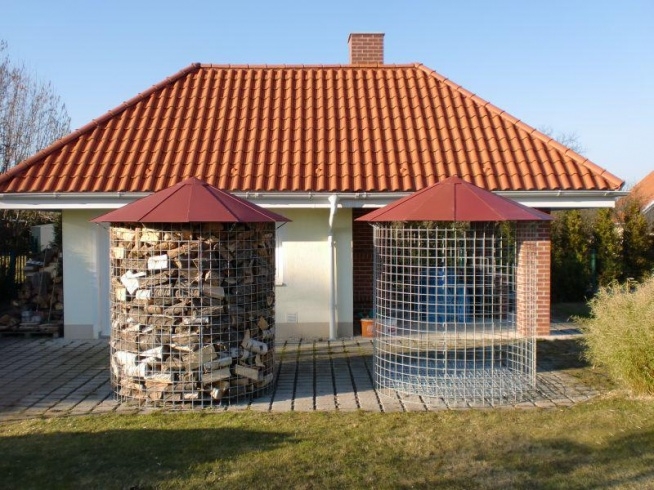
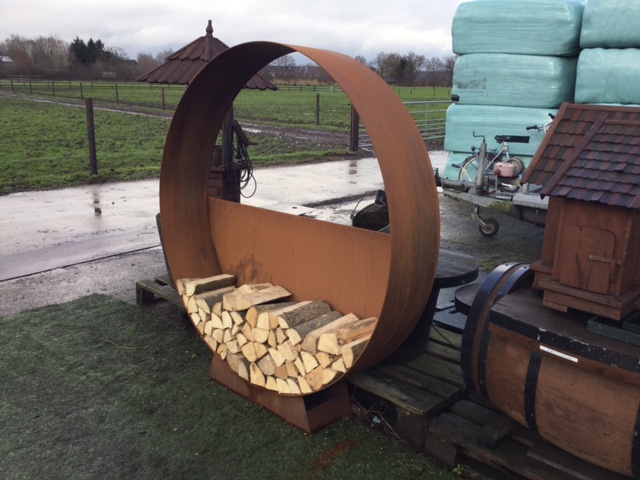
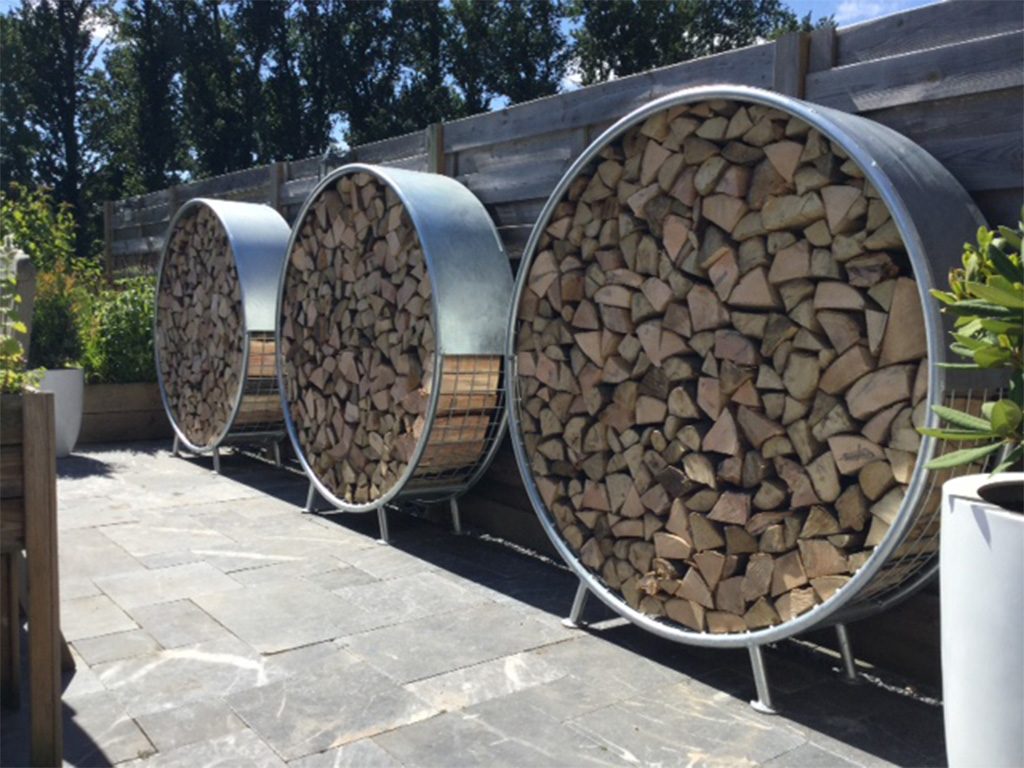
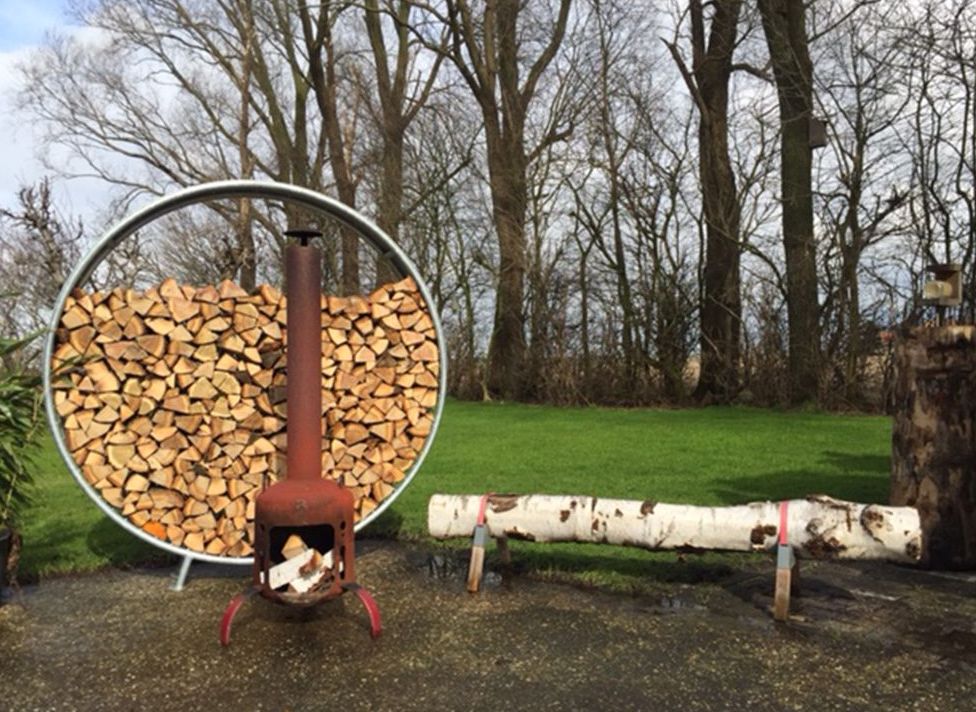
The woodpile does not have to be laid in a “well”. Very effective method For storage, round woodpiles are considered (an example is shown in the photo); with this arrangement, the wood is dried directly on the street. The firewood dries quickly in them, and such a structure looks unusual.

For a round woodpile, you need to dig a wooden pole about 200 cm in height into the ground. Logs or small logs are placed around it in a circle. The radius is made 2 times the length of the firewood. If the log has a length of 30 cm, then the diameter of the circle is made 60.
After this, you can stack the first row of firewood. The logs should rest on one end of the logs laid out in a circle, and the other should “look” at the pole. When laid in this way in the outer circle, gaps are formed between the firewood. There is nothing wrong with this, since the cracks will be closed by the second row.

The second row is folded parallel to the first, trying to close the gaps. At the same time, firewood is placed tightly around the pole parallel to the pole. And so, gradually laying rows around the perimeter of the circle, filling the center of the woodpile.
Advice! When the firewood around the circle begins to fall a little, you need to lay out a transverse ring of firewood to raise the logs in the circle.

Then the firewood is laid out until it almost covers the vertical logs in the center. At this moment, the second row in the center of the woodpile is already beginning to be stuck into the cracks between bottom row vertical firewood around the pole.
Pay attention! Try to lay the wood evenly and tightly along the entire length of the woodpile.
Using this technology, the woodpile is laid up to the top of the pole, as long as you can reach your hands. Usually 2-3 levels of firewood are formed. Around the first row of the woodpile, two more can be stacked, which allows you to store huge amount logs in one place.
A firewood shed is needed for storing pre-harvested logs and drying them. The drier the wood, the more heat it produces. Firewood is placed in it in neat rows so that they can be easily taken out without collapsing the entire stack. You can build a firewood shed for your dacha with your own hands from bricks, wood, metal or remnants of old building materials. A room for drying and storing firewood can be either ordinary and nondescript, or serve as a decoration for the site.
Types of woodsheds for a summer residence
There are several types of buildings for firewood in the country. A separate shed with a door is called a woodshed, a small stand or basket for the consumable part of the fuel supply is called a woodshed, and a shed for drying and storing firewood is called a woodshed.
The following requirements are imposed on the woodcutter:
- large capacity;
- maximum protection from precipitation;
- unhindered air circulation for quick drying of fuel.
Outbuildings are usually located in the depths of the site, away from prying eyes. But a self-built firewood shed can look like an exquisite decoration for a summer house. Sometimes firewood sheds act as an element of home design; they are used to decorate one of the walls or a relaxation corner.

Woodsheds are divided into:
- free-standing with a pitched roof;

- free-standing with a gable roof;

- extension to the wall of a building;

- woodshed built into the wall.

One of the mistakes when building a firewood shed for a summer house with your own hands is choosing the wrong location. You should not build it in the center of the site so that the structure does not obscure the plantings. You can’t install a woodshed in a low area so that the logs don’t start to rot. It is optimal to choose a small hill with infertile soil. You should make sure that there is a paved path leading to it.
Attaching a woodshed to a wooden wall of a dacha is very dangerous. First of all, it's against the rules. fire safety, secondly, the risk of infestation of the building with bugs that may be in the logs increases. If it is not possible to build a free-standing structure with your own hands, the wooden wall of the dacha should be covered with a metal sheet slightly larger than the dimensions of the canopy. And be sure to treat the walls of the house and woodshed with a special insect repellent solution.
Free-standing firewood sheds look like a shed with lattice walls. If necessary, cover open woodsheds in winter plywood sheets for protection from snow. They can only be installed at the bottom of the canopy. With the arrival of spring protective sheets removed so that the firewood dries faster.
Important! Firewood must not be placed on the floor or ground. This will allow them to become saturated with moisture and impede air circulation.
What are wood burners made of?
You can build woodsheds with your own hands from almost anything:
- beam;
- brick;
- leftover lumber;
- materials obtained from dismantling old buildings, etc.
As a last resort, you can build a woodshed “from what you had.” Review the supplies of lumber available at the dacha, and, based on this, build a shed with your own hands. Fast, cheap, but unreliable - there is no guarantee that the entire fuel supply will fit. Another economical option- woodshed made from wooden pallets.

An approximate list of materials and tools that will be required to build a woodshed at your dacha with your own hands:
- cinder block, pipes, pillars, concrete for the foundation;
- logs, beams for the frame;
- boards for wall cladding and roof construction;
- roofing material (galvanized sheets, corrugated sheets);
- nails, metal fasteners, corner;
- power tools, tape measure, hammer, axe, screwdriver, level, plumb line, hacksaw, saw.
Important! Roofing requires light but durable materials. Slate and tiles are too heavy; ondulin or roofing felt can sag on the sheathing with large cells.
If the dacha is built of brick and there is an overhang of the foundation that allows you to place a woodshed on it, you can use the roof of the building as a canopy, and build the walls and floor with your own hands from metal grating and leaf. This is the safest and most economical option: the foundation, back wall and roof already exist, materials are only needed for the side walls and floor.

More difficult option a wooden firewood shed attached to the wall can also be placed on the foundation of the building, and the roof can be slightly expanded with galvanized sheets.
Drovnik's drawings
Before starting work, you should determine how much fuel is supposed to be stored in the woodshed. If you come to the dacha from time to time, and you only need fuel to light the barbecue, then you won’t need a large firewood shed. If you plan to live at the dacha during the cold season, and firewood is needed not only for cooking barbecue, but also for heating the house, then you will have to build a spacious firewood pit in which the logs can dry well. You need to build such a structure not far from your home, so that in cold and bad weather you don’t have to go far for fuel.
Important! For heating in winter season dachas with an area of 100 sq. m. you need approximately 1.7 cubic meters of birch firewood or 2 cubic meters of pine. It is necessary to create a supply of fuel for at least two seasons so that the wood has time to dry well.
Drawing of an open woodshed, which is easy to make with your own hands:
Approximate diagram columnar foundation, a method for installing and securing poles with your own hands:
If the logs in the woodshed are stacked several rows deep, it is more appropriate to divide the volume into parts. Then damp, recently delivered firewood will not mix with already dried firewood.
Drawing of a woodshed with a pitched roof:
Important! For ease of use, the roof of the firewood shed is raised to a level of 2 m or higher.
How to make a woodshed for storing firewood
The woodshed requires a reliable foundation. As a last resort, you can get by with columns dug into the ground to a depth exceeding the freezing level. It is optimal to use ready-made concrete tables with dimensions of 200x200x400 mm. If there is frequent wind in the region strong winds, anchor bolts are embedded in the foundation pillars to secure the firewood frame. It is not enough to just dig the posts; they need to be concreted or reinforced with sand and crushed stone, covered in layers and compacted well.
Sometimes the floor in the woodshed is made of lattice or large gaps are intentionally left in it. This is not the smartest solution. Wood debris and dust that spills into the cracks will quickly rot, creating favorable conditions for reproduction harmful insects. Not only firewood can be damaged, but the dacha itself and the entire garden plot. Another danger of a cracked floor is that in warm weather, rotting debris may ferment. Not only are alcohol vapors explosive, they are also harmful to health.
Important! Monolithic foundation for a woodshed is difficult to manufacture, but will save you from many problems: there is no need to lay the floor and take care of the debris underneath it. In addition, concrete accumulates heat and then releases it for a long time, that is, the firewood will dry out much faster.

Experts have not come to a consensus regarding the location of the planks, the angle of inclination, and the distance between them. The horizontal lathing strengthens the frame, but splashes bounce off it when it rains, which is not good for fuel. The horizontal lattice does not have this disadvantage, but it does not support the frame. The best option- a diagonal lattice, but it will require high-quality material.

They claim that using planks mounted in a certain way can speed up the process of drying firewood in the country, but there is no evidence of this. The best option is to completely sew up the top and cover the bottom third with a lattice. In this case upper part will reliably protect from precipitation, and the lower one will provide access to air.
Important! Wood felled in winter time or early spring, will dry out by the beginning of the heating season, and firewood collected in the summer will only be ready next year.

Free-standing woodshed
The simplest option is a canopy on four poles with the floor raised above the ground. It’s easy to make it yourself from leftover materials, but large number fuel may not fit. A spacious separate firewood shed will require the development of a plan and the construction of a foundation on at least six columns.

Important! The distance between a residential building and a separate firewood shed cannot be less than 4 m.
Most often, wood sheds in the country are built from wooden beam and boards. The optimal flooring option for a woodshed is: tongue-and-groove boards (from 40 mm), laid on logs (150x75 mm) in increments of up to 450 mm. The floor must withstand loads of approximately 1000 kgf/sq.m. m. The gap between the base and the ground level is under no circumstances covered with a plinth, so that there is access for removing fire hazardous debris and air can circulate freely.
Drovnik open type built with lattice walls. If the region has snowy winters, then the slats are filled at a slight angle to prevent precipitation from getting inside. If the dacha is not available required quantity identical planks or boards (from 30 mm), you can use any relatively thin lumber, placing them in any order: vertically, horizontally, at an angle. The main thing is to leave as many gaps as possible. The sizes of the cracks vary from 5 cm and more. Lumber is nailed (preferably with corrugated nails) or secured with self-tapping screws.

Important! Gaps in the sheathing that are too wide will give thieves access to the firewood supply.
The lower crown is made of timber (approximately 150x150 mm), for the side posts and the top trim the size is 100x200 mm. The recommended roof angle is 15-20°. Often, when constructing a roof, rafter beams are not used. Instead, a sheathing is installed in two tiers in increments of up to 45 cm. Longitudinal (along the long side) and cross beams can be installed in two ways:
- longitudinal on top (good ventilation, suitable for regions with little rainfall);
- transverse on top (for places with high rainfall, snowy winters and strong winds).
For regions with harsh climatic conditions It is recommended to install a shed with a gable roof at the dacha. It will better protect the fuel from precipitation. But there is a nuance: the pediment needs to be made lattice like the walls, or small holes will have to be left for ventilation.

Important! The sheathing of the walls of a gable woodshed should be straight (horizontal or vertical), cross or diagonal. Sheathing of the “blinds” type is not suitable for this design.
Woodshed adjacent to the wall
It is much easier to build a canopy adjacent to the wall of a summer house with your own hands than a free-standing structure. It is ideal for regions with warm winters with little snow, where there is no need to store large amounts of fuel. The disadvantages of an attached firewood shed include:
- high level of fire danger;
- the risk of infection of the dacha with bark beetles, mites, and fungus.
Problems may also arise with the foundation of the building. It’s good if the dacha was built taking into account the future extension and the foundation for it has already been laid. It is almost impossible to connect an existing foundation and the base of a woodshed with your own hands without damaging the structure.

The slope of the roof of an attached firewood shed should be directed away from the house. Then the heat from the residential building will speed up the drying of the logs. At the same time, the front wall cannot be made closed, since moist air collects under the overhang of the roof, which will prevent the firewood from drying. The roof deck should be as light as possible so as not to overload the structure. Galvanized or corrugated sheets are suitable.

Important! To reliably protect fuel from precipitation, the roof overhang should be at least 35 cm.
Covering the side walls with inclined slats (“blinds”) will protect the firewood from moisture, but will make it difficult for air to penetrate, that is, it will slow down drying. If such protection from frequent precipitation is necessary, the “blinds” slats should be spaced at large intervals or mounted in a woodshed forced ventilation. Budget option sheathing – poles or slabs with the “back” facing outwards. This is a cheap, but very fragile material, which is also quite difficult to secure.

Important! Treatment against bugs and fungus will not hurt a stone or brick cottage. Insects manage to “seep” into the smallest cracks, and fungal spores are able to penetrate even through the seams of brickwork.
Photos of woodsheds for a summer residence with your own hands
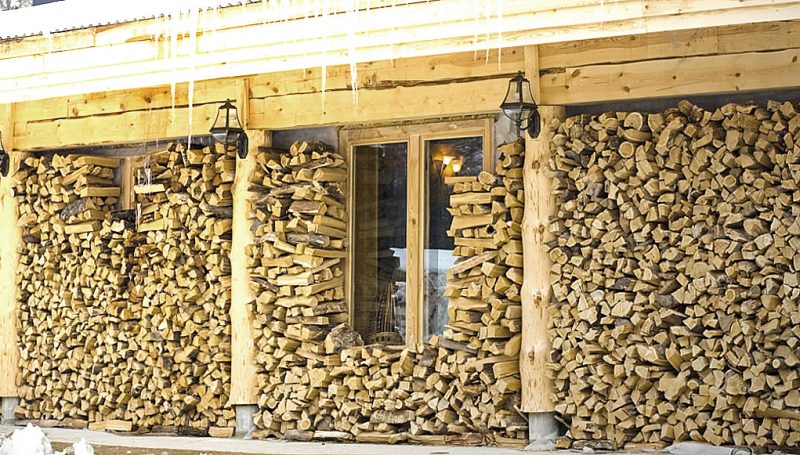
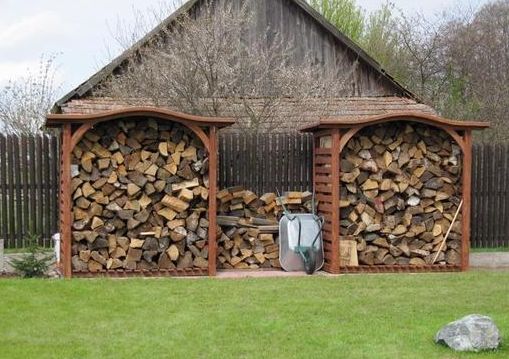
Dacha in rustic style will only benefit from a unique design solution - a whole wall of logs.
Almost all owners country houses keep supplies of firewood on their plots. They can be stored in different ways. Most often, woodsheds are created - special structures for storing natural fuel.
Free-standing firewood sheds with a pitched roof:


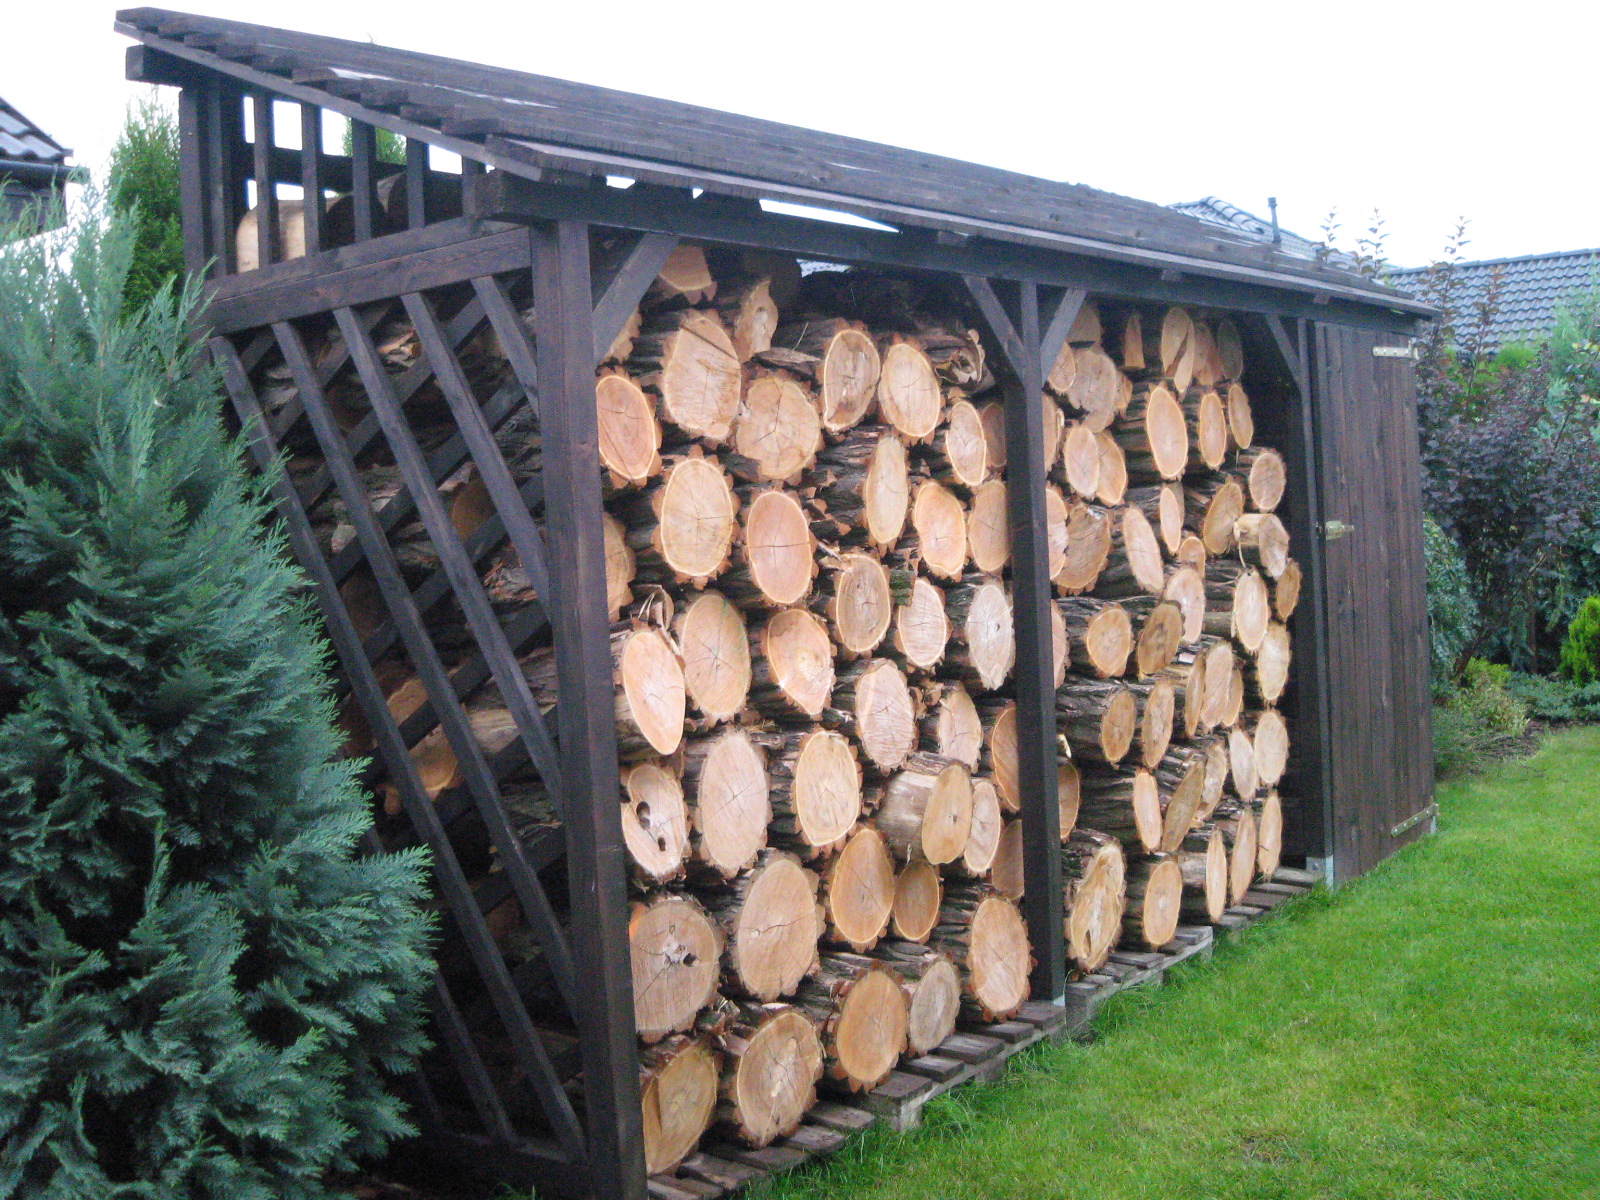
With a gable roof:


Photos of various firewood burners integrated into the wall:


What are they made of?
A wooden firewood rack for a summer house or private home will require the following arsenal of materials:
- 6 cinder blocks. Necessary for the foundation.
- Logs or beams. The goal is the floor frame.
- Boards. The goal is to finish the floor.
- Beam for the frame.
- Boards to hold this frame.
- Boards for rafter elements roofs.
- End boards. The goal is the visor.
- Roof.
- Boards for the roof itself.
- Sets of nails.
- Metal corners.
- Self-tapping screws.
The most common material for creating woodshed walls and floors is wood. The best materials for its roof are: polycarbonate, slate or corrugated sheeting.


If the woodshed is closed, the firewood needs good ventilation.


On the list the right tools appears:
- electric drill;
- shovel;
- screwdriver;
- plumb line;
- axe;
- roulette;
- hacksaw;
- screwdriver;
- square
Types of wood burners
The parameters of the woodshed and its appearance are determined by the amount of firewood intended for use throughout the season. The most simple version for DIY assembly - this canopy with floor and three walls. The floor here is slightly raised above the ground. This design is positioned separately on the site or attached to a utility block, bathhouse or house.


This type of firewood can be made strong and reliable with your own hands by using strong logs. Its roof is created without complex techniques: the slate rests on the floor beams.
The roof can be made more complex if desired. For example, do it with two slopes.
Options for simple but convenient canopies:


A more complex but effective polycarbonate option:

Options decorative solution gable roof free-standing woodshed:


Free-standing firewood racks with internal decorative elements; they are simply inserted when stacking firewood:

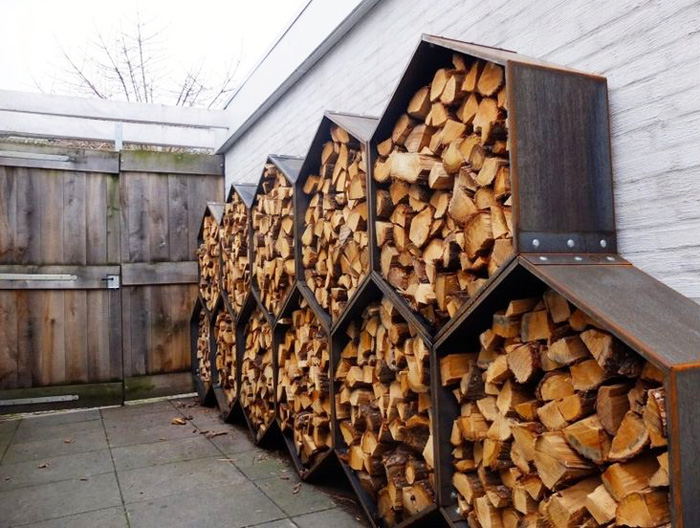
A design with a twist - convex side walls.

Miniature wood burners can easily replace a bedside table, stand, stool, bench, or wall decor element.


Options for beautiful firewood laying:


A place for firewood, if the supply is small, can also be provided in original places:


Lumberjack “string bag”:

Non-standard wood options:


Small woodsheds. Pros: portability and ease of manufacture.


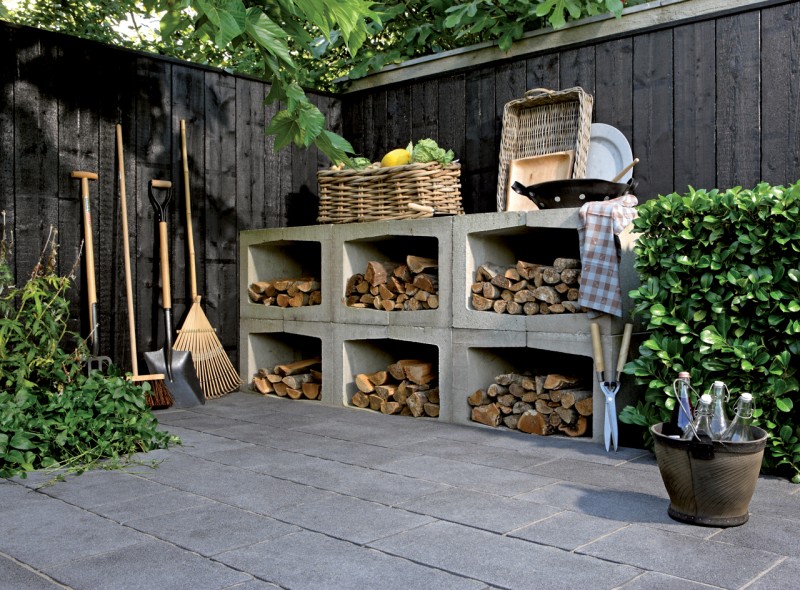
From concrete trays:

The nuances of creating different options
Bathhouse with woodshed under one roof
According to the templates, a bathhouse with a woodshed is created on a single foundation. A small extension is being built. All required communications are provided. Such a block can already be included in the bathhouse construction project. It will become another room for her. In this situation, the following criteria are imposed on the bathhouse:
- Availability separate entrances and exits for this extension. This is how the safety of bathhouse guests develops.
- There are different water supply lines to this block, the toilet and the steam room.
- An additional heating system is being installed.
- The roof for the woodshed and the bathhouse is shared. This way its effectiveness will be maximized.
- Regular fire safety analysis.

The optimal solution is to use a ready-made personal or sample project. It can be built independently or with the assistance of specialists.


Separate wood shed
To erect this species, you need a slight elevation and a dry, shaded place. Firewood should not lose its qualities. They must be well ventilated and protected from ultraviolet radiation.
Construction work begins with the creation of a frame. If a template drawing is used for the work, then you can get a structure where firewood, various utensils and other things will be stored.
Here's how to do it right:
- Digging pillars. Suitable pole versions: wood or metal. They are covered with rubble. It is permissible to fill them with concrete. They are thoroughly compacted.
- The floor is at least 10 cm above ground level. On the bricks there are lag and roofing felt positions.
- The boards are installed with nails.
- The finished frame is being covered. Boards are used. Gaps remain between them. This way the firewood receives the necessary ventilation. Method of nailing boards: checkerboard layout or parallel to each other.
- The roof has one slope. Its edge protrudes at least 30 cm. This way the firewood receives protection from precipitation.
During the work, the wood must be processed special drugs, protecting it from mold, insects, fungi and the influence of moisture. The braided version has an excellent appearance.

Option against the wall or utility block with woodshed. It is attached to a building or utility unit. And the wall here becomes insulation. This is the main advantage of this option. Its disadvantage is that water flows down the walls and drips from the roof. Therefore, it is necessary to provide for the protection of firewood from various waters. 


First of all, there is a competent choice of location. If you concentrate the woodshed at the southern wall, the firewood will be strongly influenced by straight sun rays. The firewood will burn faster and become loose. For this reason, the best position is near the north wall. This way the firewood will still be provided with good ventilation.
How we work
The production of a firewood shed here is identical to the stages of construction of a separate version. If you have the necessary materials (slate, boards, etc.), the firewood parameters are determined based on the material parameters. The stacking of firewood in it is carried out in such a way that the wood is dried naturally, and the logs stacked in rows fix each other.
There is a misconception that the presence of a floor in a woodshed is not necessary. In its absence, there will be no natural air flow, moisture will accumulate below, and the lower layers of firewood will become damp. Having created a high-quality floor once, it can be replaced after 15 years. And the firewood is always guaranteed to be dry. 
Frame firewood for a bathhouse. This is the most functional option. It is lightweight and provides high-quality air current. Such a building is well ventilated, keeping it cool inside, ensuring a quick release of moisture accumulating there. But wood does not lose its qualities.

The following configuration is acceptable here: the woodshed is not completely finished, and the cladding of one or two walls is obtained from wooden lattice. Outwardly, it will look like a gazebo, and often this option is suitable for a wood burner for an (outdoor) fireplace.


If you often visit your dacha in winter, then you need to create a defense for the firewood in the form of wooden shutters.
Often in order to save money wooden frames covered with metal. In reality this is impractical. Because of metal sheets Proper ventilation is not achieved and a greenhouse effect is formed. Therefore, it is better not to skimp here and build the entire firewood shed from wood.
Two walls can be left open. Be sure to provide ventilation slots in the board finishing.
Design options for free-standing firewood sheds that support the style of the house and site. Beautiful woodsheds:
With partial painting of surfaces.

Entourage - black color. Although the design itself is extremely simple.


Stages of work:
- Digging beams into the ground. They are required for the frame. They are poured with concrete and compacted powerfully.
- The frame is carefully treated with a moisture protection agent.
- Rafters are created from boards. They are also treated with a protective agent.
- To obtain a high-quality functional roof, apply a layer of roofing felt. Place the slate overlapping it. The slate should extend 20 cm beyond the edges of the walls.
Instead of slate or in combination with it, you can use ondulin. For their installation, nails with wide heads are used.
The floor is made according to the following principle: bricks, roofing felt and logs are placed at a certain distance from each other. A good floor is made from boards placed tightly together.
To develop the rigidity of the building, braces are created along the side walls.
There is a small nuance here - the accumulation of water on the roof of the woodshed after rains, its flow down. It is necessary to make an allotment for her. Great option here is a drainage ditch.
This woodshed can be given the same tones as other buildings on the site, and can be varnished without changing the color of the wood.


Forged
A forged firewood can be made very worthy in terms of aesthetics. To develop its attractiveness, you can use paints and varnishes, garden decorative elements, for example, lighting or different figures.

This is a portable modification. She is quite elegant. It is used to move a small amount of firewood to the combustion source. Forged versions are usually made of metal. Meet and wooden products. Such products can be purchased at special retail outlets. You can make a personal order taking into account your tastes and wishes.
The main requirements for the forged version are:
- Ease.
- Harmonious fit into the design.
- Ease of moving firewood.
Other metal options
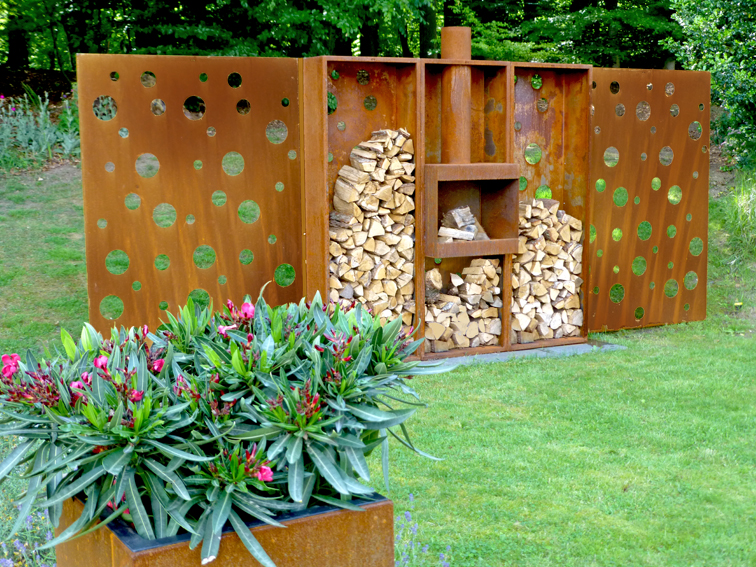
Woodsheds combined with barbecue:


Round firewood boxes: 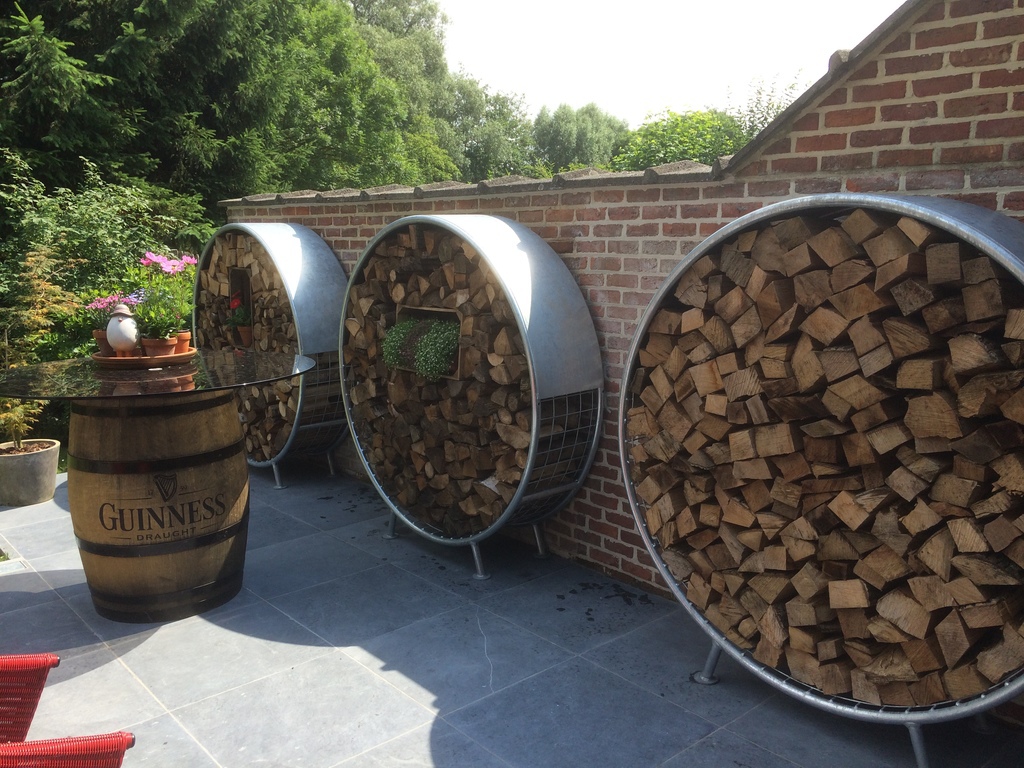


An alternative or just beautiful woodsheds on a summer cottage
If you do not have the time to build a firewood shed yourself or you simply do not have the desire to do this work, you can use alternative options: designs of a different profile. They are excellent for storing wood supplies.
The most popular alternatives are:
- Structures from warehouses used to move various goods - pallets. Usually they are folded into a cube and attached to each other. And the top is covered with roofing felt or film.


- Unused rabbitry. The grids and doors that form its front side are removed from it. And after this you get a good woodshed for storing firewood.

- Firewood rack:
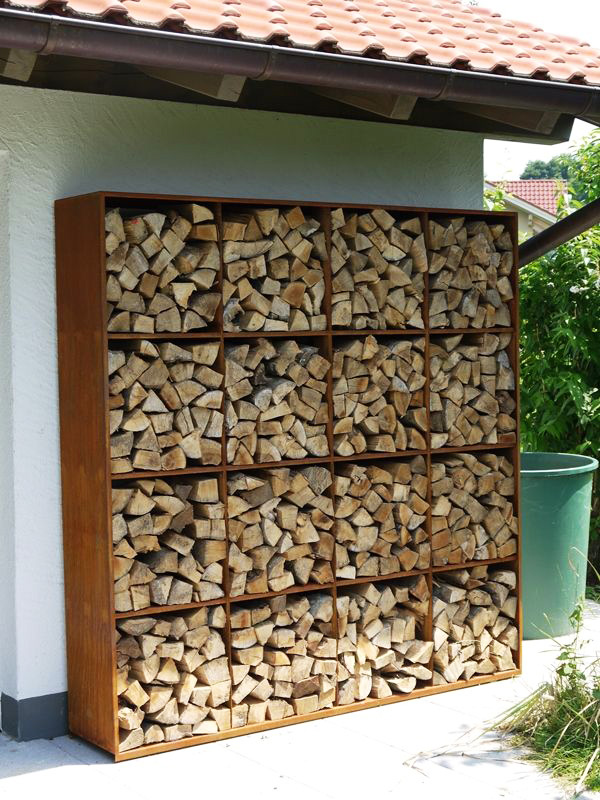
This option is reminiscent of the famous Kallax shelving unit from Ikea.

Pricing issues
The most sensitive issues here, as in other construction, are price issues. Costs are determined by the type and size of the planned woodshed. The following is a summary of the types of firewood sheds and the costs of erecting them.
- Woodshed with a bathhouse under a single roof. IN different regions Costs may differ significantly across countries. They are also influenced by the types and sizes of materials used, as well as the dimensions and configuration of the planned building. The average price parameters are as follows:
- 18-20 sq.m. (bathhouse and woodshed are taken into account), material - unprocessed log, expenses: 500,000 - 600,000 rubles,
- material: foam block, gas block or brick, expenses: 900,000 – 1,000,000 rubles.
- material – laminated veneer lumber, expenses: 1,100,000 – 1,200,000 rubles.
- profiled timber, costs: 400,000 – 500,000 rubles,
- simple timber, 300,000 – 400,000 rubles.
- Forged modifications. Today their range is quite decent. The price range of these products: 4,500 – 17,500 rubles. These are average values.
- Frame versions. Here, too, a lot depends on the ideas of the owners. The creation of such structures usually costs from 8,000 to 24,000 rubles.
Results
Thus, the woodshed is a rather useful design. Building it yourself is not that difficult. Can be purchased ready-made designs or use designs of a different profile, for example, adapt them to a woodshed, as in the photo below.

Instructions for self-production on video
Enough quality material for making a beautiful and not too complicated firewood log. And after searching for roof options, you can make your own original model based on the above design.