DIY bathroom renovation: video. Where to start renovating a bathroom - competent organization of repair work Bathroom renovation for dummies
One of the most difficult stages that includes cosmetic renovation of an apartment is the renovation of the bathroom and toilet, which is associated with the characteristics of the room and the work itself - for example, you need to carefully select materials for finishing the walls and floor, since everything that is used for renovation must be absolutely waterproof. The difficulty is caused by the dismantling of old coatings and equipment. In a new building with a bathroom area of several m2, it is much easier to renovate apartments.
Before you start trying to make the perfect one yourself budget renovation bathroom and toilet, you need to analyze this process in all details, take into account all the nuances of installing materials and equipment.
To renovate a bathroom or apartment bathroom correctly, it is advisable to strictly follow the recommended sequence of bathroom renovations. Then possible errors it will be easy to fix, and the amount of effort and time required will be optimal.
Economy class repairs include the following stages of work:
- drawing up a project - calculating quantities, choosing plumbing equipment, developing interior design, choosing color scheme. Here you need to carefully sort through and weigh all the examples and ideas for bathroom renovations so that the fresh cosmetic renovation of the bathroom does not get boring too quickly;
- complex of preparatory work;
- assessment of the quality of the floor and its repair: heat and waterproofing, screed design;
- laying water supply pipes and heating circuits;
- laying electrical wires;
- rough finishing of surfaces with plaster;
- insulation and fine finishing ceiling;
- styling finishing coating gender;
- bathroom wall cladding;
- new ventilation equipment is being installed;
- New plumbing equipment is being installed.
A number of important nuances works:
- it is impossible to equip cavities between the main and decorative surfaces- it will definitely develop there dangerous fungus. Therefore, you cannot decorate the walls with plastic or waterproof plasterboard;
- high humidity causes a high risk of injury electric shock, therefore, building codes state: sockets and switches cannot be installed here. However, there are ways to get around this limitation;
- It is not recommended to renovate a bathroom using corrosive, rotting and hygroscopic materials;
- if the apartment area is small and the bathroom is only a couple of m2, it makes sense to replace the bulky bathtub with a compact shower, and also combine the bathroom.
Design and selection of plumbing fixtures
Before making renovations in the bathroom, you need to draw up a detailed project, including all dimensions and estimates for materials and equipment. You should start with design development - this is especially important when the renovation is not done in the old panel house, but in a new building. The premises in them are usually atypical, the finishing needs to be done from scratch, there is usually nothing to start from.

Bathroom design
You need to choose the right equipment. Thus, a modern washbasin can simplify the process of laying pipes, but the walls will have to be finished with high-quality smooth tiles, since splashes and dirt will quickly spoil the relief material. A good faucet can also make the plumbing installation process less of a chore.
There are many nuances, and variations in their implementation lead to the fact that cosmetic renovation of economy class apartments may require more money than work on a grand scale in the same apartment in the same entrance. So calculating everything correctly is perhaps the most important task.

Selection of plumbing
When choosing plumbing, you need to remember that it is inadmissible to use built-in faucets in panel houses - it is prohibited to make wall niches there.
Pipeline
The range of pipes is wide - there are expensive options and economy class models. When redecorating a bathroom with your own hands from scratch, it is best to choose polypropylene pipes. They are best suited for their operational characteristics, are easier and more reliable to install, do not leak, and can be easily built into walls.

Bathroom piping diagram
A thrifty person will decide that it is better to use a cheaper one in a new building. modern material– steel. But steel pipes require complex work, they quickly deteriorate even on the outside when coated with paint; their efficiency becomes questionable when installed in such a small room.
To lay a water supply, you will have to drill into the walls, so you should remember that the internal diameter is indicated on the pipes, and you need to measure the outer one yourself and select the appropriate tool.
Connections and shut-off valves
When connecting sections of pipes in a bathroom in a panel house, you should only use plastic fittings. Metal is used only when connecting a polypropylene pipeline to water consumers - faucets, water heaters. Plastic fittings will allow you to hide the components without fear that it will leak.
The fittings used are plastic, all mechanisms are securely sealed into the polymer water supply. The reinforcement is connected to the metal using a carved pipe with thick walls. All this will ensure maximum durability of the water supply system.

Required fittings
Surface finishing
Traditional choice - ceramic tiles, and there is no need to consider other options for bathroom renovation. Using tiles you can create a bathroom not only in sterile white color, but in almost any color. color scheme. In any case, this applies to the walls, but the ceiling can be finished with plastic.
As for the floor, it is better to choose high-quality porcelain tiles yourself, which are less smooth than tiles. It is more expensive, but due to the small amount of m2 the difference will be insignificant. The bathroom floor is almost constantly wet, and the low slip coefficient of the floor finish could one day save your life.

Ceramic tiles are most often used to decorate a bathroom.
Before purchasing, you need to check the quality of the material, for which several tiles from the batch should be carefully examined, compared, and evaluated.
Not only the aesthetic side of the room, but also the hygiene of the surfaces depends on the quality of the tiles. Should only be used perfect material, because even a small flaw or unevenness will become a hotbed for the spread of fungus and infections.
Materials for work must be stocked in quantities corresponding to the area to be finished in m2 plus a few percent for cutting and trimming. Bathroom finishing in wooden house carried out in the same way.
Tile adhesive
Everything is simple here - you shouldn’t choose cheap economy class glue for walls, it’s better to rely on reputation famous manufacturers. To decorate the walls of a bathroom and toilet in a new building, it is worth using slow-hardening glue so as not to rush and have time to eliminate defects. The adhesive consumption for walls will be 3-4 kg/m2.
The process of laying tiles will require the following tools:
- fine-toothed trowel;
- tile cutter;
- plastic crosses;
- grout smoother;
- rag.

Basic tools for laying tiles
Preparing a bathroom or toilet for renovation
Where to start renovating a white bathroom once the design has been completed and the materials have been selected? The first thing you need to do is prepare the bathroom - remove everything old and unnecessary and bring the surfaces of the walls and floors to a condition suitable for repair.
If the cosmetic renovation of apartments is not being done in a new building, you need to decide what to do with the old plumbing. good cast iron bath You can leave it with a little restoration with paint. Tin can be updated acrylic liner, if it is not completely spoiled. If you want to do a complete redevelopment by combining a bathroom and installing a shower, old bath is thrown away.
After this, the water supply is shut off, the pipe with cold water is disconnected, a temporary pipeline is installed to the kitchen and toilet, at least from rubber hose. Then all the furniture and appliances are removed from the premises, and the electricity is turned off at the switchboard.

Old coatings are removed
All surfaces are cleaned of old coating, starting from the ceiling. To do this, use a hammer drill to remove everything to the base. You need to protect yourself from dust with a respirator and mask. In a panel house you can sometimes find GVL insulation under the tiles. When renovating a bathroom, it needs to be completely removed because the sheathing is probably rotten through. You can find worse things, even black mold. You should get smooth, clean walls, the horizontalness of which must be checked with a level.
Stages of floor work
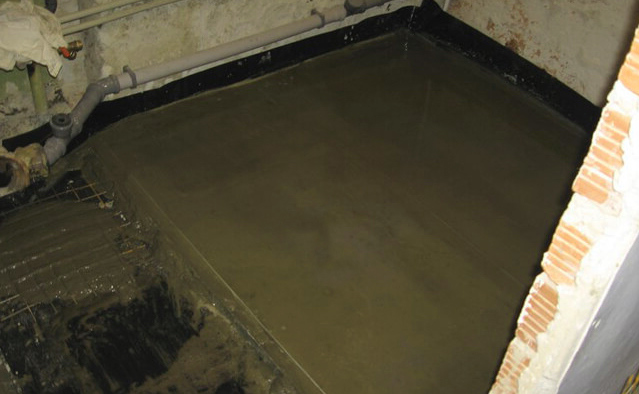
The process of preparing all m2 floors is similar, only the screed can be left alone if it is of high quality. You just need to sand it with a grinder to get rid of any remaining tile adhesive. After this, the floor is washed, the screed is repaired and, if necessary, a fine layer of self-leveling mixture is used.

Screed in the bathroom
In a panel house, leveling with a self-leveling floor is ideal option, since in this case you will get a budget renovation in the bathroom. Building codes state that the total thickness of the screed should be at least 3 cm. But before leveling, you need to isolate the floor from water.

Self-leveling floor
Humidity protection
Economy class polyethylene is not recommended for waterproofing a bathroom in a new building - the reliability of such protection will be insufficient. Only special material is suitable for especially wet areas, for example, modern polyester. The joints of the material are fused with a hairdryer. The film must be laid overlapping, with an overlap on the walls and with folds in the corners. In this case, the insulation can withstand 4 tons of water for every 10 m2 of area.

Bathroom waterproofing - important stage on the way to comfort
Material selection
Finishing the floor should be done last. To do this, you can choose any material, since almost each of them is suitable for finishing the floor:
- linoleum - this choice, although not very presentable, is quite economical. But in this case it is worth purchasing quality linoleum with improved characteristics;
- laminate - the material must be moisture resistant and high quality. By saving on material, you can replace the fact that after a short period of time it will begin to swell;
- tiles are the most best choice for those who are planning to renovate their bathroom. The tiles are laid on the floor independently, end-to-end, without seams. Each tile must be tapped after installation. rubber mallet so that there are no cavities left;
- parquet - this material for the bathroom will become a real exclusive. But the choice will be completely justified, because parquet is a warm, durable and, most importantly, environmentally friendly material, although it will require careful maintenance;
- cork – by choosing a moisture-resistant material option, you will get a soft, environmentally friendly and easy-to-clean floor;
- self-leveling floor – this new product will fit perfectly into any bathroom renovation options. In addition, absolutely any 3D pattern can be applied to such a floor.

Linoleum on the floor

Self-leveling floor


Floor tiles

Cork covering

Light laminate flooring
Conducting communications
Pipes sticking out everywhere greatly spoil the aesthetics of apartments, and making grooves for them in the walls is too difficult and dirty a task. In a new building, it is often impossible to violate the integrity of the walls at all. How to hide the water supply? Eat different ways do it.
The best solution is to run all the pipes (hot, cold and sewer) in a bundle around the perimeter of the bathroom and cover it with galvanized slopes. Using silicone, the slopes are hermetically decorated plastic panels. If the pipes need to be serviced (unlikely if polypropylene is used), the slope can be quickly cut off and then glued back. In a standard bathroom, no more than a meter of such elements will be needed, the rest will be hidden behind the plumbing and furniture - any thrifty owner will be happy with this option.

Conducting communications
The grooves will have to be punched only under vertical pipes for mixers. Important: the process of replacing communications should begin with the sewer system. The wiring is hidden in the corrugation. Plastic will do, although if desired, you can also use metal and cover it with paint. The heating pipes in the bathroom are replaced with metal-plastic ones, which can be bent at any desired angle, so they are ideal for assembling a heated towel rail.
Ceiling
First of all, the ceiling is insulated to prevent the formation of condensation. Most suitable material for finishing - plastic panels in any color. They are warm, moisture-resistant, and durable. Stages of laying the material:
- panels are mounted with stickers or silicone;
- A thin strip of glue is also applied to the ridge of each board;
- the two outer boards need to be laid together, folded at an angle, after which they snap into place and snap into place;
- Before the glue hardens, each panel must be supported with wooden slats.

Plastic panels on the ceiling in the bathroom
Walls
Crosses must be inserted between the tiles on the surface of all m2 of the bathroom walls to maintain same size seams. In the places where the pipes will be brought out, you need to pre-drill holes of the required diameter. The corners need to be filled with silicone sealant.
You need to choose a special tile adhesive that is resistant to moisture. It is applied in an even layer of small thickness using a notched trowel. You should not use a tool with large teeth - in this case, the grooves will be too wide, and the cavities in the thickness of the glue will not allow the tile to hold securely. After placing each element, you need to check its evenness with a level. If the tile protrudes too much above the neighboring ones, it will either have to be knocked down rubber mallet, or remove and remove excess glue. If the tile sags, glue needs to be added.

Installing tiles on bathroom walls
To make the seams even, you can use a leveling system - devices consisting of clamps that allow you to maintain a constant width of the joints. In a small area and in the absence of masonry experience, the use of such a system is completely justified.
The tiles are rubbed with diagonal movements, excess material After drying, remove with a clean rag.
Plumbing and ventilation
The technology for installing equipment in a new building is quite simple. The main thing is to connect all the pipes correctly. This completes the sequence of renovating a bathroom in white.
When installing a bathtub, the first thing to do is connect the drain siphon, for which it is recommended to use corrugated hose. Its tightness should be checked by passing 20-30 liters of water through it, wrapping the hose with a dry rag. After this, the bath is grounded.

The washbasin is either hung on the wall, mounted in a cabinet, or placed on a pedestal, depending on the existing drainage system. If the bathroom is combined, you also need to install a toilet. This can usually be done in one specific place - where there is a sewer outlet. The toilet is again selected in accordance with the type of exit - it can be wall-mounted, floor-mounted or corner-mounted. It is advisable to hide the highway so as not to spoil the appearance of the room by carrying out construction work for this.
Every few years, every person strives to renovate their home; the renovation affects all rooms in the house, as does the bathroom. There is a bathroom in every apartment and almost every house, and like any room, sometimes it requires renovation. So, you can do the renovation of a bathtub in your home yourself, and we’ll talk about it later.
as low as possible and therefore for some shower cabins you will have to make a podium.
To prevent the pipes from spoiling the aesthetic appearance of the bathroom, they should be camouflaged somehow. To do this, you may need to ditch the walls or build a box from plasterboard.
To equip sockets, switches and lamps, it is necessary to install the cable, having previously drawn up a diagram.
Ventilation shafts, as a rule, are not touched, but only the grille is changed so that it matches the future interior of the bathroom.
Finishing work and plumbing installation
Screed

Thermal insulation
To insulate the bathroom floor, it is best to use polystyrene foam or penoplex. But most often in modern renovations they use a heated floor system. Heated floor systems can be water, film, or electric. These systems can affect the microclimate in the bathroom.
 Wall decoration
Bathrooms are traditionally finished with tiles, but you can decorate the bathtub with a cheaper material, namely, use plastic panels to decorate the walls.
The walls in the bathroom can also be finished, because modern decorative plaster transports moist air.
 Ceiling repair
To finish the ceiling they use tension and slatted ceiling. The design of the ceiling should be similar to the design of the walls.
The ceiling can also be finished with plastic panels. You can create very interesting multi-level ceilings from plasterboard.
 Plumbing installation
After all the finishing work has been completed, you can begin installing the bathtub, connecting plumbing, and installing furniture.
Repairing a bathroom on your own is a complex matter and requires some specific skills, but it is still an interesting and educational task.
Of course, by using the services of professionals, you will make your task a little easier, but you will lose financially.
It's up to you to decide whether to do the repairs yourself or use the services of specialists.
We hope you found this article helpful. We wish you good luck and patience!
Sometimes people try to save money and do only selective cosmetic finishing in their living space. But this principle is not entirely acceptable for a bathroom or toilet. It is recommended here to avoid serious costs in the future. This is due to the functionality of the room and the concentration of main communications. It is about repairs from scratch that will be discussed in our article.
What is renovation from scratch?
When they talk about renovation from scratch, they mean all stages of work in the bathroom:

- replacement or connection of sewer and water pipes for cold and hot supply;
- installing electrics on walls and ceilings;
- finishing the walls from the base to the final coating;
- floor work from screed to finishing layer;
- ceiling finishing;
- plumbing installation;
- connecting faucets and household appliances;
- ventilation system;
- installation of an interior door;
- installation of bathroom furniture;
- filling the space with accessories.
Photos are enlarged, click!
Important! Regardless of the room in which the bathroom renovation is being done ( new apartment or secondary), from scratch - this means everything is updated down to the smallest detail. Such renovations require careful consideration at the design stage because costs can vary between completely identical bathrooms. It is during this period that it is necessary to decide on the design of the bathroom and understand what materials and components will be needed for the project.
- In new apartments, the developer only makes connections to the bathroom, and leaves the placement of engineering structures at the discretion of the residents.
- In apartments that have been renovated for more than five years, communications are usually not in the best condition, which requires their replacement to prevent breakdowns. If you do not replace it, it will be a waste and costly to eliminate the consequences in the future. For modern renovation in the bathroom from scratch is acceptable hidden installation communications so as not to spoil the aesthetic appearance of the room. Doing this with old pipes is risky. It is more economical to replace old communications with new ones, not forgetting about plumbing.
Sequence of work when repairing from scratch
Having imagined the scale of work when renovating a bathroom from scratch, you need to draw up an estimate. Without a detailed analysis of the space and drawings on paper, it is difficult to make a list necessary materials. If you are far from design-minded and have no experience finishing works, trust the specialists to renovate your bathroom from scratch. Believe me, this option will be cheaper than redoing it after an incompetent master.
When choosing a team, find out the prices of different companies and choose the best option for your budget. Typically, the range of services includes plumbing and electrician work. At self-repair you will have to invite them to connect water, sewerage and electricity.
Important! The timing of a bathroom renovation depends on the condition of the room. If a new floor screed is required, the time frame is long so that the solution has time to dry. It also takes time to dry the walls if the leveling is done with beacon plaster. But to achieve ideal evenness of surfaces is to obtain beautiful walls, floor without level differences.
When a bathroom is being renovated from scratch, there is the possibility of redevelopment:
- combine toilet and bathroom;
- move the door;
- change the geometry of the room to a more functional one;
- install a heated floor;
- add a heating element;
- replace bulky plumbing fixtures with compact version if the space is small.
Important! The choice of materials must be made in advance, because many are delivered only to order and the lead time can be long. The designer's advice will help you avoid such expectations by offering analogues.
If the renovation is done from scratch, then the choice of style depends on the wishes and tastes of the owner. Here important criterion is the size of the bathroom. Not all styles are suitable small rooms, but for spacious ones there are a lot of ideas. For any style it is possible to choose both expensive finishing and budget materials good quality. And this is an important question when deciding to renovate a bathroom from scratch.
If you are about to make major changes in your bathroom, then you should be patient for a certain period. The period depends on the type of work and the experience of the team or home craftsman.
Let's look at the photo:
Video material:
Watch a video of finishing a bathroom from scratch.
One day, in every home, the time finally comes when it is simply impossible to put off renovating the bathroom with your own hands any longer, because the old tiles and wallpaper with which the walls are covered have lost their attractive appearance or, even worse, they have gradually begun to lag even from the surface, and all the pipes simply rusted to an impossible state.
More stronger desire making repairs becomes easier as more and more building materials appear on the shelves various materials, capable of quickly and at an affordable cost converting even small room to a Euro-class room that will be admired by all guests of the house.

If you are interested in instructions for renovating a bathroom, then the main point What you should understand from it is that the sequence of actions during repairs must be followed. Then even mistakes made can be eliminated without problems without wasting more time and effort.

Difficulties in self-repair
Many builders say that the most difficult stage of repair is considered to be all those actions that will need to be done due to the characteristics of the room.

For this reason, it is especially important to approach the choice of materials that will be used in the future for finishing the ceiling and walls, since all materials used must be waterproof.

Also difficult are the works associated with the dismantling of equipment and various coatings. It is much easier to renovate a bathroom and toilet in a new building, since the room is usually no more than a couple of square meters.

Before you start making repairs yourself, be sure to understand the entire process in detail, since it will be necessary to take into account all the details of installing equipment and materials during the work.
Nuances of bathroom renovation
Firstly, in order to avoid the formation of fungus, in no case should you create cavities between the decorative and main surfaces. For the same reason, it is prohibited to decorate any walls with plasterboard, which is waterproof and plastic.

Secondly, in accordance with existing building codes, it is not recommended to install switches and sockets during renovation.

There are options on how to get around this limitation, but you still shouldn’t forget about high rates humidity, causing a fairly high risk of electric shock.
Thirdly, when renovating a bathroom, it is better not to use materials that are susceptible to rotting or are hygroscopic or corrosive.

Fourthly, when the area of the room being renovated is quite small, it makes sense to install a modern shower stall instead of a large bathtub.

Ceramic tiles: nuances of use
Enough important issue Ceramic tiles are the choice for walls when you start renovating a bathroom in a Khrushchev-era building, since there are quite a few different criteria that need to be taken into account.

First of all, you should know that all tiles used today for finishing wall and floor surfaces are divided into different grades, which you can find out by carefully studying the packaging. The manufacturer is required to indicate it.

Taking into account international standards, today bright red is used to denote the highest grade, bright blue for the second grade and, accordingly, green for the third grade.

If we look in detail at the highest grade of tiles, we can see a 5% deviation from the norm, which is considered acceptable today.


When purchasing the second grade, you can see approximately 1⁄4 of the tile with defects. Therefore, if you decide to save money, do not be surprised later that in almost every tile in the batch there will be one or another deviation from the standard that was established. Of course, photos of a bathroom renovation in the future are unlikely to become a model for other apartment owners who decide to update their bathroom.

When purchasing tiles, be sure to take at least a small supply. Since defects during installation are almost inevitable, it is imperative a certain amount with full shade matching.
When choosing a floor covering, look for bathroom renovation ideas, you will probably be able to find some interesting options. One of the popular materials today is porcelain stoneware, as well as special tiles, intended exclusively for the floor. The materials are distinguished by good strength indicators, they have a slightly rough surface, which is especially important for the bathroom.

When purchasing several packs at once, do not forget to check the indicated batch number on each of the selected packages, and also check the size of the tile. If you notice that the difference is more than one millimeter, then it is better to take another package.

Buy all materials necessary for repairs with a reserve, since several percent of their total quantity will be written off for trimming and scrapping.

Doing a quick bathroom renovation yourself may not be as easy as it seems at first glance due to small size premises. However, if you make every effort, use quality materials and tools, everyone can cope with the task.

Bathroom renovation photo


In order to carry out high-quality and relatively quick bathroom renovations on our own and without involvement third party specialists, it is recommended to study the entire sequence of work in detail. However, drawing up a sequence and following it is only half the battle; for a novice builder it is necessary to obtain certain theoretical and practical knowledge that is necessary for working with finishing materials. In order to gain the necessary experience, you need to watch a video of a bathroom renovation, where experienced specialists will not only show, but also talk about the features of all finishing materials. To fully present the specifics of the processes, we decided not to make a photo report, since the picture will not convey all the subtleties of the process. Instead, we have selected several video lessons that will briefly describe all stages of the work in full.
Dismantling of plumbing and finishing materials
After drawing up the preliminary design and purchasing required quantity building material, you can safely begin dismantling the old plumbing and finishing that requires replacement during renovation. It is recommended to begin dismantling by removing the plumbing fixtures, as they will interfere with removal old cladding from the walls and floor of the room.
The work stage in this case will be structured as follows:
- We disconnect the drainage system from the plumbing elements and close this hole from dirt and construction debris;
- the water supply system is shut off and the washbasin and toilet are disconnected;
- the bathroom, toilet and sink, along with all the furniture, are removed from the room to free up space;
- all old water pipes cut down to the main shut-off valve;
- using a hammer drill, hammer or spatula, remove all the finishing down to the concrete base.
It is important that if the plumbing pipes cannot be replaced, they must be protected from damage when the trim is removed. You can see how to remove old tiles in the bathroom renovation video below.
Installation of new plumbing
At this stage of work, the preparation of channels in the walls under new plumbing and its styling.
Important to remember if you have no experience in laying plastic pipes, it is recommended to invite a competent specialist for this work. If you decide to do everything yourself, we suggest watching a video report on how to work with PVC pipes below.
If the pipes are hidden in the wall, then the sequence of work will look like this;
- using a hammer drill, pipe channels are laid in the wall according to the preliminary design;
- then the pipes themselves are laid with soldering at the connecting points;
- pipe for hot water pre-insulated to reduce heat loss;
- install additional elements in the form of filters, mixers, pressure gauges and water meters.
For visual aid You can watch a bathroom renovation video tutorial that describes the installation process.
Preparing walls and laying tiles
After the pipes are laid and brought to the consumer’s installation site, the stage of preparing the walls and laying the facing tiles begins.
It is important to remember that when buying ceramic tiles for cladding, you must first accurately calculate required quantity material and purchase it with a small reserve in case of damage or cuts.
Before laying tiles, it is necessary to prepare the surface of the wall and floor. For these purposes it is used plaster mixtures and putty, which are applied to the surface for leveling using a spatula and a rule. To level the floor in most cases it is used cement screed with preliminary waterproofing of corners and joints around the entire perimeter of the room. You can learn more about this stage by watching a video on bathroom renovations.
Installation of new plumbing elements
After ceramic tiles have been laid on the floor and walls and installed suspended ceiling, you can begin installing new plumbing elements in pre-designated locations. Installation should begin with the bathtub, since this is the largest element and requires large quantity places for correct installation.
After the bath, the toilet and washbasin are installed in place. Next, the mixers are installed, connected cistern and connecting all elements to the sewerage system using plastic pipes with a rigid or corrugated base. This process will be described in detail by the bathroom renovation lessons presented in the video.
The final stage of repair
At the final stage of the renovation, the final decoration of the room is carried out, which includes the installation of a mirror, installation of various shelves and additional hangers, installation of lamps, washing machine, placement of bath accessories and decorative elements.
By watching video lessons on bathroom renovation, you will gain the necessary theoretical knowledge and useful tips for repairs, which will help you avoid many mistakes and significantly speed up the work process.