Frottage drawing technique in kindergarten. Drawing using the frottage technique
How many interesting crafts you can make it with children on the eve of Maslenitsa and during Maslenitsa week! These, in addition to the traditional effigy for burning, are rag ritual dolls of several types, ruddy openwork pancakes, cheerful suns, “martiniches” and other crafts that carry joy from the imminent change cold winter for a gentle spring. Children's drawings depicting the holiday are also imbued with the same bright mood.
Conduct children's creative activities on the eve of Maslenitsa with us. For you - a wide selection of master classes on making crafts and organizing thematic art activities dedicated to the wonderful folklore holiday.
Wide Maslenitsa in children's creative expression.
Contained in sections:Showing publications 1-10 of 229.
All sections | Carnival. Drawings and crafts
Doll Carnival is a mandatory attribute of a cheerful folk festival - farewell to winter. Presence in the house of a pet doll Maslenitsa in the old days it was mandatory.Usually ritual doll Maslenitsa is made from straw, bast or bast, but you can also make it from fabric, thread...
 It’s still winter outside, snowstorms are blowing, sometimes slight frosts strike, but the dormant winter sun peeks through the gloomy clouds. Spring is coming! This pleases us no matter how. An exhibition of arts and crafts is taking place in Kirovgrad. Orthodox traditions Russia – Cheerful...
Carnival. Drawings and crafts - Master class on making crafts from a bottle and corrugated colored paper Maslenitsa doll’’
Publication "Master class on making crafts from a bottle and corrugated..."  Maslenitsa week has a lot of traditions that have been observed for a long time by our Slavic ancestors. Modern people they try to adhere to Maslenitsa rituals: pancakes are baked all week, fun festivities take place on the street, everyone goes to visit each other. The main attribute of Maslenitsa...
 Image library "MAAM-pictures"
 On the eve of the Maslenitsa holiday, I am sharing with you my Maslenitsa doll, which we sent to the competition at the Local Lore Museum of Kirovgrad. To make such a doll I needed: 1. A bottle from mineral water 2. Multi-colored fabric (preferably cotton -...
 Master class "Maslenitsa doll" You will need: Printed napkins - 2 pcs, white napkins - 2 pcs, White threads or the color of the napkin - a skein, scissors, cotton wool. Manufacturing progress. 1. Lay out a white napkin on the table. At the same time, you need to roll a small ball out of cotton wool (the base...
 Crafts for children become especially interesting when they find something good practical application. Therefore, in order to instill in a child an interest in creativity, it is better to make things with him that will be useful in the near future - for example, various souvenirs, decorations and gifts for the holidays....
Carnival. Drawings and crafts - Abstract of GCD on application in the senior group “Maslenitsa”
SUMMARY OF NODES ON APPLICATION IN THE SENIOR GROUP Topic. "Carnival". Goal: to form an idea of winter/spring folk holidays, traditions, fun; develop skills in working with colored paper, improvised materials, and develop the ability to work in a team; bring up...
Summary of the drawing lesson “Maslenitsa Doll” in the middle group Educational field “Artistic and aesthetic development” Objectives To introduce children to national holiday Maslenitsa. Develop the ability to place an image on an entire sheet of paper and carefully paint over it. Develop artistic and creative activity, imagination, skills...
Maslenitsa is the holiday of the birth of the sun, which has been celebrated since ancient times. One of the main symbols of the holiday is the pancake. It is associated with the sun and is a kind of amulet for the home from harm.
But don’t forget about other symbols, such as the scarecrow and Maslenitsa doll, and Maslenitsa crafts made from straw and wheat.
DIY yarn sun
This sun is called “Yarilo”. It can be easily made at home.

You will need:
- tapes different colors, width 0.5;
- yellow thread or yarn;
- cardboard circle;
- glue;
- gypsy needle or awl;
- colored paper for eyes, nose and mouth.
Use an awl to make a hole in the center of the cardboard circle. Cut the yellow thread or yarn to the same length. Apply glue to the entire cardboard circle. Without letting it dry, we begin to form the sun. To do this, you need to thread yarn through a gypsy needle and push it through the hole in the circle. But not to the end, but only to the middle of the thread, after which we put the threads on the cardboard and press down so that the threads are grabbed with glue.
Now we continue to repeat this process until the sun is completely covered with threads and the cardboard is visible.
Then let the glue dry and glue the threads together.
When the glue is completely dry, you can start making rays of the sun. Distribute all non-glued threads that remain outside the circle into even bundles and tie them with satin or silk ribbons of different colors. The more flowers there are, the brighter and more beautiful the sun will be.

After all the work done, all that remains is to make the face of the sun. It needs to be cut out of paper of different colors and glued to the threads with glue.
That's it. Everything is ready. This decoration can be hung on a wall or door as a decoration and also as a talisman.
Baba on Maslenitsa
Such a woman is also a symbol of the sun. The turn of the skirt represents a bracelet - one of the ancient symbols of the sun. Hands raised up means sun worship.

- white fabric;
- multi-colored fabric for a skirt;
- red fabric for a scarf;
- pins;
- cotton wool;
- red thread.
We cut out a 20x20 cm square from white fabric; it will serve as the woman’s body. Then we cut off two more squares measuring 10x10 cm, from which the doll’s hands will be made later.
You will need two more pieces of fabric, but this time not white, but colored - 20x20 cm, from which you will make a skirt.
Don't forget about the scarf for Maslenitsa. It needs to be cut from red fabric, with the largest side approximately 12 cm.

The doll's head will be made of cotton wool or padding polyester.
We form a not very large ball and place it in the center of a white fabric measuring 20x20 cm.
Then we wrap a cloth around the cotton wool and tie it lightly with red thread.
This will serve as a guide for the neck and keep the cotton in the middle of the fabric.

The thread should be wound only clockwise, in the direction of the sun. This should be done in order for the amulet to be successful.
Let's start with the sleeves. We take small white squares of fabric 10x10 cm, wrap a small triangle on top.
To the right and left of it we wrap the edges by 1-2 cm, after which we again wrap them in the middle, and fasten both edges together so that they do not separate. We do the same with the second square.

The edges of the handles should be wrapped with red thread so that it looks like sleeves.
Now you should fasten your hands to the woman’s body. We take our “hands” so that they are raised up.
We insert it between the folds of the body fabric and wrap it clockwise with the fabric.
This process will be a little difficult for beginners, but with a little practice, such temporary difficulties will not bother the master.

It's time to take up the skirt. We fold both squares into triangles and place them on top of each other.

We place the doll with the hands intertwined on the crosshairs of the fabric.

First, we wrap the left triangle so that it does not cover the doll’s hands.

We put the right triangle on top, as if overlapping.

Then we wrap both triangles to the end and tie them with red thread clockwise.

Now all that remains is to tie the red scarf on the doll’s head. That's all, DIY Maslenitsa is ready.

DIY crafts for Maslenitsa
You can make a couple of dolls, they are very interesting to make. They can be made by both adults and children.

For these dolls you will need:
- red yarn – 1-1.5 m;
- multi-colored threads
- scissors;
- cardboard square 10x10 cm.
First you need to decide on the sequence of thread application.
Place them in the correct queue.
We wind the threads tightly onto the cardboard, gradually changing one color to another, so that the doll is beautiful and colorful.

Carefully remove the threads from the cardboard, tie it on one side with a thread, and cut it on the opposite side.

Align the colors and trim the edges if necessary.

Now you should do the doll's hairstyle. To do this, threads of the same tone need to be woven into a braid twice the length of the doll. We attach the braid to the base of the doll and do the hairstyle.
We pull the neck tightly with a thread, the head should be round and not large in size.
Let's start making hands. In the same way as when making the body, we wind the threads onto the cardboard, alternately changing color scheme. Can be made from other colors, completely different from the color of the body.

We remove the threads from the cardboard, and thread a red thread on both sides, tying them tightly.

Using the same red thread, we tie the edges of the hands to make fists.
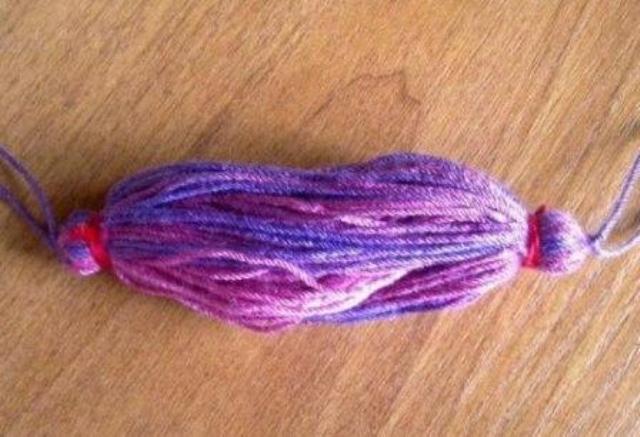
We put handles between the two halves of the body and fasten them there with thread, making a waist.

To add another iconic amulet, we tie the doll’s body crosswise with red acrylic thread.
We wrap the thread around the neck in one direction and the waist in the other.
It can be knitted several times, adding some kind of belt with tassels. We straighten the skirt, and the first doll is ready.

Let's start making the second doll.
The manufacturing process is the same as the first one. But the hairstyle is done differently.
We make a bunch of threads and tie it with a knot in the middle. We attach it to the place of the future head.

The head is made in the same way as its predecessor, only the hair is tucked in differently and secured with red thread.
We make the body and arms according to the already known process. We distribute the bundle going from the body down into two equal parts.
We tie each of them, making feet. You can make a shirt by slightly cutting off the first three rows of threads coming from the body, on both sides.

We connect the dolls together with thread.

Everything is ready, such a talisman can be presented to a couple, wishing to strengthen the relationship.
How to make Maslenitsa more fun? Costumes for Maslenitsa
Maslenitsa – big holiday, we love the people, who should be met not in simple clothes, but in a suit appropriate for the holiday.

The most popular Russian folk clothing, which you can make with your own hands.

Suitable for a man shirt-kosovorotka, along the edges of the hem and sleeves, you can alter the braid to your liking.

A hand-embroidered shirt would also be suitable. It is worn for graduation and belted. Instead of a belt, you can use a red scarf with tassels - a sash.
If the holiday will be held on fresh air, then you should make it wider so that you can put a shirt on top of warm clothes.
You can put a cap on your head, made like in the old days, from white satin, with slits in the front and back. They must be fastened with buttons.

Female version It’s even easier to make a suit. A sundress that is flared at the bottom and also embroidered with velvet along the edge is suitable, satin ribbon or embroidery.

You can use a multi-colored scarf as a headdress. And large red beads and earrings will come in handy as decoration.
How to make straw bouquets for Maslenitsa with your own hands
Such an unusual bouquet of straw will decorate any festive table or can be used as a gift.

You will need the following ingredients:
- straw or thin branches;
- flowers;
- thick rope or twine;
- scissors.
Take a bunch of straw.
The length should be almost same size, if necessary, trim the bottom.
You also need to use scissors to level the bottom of the future bouquet so that it can stand without unnecessary help.
Tie the sheaves tightly with rope just below the middle, also the bottom of the straw.
Make the bottom wider than the middle.

All that remains is to stick flowers into the bunches of straw - small ones or wild ones are best.
Video: doll for Maslenitsa with your own hands
Watch a master class on making a Maslenitsa doll
Vika Di
Maslenitsa is a traditional Slavic holiday, farewell to winter, celebrated in February or March. For example, in 2018, the week of folk festivities will take place from February 12 to 18, and Maslenitsa itself falls on Sunday, the 18th.
Maslenitsa week usually divided into two periods: narrow and wide Maslenitsa. Broad Maslenitsa is considered last days weeks: Thursday, Friday, Saturday and Sunday.
Jan 31, 2018 at 2:51 PST
What can you make for Maslenitsa with your own hands?
There are the most various options crafts that can be easily done at home. Previously, on Maslenitsa they made small dolls in a scarf and a colorful dress; they personified solstice.
It is very easy to make such a charming doll yourself. You can involve children in production.
For production you will need:
- scraps of fabric (two white for the head and hands,
- two different colors for the dress and a red one for the headscarf),
- a piece of padding polyester or cotton wool,
- thick thread (preferably red).
For the head, a piece of padding polyester is wrapped in a white flap so that the ends of the flap hang freely. The “head” is wrapped with thread, all folds are carefully pulled back, and a scarf will cover them. Hands are made from a second white piece of fabric according to the same principle as the head: padding polyester or cotton wool is wrapped in a “sausage” in fabric and secured with a thread to the head so that hands are formed. After that no need to break the thread– you will need it to attach the skirt.
The colorful pieces are wrapped in a skirt around the doll’s body and also secured with threads. The red flap is tied on the head with a scarf. You can even use sponge for decoration. The doll is ready!
The main symbol of Maslenitsa is considered to be an effigy of winter, which, according to the old custom, is burned, signaling the arrival of the long-awaited spring.
Usually for this holiday they make little dolls, personifying winter. They are made from the most different materials: floss threads, corn cobs, various fabrics and fillers.
But handmade gifts for Maslenitsa can be made not only from fabric and thread. You can bake a very interesting and beautiful gift. For example, a sun made from salt dough. This vi d dough is not suitable for human consumption, but great for sculpting.
To prepare the salt dough we take:
- 1 glass of salt;
- 2 cups flour;
- 250 ml water.
The process of preparing salted dough sunshine:
- Mix flour and salt, then add water a little at a time.
- Mix all ingredients into a dense mass.
- From the dough we make a pancake a little larger than the size of the sun (we leave a little dough for the spout, eyes and other elements that you want to add).
- Draw a sun template on a piece of paper, cut it out and place it on the pancake. Using a stack, kitchen or stationery knife, cut out a sun along the contour.
- From the remaining dough we make any small details: eyes, nose, bows, etc.
- We bake the workpiece in the oven at 180 degrees for 10 minutes. Since every housewife has an oven with its own character, carefully monitor the process so that the workpiece only browns, but does not burn!
- After cooling, the workpiece can be painted ordinary paints in the desired color. In the case of the sun it will be yellow or orange.
Puff pastry sun
Salt dough can be used for figurines, making entire sculptural compositions.
Maslenitsa souvenirs for school: what crafts can be made for the Maslenitsa holidays?
Most often, paper is used as a material - it is used to make appliques, crafts using the quilling technique or postcards.
The Maslenitsa theme offers a wide range of themes for crafts: the sun, pancakes, the departure of winter - the arrival of spring and many other similar ones
From an ordinary CD and paper you can make a very cute sun craft! To make such a craft, you will need: an unnecessary CD, yellow and orange colored paper, scissors, glue.
Paper is cut into small strips, which are folded into a loop, the ends of the strip are glued together. Glue loops are attached along the edges of the disk in two rows, so that the yellow ones are located closer to the center of the disk than the orange ones. A circle of yellow paper is glued to the center and a face is drawn on it. The sun is ready.
Crafts made from colored plasticine are also suitable as a DIY souvenir for Maslenitsa. Using the same CD As a basis, you can sculpt a beautiful spring-themed panel, decorating it with plasticine flowers and leaves.
An interesting and unusual spring craft is made from ears of wheat, if you can get a handful of ears.
You need to cut out two circles from ordinary cardboard - one larger than the other. On the larger circle, draw a circle with a diameter small circle. Glued onto cardboard wheat ears, one to one, placing them close to each other in a circle. After this, a smaller circle is glued on top, so as to cover the “legs” of the spikelets. Above the craft can be decorated as desired.
However, the most important decoration of any home for Maslenitsa remains, of course, pancakes.
You can also make crafts from them: build a house or a well out of pancakes (instead of water in such a well, you can use a bowl of sour cream or jam), dress dolls in pancake clothes, cut out figures or wrap them in the form of a doll.
Carnival- one of the few remaining Slavic holidays that have come down to modern times from ancient times.
2 February 2018, 16:50


The bright Maslenitsa, which came to us from ancient times, brings not only the “birth” of the sun, Yaril, but also warmth, spring, fun and laughter, a readiness to begin again field work to the joy of ourselves and our entire family!
Children are always very sensitive to everything that brings light, joy, sincerity, and from the Maslenitsa holiday they expect not only rosy-cheeked pancakes and a fiery show, but also some pleasant surprises!
So let's make some fun crafts for Maslenitsa for our children!
The first craft will be the sun, called Yaril in ancient Slavic!

This amulet craft is made from regular threads for knitting and bright ribbons!
You can make “Yarilo” together with your children - it will be more fun and interesting!
So let's get started!
Prepare the following materials for the sun craft:
- Pieces of bright satin ribbons of different colors, 0.5 cm wide;
- Bright yellow wool threads for the sun;
- A cardboard circle of approximately the same diameter as you intend to make the craft;
- PVA glue;
- Awl, or gypsy needle;
- Pieces of blue and red, blue and pink colored paper, for the eyes, mouth and nose, respectively.
Let's start creating:
1. Take an awl in your hands and use it to make a small hole in the very center of the cardboard circle;
2. Now we take and cut the yellow yarn into equal thread lengths. To determine how long the threads should be, measure the diameter of the circle and add the length of the ray to it!
3. Lubricate the entire cardboard blank with PVA glue and until the glue dries, move on to the next stage - form a sun from threads;
4. To do this, thread a piece of yellow2 yarn into the gypsy needle and push it through the hole. Then we leave one half of the thread on one side of the cardboard, and the other on the other. We beautifully lay the threads on the cardboard and press down so that the rays “grab” on the glue. We repeat this procedure until our Yarilo is completely covered with bright rays. Let the glue dry completely, and the threads will stick firmly!

5. Ours is ready for the next stage - the formation of volumetric rays from many threads. We need to distribute all the threads into even rays and tie them, right behind the cardboard base, with bright satin ribbons! The more colors predominate in the ribbons, the more fun the sun will be!
6. Now we cut out Yaril’s eyes, mouth and nose. Look how cute the sun turned out! To match Maslenitsa:
See what else you can create for your child and with your child during the long and fun Shrovetide week:


As you noticed, the materials for making such toys can be very different: threads, pieces of fabric, straw or hay...
To please your baby with handmade dolls made from hay, straw or thread, I suggest you consider this detailed diagram builds:


Let's also make a Maslenitsa doll with you - for the amusement of the child, for bountiful harvest in the household and peace and prosperity in your home:
As you may have noticed by looking at the photo of our Maslenitsa, the pose itself can tell a lot about you! For example, a special turn of a skirt symbolizes a bracelet - one of the most ancient symbols of the Sun and life... hands raised to the top are a symbol of sun worship, an appeal to Yaril! Such a talisman, made during Shrovetide week, has enormous protective properties...