How to make a frame with a stand. Frame decor: secrets of magical transformation with your own hands (50 photos)
It's hard to find a home or office that doesn't have space for paintings and photographs. But simply attaching a photograph or a masterpiece of art to the wall will be ugly and absurd. It is precisely in order to frame photographs and paintings that frames were invented. With their help, you can refine the interior and add comfort to the premises. Nowadays there are millions of frame options in stores, but it is not always possible to find what suits your home. That is why we will tell you how to make a frame with your own hands, while spending a minimum of money and effort. You need to start by choosing a design for your future craft.
Deciding on the design choice
What you need to pay attention to when choosing a design for a frame:
- will it fit into the overall interior of the room;
- the frame must be in one color scheme with images, not with walls;
- the frame should complement the image.

To achieve the desired result, you need to carefully consider the material from which the frame will be made.
Material selection

There are no special restrictions on the material. The only thing that remains unchanged is the base on which the decorations will be glued. It should be dense, strong and not wet from glue. Thick cardboard and, of course, wood work well for the frame. Moreover, the wooden frame itself is already a completed craft. It can be varnished and will be appropriate for any interior.You can decorate the product with any available means. This could be pasta, pebbles, clothespins, buttons, beads. But do not forget that the chosen material should complement the picture. So, for example, shells will go well with a seascape, and a frame made of pasta with the addition of cereals will be perfect for the kitchen.


Let's look at the two main materials from which frames are most often made - wood and polyurethane foam.
Wooden frame
Wood is a classic material used to make picture frames. Such designs are durable and fit almost any picture and room design.

To make a wooden frame, you don’t have to go to the forest to get wood, then process it and cut out the planks. You can go to a hardware store and purchase wooden skirting boards there. They are perfect for a product like this.
What you need:
- Wooden plinth. Its length and width should correspond to the size of the picture. Therefore, be sure to measure the picture before buying a plinth and do not forget that the frame will be longer than the canvas.
- Well sharpened knife.
- Scissors.
- Sandpaper.
- Furniture glue. PVA will do.
- Hacksaw.
- Small nails.
- Hammer.
- Ruler. It would be better if it was angular.
- Cardboard or plywood.
What to do:

For a richer look, you can use carved wooden baseboards. Their price corresponds to their appearance, so you will have to pay a decent amount for such material for the frame, but upon completion of the work it will be worth it.

Polyurethane foam frame

For women, “polyurethane foam” sounds threatening, but there is no need to be afraid, because it is ordinary polystyrene foam, only stronger. Ceiling plinths are made from it, which are now used to renovate apartments. Their price is low, but the variety of patterns is impressive. Differences in manufacturing with wooden baseboard No. But don’t forget that this is not wood, so you should handle polyurethane foam more carefully. Any blow can lead to dents, or even break the entire structure.
What you need:
- Ceiling plinth.
- Hacksaw or sharp knife.
- Glue.
- Ruler.
- Plywood or cardboard (depending on the size and strength of the catrina).
Photographs are a repository of a variety of moments. They preserve life itself. That is why people always, even in the era of digital technology, put on the table, place on the walls photos related to a particular event or person. Spectacular and unusual photo frames are not cheap, but everyone wants to decorate their home with a noticeable decorative element. Therefore, the decor of photo frames has always been, is and will be in demand. Decorating frames with your own hands is possible for almost everyone; it is exciting and makes you feel like a real creator.
Paper photo frames
How many things can you make from paper? Countless products, interior items, crafts and much, much more. The Internet is teeming with ideas, each better than the next.
Photo frame using origami technique
Required materials:
- colored single-sided paper;
- scissors;
- a simple pencil;
- PVA glue;
-ruler.
Base - 4 squares 15x15 cm.
 Fold the square diagonally with the colored side facing inward.
 Expand. Place the square face up and fold the bottom side of the square towards the fold line as shown in the photo.
 Turn the workpiece over and bend the bottom corner.

 Turn the workpiece over to the front side and bend along the fold line.

 Turn over. And fold the bottom part along the fold line.
 Place the side in the pocket. The module is ready.
 Reverse side of the module.
 To assemble a photo frame we need 4 modules.
 Apply glue to a sharp corner and insert it into the corner of the 2nd module, as shown in the photo.
 Then the 3rd and 4th module.

 The photo frame is ready.
 Reverse side of the photo frame.
 Insert any photo or funny picture.
 Volumetric photo frame
The good thing about this frame is that all you need to create it is a piece of paper and scissors. What’s also great is that the frame is voluminous.
The size of the frame depends on the size of the sheet of paper. This means that you can make a frame of any format. And use it to post a photo or collage, as well as to decorate handmade crafts.
Print the frame template
 If you don't have the opportunity to make a printout, then make a template for a homemade paper frame with your own hands. To do this, you need to place a photograph in the center of the sheet and trace its outline (or simply draw a rectangle of the appropriate size in the center of the paper). Then set the strips aside different sizes(alternate strips 1.5 cm and 1 cm wide). Make indentations at the top and bottom as shown in the template.
 Next, we bend the drawn strips along the ruler. We begin to wrap the sides of the future paper photo frame. We do this carefully so as not to wrinkle the craft.
 The short sides are folded first, followed by the long ones. We need to insert the corners of the long sides of the paper frame into the corners of its short sides to secure the structure tightly.
 If the paper is very thick and glossy, it makes sense to insert the photo first, and only then fold the sides. This way it will “sit” tighter. If you are worried about the design, you can drop a little glue or use double-sided tape.
Paper frame using quilling technique
Option 1:
For work you need to prepare tools and materials:
- photo frame made of light wood.
- acrylic paint white
- sponge or sponge for applying paint
- quilling paper white and blue - strips 3 mm wide
- tweezers for quilling
- quilling awl
- scissors
- PVA glue
- glue Moment
- acrylic contours - imitation pearls - white and blue colors


Let's start by preparing the frame. It is better to take a frame made of light wood. Then there is no need to prime the frame first, and white paint fits perfectly on the tree. If the frame is made of dark wood, then you will need to apply primer first to disguise dark color tree.
Remove the glass from the frame. Using a sponge, apply paint to the frame on all sides using a blotting motion. It is better to apply 2-3 layers. And leave the frame until completely dry (after 1.5 hours the frame will be completely dry). 


While the frame is drying, we will prepare the decorative elements with which the frame will later be decorated. Let me immediately note that when creating such elements there are no uniform schemes or rules. All this is purely a flight of fancy and mastery of working with paper.
We take 8 strips of white color and glue them together with a ladder, that is, each strip is glued to the previous one with its tip, while the tip of the strip is located slightly lower. 

Using an awl, we twist the glued strips, while wrapping the strip so that the gluing points are inside. 
Unravel the twisted roll. This is such a beautiful curl. 
Now we glue all the strips together in one place, just below the curl. 
When the joint is dry, we give the strips a wave shape and glue the strips together again. 
We cut off the remaining free ends so that each strip is longer than the other. 
And twist each end. 
Please note that this is a large complex element. Now we glue this element to the already dried frame. The element can be bent to fit the frame. 


In the decor of this frame, I wanted to play with 2 colors - white and blue, as well as a smooth transition from one color to another, so let's start creating a central element, but already blue color.
We glue 6 strips of paper together with a ladder and roll them into a roll.
 Glue the strips together in one place. We cut the ends in the same way as the white element: each strip is longer than the previous one.
And we wind each strip onto a quilling awl. 
Now we unwind the previously twisted rollers. This is easy to do by running an awl over them. 
Now we glue this element to the frame. It is better to use instant glue for this. At the same time, we glue this element in the upper left corner, as in the photo. 
We straighten the curls so that they lie in the same plane and glue them. 
In order to make a smooth transition from one color to another, we glue strips of white and blue, 4 of each color. And twist it into a curl. 

Glue on left side framework. 
To fill the voids, we make and glue curls to the frame. Left - white, right - blue. 

Add another blue curl, but this time larger. 
Now let's go back to the bottom of the frame. For decoration we twist a lot of small curls. To do this, cut the strip into pieces of arbitrary size and twist the ends. 
We glue the elements so as to fill the entire space. 

I always encourage you not to be afraid to combine various techniques, and in this case I used acrylic contours for painting. Using an outline with imitation pearls of a natural color, we place a series of dots. The size of the dots increases, from smaller to larger. 
In the upper part of the frame, where the swirls are blue, draw dots with a contour of a suitable shade. 
I drew wavy lines so that one color of the dots smoothly transitions into another. 

And here is the result. 
Place your favorite photo in a frame and let it please your eyes for many years to come.
Option 2:
To make a quilling photo frame you will need the following ingredients:
Thick paper for background (minimum 300g/m2)
- less dense paper for flowers (from 120 to 160 grams/m2 - denser is not advisable, because strips of this size will not curl so obediently and smoothly) in two colors. In my case, it's white, which will stand out, and a more subtle shade of the background color, which will allow our flowers to blend better with the main color and help highlight the details.
- a paper knife and a steel ruler for cutting strips. Cutting with scissors is a tedious task.
- PVA glue
- a toothpick or other device for twisting rolls

 We cut strips 30 cm long and 5 mm wide, and estimate the quantity based on the plot we have planned. There are many clever ways to cut quickly, such as cutting multiple layers of paper at once, but at this density (120 to 160) it is quite difficult. Therefore, in order not to be too tricky for a long time, I fastened the paper for the flowers with a notebook sheet in a cage and, Whack-Whack-Whack, moving the ruler across the cells, but first we’ll make a frame, and the best part will be for later.
We mark our densest leaf. I recommend that you first draw up a detailed diagram on paper so as not to cut off too much and take into account all the dimensions. I was counting on a 13x18 photo, based on these dimensions we choose the width of the frame, mine on the left and bottom is a little wider. Having finished marking, we cut out a window for the photo, which should be slightly smaller than the photo itself.


Now let's take care of the “pocket” into which the photo will be inserted. Photo paper is very thick and has a significant thickness, so to prevent the frame from deforming when a photo is inserted into it, we will give the pocket a little width. We glue a narrow strip of thick paper on the back side, and now we can glue the “pocket” itself, which will prevent our photo from falling out of the frame.


The base is ready

Let's move on to the flowers. So, to make a petal we need a strip of paper, which, using a split toothpick (or a more noble tool), is rolled into a tight roll. The roll, in turn, is unrolled to a certain diameter, then the end of the strip is fixed with PVA glue and the roll is given the desired shape using your fingers. We wash our hands so that there are no offensive dark spots at work later. The sections of the strips get dirty especially easily; for white paper this is simply a disaster; it can easily give it a very poor appearance.


To make identical petals, it is convenient to use a template to unwind the rolls to the same diameter.

 I also really like flowers of this shape.
 And leaves, of course

In general, we twist as much as we like, don’t forget to create flora of various sizes.
When the main elements are ready, we place them on the frame and glue them. This is not the final version, but I think the meaning is clear.
 Now we add details until the composition seems complete enough.

The last step remains - attach a stand to the back for stability.
 The frame is ready!
 Photo frame made of paper tubes
Option 1:
We will need:
- old newspapers or magazines;
- base frame;
- glue;
- wooden skewer;
- scissors.
 Before making a frame from newspaper, you need to prepare several dozen tubes. To do this, divide the printed publication into separate sheets, and then, starting from the corner, wind each sheet onto a wooden skewer.
 |
 |
To secure the tube, coat the corner of the sheet with a small amount of glue. Wait until it dries and carefully remove the skewer. Make several dozen more paper tubes in the same way. In our example, about 55 such tubes will be required.
 |
 |
Check if the tubes are long enough to cover the frame. If they turn out shorter than required, glue two tubes together by inserting one into the other. Now you can start creating a frame from newspaper tubes. Apply a thin layer of glue to the base frame. You can use a primer if the base color doesn't suit you.
Glue together a rectangular frame from four tubes, the size of which corresponds to the photograph or painting you plan to display. Carefully remove the ends of the tubes protruding beyond the edges of the frame, and the craft is ready!
 |
 |
Option 2:
 We cut strips along the entire length of the sheet, i.e. 30 cm. Strip width 5 cm.
 It is better to use glue that is not liquid. And you will need wooden stick. We place the stick so that the ends of the strips remain empty, mine are 5 cm. Twisting a tube in this way is not as easy as it seemed to me at first, and I came up with my own method, which I share with you.
 First step. First we make a side in the shape of a stick. This makes it easier to glue it on later. If you do not have such sticks on hand, you can replace them with paper straws. Which are twisted for weaving. For us, the main goal is a frame made of straight tubes (no twists).
 Step 2. Rub the stick with pencil glue on all sides and glue the side to it. Let it sit (the stick and paper should stick together), while we glue the next one. And so we made the preparations and proceed to the next step.
 Step 3. We make the first turn of the stick, pressing firmly and straightening the ends of the tube. Then don’t try to twist it tightly, you’ll only wrinkle the paper. You just need to give it the shape of a tube. Then on the floor on a mat, start rolling the sausage (as with dough), first lightly, then you will feel that it is curling up. Then you press firmly and roll until you feel the stick. Try to ensure that the ends where there is no stick are the same thickness as the center. And also, if you roll a tube and it doesn’t curl, it means the stick has come unglued.
 Step 4. Secure the tube with clothespins. Clothespins have two sizes of recesses, we fix them in the second - smaller one. Possible for three clothespins.
 Step 5. First glue between the clothespins, then remove them and finish gluing where the clothespins were. I carefully glued it with PVA glue with a needle. The tube is ready.
 This way I glued two tubes together. The tubes, if glued this way, will not move. They will be even. I applied the glue with a toothpick between the tubes directly from the top. And also, don’t forget to lay all the tubes with the seam facing up - this will be the wrong side.
 My clothespin only fits two tubes into a large recess.
 These are the stripes we got for the frame. One photo is missing of how I glued 4 tubes together. It’s already simple, cut out a strip no wider than 4 tubes and glue it on it.
 I needed a frame for this picture. I laid it out as I saw fit and measured the internal size.
 I made a mark along the ruler from corner to corner and cut with a very sharp knife.
 I cut out a corner and glued it onto it.
 I constantly measured the frame so that it wouldn’t turn out crooked.
 And here is the corner. It worked!
 Bamboo paper photo frame
For a bamboo frame you need thin, dense tubes of foil or cling film. The tubes may differ slightly in diameter - this is bamboo, and in nature it can be different.
 I cut the tubes, but it seems to me that whole ones are also possible; for example, I saved money because I didn’t have many tubes and I like it better when the flat side is near the frame.
 First fitting. The stretcher was glued together from 2 corrugated cardboard sheets, the front side was covered with velvet adhesive film, and the back side was covered with wallpaper. On the top crossbar you can see that the sizes of the tubes are different.
 Each prepared “stick” was pasted over with pieces of some kind of wrapping paper (found in bins). A jute rope was glued under the paper in several places (future jumpers - bamboo rings). Where there was a difference between the diameters of the tubes, I also wound a thread, having previously glued the tubes by overlapping the larger smaller.
 Cover the glue-dried tubes with brown putty (I covered everything well with my finger, paying attention to the jumpers).
 When the tubes were dry, I carefully sanded them with fine sandpaper. In the places where the jumpers were, I used a brush with brown paint and, without waiting for it to dry, I seemed to stretch the paint away from the jumpers, thereby making the color transition smooth and natural.

Cardboard photo frames
Option 1:
Create beautiful frames without the appropriate equipment it is problematic. Therefore, collect a minimum set of tools. It should include:
- large scissors;
- stationery knife;
- PVA glue;
- simple pencil;
- scotch;
- small scissors;
- fine-grained sandpaper;
- ruler.
Note: It is advisable to get a cutting mat; it makes it much easier to mark out the details of the future frame.
 If you are not satisfied with the color of the cardboard for the frame, purchase a can of spray paint. To decorate photo frames, use shells, pebbles, glass, rhinestones, beads, etc.
In addition to the basic tools, you will need: a paint brush with soft bristles, a spray bottle, water and tongs. They will be needed to prepare the material for use.
Preparation of material
The best material to make your own photo frames is cardboard. Why? It is cheap and easy to process. Every home has at least one cardboard box and glue with scissors.
In its raw form, cardboard is of little use for making a photo frame. Its preparation boils down to the following - separate top layer until the corrugated part appears.
 Sometimes this is not easy to achieve, because different types cardboard is made from varying amounts glue and they have different thicknesses.
How to quickly peel off the top layer of cardboard:
- Wet the part of the paper that needs to be removed. Distribute the moisture evenly over the surface using a brush. Wait 2-3 minutes for it to soak. Using your fingers or a knife, pry up the edge of the layer and try to remove as large a piece as possible. Cut off the rest. Clean off dried glue with sandpaper.
The method described above is applicable to large pieces of cardboard; for small ones, sometimes it is enough to rub the top layer.
 Note: Spray the water more carefully. If you overdo it, the cardboard will become soggy. IN best case scenario you'll have to wait until it dries. At worst, start the work all over again.
Instructions
First you need to decide what kind of photo the frame is being created for. It is not the content that is important, but the size and orientation of the card (vertical or horizontal). Based on this, proceed:
Step #1. Cut out the base.
Cut out the base of the frame from a large piece of cardboard. Its dimensions should be at least twice the size of the photo. Next you will understand why. Using a ruler and pencil, mark the contours of the future part. Then cut it out with scissors.  Step #2. Making a compartment for photography.
In the middle of the base, draw a rectangle slightly smaller than the photo for which the frame is being made. Carefully draw along the outline with a stationery knife and cut out a window.
Cut out a rectangle that will cover the photo hole on the back of the frame. Glue the door with tape on one side.
Step #3. We complete the preparation.
Make several cardboard strips of different lengths. Stick four of them around the photo compartment. Use the rest to create the structure of the front part. For clarity, look at the figure below.
 To make the frame fit more tightly to the wall, glue triangles at the corners of the back. They compensate for the thickness of the door and allow the photo frame to hang more evenly.
Making triangles couldn't be easier. Cut one out using a pencil and then use it as a stencil.
Step #4. Decor.
Everything we did before had little to do with creativity. It's time to turn on your imagination to the fullest. Here is one of the options for designing a frame, but this is just an example, you can come up with your own version.
So, to decorate the photo frame we use the same cardboard. Take the prepared material with bare corrugation and cut into ribbons. Divide several of them into elements as shown in the figure below.  Next, glue the decorative parts onto the front of the frame. The result is an asymmetrical relief pattern. This photo frame is unique and, with the proper approach to manufacturing, will outperform its designer counterparts.
Additional photo frame design options are: 

 Traditional photographs have an energy that digital images lack. Enclose them in frames made by yourself. It will do captured moments life is brighter, and the design of the room is unique.
Option 2:
You will need: corrugated cardboard, self-adhesive paper, scissors, ruler, pencil, colored paper napkins or corrugated paper, stationery stapler, thermal gun, photograph.
 From cardboard we cut out 2 rectangles 16X20, one 5X15. On one of the rectangles in the center we draw another rectangle, retreating 3 cm from the edge, the inner rectangle is 10X14.
 On self-adhesive paper, lay out our rectangle, outline it with a pencil and add 2-3 cm each, as shown in the figure, cut out and carefully glue two large rectangles.


 We cut a small rectangle (hereinafter referred to as the holder) from one edge diagonally as in the picture and also paste it over.

 To make flowers from napkins, we will need 9 napkins, from which we will get 18 flowers.
Cut the napkin into two parts exactly in the middle.
 Cut out a circle with a diameter of 5 cm from cardboard. Fold the cut napkin in half and fasten it with a stapler. Let's circle our circle.
 Next we cut out and shape the flowers.
 Using a heat gun, glue the holder onto the entire rectangle from the glued side.
 On the other side we paste a photo.
 We assemble the frame by gluing both parts and flowers.

Wooden photo frames
As you know, wood is an ecological, expensive and exquisite material.
Wood in any interior emphasizes aristocracy. By posting wooden product In our home we get a little closer to nature.
Step 1: Materials
 You will need a couple of pallet boards for the project, although any other wood will do. In my case, the slightly weathered look of the pallet wood goes perfectly with the equally time-worn sign, so I used that. If you want to achieve a more polished appearance, then pallets can also be used, you just need to sand the boards thoroughly and, for example, coat them with varnish or paint.
For the back wall of the frame you will need something flat, such as MDF or hardboard. Thin plywood or thick cardboard will also work. The only requirement for back wall, these are the dimensions. The dimensions should be slightly larger than the visible area of the frame, and smaller than its edges. In other words, it can be the size of the frame, but a couple of centimeters smaller on each edge.
Step 2: Attach the object of adoration
 Our frame is not quite ordinary; it will not be possible to insert glass into it, behind which the photo is placed. Since there is no glass, you will have to glue it down to prevent the photo from falling out. I used a car sign instead of a photo and glued it to the MDF (back wall) on hot glue.
Glue can be any kind, but with hot glue it goes faster.
Step 3: Cut out the frame
 Now we need a ruler, and basic skills in working with a hacksaw (which all men have by default from birth). All you need to do is measure the length of the inner edge of the frame on the board, and draw 45-degree angles, and then cut the board along them.
Step 4: Putting all the pieces together
 I just hot glued each side of the frame to the back panel and that was it. As you can see, there are small gaps between the boards, and I like this look even better.
Step 5: Glue it a little more
 Along the edges of the back wall I applied another thin layer of glue for additional adhesion.
Step 6: Frame Mounting Hole
 The hole for fastening is made from the back side, and the main thing here is not to make it through.
Step 7: Finishing Touches

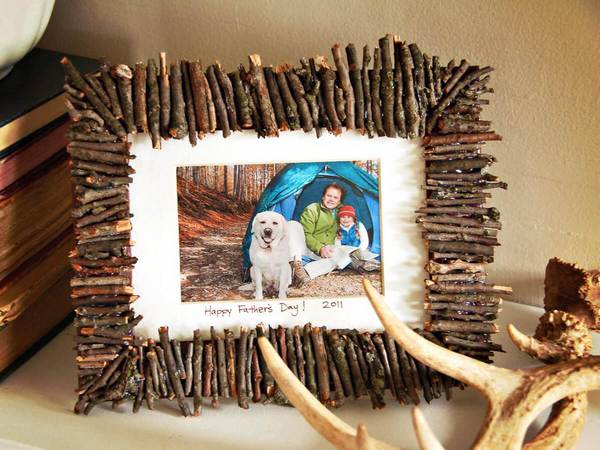
Frame made of tree branches
We will need:
- thin branches;
- cardboard;
- glue gun or superglue;
- moss (real or decorative);
- decorative flowers;
- acrylic paints;
- craft varnish (optional).
To make such a frame, you need to take a responsible approach to the choice of material. Try to choose branches of one or two sizes (thicker and thinner). It is better not to take twigs with slippery bark, as over time they will begin to dry out, which will make them not very beautiful. And it’s more difficult to work with slippery bark. Dry branches collected from the ground rather than plucked from trees are best.
 The blank for the photo frame needs to be cut out of thick cardboard (and several layers glued together) or plywood. Next, paint the future frame brown or any other color. The main thing is not to leave it white, as it will not look very nice.
Free the branches from excess bark and straighten them. Cut to frame size. Place four thicker branches as the first layer and glue them.
 Next, lay out another layer of branches. Increase their mass on the photo frame gradually, gluing each one separately. If you are using superglue, the reliability of which you are not too sure of, fasten the branches together with wire. It is advisable to choose wire of an inconspicuous color or completely cover the finished photo frame with spray paint so that the fastenings are not noticeable.
Glue moss around the edges of the frame. If you don't have anything similar, add leaves or pine cones that can be pre-painted.
Add decorative flowers or beads, painting them with acrylic, to decorate them with berries. At the end, the craft can be sealed with non-toxic wood varnish.
 Photo frame made from sushi sticks
Option 1:
Making a layout
We fold the sticks in the form of a lattice. To do this, we place two sticks parallel to each other at a distance of approximately 20 cm, then we place 5 sticks perpendicularly on them at a distance of 2.5-3 cm.
 Preparing the components
We fasten all parts of the layout with threads. Then we repeat the same thing again. We should get 2 grids, the same as in the picture.
 Connecting the components
We put the lattices together and tie them together.
 The photo frame is ready!
We make a loop so that our frame can hang. Then we glue the photo using double-sided tape. That's all, the product can be placed on the wall!
 Option 2:


 Frame made of wood chips
Wood chips can be purchased at construction stores and home improvement stores.
This frame will a great gift. And you can use it not only for a mirror.
This frame design would be appropriate for photos and watches, and it is possible to place some kind of frame in the center. beautiful composition from flowers or glass.


 Photo frames from improvised means
Pasted decor
You can glue a lot to a frame, everything is determined by the taste and imagination of the master.
 Buttons
Photo frames decorated with buttons will look original, especially if you choose them in the same color. However, this is not a mandatory condition. The desired color uniformity can be achieved using acrylic paint. For example, buttons coated with gold paint will transform beyond recognition an old photo frame that by a lucky chance did not end up in the trash bin.
 Beads, rhinestones
Over time, such things accumulate in abundance in every woman. All this can become a unique collection of materials for decorating an elegant frame with your favorite photo with your own hands; it’s worth gluing them onto a pre-planned drawing or ornament. Tip: you can use whole brooches, beads, beads, pearls, interesting pieces of glass, fragments of broken dishes, mosaic elements.
 Natural materials
Tastefully decorated frames in a natural style always attract attention. After all, we are all children of nature. 
Photo frames made of coffee beans, shells
Coffee beans
Coffee beans are useful not only for making an invigorating drink, they also turn out to be excellent material for decorating photo frames with your own hands: they have a wonderful smell, original texture, noble color, they do not deteriorate. The work won’t take much time either: it’s not so difficult with the help glue gun or use PVA glue to tightly line a standard photo frame with coffee beans, which in its new guise is guaranteed to become a leading interior accessory.
 To make your handmade frame smell fragrant, buy star anise and star anise and find a place for them in the overall decor.
 Shells
This is one of the rewarding materials for decorating a photographic frame with your own hands. Need shells for decoration various shapes and magnitude. In addition to shells, it is appropriate to use interesting glass, sea pebbles and other finds made on the sea or river bank in inlay. 

 Photo frames made from egg trays
These roses are made from regular cardboard that eggs are sold in in bulk.  All you need is a mirror, a few egg cartons, scissors, glue and spray paint.
 1. Cut out the cells with petals
2. Cut out smaller petals inside the bud, and glue them with a slight offset of the petals.
3. Repeat until you have a full rose.
4. Glue the roses to the mirror. It is better to seal the mirror with masking tape; you still have to paint it.
5. Spray paint, let the paint dry and remove the tape.
Foamiran photo frames
Materials and tools
To make bright butterflies, prepare:
- foamiran (plastic suede) 2 mm thick, black and two types of color;
- thin white and lilac foamiran;
- glue "Moment";
- scissors;
- pastel;
- pencil;
- paper;
- cotton swabs;
- knitting needle
 Manufacturing technique and photo
On paper folded in half, randomly draw a template with a pencil - half the silhouette of a butterfly, or download a ready-made picture. You can transfer the silhouette of an insect from a book or children's coloring book.
 Cut out the pattern with scissors, lay it on black foamiran, trace it with a knitting needle, lightly pressing on the plastic suede. The material for the base can be dark blue, brown, the main thing is that the top layer is much lighter. Repeat for a different size and shape.
 Fold the paper template in half again and cut out another silhouette that follows the contours of the first, retreating 2-3 mm from the edge. Repeat with another paper pattern.
 Cut out all four butterfly silhouettes from foamiran. Make decorations from thin material of different shades.
 Tint the top blank with pastel, placing it on a slightly damp cotton swab. Color without using strong pressure, the movements should be light to get natural “live” shades. Apply colors symmetrically - in nature, these insects are always mirror-like.
 Also color the detail of the second butterfly.
 Fold the painted parts in half and randomly cut them into equal parts. Immediately arrange the resulting elements on black symmetrically, otherwise it will be difficult to choose the same ones later.


If desired, also cut the resulting shapes into smaller ones. The smaller they are, the more interesting the pattern of the wings will be.
 Lay out the entire pattern of the wings and begin gluing the decor to the base one by one. It is advisable to work from the edge to the center, leaving a small black gap between the workpieces. This will create a volume effect and make the craft more interesting.
 Try to ensure that all elements are glued symmetrically. Remember the perfection of nature.
 Now you need to prepare the photo frame. From thick foamiran, cut out two circles that make up the base of the frame; in this master class, the diameter is 22 cm.
 Make a smaller hole in one of them (for the desired photo).
 Cut out a blank that fits half of the top photo frame. Glue it to the bottom base of the photo frame. Glue the front part on top. Follow the instructions printed on the glue tube.
 Glue the resulting butterflies onto a photo frame, choosing good places, as in the photo.
 Cut randomly small butterflies from colored foamiran for additional decoration of the photo frame and stick them on the front part.
 Apply pastel using the method already described on the frame and butterflies.
 Glue a magnet if the frame will be placed on the refrigerator or attach a holder for a photo frame.
 A photo frame with foamiran butterflies is ready to decorate your interior or become a gift.

It's always nice to look at photographs that capture memorable moments from your life. Be it a wedding celebration, the birth of a child, or just a photo on a bench in an autumn park.
And in order to prevent valuable shots from disappearing, we try to carefully preserve them; a photo frame may be suitable for this. You can buy it at the store, but making it yourself is much nicer.

Recommendations for making a photo frame with your own hands
In order to make a frame you do not need expensive materials; most likely, you have everything you need at home.

Initially, you need to decide what the base of the frame will be made of.

Suitable for this:
- Paper colored or plain;
- Durable cardboard;
- Fibreboard, wood, etc.
For those needlewomen who have more experience, it will not be difficult to make a base for a photo frame from an old watch case, a box of matches, branches, twigs, plastic forks or spoons, and disks.

The greater the variety of available materials, the more interesting the work will be. The most popular materials are wood and cardboard.

Paper photo frame
If you have wallpaper scraps on hand, they can serve as a good basis for making a three-dimensional photo frame. Plain color is also suitable colored paper, which, if desired, can be painted in the color you need.

Newspaper can also work for this. Using knitting needles, twist it into a tube, weave a frame, then form a frame and paint it with bright colors.

Cardboard photo frame
Cardboard will serve as the most reliable base for a photo frame. Draw out template details for the future frame. If you plan to hang the photo frame on the wall, attach a small loop made of thick thread to the back wall.
If you want to admire a photo on your desktop, take a step. Decorate the cardboard with flowers, stars, hearts, butterflies, which are prepared in advance from multi-colored paper.

Do not forget that excess design may look unsightly. If the paper contains a beautiful design, then there is no need to add decorations.

Wooden photo frame
If you decide to make a wooden frame, then for this you will need twigs and branches. First, think about what size the photo frame will be, because the width and length of the source material will depend on this.

The fastening element will be organza or rope. The work will not take much time, and the manufacturing process will be entertaining and interesting.

Weaving from willow, willow or vine branches requires certain skills, so this work is not for everyone.

An excellent material for a photo frame would be ice cream sticks. With their help you can create your own unique creative masterpiece.
Photo frame from other improvised means
Save colorful cards, they are great for decoration. Master the quilling technique and your bright works will delight you for a long time.

Pay attention!

You can also use multi-colored napkins, cut them into small squares, twist them into small balls, and attach them to the base with glue. This work is not difficult, but even a child can do it painstakingly.

Various pieces of fabric are also suitable for decoration. For example, if you decorate a cardboard frame with denim, it will look very stylish and creative.

You can also attach puff pastry figures to the photo frame. Unnecessary markers, plastic tubes, pencils, fragments of broken vase, discs and much more can be used for decoration.

Natural materials (dry leaves, flowers, cones, nut shells, wood shavings, multi-colored small stones, shells) they are perfect for decorating photo frames.
Experiment with food items, decorate the frame with rice, buckwheat, peas, beans, corn or sunflower seeds.

Please use when checking out pasta(corns, stars, vermicelli or spaghetti). To make the frame look more colorful, you need to paint it with colored paints.
Pay attention!


From everything that has been said, we can conclude that in order for the photo frame to turn out beautiful and unique, for this you will need any available material, your imagination, idea and desire.

DIY photo frames


Pay attention!


A well-taken photo can preserve life’s pleasant moments in memory. Favorite photo, placed in an original frame, will decorate any interior. A good alternative to purchased frames, the choice of which is huge on the market, can be a unique, one-of-a-kind product that you make with your own hands.
As a basis for the future masterpiece, you will need thick cardboard, as well as scissors, a brush and a pencil, paints (acrylic, gouache or oil), universal glue and sanded peas (whole or in halves).
It is best to start creating a photo frame from cardboard with your own hands by determining the size of the future frame, which will be 1.5-3 centimeters larger than the photo itself. Cut out two identical blanks from cardboard. Place the photo in the center of one of them and trace around the perimeter with a pencil. Make the inner window a little smaller than the photo: mark about 0.5 centimeters along each edge and cut it out. You need to glue peas onto the resulting blank (in any convenient way), then paint the frame in the selected colors and coat it with varnish. From the same cardboard, make a support leg or a loop if the photo will be placed on the wall and glue the prepared element to the back of the frame. Then the two halves (top and bottom) need to be carefully glued together.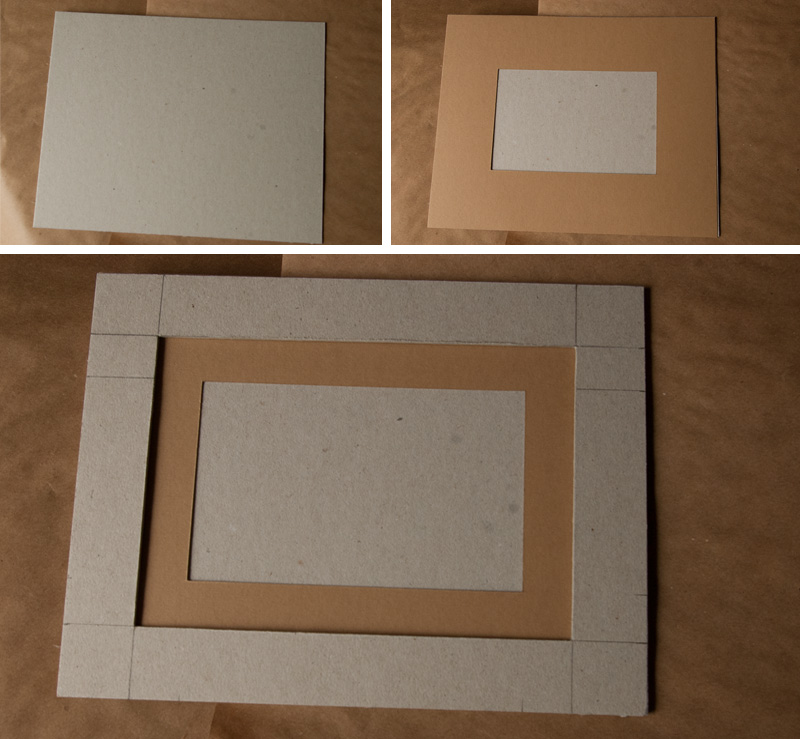
In times of digital technology, the value of paper image media has dropped significantly. But in vain, photography is primarily a memory from the past. People are accustomed to keeping things dear to their hearts close to them. But storing photos in digital media is not always convenient, and the presence of an attractive frame with a favorite image on the table automatically attracts the eye and, accordingly, brings back pleasant memories. You can make a photo frame with your own hands from available materials, using natural materials for decoration.
You can make a photo frame with your own hands using available materials
Knowing how to make photo frames yourself at home is quite useful - sometimes you need a frame of non-standard sizes to hang on the wall, for example, a poster from your beloved computer game, or large-sized photos, but buying a large frame can be quite expensive, and it’s not always possible to find a color and texture that matches the photo. A homemade frame will come to the rescue if you decide to hang a hand-embroidered picture on the wall, or certificate of honor, or a page of compiled handwritten text - at weddings and anniversaries, guests often write such congratulations and wishes as a keepsake to the newlyweds or celebrants. Photo from kindergarten, or with school line September 1st, wedding or just good photo from a walk - are there many reasons to hang one of your happy moments on the wall or put it on the table? Let's take a step-by-step look at how to make a suitable frame for them.
You will need:
- 2 sheets of thick paper measuring 30 by 35 cm;
- Old glossy magazine;
- PVA glue, a piece of cardboard;
- Multi-colored threads, colorless nail polish;
- Stationery knife.

This photo frame will be quite affordable.
How to do:
- Stepping back from the edges of the sheet, measure 5 cm. Draw lines along the marked points. Cut the resulting rectangle from the middle of the paper sheet. The result is the base of a photo frame.
- Roll one magazine page tightly into a tube and secure the edges with glue.
- Wrap thread around the curled page, securing the ends of the threads at the bottom.
- Make several of these tubes.
- Glue each piece to the base starting from internal corners products. To give the effect of a volumetric bend, bend the tube at the corners.
- Glue three sides of the second sheet of paper to the inside of the frame. The fourth side is necessary for placing photographs into the product.
- We form the frame leg from a piece of cardboard.
After drying, the craft can be carefully and easily coated with varnish.
Cool DIY photo frame in 5 minutes (video)
How to make a beautiful photo frame from cardboard
Necessary:
- Colored cardboard, colored paper;
- Stationery knife;
- Colored pencils, stickers.

A cardboard photo frame can be very simple
How to do:
- Cut out a rectangle of the given parameter with a stationery knife.
- Mark the dimensions of the photograph on the wrong side of the figure, deviate 1 cm from the markings, and place measurement points for the window. Cut out the inner rectangle.
- We cut out the inner side of the product from less dense paper.
- Glue both sides of the frame, leaving one side for inserting a photo.
- Draw the desired pattern with pencils and decorate with stickers. The edges of the photo frame can be decorated with golden chocolate wrapper.
We make the frame's stand from cardboard. Cut a thin rectangle, fold it in half, and glue it to the craft with the base.
Original design for a photo frame: master class
A very delicate and beautiful frame is obtained when decorated with artificial flowers, wallpaper, pieces of lace or braid.
Necessary:
- Wooden or plywood frame - base;
- Scissors, glue;
- Pieces of wallpaper, golden braid, lace, beads.
The photo frame can even be decorated with broken branches
How to do:
- Artificial lilac branches or other flowers with small fluffy flowers are ideal for crafts. Arrange each flower into inflorescences.
- Cover the base with wallpaper and let it dry completely.
- Place one inflorescence on a drop of glue from the top corner, bend the petal up a little and glue the second one next to it. Thus, fill the entire upper corner of the frame with flowers.
- We decorate the lower opposite edge with lace, gluing it with glue.
- We glue golden braid along the edges of the inner frame.
- Place the beads on the glue like flower cores. Glue beads of the appropriate tone to the lace ornament.
- Glue a piece of starched lace along the top of the flower corner of the craft.
How to decorate a regular photo frame
Photo frame design options:
- Worn discs. Since the material, when broken, contains sharp corners, it is more advisable to wrap the discs in an unnecessary towel. Break it with a hammer. Place small pieces in an interesting mosaic on the frame using glue. After drying, apply black paint to the spaces between the fragments. acrylic paint under gloss.
- Wallpaper. Pieces of wallpaper remaining after renovation are very suitable for decorating crafts, especially if they have pictures. Cut out a wallpaper pattern or flower and glue it to the corner of the frame.
- Old buttons. Collect all unpaired buttons. Decorate the product with them, gluing them with glue from the outer corners.
- Sea pebbles and shells. They look great when paired with starfish decor made from salt dough, rope threads and a figurine of a sea anchor. Such a frame with a joint photo - wonderful gift for a close man.
- Satin ribbons. When gluing the ribbon as a decorative element, decorate it with the remnants of lace.
- Puzzles. Pieces of the picture, laid out randomly around the frame, will be an amazing addition to a child’s photograph. For variety, add toy figures cut out of paper to your decor.
- Decorate the frame in the New Year style with Christmas tree tinsel and shards of balls.
- Paints. To paint frame parts, it is better to use gouache or acrylic paint.
- Pieces of fabric. Here you can come up with both finishing each detail of the frame with a fabric base, and weaving decorative elements from fabric strips.
- Quilling and beads. Paper swirls will make the photo frame very interesting. And beads and beads give the decoration a fabulous look.
- Colored threads. They harmonize well as decoration when creating frames from magazine pages. Tie each page with thread and glue it to the base of the product.

The photo frame can be decorated however you like
If desired, crafts can be decorated with decorative small flowers, knitting threads, pieces of wool, dry herbarium, colored pasta or seeds.
What can you use to make a photo frame with your own hands?
If you plan to hang a framed photograph on the wall, it is better to take it for making lightweight material- ceiling plinth, cardboard, paper.
- A very simple frame layout can be made from ceiling plinth. Smooth surface material will allow you to make sure you don’t make a mistake in size. Use a ruler to carefully measure the required measurements and cut with a utility knife. Further, according to inspiration, the product can be decorated with paints or decorated natural materials: shells, branches and leaves of a tree. After the glued decor has completely dried, carefully cover the craft with colorless wood varnish.
- Wooden frames are more durable in construction. For the craft, take two identical strips in size. Knock down with nails or glue in the form of a rectangle, open with varnish.
- A photo frame made of cardboard and yarn is a very easy craft to make. Fold into a rectangle or other shape geometric figure cardboard or thick paper in several layers. Carefully spreading PVA glue, we sequentially glue the frame with multi-colored yarn and buttons.
- A frame from a glossy magazine looks unusual. Roll each page of the magazine into a tube and glue it into a geometric shape.
You can involve your child in creating a frame from dough. An exciting activity will amuse the little fidget, and the product will turn out to be unusual.
- Mix flour, non-iodized salt and water. We take salt in half the portion of flour, and half as much water as salt.
- After kneading the dough, let it rest, then mold the craft. Keep the finished frame in the oven at 80 degrees until completely dry on both sides.
- The ornament for such a product can be molded together with the frame.
After drying, paint the craft with gouache and open it with colorless nail polish.