DIY concrete mixer from a barrel with a hub. Homemade concrete mixers: manual, electric
Comments:
How to make a concrete mixer with your own hands? What materials and tools are needed for this? Many people who need a homemade concrete mixer try to make one from what they have at home.
This unit is needed for concrete work on summer cottage or during the construction of various buildings. Many people cannot afford to buy branded machines, which is why people make concrete mixers with their own hands. Below we will discuss some of these designs that are relatively easy to manufacture.
How does a homemade concrete mixer work?
In practice, there are 4 main methods of mixing the solution:
- Gravitational.
- Mechanical.
- With forced vibration.
- Combined.
In the first method, the container with the components rotates cement-sand mixture and mixing occurs under the influence of gravitational forces. With this method, a large volume of mortar cannot be mixed, and the quality of the concrete at the end is slightly more than satisfactory. Therefore, this method is not used on a wide scale. But a DIY concrete mixer made using this method may well be suitable for a small amount of work.

With the vibration method of mixing the solution, the machine body does not move, and a mixer equipped with a vibrator creates a compression wave in the mixture of sand and cement. It turns out concrete high quality. But this method also has significant drawback- high energy intensity. For example, to obtain 18-22 liters of solution, you need an electric drive motor with a power of 1.3-1.5 kW.
Mechanical mixing of material into pure form are not used, but are used in a combined method together with gravity. This homemade concrete mixer consists of a vessel that rotates in a horizontal or inclined plane. Protrusions are made inside the structure that mix the solution. Such designs attract homemade workers because of their ease of manufacture. Therefore, mainly units of this type are described below.
Return to contents
How to make a simple handmade homemade concrete mixer?
Its operation diagram is clear from Fig. 1. In this design, you can mix any, even “dry” solution. It can be done by anyone who has experience using it. simple tools. It comes together in 2-3 hours. Here is a guide to making such a unit:
- Take the old one milk can or boiling down.
- If there is a crack or fistula in it, they are eliminated by electric welding.
- A piece of pipe is threaded through the handle of the lid of the vessel and tied tightly to the handles of the can with a rope. You can also use a rubber band.
- To secure the vessel to the axis, it is welded to it. If it is made of aluminum, then it is necessary to make holding elements. For them, metal strips 7 mm thick are used. The vessel is attached to them with screws.
- You need to cut holes in the frame in the shape of the Latin letter “U”.
- The axle is placed in them.

If a barrel is used, then you can make a horizontal unit. To do this, a hatch is made in its side for filling the mixture, and the vessel itself is strengthened directly on the axis. The unit is installed on legs made of steel pipes.
This design will rotate slowly, but the concrete will be well mixed. The only drawback that such a homemade concrete mixer has is the mixing time of the solution, from 4 to 20 minutes. Compared to using a shovel, this design has 4 times greater productivity. Rotating the axle manually is a little tedious, so you can attach an electric motor through a gearbox or belt drive. Its power should be 2.5 kW with a vessel volume of 50 liters.
Return to contents
How to make a homemade concrete mixer with forced mixing?
This device will consist of the following components:
- Tub - made from old barrel, the walls of which must be rounded with a sledgehammer. This is necessary so that cement and sand do not accumulate in the corners of the vessel. For small portions of solution, a tub can be made from 2 basins. In general, you can use plastic containers. They are fastened along the rim with a steel tape, which is tightened with a screw. The bottom of one basin must be cut out so that the solution can be loaded and unloaded.
- Steel ring gear (you can buy it).
- Car flywheel.
- Starter gear from the car.
- Wheel hub.
This drive works like this. The flywheel rotates on an axis, and the tub moves with it. The second end of the axle is secured using bearing No. 208-210, which is inserted into the coupling located in the hub. You can also make a vertical version.

To do this, a working vessel is bolted to the wheel, and the flywheel is welded to the hub. Then the coupling with bearings is attached to the flywheel, and an additional part is needed to secure the neck of the vessel.
This structure can be connected through a gearbox to an electric motor - the result is an electric concrete mixer. The rotation speed is selected within the range of 25-55 rpm. If the speed is increased, the solution may splash out. The engine power is selected as follows: per liter of solution 20-25 W. To ensure these indicators, a belt drive can be used. If we assume that the tub has a volume of 200 liters, then an electric motor with a power of 1.3 kW will be needed. This unit gives good quality concrete mixture and allows you to greatly speed up the construction process.
Return to contents
How to make a concrete mixer from a washing machine?
Any old car can do this. It is important that it has an activator at the bottom of the case. It must be replaced and mounted on a shaft of suitable size. There is a thread inside the washing tub. It is secured with brackets (nuts), which are made in the shape of the letter “P”. We also need to make a structure from a steel strip with blades that rotate 90 degrees. All these parts must be positioned symmetrically so that there is no beating during operation. Drain hole needs to be muted. A similar electric homemade concrete mixer has low productivity, but is quite suitable for small jobs. If desired, you can also make an inclined unit. To do this, a frame made of steel pipes is welded, which has an inclined platform. Channels are welded onto it, and the washing machine is bolted onto them. The design works the same way as the vertical version.
People who are planning to build a house for themselves make a list necessary equipment. And it turns out that you can’t do without a concrete mixer. Purchasing such a device involves a lot of money, so craftsmen have developed instructions on how to assemble such a device yourself. An important factor is also the fact that this product is designed for long and repeated service.
You can be sure that if you follow the instructions carefully, assembling the concrete mixer will not take much time. Here's a list of the benefits you get:
- the design involves the use of economical materials (i.e. you won’t have to spend a lot).
- even a person without special skills can assemble this product.
- the component parts are not particularly rare. They are not difficult to find, but be prepared that if you don’t have them in your possession, you will have to either ask friends or buy them.
A homemade concrete mixer includes the following parts: a handle for throwing concrete, a motor, a frame, and a container for concrete. If you intend to transport a concrete mixer from place to place, then you should also assemble a corresponding mobile structure based on a cart with wheels.
First, you need to think about the plan for the upcoming work, namely, draw a drawing of a concrete mixer, decide what components it will consist of.
There is no doubt that part of the concrete mixer will be a bucket. You will have to find a container or vessel of large volume.
— Perhaps it will be one of those barrels that often stand on personal plots (both metal and plastic will do).
— Sometimes there are very large, multi-liter pans that are also suitable for concrete.
— Round, capacious tanks, like the “titans” used for making tea on trains.
If you couldn’t find a similar container at home or with your friends, then you’ll have to work hard to make it yourself. At the same time, you will save a lot of money, because such products are not cheap in the store.
It is immediately worth noting that for comfortable work concrete mixers will require a capacity of 200 liters. and more. Then you don’t have to unload and unload it, but cook it right away required quantity mixtures.
 In particularly unfavorable conditions, people manage to make concrete by persistently mixing the mixture with a shovel. But this is hard, exhausting work. After all, the mixture contains cement, sand and water - the substance turns out viscous, and the end result may be worse than if you use a concrete mixer. But some old container (for example, a 200-liter barrel) will become an essential part of the concrete mixer and will save you from suffering.
Let's consider two options for making such useful device. So, in the first case, you will rotate the concrete mixer with your own hands. Which, however, is much easier than doing it without this device at all, with a shovel. The second option is more “advanced”; it uses an engine (electric or gasoline), but, accordingly, more costs will have to be incurred.
If you decide to make a concrete mixer without additional traction, then you will need a shaft and a barrel. Handles are attached to both sides of the shaft. You rotate these knobs, and the shaft rotates along with the barrel of mixture mounted on it.
The assembly sequence is as follows:

Now consider the option if you decide to use an engine. 
In this case, the engine torque will go through the belt to the pulley, and from the pulley, fixed instead of the handle, to the shaft. The rest of the details are the same as when using manual traction.
You may prefer the vertical version of this design. To do this you need to do the following:
- Place the frame with the motor on the base. It will provide turns.
- The rotation of the barrel occurs thanks to the shaft and special rollers on which it rests.
- To avoid the difficulty of turning the device over, a handle is welded to the axis of the frame, and the frame itself is removed.
Typically, such an advanced model of concrete mixer is stored and used for its intended purpose in a special protected place. It could be a garage, a barn, a spacious utility room - the main thing is that there is electrical wiring there.
Not everyone has welding equipment, and not everyone knows the skills of this craft. In this case, the frame is made of an iron angle, and the concrete mixer itself is bolted. If you have an old washing machine, then the motor from it will fit this device. Also, if you find an unnecessary drill with a 1.3 kW working motor, you can use it. A regular gasoline engine will also work.
Frame
 The greatest loads of our structure will be borne by its frame. After all, when the bucket rotates, a load is generated that significantly supplements the mass of concrete. At the base of the frame, a steel angle with parameters of about 110-130 mm is required.
If welding equipment is not available, you will have to make do with 27 mm bolts (or better yet, even larger ones). It is highly not recommended to use bolts of a smaller caliber, because... they may not be able to withstand the heavy loads ahead. But in any case, welding the frame remains a more reliable option.
Try to find a 1.3 kW motor. Some craftsmen who do not have such a device manage to connect two motors with identical speeds and torque. But a small failure of one of them can lead to a general breakdown.
Gearbox
Rapid mixing of concrete is unacceptable. It is recommended to do about 35 revolutions per minute. Most engines are designed for high speed. Slow engines enter specialty stores extremely rare. So it would be optimal to use a fast motor complemented by a gearbox.
Belting
 This is the most economical and simplest way to manufacture a gearbox. You will need pulleys and belts.
If you need to reduce the speed from 1000 to 35 per minute, then you need to divide the actual number by the desired one. So, 1000/35 = 28. Therefore, the diameter of one pulley should be 28 times greater than the diameter of the second.
Suppose the diameter of a small pulley is 3 cm, then 3*28. It turns out 84 cm - this is what a large pulley should be.
Chain transmission
If you decide to use a chain drive, then the principle of its design is the same as with a belt drive. The only difference is that the calculations take into account not the diameter, but the number of teeth in the small gear.
Gear
If you have a ring gear from an engine old car, or better yet, a gearbox, then it can be used for a gear drive device.
The sequence of actions is as follows:
- Turn the barrel over.
- Place a hardened steel disk (crown) in the middle of the bottom
- Mark the required places.
- Set the crown aside and use a drill to make holes in the marked places.
- Screw the crown as tightly as possible with bolts.
But if it is possible to weld the crown, this would be the best option.
If you have already installed the crown, then to install the gearbox you need to carry out the same steps. Those. you make marks, make holes as tightly as possible and secure with suitable bolts.
The next step: installation of the barrel, inside of which the blades are already welded or screwed. Metal corners or sheets are used for this.
For reliability, it is necessary to replace the last pulley or gear with a special gear located on the starter (Bendix) of the car. If you haven’t done this before and don’t want to make a mistake, dig into the documentation. It is this gear that is designed to take and withstand the greatest load when the bucket loaded with concrete rotates.
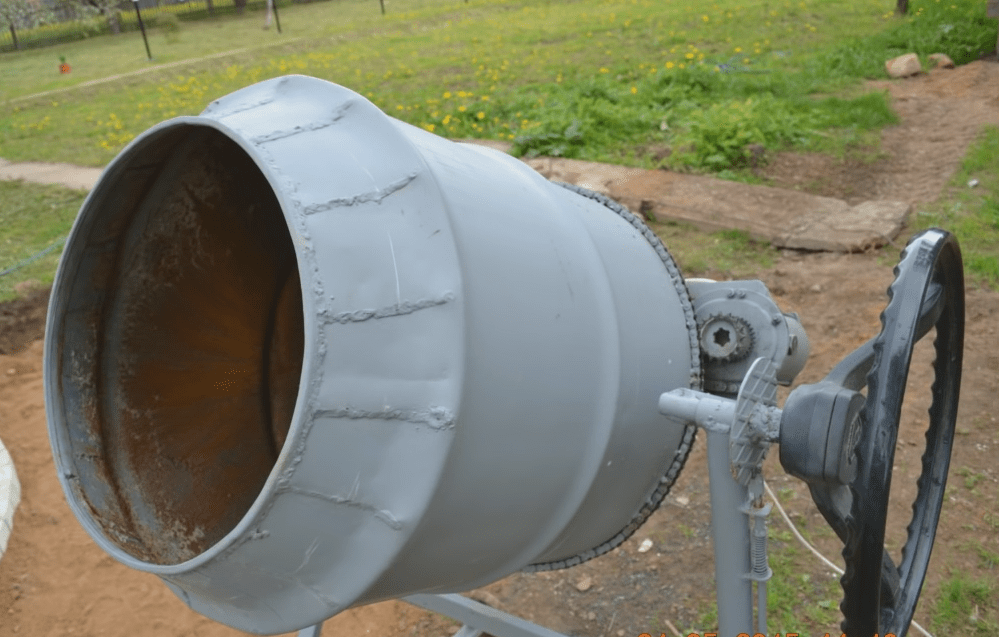
Steering wheel
If you are making a vertical concrete mixer, then to unload concrete from it you need to make a steering wheel
You have the following options to create it:
- use a pulley or wheels (you can use old ones)
- A piece of pipe with thick walls will do.
If you have selected a suitable pulley or wheel, then drill several holes around their circumference (your choice - 6 or 8). The minimum diameter is 6 mm, but it is better to do more. The holes are threaded. Even long bolts can act as handles (but in this case you need to cut off their heads and cut threads of more than 10 mm), but threaded rods or metal handles are better suited. They must be screwed into the holes on the wheel or pulley.
Making a steering wheel from a thick-walled pipe is almost the same as in the case of a pulley and wheel. Sometimes, if the pipe diameter is too small, some handles are installed offset.
If it is not possible to make a steering wheel at all, then the concrete is removed with a shovel. This is a more labor-intensive, but also effective method.
The most important part of the concrete mixer will be the tub. She needs to pay special attention. It's good if you have a suitable container. And if not, you have to do it yourself. You will need a metal sheet 2 mm thick. On the back of this sheet a development of a large truncated cone is drawn, and on the back - a development of a small truncated cone. You also need to draw a circle for the bottom.
Then you need to cut out this development, bend it and connect all the components of the tub. Before final welding, it is necessary to study how accurately the parts fit together.
Unit frame
 You need to determine whether you expect the concrete mixer to have a long service life or whether one season will be enough. In the first case, you can assemble a frame from wood, but for durable design it must be made of metal.
If you choose the option with wood, then prepare self-tapping screws - they will be needed during assembly. In addition, you need to find a beam (its parameters can be chosen from 10×10 or 15×15 cm). The connections are carefully glued at the joints.
A concrete mixer that will serve you for many years should have a metal frame. For production you will need a 45x45 mm corner or channel. As with other operations, more in a reliable way The fastening will be done by welding the base, but in extreme cases, riveting or tightening with bolts will do.
Concrete mixer frame
Whatever type of construction you choose, you must drill holes in the frame of the concrete mixer for all devices that ensure operation.
Engine
As you know, Soviet washing machines, like refrigerators, despite their long operation, serve faithfully. Therefore, a motor taken out of an old one may well serve as an engine for a homemade concrete mixer. washing machine. To ensure an acceptable speed for the concrete mixer, a gearbox is used.
You can also connect a gasoline engine. This option is more mobile, because does not require electrical wiring. The engine can be taken from a moped. The transmission is carried out using a chain, which can also be taken from a moped or scooter.
Despite providing more mobility, the use gasoline engine involves risk. If there is a spark or other accidents, an explosion is possible. But using an electric motor also carries potential dangers.
 To protect yourself and others, remember the following rules:
- because If you are going to work in a damp environment, you need to check the insulation of the cord.
on the contrary, you cannot check the solution when the tub is rotating. - because The concrete mixer will vibrate during operation; it is necessary to install a reliable support for the wheels (if we are talking about a mobile version). Otherwise, she may unexpectedly move away, causing injury to someone.
- the same vibration weakens the tightening of the nuts. Therefore, check them regularly and tighten them if necessary.
- Mittens would also come in handy. They will protect you from getting the solution and causing allergic irritations.
- Do not leave a running concrete mixer unattended. It is unacceptable for children to approach her.
From all this it follows that even such a seemingly complicated unit as a concrete mixer can be made with your own hands. The main thing is to follow the instructions carefully and responsibly. And because Since no construction is complete without a concrete mixer, it can be rented out, which will not only recoup costs, but also make money.
To improve a summer cottage, you often need cement mortar or concrete. Craftsmen are faced with a choice - to knead by hand (which is difficult and ineffective, since the solution hardens quickly) or to purchase an industrial concrete mixer, which is unjustified for irregular work. Therefore, many summer residents prefer to make a concrete mixer with their own hands, as it is simple and practical.
Principles of mixing concrete
There are several mixing options mortar in a concrete mixer. Namely:
- Gravity method.
- Forced-mechanical.
- Forced vibration.
- Combined gravitational-mechanical.

The easiest way to cook concrete mortar- This is mixing with a shovel in a stationary trough. The most unjustified and low-quality method. Not only does the solution itself quickly harden, but it is also problematic to mix the mixture until smooth.
Sometimes craftsmen stir the solution using a drill with a mixer attachment in a bucket. This option is somewhat better, but has its own very serious drawbacks. First of all, the drill is not designed for long-term continuous operation, with all the ensuing consequences. In addition, the technology of this type of mixing requires constant rotation and movement of the tool in the mixture. It's unreliable, difficult and tedious.
Gravity mixing
 With the gravitational method, the tub with the solution is loosened or tipped over, and the solution mixes itself. That is, the components move independently in the container under the influence of gravity. The quality of the finished product is not very good and large volumes are difficult to achieve. However, many masters in living conditions This mixing option is used.
The advantage of this type of mixing is the simplicity of the concrete mixer design. Therefore, devices of this type are often created in garages, cottages and small businesses.
Forced-mechanical
The forced-mechanical method is the simplest and most common. His distinguishing feature- it's motionless standing container. The components are most often mixed mechanically in a drum. The drum can be horizontal or vertical. The essence of this method is clearly revealed by the example of using a drill in a bucket.
With limited volumes, this method may be justified, but it has its own characteristics:

Combined type of mixing
Many homemade concrete mixers made with their own hands use a combined method. It simultaneously combines the previous two methods and has a number of advantages:
- There is no need to tightly seal the rotation units, since there is no contact with the solution. The drum is not closed at the top.
- Parts of this type of structure last longer because the mechanism is reliable and simple.
- The composition of the component can be anything, including gravel, crushed stone, expanded clay, and so on.
Vibration method
 Recently, the vibration method of preparing concrete has been gaining popularity. This method allows high-quality mixing of large volumes of mixture and is used in cases where it is necessary to produce a reinforced concrete part with excellent and precise operational parameters.
In principle, vibration mixing can mix ingredients almost perfectly. The only limitation is the preparation of a “heavy” solution. To use this type of mixing, significant energy consumption is required. About twenty liters of mixture requires a vibrator power of 1.3 kilowatts. At home, instead of a drive and gearbox, a very powerful hammer drill is used. There is no need to press the cartridge, and the vibrations should be independent.
Drawings and designs of concrete mixers
Before starting assembly, you need to prepare a working tool, decide on materials and prepare a container of the required volume. It is not recommended to select small containers, since the solution in it may harden before the required time, and if the prepared mixture is not enough, the whole process will have to be repeated all over again. The optimal capacity of the container is two hundred liters.
The general requirement is strength, reliability and stability of the structure. It is necessary to manufacture such structures as responsibly as possible, since the slightest miscalculation or carelessness will lead to breakdown or even injury to the worker.
The simplest concrete mixer from a can
 If you save electricity and time, you can assemble a manual concrete mixer from a regular milk can. The entire assembly process takes several hours and the most crucial moment is welding the frame. With a little patience, simple gravity concrete mixing equipment is ready.
To make this concrete mixer you will need a can or other similar container, several pipes or thick rods.
Despite the simplicity of the design, even dry screed concentrate can be mixed in the can. The axis inside the can cuts the mixture as it rotates.
Procedure:


The coupling can be omitted, thereby further simplifying the design. Instead of couplings, you can cut out arcuate recesses and place the axle in them. The rotation will be uneven and squeaky, but it will knead well. In one cycle of work in a forty-liter can, about three buckets of solution are obtained. Sometimes a barrel is used instead of a can. This raises the problem of how to fix the lid. This issue can be solved in an original way if the handles are attached to a barrel without a lid. different levels. One end of the handle is near the bottom, the other is near the top. As a result, the container is placed at an obtuse angle relative to the surface of the earth and the solution does not spill out during rotation. But the quality of the kneading with this method suffers.
Concrete mixer from a barrel
A homemade concrete mixer made from a barrel with your own hands can replace the factory model and mix uniformly good mixture. All materials needed for assembly can be found in the garage or summer cottage. The unit can be either with manual drive, and mechanical.
Scroll necessary details for assembly:


Among the tools you need a grinder to cut metal, and welding machine for a strong connection of parts.
After preparatory work The question of how to make a concrete mixer with your own hands is no longer a question.
First, the barrel is centered and placed on the axle. Then they are designed internal elements, which will help mix the concrete.
 Using a drill or welding device, two holes are drilled at the top and bottom of the barrel. A metal axle with a diameter of thirty millimeters is pulled through them, and this structure is tightly welded. Thus, the shaft and the tub are securely attached to each other.
A rectangle is cut out in the center of the barrel along the long edge. It will be a hatch for filling the components of the solution. Approximate Dimensions the hatch is approximately ninety by thirty centimeters. If the hatch is small, it will be inconvenient to use. And if it is made too large, the strength of the structure will decrease.
Blades are constructed from a metal square and mounted in a barrel. One side is welded to the wall, and the other to the axle. For good mixing, four or five blades, evenly spaced inside the barrel, are enough.
The rectangle obtained from cutting out the hatch is welded to the hinges that are attached to the barrel. The result should be a lockable hatch. After that, a latch or latch is attached to the hatch cover. The main task of the lid is not to open while the device is operating.

Then the frame is welded. A second length of fifty millimeters is welded to the long channel. The same is done with the second support.
A pipe is welded to the other edge of the channel into which the concrete mixer axle will be inserted.
Then, when the metal axle fits into the bushings, retaining rings are welded on both ends. Their role is played by thick metal washers.
After which the steering wheel is welded to one of the edges of the axle.
If an electric model is being assembled, then it is necessary to assemble and connect the corresponding unit, consisting of a motor and a drive system.
Tricks for using homemade devices
According to the principle of operation, homemade concrete mixers are similar to industrial designs and perform the same functions. But to achieve comfort, home devices need to be used a little differently.
Tips for working:

When assembling and operating home-made structures, one must not forget about compliance with safety precautions. This applies to the rules for working with power tools and conventional equipment. Following the usual simple instructions will prevent unpleasant situations and avoid injury.
Many people like it on their personal plot carry out repairs yourself. To fix the foundation of a house, fill paths, or install fences on posts, you need a machine such as a concrete mixer. There is no point in purchasing an industrial model, because it will be very expensive. In this case great solution You will be able to make a concrete mixer yourself, which will not require large financial costs. So how to make a concrete mixer yourself? Thanks to the presented video, you can clearly see the entire process of such manufacturing.
Why is a concrete mixer needed?
Many people think that it is not large number The solution can be easily mixed with a shovel. However, this results in a very low quality mixture. The fact is that it is very difficult to stir the solution in a trough with a shovel. Such physical activity not everyone can do it, so easier to install the concrete mixer, assembled with your own hands from a barrel. In addition, if you mix a large amount of the mixture, the composition will end up dry. The solution begins to lose moisture much faster than it can be stirred to the required consistency.
Concrete good quality It won’t work even if you use a drill. When you attach it to the bracket, lumps of sand remain in the mixture. The drill must not only spin, but also move back and forth and in a circle. Often the tool cannot withstand such stress and breaks.
To understand the principle of operation of a homemade concrete mixer with your own hands, which is made for a small amount of work, it is necessary to consider the process of mixing the solution. There are 3 ways:
- gravity method;
- vibration method;
- mechanical method.
Gravity method. This method is not used in industry, because the resulting cement has low quality. As a result of gravitational mixing, the container tumbles over, the components begin to “plop” on top of each other and mix into a relatively homogeneous mass.
Vibration method. Counts the most reliable production method concrete in industry. In the fixed tub, a vibrating mixer begins to move, resulting in a high-quality solution.
Mechanical method. Can only be used in conjunction with gravity. In this case, either the mixer begins to rotate in a stationary tub, or the tub with protrusions inside rotates.
Concrete mixer manufacturing technology
There is a large number homemade units, which are adapted for the production of concrete. Most simple design can be made from an ordinary milk can, a large saucepan, or old boiled milk. Its drawing is quite simple, and its manufacturing technology is even simpler:
- weld the container to the axis;
- insert a stick, a piece of pipe or a rubber band into the lid and pull the lid very tightly towards the handles;
- to simplify the design couplings are not used, and cut arc-shaped recesses in the frame and lay the axle on them.
To make a more practical unit, it is necessary to use other drawings.
Stages of making a concrete mixer with your own hands
Making a container
 Before you start creating a concrete mixer with your own hands, you should choose a container. Best to use for this metal barrels, which can hold at least 200 liters. Exactly this volume is considered optimal in order to knead required quantity concrete at a time. It is better not to use plastic tanks, as they will not last long.
To make a concrete mixer you will need a barrel with a lid and a bottom. If the container initially does not have a lid, then it should be welded by cutting it out of a sheet of metal. After this, flanges with bearings should be attached to the bottom and lid of the barrel. A hatch is cut out in the side, through which the components of the solution will subsequently be poured. It is best to make such a hole closer to the end of the container, which will be lower during operation of the concrete mixer. The cut out part of the barrel will be used as a hatch cover. It is secured using hinges and some kind of locking device.
In order for the solution to mix better, blades are welded to the inner walls of the barrel at an angle of 30 - 40 degrees. The angle of inclination is calculated in such a way that during the mixing process the concrete can be “pushed” outward. In addition, such the blades can be fixed not on the walls, but on the shaft of the device itself.
If suitable container If you can’t find it, you can make it yourself. To do this you will need the following tools and materials:
- sheet metal 1.5 - 2 mm thick;
- welding machine;
- rollers;
- wooden mallet or hammer.
Before you start cutting metal, drawings should be prepared indicating the required dimensions. To make the body of a concrete mixer, you will need a central round section, the bottom of the container and two truncated cones that make up the bottom and top part designs. Parts cut according to the markings must be bent into rings. It is more convenient to do this using rollers. After all parts have been adjusted, the seams are securely welded.
Base installation
 A homemade concrete mixer must have a reliable and stable base. Otherwise, the structure may tip over during operation. If it is not intended to load a large amount of concrete into it, then it is better to make the frame out of a square one wooden beam
, having a cross-section of 10x10 or 15x15 cm. To ensure that the base of the structure does not suffer from vibration during operation, you should use “half-tree” or “tenon” type connections. After assembly, all joints must be properly glued and tightened with self-tapping screws.
A homemade concrete mixer must have a reliable and stable base. Otherwise, the structure may tip over during operation. If it is not intended to load a large amount of concrete into it, then it is better to make the frame out of a square one wooden beam
, having a cross-section of 10x10 or 15x15 cm. To ensure that the base of the structure does not suffer from vibration during operation, you should use “half-tree” or “tenon” type connections. After assembly, all joints must be properly glued and tightened with self-tapping screws.
If you want to create a more reliable and durable unit, you should give preference to a frame that welded from metal corner size no less than 45x45 mm. You can also use a channel. If there is no gas welding machine, then the frame is secured using rivets or nuts and bolts.
If there is such a desire, the base can be equipped with wheels. This will require an axle without bearings and the wheels themselves. This concrete mixer is easy to turn over and move. When assembling the base, it is necessary to provide handles. With their help, the device can be moved.
During the assembly process, the frame must provide space for the engine. Also a counterweight will be needed so that the structure does not topple when unloading concrete. If you plan to unload the solution with a shovel, then in this case a counterweight will not be needed. All these points must be provided for during the creation of the drawing.
Engine installation
To make the concrete mixer more efficient, you need any single-phase motor whose rotation speed is no more than 40 rpm.
Many masters who create homemade design, it is advised to use electric motors from old washing machines that have failed, such as “Volna” or “Chaika”. Such motors can operate long time and don't overheat. When choosing a motor, you should remember that the optimal rotation speed of the tub is 20 - 30 rpm. For this, various gearboxes are used. However, optimal and simple option is the use of a pulley and a drive belt.
Instead of a washing machine motor, You can use a motor from a motorcycle or a gasoline-powered moped. In this case, the concrete mixer will not require power supply and can be used in any conditions. The engine is mounted using 4 bolts to the bracket or frame, which are welded to the gearbox housing.
However, a homemade concrete mixer can also operate using manual control. In this case, neither electricity nor gasoline will be needed. Such a simple device is mobile, easy to assemble, and anyone can operate it. Its only drawback is the presence of an assistant to mix the solution.
Finally, a shaft is threaded through the container of the structure. To make the device more stable, it should be dug into the ground at an angle of 30 degrees.
Thus, to make a concrete mixer with your own hands, no special skills are needed. The manufacturing process can be seen more clearly in the video. Before you start assembling such a device, you should use the drawings. They will help you correctly and accurately create a homemade design without major financial investments.
Anyone who has even installed a fence on posts has had a question: how to make a concrete mixer with your own hands? It’s a painfully boring and tedious task to shovel the solution in a bucket or trough. And if you need to form a floor screed, then you won’t be able to do it with your hands at all: the “dry”, very viscous solution will begin to set before you “pound” it to the desired homogeneity. Buying a factory-made one, especially if you build irregularly, is expensive; the equipment is not cheap. Renting will also cost a lot: concrete work an hour or two do not continue, and you need to give a deposit in the amount of the full cost of a new one.
Meanwhile, a homemade concrete mixer is not God knows what kind of device, and for minor work, including pouring the foundation of a country house, it is quite possible to make it yourself. The time spent will more than pay off by speeding up mixing and improving the quality of work in general: the next portion of ready-made concrete will have time to prepare and be poured before irreversible changes occur in the previous one, reducing the strength of the monolith.
Why can't you use a drill?
Almost everyone has at least once seen how a solution is mixed in a bucket with a drill with a mixer attachment. It would seem that this is the solution! I pulled the drill with the mixer with a clamp to the bracket, and know, change bucket after bucket.
Firstly, the drill is not designed for long-term operation and will not last long in this mode. But this is not the main obstacle. Anyone who mixed the solution in a similar way, knows: when kneading, the tool must be moved back and forth and in a circle. Otherwise, when dumping the solution, you will see lumps of sand, and this is an unacceptable defect. Therefore, mechanical forced mixing in a stationary tub is not used in industrial conditions– the mechanism for moving the mixer is complex, expensive and unreliable.
How do concrete mixers work?
Since we are talking about mixing methods, it doesn’t hurt to figure out how a concrete mixer generally works. And it will also be useful for a complete understanding of what follows.
There are mainly four methods of mixing cement-sand mortar:
- gravitational;
- forced mechanical;
- forced vibration;
- combined gravitational-mechanical.
With gravity mixing the container with the solution components is tipped over, the solution plops down on itself and is mixed at the same time. You can’t mix a large volume this way; the quality of the finished concrete is only satisfactory, so this method is not used in industry. But you can quickly and easily make a quite decent gravity concrete mixer for yourself, see below.
With vibration mixing the tub remains motionless, and the mixer-kneader excites compression waves in the mass of the initial mixture, which mix and compact the solution very well. The disadvantage of this method is high energy consumption: for 20 liters of solution a 1.3 kW mixer-vibrator drive is required. But the quality of the concrete is exceptional, so vibromixing is used for especially critical structures: hydroelectric dams, etc. In this case, to save energy, the pre-mixed solution is poured into the formwork and “finished” with vibrators on site. But you can make a small vibrating mixer yourself; this will be discussed later.
Forced mechanical mixing not used in its pure form; why - stated above. In the vast majority of cases, mechanical mixing is combined with gravitational mixing: a mixer rotates in a horizontal or inclined tub, or the tub itself rotates with protrusions inside. It is quite possible to make this kind of concrete mixer yourself, and much faster and easier than it seems at first glance. Drawings, if necessary, are at your service via the link, and here we will look at the principles of operation and features of various designs.
It couldn't be simpler

Take a look at the picture. This is the simplest gravity concrete mixer. You can even mix dry mortar on a screed in it: the pipe-axis will cut the mortar when transferring, so some forced mixing also takes place in this machine. And this contraption can be further simplified and reduced in price to the point that an average amateur master who knows the basics welding work, can make one in literally an hour and a half to two.
There is no need to make holes in a rather expensive milk can: leaky milk can will do just fine. We weld the fistula or crack, and fasten the lid like this: we thread a piece of pipe or just a stick into the handle of the lid and pull it tightly to the handles of the tub with a rope or a thick rubber cord; will go torn for attaching cargo to the top trunk of a car.
Turned axles for attaching the tub to the axle are also not needed: we simply weld the weld-in, and for aluminum we weld a couple of suitable pieces of metal to the axle - a rod, strips 6-8 mm thick, and fasten the tub to them with bolts. And you can do without couplings from pieces of pipe, not to mention bearing ones: we cut out U-shaped recesses in the frame posts by welding, the axle will simply lie in them. It will rotate with creaking and jerking, but it will knead properly.
There is only one drawback to such a mixer: it is difficult to rotate, and the kneading lasts from 5 to 15 minutes. depending on the viscosity of the solution. But labor productivity increases at least three times compared to a bucket and shovel, and the quality of concrete for independent construction such as a simple manual concrete mixer produces is quite acceptable.
Forced kneading: parts and components

Correct design of a homemade concrete mixer tub
The design described above allows you to quickly and with acceptable quality pour the foundation for country house or a barn. If you are starting a larger construction project, you will need a forced concrete mixer. They are also available for self-made, there are simpler and more complex designs. Let's look at the individual nodes first.
Tub
A cylindrical tub for a mechanical or combination mixer is, generally speaking, not good. The solution in the corners will not mix properly, or you will have to rotate for a very long time, straining or consuming electricity. An exception is the concrete mixer with a rotating horizontal bucket and comb mixers, described below.
A tub from a barrel, the most accessible one, should be at least slightly rounded: cut by welding and boiled into an “egg” or “pear”, as shown in the figure. For small portions of solution, an excellent tub is made from two basins; galvanized or enameled - it doesn’t matter. If the mixer is used from time to time, plastic ones will also work, fastened along the rim with a curved trough with a metal strip secured with a bolt. The bottom of one of the basins is cut out, and such a tub can only be tilted: it is impossible to arrange a side unloading.
The neck of a tilting tub with top discharge must in any case be reinforced with a transverse bar; better - two, welded crosswise.
Drive
 The ring gear used in factory-made mixers is expensive and you can’t make it yourself: you need special equipment. For a complete replacement, the following parts are needed:
- A flywheel from a car engine, an old one from any car will do.
- The bending gear (with which the starter is connected to the flywheel) comes from the same place.
- Wheel hub from the same car.
What such an assembled drive looks like can be seen in the figure on the right. The axis on which the flywheel and the bucket rotate with it, the root end enters the coupling with ball bearing No. 208, located inside the hub.
This is one option; the second is to weld the hub to the flywheel, and attach a bucket to the hub with bolts behind the bottom. In this case, the bearing coupling is attached to the flywheel, and a second coupling is needed to reinforce the neck of the tub. The bearing of the upper coupling with a tilting tub with a top discharge will always get solution, so this solution is justified only with a horizontal tub with a side discharge and solid bottoms.
If you find a mechanical gearbox with the desired gear ratio, great - just connect it to the axle. For an inclined tub, a direct gearbox is preferable; for horizontal - angular, but here the master is afraid, see for yourself how it will be more convenient for you.
The rotation speed of the tub is 30-50 rpm. At higher speed the solution will begin to splash, and if less, it will not mix well. To ensure the required speed gear transmission if necessary, supplement the belt, as shown in the same figure.
The engine power is taken at the rate of 20 W/l for an inclined rotating tub, 15 W/l for a horizontal rotating one and 12 W/l for a stationary tub and a mixer rotating on an axis. The indicated power is the minimum; a big one, of course, won't hurt. Volume refers to the volume of solution of normal viscosity, not the entire volume of the bucket. That is, if you have a 1.2 kW engine, then in a tub of 200 liters of barrel you can load only 60 liters of regular solution, and 45 liters of dry screed. Therefore, when choosing a vessel for a tub, you should not chase volume; you must first decide on the motor and go from there.
Mixer
Mixer design for a homemade mixer special significance does not have. Its design is important for large volume industrial mixers. But location matters.
In homemade mixers, especially with a tub made from a barrel, it is better to weld the mixer to the axis: alternating loads on a thin-walled vessel will not benefit its durability. The exception is that in everything except the complexity of manufacturing, the comb mixer is an excellent one.
Designs of homemade concrete mixers
Simple mechanical

Open type concrete mixer
A simple concrete mixer with forced mechanical mixing is shown in the figure. Its advantage compared to the one described above is its larger volume. The drive is not necessarily electric; it can also be manual. Unloading – lateral tilt of the tub.
The main drawback is common to mixers with a cylindrical bucket: poor mixing in the corners. The second drawback is the spraying of the solution at speeds of more than 35/min. It can be eliminated by welding the cut part of the barrel into place after assembling the mixer and cutting a hatch in it.
The duration of mixing the usual solution is 5 minutes; dry – 12 min.
Video: horizontal mortar mixer from a barrel
Combined horizontal with combs

This stirrer can also be manual or electric. There are two advantages, and very significant ones: high homogeneity and, accordingly, quality of concrete and speed of mixing. This DIY concrete mixer from a barrel produces concrete of excellent quality, not inferior to the best industrial designs, and the speed of mixing is determined not by time, but by the number of revolutions: turn it 3-4 times, and the solution is ready.
There is only one drawback: the complexity of the design. Even a manual one consists of several dozen items of parts. Names, not pieces. Special attention during manufacture, it requires an unloading hatch: the card loops, latches and seal for it must be very strong and reliable. However, for cases where it is necessary to perform a significant amount of work in a limited time in places without power supply, this is perhaps an indispensable option. Concrete mixers of this type are produced by industry.

Construction of a concrete mixer with a tilting bucket
"Real Electric"
The electric concrete mixer of the most common design, which is most often copied by amateur craftsmen, does not require any special explanation. Its diagram is shown in the figure. Many designs differing in details have been described, and detailed drawings are also easily available, so we will only give some explanations:
- The bottom and neck of the tub must be reinforced with cross-welded strips.
- It is better to make the tub rotating along with the axis: this complicates the design of the frame, but eliminates the need to seal the shaft in the bottom of the tub, which is why homemade mixers most often do not last long.
- The best mixer for such a mixer is a frame type, welded to the axle.
Video: homemade “electric mixer” for 180 liters
Vibrating
Many home craftsmen who have a 1-1.3 kW hammer drill with manual forced (not requiring pressing the working body against the wall) activation impact mechanism, they tried to make vibrating concrete mixers, but most often the design turned out to be unsuccessful.
Typical errors are as follows:

Design of vibrating concrete mixer
- Wrong choice of tub. It must be round, high enough and not very wide: optimal distance from the edges of the vibrator to the walls is approximately equal to its radius.
- Flat vibrator. Vibrator from metal sheet will not excite in solution the required system internal waves. The vibrator profile should at least approximately correspond to that shown in the figure. A good vibrator is made from two plates or saucers put together; preferably metal ones.
- The vibrator is too big. Vibrator diameter – 15-20 cm/kW. That is, a 1.3 kW preforator will pull a vibrator from 25 cm plates. A wider one, even if it twitches with the eye, will not “rock” the solution.
- Incorrect placement of the vibrator. The vibrator should be located along the axis of the tub at a distance of approximately its diameter from the bottom. The level of the solution above the vibrator should also be approximately equal to its diameter.
If the specified conditions are met, the quality of the solution is excellent. Control the duration of the kneading - on the surface of the solution. It stopped gurgling and moving, waves began to appear - the solution is ready. Not so great good cement or sand, it may not reach the waves. In this case - 10 minutes minimum.
Conclusion
It is not difficult to make a concrete mixer with your own hands, and the speed of work increases much even with the simplest mixer. And, of course, it’s more pleasant to sip tea from a thermos while kneading than to strain yourself with a shovel. Not from a seagull or from a thermos - it is categorically not recommended: the quality of work falls catastrophically even with the most advanced technology.
(No ratings yet)