Instructions for pasting vinyl wallpaper. How to hang vinyl wallpaper: a step-by-step guide
Anton Tsugunov
Reading time: 5 minutes
Wallpapering - simple and cheap way updating the decoration in any room. But even such a simple task can turn into torture if you don’t know all its subtleties. For those who plan to glue vinyl wallpaper, you will have to figure out where to apply the glue - on the canvas or on the wall - what tool to use, how to prepare the surface and how to finish hard-to-reach areas. All this is discussed in our article.
Features of gluing vinyl wallpaper depending on the base material
Wallpapers with vinyl covering may have a paper or non-woven base. Not only the characteristics of the coating, but also the principles of gluing depend on the substrate material.
- The adhesive mixture is impregnated with the wall, not the canvas, which simplifies the work process.
- This backing is much stronger than paper and differs high performance wear resistance, can hide small irregularities and cracks on the walls.
- The disadvantages of non-woven wallpaper include the rigidity of the material. The low plasticity of the panels does not allow for quick and efficient finishing of convex areas.
- The glue is applied not only to the surface of the wall, but also to the canvases themselves.
- The material stretches well, and can be used to quickly cover protruding surfaces, such as niches, columns or corners.
- The disadvantages of vinyl wallpaper on a paper backing include the possibility of fibers breaking due to minor mechanical stress and increased glue consumption.
Tools and materials for work
To carry out high-quality finishing work, in addition to vinyl wallpaper and adhesive, you will need the following tools and materials:
- Paint brush or roller with soft bristles - for applying primer to the base and glue to the wallpaper or wall.
- Rubber rollers. Tool with wide work surface used for smoothing fabrics, narrow - for high-quality joining of joints.
- Ruler, plumb line, building level, square and pencil - for marking.
- Masking tape - for protection individual elements from ingress of adhesive composition.
- Plastic spatula - for removing air bubbles and excess glue.
- A sharp stationery knife and scissors - for cutting strips.
- Wide metal spatula - for trimming canvases near the ceiling and floor.
- Container for glue mixture.
Advice! To speed up work, use glue with an indicator, which makes it easy to control the uniformity of application of the mixture to the surface of the walls or canvas.
Preparing the surface
Before gluing vinyl wallpaper, you must carry out the following operations:
- remove the housings of switches and sockets, having previously de-energized the room, seal the areas with masking tape;
- remove protruding fasteners (dowels, screws, nails);
- clean the surface of the old coating;
- repair uneven areas with plaster or putty;
- Apply a deep penetration primer to the base and wait for it to dry.
Wallpaper can only be glued to dry and clean walls. Checking the dryness of the base is quite simple. To do this, take a small piece polyethylene film 50 × 50 centimeters and fix it with tape on the wall so that a sealed space is formed inside. After a day, the polyethylene is checked. The protruding drops indicate that the wall has not dried out.
About all the nuances of preparation concrete surfaces How to hang wallpaper is described in detail.
Step by step instructions for processing a wall or ceiling made of plasterboard before pasting with wallpaper material can be found in.
Important! Level surfaces to suit wide meter wallpaper you need to be especially careful; even with small differences, problems may arise with the joining of adjacent strips.
Making the markings
After the preparatory stage, markings are carried out to ensure the correct placement of the canvas on the surface. Mark the walls using a long ruler, chalk and plumb line.
- The first line is aligned with the edge of the window, gradually moving to the left along the perimeter of the room.
- Further lines are drawn taking into account the width of the wallpaper.
- From the window to left side markings are made to the corner of the wall with the doorway, numbering each section.
- Next, lines are drawn to the right from the window to the door.
Preparing wallpaper for hanging
Before carrying out major work roll materials cut into strips, the length of which corresponds to the height of the wall plus a margin of 5–10 centimeters. For greater accuracy, the height of the room is checked in different places. If the sizes match, several strips are cut, the total width of which allows you to cover the entire plane of the wall.
If the height of the ceiling in the room is not the same, each subsequent strip is cut off after gluing the previous one, or before cutting, each section between the marking lines is carefully measured.
When preparing strips with a pattern, make sure that the pattern matches. To do this, you need to combine adjacent canvases so that the image elements are joined in the correct order. The finished strips are stacked on top of each other in the required sequence.
Gluing vinyl wallpaper: step-by-step instructions
Work on covering walls with vinyl wallpaper is carried out in the following sequence:
- We dilute the glue according to the instructions on the package. The finished solution should have a uniform consistency without clots or lumps.
- Close the windows in the room tightly, turn off the air conditioners and fans.
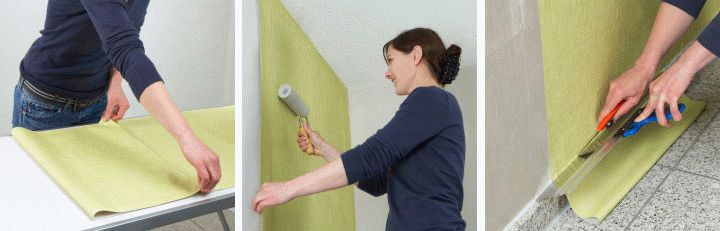
- Apply glue to the wallpaper canvas paper based or on the wall if the material is glued to non-woven fabric. In the first case, we fold the canvas into an “envelope” - the edges are aligned with the middle of the strip, and wait 5-10 minutes until the paper layer is saturated with glue. We glue the non-woven vinyl immediately after coating a section of the wall slightly larger than the width of the wallpaper.
- We apply the prepared strips to the base along the drawn line, joining adjacent elements taking into account the pattern.
- Using a rubber roller, smooth the fabric from the middle to the edges, getting rid of bubbles and achieving a perfect fit of the material to the surface. Remove protruding glue residues with a piece of foam rubber or clean cloth.
- After drying, press the edges of the wallpaper with a wide metal spatula and trim with a sharp utility knife.
How to hang wallpaper near window and door openings?
The process of gluing wallpaper near openings causes difficulties for inexperienced craftsmen. The canvases must be joined so that their edges do not touch the corners of the window or door opening.
If the door is located in the corner of the room, the discrepancy between the patterns on the wallpaper will remain invisible. If door design is located in the center of the room, the pattern should be combined both before and after the opening.
- The last canvas is glued in such a way that it can cover the casing.
- Then the limiting decorative element and cut off the hanging part of the canvas sharp knife.
- Next, smooth out the wallpaper at the joints, as well as between the wall and the casing.
- A short piece is glued to the top of the door, observing the sequence of the pattern.
Procedure for gluing near window openings:
- The strip is glued so that it covers the slope.
- Several horizontal cuts are made at the edges, which will allow you to bend the wallpaper downhill.
- The edges of the canvases are trimmed along the border of the opening.
- After gluing one of the side strips, fix short sections of wallpaper on the top and bottom of the opening.
- After this, they begin finishing the other side of the opening.
Advice. Before wallpapering the second side of the window, apply an additional marking line. This makes it easier to achieve the correct vertical position of the canvas.
How to properly hang wallpaper in corners and hard-to-reach places?
There are two methods of gluing canvases in the corner part of the room: overlapping and end-to-end with trimming.
- In the first case, we glue the strip, making an overlap of 1–2 centimeters on the other wall. Next, we draw a marking line along the width of the roll on a perpendicular wall and fix the second canvas so that its edge runs strictly along the corner of the room and does not interfere with another plane. After this, the wallpaper is carefully rolled with a roller.
- The overlap and trim method is used to fix heavy vinyl wallpaper with a large pattern. The technology for carrying out the work is initially similar to the previous method, but at the junction the second sheet does not need to be coated with glue. Next, take a long rule and a sharp utility knife. We make an even cut, bend the edge of the rolled material, apply glue and roll this area with a roller.
In hard-to-reach places behind heating radiators, wallpaper is installed from behind. After fixing in the desired position, the blades are rolled with a narrow roller with a long handle.
In places where sockets or switches are located, rolled materials are glued over the boxes, then cross-shaped cuts are made with a knife. The resulting triangular tails are bent, all excess is trimmed, and the socket bodies are installed in place.

Before gluing vinyl wallpaper with your own hands, you need to know how to do it correctly so that you can enjoy its appearance for a long time. In addition, covering walls with wallpaper of this type requires a separate approach due to the characteristics of the material. Therefore, it is worth knowing something about him.
Essentially it is a vinyl film applied to a paper base or non-woven material. Such canvases are produced in 3 types:
- silkscreen printing;
- foamed vinyl.
Vinyl wallpaper is very durable, unlike paper wallpaper. Depending on the quality, they can be the most environmentally friendly wallpaper. But in this case, when choosing, you should pay attention to the brand.
Preparatory work
Before gluing vinyl wallpaper, the walls of the room must be treated with a primer. You need to go over it especially carefully in the corners. If there is an old coating, it must be removed and the surface leveled and puttied. Then wait about 2 days. Then sand the walls and apply a primer. Wallpaper glue can be used as a primer.

After priming the walls, you must wait at least 2 hours. In the meantime, you should remove all external parts of sockets and switches and prepare them. To prevent a short circuit, de-energize the room. In addition, all windows and doors must be closed.
Nuances when covering a room with vinyl sheets
Some people wonder: how to properly hang wallpaper if you need to adhere to the pattern. In this case, it is best to check the pattern by applying it to the previous strip and cut off the excess, leaving a small margin at the bottom and top.
But if compliance with the drawing is not required, then the canvas required length can be cut immediately, with a small margin of 5-10 cm. This margin can be useful if the ceiling and floor are not perfectly aligned, as a result of which the walls may differ in height. By the way, when gluing in the corners, it is best to cut this margin so that you can make an even cut there in the future.
VIDEO:
It is best to start gluing the walls from the corner opposite the window. In this case, it is initially necessary to mark the width, minus 1-2 cm, using a laser level. When wallpapering a room, this device is indispensable and very convenient. If the corners are not perfectly aligned, then the line should be shifted towards the corner so that the first strip completely covers it.
Before wallpapering near radiators, they need to be turned off to reduce the likelihood of the wallpaper deforming when drying. It is recommended to install wallpaper 10-20 cm under the radiator.
Pasting walls
To apply glue to the wallpaper you will need a roller and a brush. The glue is optimally distributed over the entire canvas with a roller, and the edges are processed with a brush. Moreover, it is advisable to do the latter twice: before applying glue to the entire canvas and after. Then you need to re-treat the wall (this must be done especially carefully in the corners) with an adhesive composition.
To make gluing vinyl wallpaper more convenient, it is better to fold the panel in four like an accordion. The top edge must be placed a couple of centimeters on the ceiling or molding and aligned with the marked line. Then, using a plastic spatula or rubber roller, you need to completely smooth the canvas, driving out the bubbles. It is permissible to pierce the bubble with a needle. Excess glue should be collected with a clean white rag.
We glue the remaining vinyl wallpaper in the same way. It is important to know that paper-based fabric, unlike non-woven fabric, stretches a little, so it should be glued with an overlap of 1-2 mm, otherwise after drying the fabric may separate at the joints. You need to work very carefully with such wallpaper. Among other things, you need to additionally go over the joint with a small roller.
How to glue corners
Particularly difficult for wallpapering are the corners of the room. Two methods can be applied here. The first one is overlap. With this method, it is best to stock up on glue for the edges. However, if the canvases are thick enough, then it is best to glue them end-to-end and trim them. To do this, the strip is overlapped with another, after which, at a slight deviation from the edge, both strips are cut vertically with a knife using a ruler. Then the excess is removed from the walls, and the joint is rolled with a roller.

But most often the corners turn out to be uneven. And it happens that the very middle of the canvas falls on them. Of course you can cut it into in this case wallpaper in this place and join again, with a slight overlap. But you can do it a little differently: do not cut the strip, but stick it as evenly as possible. In this case, you need to make sure that all the wrinkles go into the corners. Next, the wallpaper in these places must be carefully cut with a sharp knife and glued together with an overlap. This way the design will be preserved, and the corners will look more aesthetically pleasing.
To ensure that the top and bottom edges of the wallpaper are even, trimming is done after gluing the strips. Moreover, if the vinyl wallpaper is thin enough, then trimming is best done at the very end, after drying. If the canvases are thick, then it is better to do this right away. Trimming should be done using a wide metal spatula and a knife. In corners it is better to use scissors.

Cutting sockets and switches should be done using sharp scissors. In this case, you need to focus on the switch frame, and not on the socket box.
To prevent fire hazards, it is important that vinyl wallpaper does not fall on the switch itself. Bending the corners inside the socket box is unacceptable.
Pasting windows and doors
When carrying out DIY repairs special attention should be given to window and door openings.
When gluing doors, you should slightly apply the wallpaper onto the trim and then trim it using a metal spatula and knife. But it would be better to carefully remove the platbands. However, you should not wallpaper the door on both sides at once.
When gluing windows, you need to proceed as follows. If the window opening is perfectly flat, then you can mark it on the canvas in advance or cut a strip exactly to the window line. However, in the latter case, it will still be necessary to pay attention to the corners of the window sill. But if the window opening is uneven, then it is best to glue the panel completely, avoiding smudging in the intended location of the opening, and then cut out the excess in place with sharp scissors or a knife.
Many people are interested in how to glue vinyl wallpaper. We will fulfill this wish, but first we will help you figure out why this wallpaper has become extremely popular and what these finishing materials are.
Vinyl wallpaper dates back to the middle of the last century, created by two American engineers, one of whom discovered the excellent properties of polyvinyl chloride, and the other applied this material to a paper base. Unfortunately, only in our time have people come to appreciate this unique material, which has rightfully become a leader in sales and all kinds of ratings. Therefore, it is quite natural for the average person to be interested in vinyl wallpaper, as can be seen from numerous requests on the Internet. Topic “ How to properly stick vinyl wallpaper?” is constantly heard.
Vinyl wallpaper - types, characteristics
Today, manufacturers have launched the production of two types of vinyl wallpaper, which differ in their underlying base; in one case it can be paper, in the other it can be non-woven fabric. However, this is not the only difference on the market today building materials wallpapers of this category are available for sale, integral part which is foamed polyvinyl, thanks to which an excellent structure of the material is created.

It has an unusually dense, non-standard heterogeneity of texture, due to which the wall surface does not need to be brought to an ideal degree of evenness, which is prerequisite for wallpapers of other categories. The material will hide minor flaws and defects, while its surface will look perfectly smooth.
And, of course, the characteristics of vinyl wallpaper deserve attention - they are almost flawless and meet the requirements of modern times
When purchasing this material, you should pay attention to the icons applied by the manufacturer on the packaging of each roll.
First- This is a method of applying glue. This indicator is very significant; it should be strictly adhered to when gluing vinyl wallpaper. Because manufacturers offer varieties that require, in one case, to apply glue to the wall, and in another, directly to the back side of the wallpaper strip. These are completely two different production processes. Now add to them one more option, in which the wallpaper is supplied with an adhesive layer applied to it at the factory.
Secondly, Spend some time studying the characteristics of wallpaper, which are divided depending on their effectiveness in withstanding moisture and dampness:
- Water resistance during processing.
- Stability during wet processing.
- High resistance during wet processing.
- Resistant to mechanical stress (can be washed with a brush).
- High resistance to mechanical stress.
Preparing the wall surface for wallpapering
The beginning of wallpapering the walls is preceded by the removal of previous finishing materials from the surface (of course, if the apartment is not from a new building). You can remove old wallpaper quite easily; to do this, just moisten it with water (preferably warm) using a sponge or paint roller, wait a while so that it is well saturated with moisture, and then, using a spatula, separate it from the wall.

In the case when on the wall previous coverage completed water-based paint, you should use a drill with a metal brush attachment. And so regardless of the previous finishing material, the old coating must be removed. Any average person can do this work independently, the main thing is that there is a desire.
Then a thorough examination of the surface is necessary to identify and remove identified defects and flaws. Cracks, recesses, chips and other small details can be repaired with putty or plaster mortar. The freshly applied leveling material must be given time to dry, after which the surface should be primed with a deep penetration primer mixture, dried and the leveling finishing layer of putty should be reapplied.
But, since we are now talking about covering the walls with vinyl wallpaper, the first layer of putty will be quite enough, which, along with removing defects, will simultaneously serve as a leveling layer, which will remain to be brought to relative evenness with fine-grained sandpaper and primed (and also give time to the primer to dry). And if any roughness remains, the wallpaper material itself will absorb them.
We draw your attention to the fact that you should be careful when choosing a primer, because there is a huge range of these products on the building materials market. And you should choose a special glue for vinyl wallpaper. But if it so happens that for some reason it is not available at the moment, you can use wallpaper glue, which should be diluted with water until liquid state. This mixture is also very good for priming walls for gluing vinyl wallpaper.
Having finished with all the preparatory work, you need to draw a vertical line on the wall using a plumb line, it will become a reference line that specifies the correctness of wallpapering in a strictly vertical direction. This process is very simple - on one of the walls under the ceiling, tighten a self-tapping screw and tie a plumb line to it. The plumb line itself will tension the thread, all you have to do is use a pencil and a long ruler to draw a parallel line on the wall, which will become the starting line for placing the first wallpaper strip.
We remind you once again that vinyl wallpaper has a high density, which allows you to effectively cover minor defects and flaws on the wall surface. Therefore, having opted for vinyl wallpaper, when implementing preparatory work you don’t have to waste time on the final leveling putty layer, which helps save labor costs and finances.
Covering the walls with vinyl wallpaper

Wallpaper of this type is made in a fairly large width, which helps reduce joints. It would be more correct and rational if you prepare wallpaper strips before you start gluing the wallpaper; you need to cut enough strips so that they are enough to cover all the walls of the room (to calculate the need for strips, you need to perform simple arithmetic operations). The length of the strip should be equal to the height of the surface to be pasted plus five to ten centimeters of allowance for various unforeseen circumstances.
Next we use the adhesive mixture, apply it in accordance with the icon on the roll, that is, either on the wall or on the back side of the wallpaper strip. It is better to apply glue paint roller, which will evenly distribute the glue over the surface, while it is better to coat the surface with glue only under one strip, and after gluing it, proceed to treating the next section of the wall with glue.
After this, the top and bottom of the strip are brought together (back side inward), raised to the ceiling and, holding the top of the wallpaper strip, unfold it to the bottom, making sure that it lies exactly along the drawn line that you drew earlier. Next, use a rubber roller or plastic spatula to level the strip, simultaneously squeezing out the remaining air under the material. To ensure a tight fit of the material to the surface, leveling should be done from top to bottom and simultaneously from the center of the wallpaper strip to its edges. The subsequent spectacle of the pasted wallpaper depends on the thoroughness of this process.
Vinyl wallpaper is much easier to glue than paper wallpaper, because unlike its analogues, vinyl strips are laid end-to-end. Although some craftsmen use the technology of overlapping their stickers, they do this using a little trick - they put the next strip on the previous one with an overlap of about two to three centimeters. After installing the second sheet, a vertical cut is made in the middle of the strips located one on top of the other. Then the upper cut strip is removed, and the lower one, which is located under the second strip, should also be removed. After this, the edge of the second strip needs to be glued. The result will be an even joint, almost invisible to the eye. This technique speeds up the gluing process and reduces the possibility of gaps between strips.
We described an option in which the wall surface is coated with glue, and if the wallpaper strips themselves are coated with glue, then the prepared wallpaper blank should be placed on the floor and the back side of the material should be coated with the adhesive mixture. It is also better to do this with a roller, thanks to which you can achieve uniformity of the adhesive layer. Wallpaper should be applied to the wall surface 5-6 minutes after coating with glue - this time is enough for the material to be well saturated. The further gluing process is carried out using the same technology as when applying glue to the wall surface.
If you spread glue on a strip of wallpaper, use moderation, because a small layer of the mixture is quite enough, the main thing is that the material is coated with glue thoroughly and evenly.
Also, after placing the wallpaper strip on the wall, avoid stretching the material to the sides. And no less important - promptly remove any remaining glue and do not allow it to dry out. It is better to do this with a clean soft cloth.
- It is advisable to stick vinyl wallpaper at an indoor temperature of no higher than 23 degrees Celsius.
- During the work period, the room should be protected from drafts.
- If this is your first time hanging vinyl wallpaper, develop the skills to work with it on the wall of some secondary room, which can then be covered with furniture, carpet or other objects.
- Prepare thoroughly for the gluing process; you should have at hand all the materials and tools necessary to perform such work, even rags for wiping your hands.
- When diluting wallpaper glue, dry glue mixture should be poured into a container of water in small portions, stirring constantly. We emphasize once again - glue is added to water, but not vice versa!
So, we figured out how to properly paste wall surfaces vinyl wallpaper and it becomes clear that it is practically not much different from gluing any other types of wallpaper. At least at the main stages one to one. Therefore, the average person who has had to glue wallpaper at least once will be able to also carry out the process of gluing vinyl wallpaper, and, moreover, on high level, in no way inferior to the work of a highly qualified craftsman.
The main thing is not to rush and follow the wise life advice - it is better to measure seven times than to cut once.
Home renovation is a troublesome business, especially when it comes to... interior decoration, which sets the tone for the entire interior. The presence of errors can ruin the entire design of the room. We will help you avoid them by examining in detail how to glue vinyl wallpaper to the ceiling and walls.
General provisions
First, let's pay a little attention to the selected material. Why vinyl wallpaper, what's special about it? Everything will become quite clear after reviewing their quality characteristics.
Advantages
The products in question are a non-woven or paper base covered with a layer of vinyl.
This structure provides them with many advantages:
- Moisture resistance. Excellent quality, which is unusual for most other types of wallpaper. But vinyl not only resists moisture quite reliably, but is also able to withstand wet cleaning using household chemicals and even painting.

- Wide range of possible models. In addition to an amazing selection of various patterns and colors, there are also textured and silk-screened samples.

- High resistance to mechanical damage, ultraviolet radiation and even temperature changes. That is, if you are opposite a south window, get a cat and begin to ventilate for a long time in winter, they will still retain their original appearance.
- Long service life which reaches ten years.
- Simple gluing instructions, which we will analyze further in all its subtleties.
- Reasonable price. The entire set of strength characteristics is quite accessible to the budget of the average person.
Flaw
The only thing that can happen unpleasantly after applying the wallpaper in question is the presence unpleasant odor the first two months. But this is subject to the condition of purchasing cheap samples from an unknown manufacturer. High quality models do not have such an effect.
Advice: if you still manage to glue foul-smelling canvases, and even airing does not help, then it is recommended to paint them with acrylic paint.
The polymer layer will block the contact between vinyl and air, eliminating the spread of odor.

Application technology
First of all, you should prepare everything necessary for finishing work.
Tools and materials
To work you will need:
- Velor roller. Simplifies the processing of canvases and walls.

- Brush. Allows you to cover hard-to-reach places with high-quality glue.

- A clean bucket for diluting the adhesive mixture.

- Special bath with a ribbed surface.

- Stepladder - so that you can reach the top of the wall and ceiling.
Tip: choose a staircase that has a shelf on top.
Then you will have somewhere to put the container with glue.

- Metal or plastic. It makes cutting fabrics much easier.

- Tape measure for taking all necessary measurements.

- A utility knife for cutting wallpaper.


- Brush for smoothing products on the wall.
Tip: before gluing heavy vinyl wallpaper, be sure to make sure the prepared brush is sufficiently rigid.
Because soft bristles will simply crumple against dense fabrics and will not cope with their task.

- A clean rag to remove any stray drops of glue on the front side of the trim.

In addition to the tools, you need to take care of the materials themselves:
- Choose wallpaper in accordance with the rest of the interior of the room and its functionality. Products designed for painting are better suited, and for the living room, for example, silk-screened samples. The color scheme is also very important and can have a significant impact on the feelings of residents, visually expanding and narrowing the room.

- How to determine when purchasing which adhesive is best for vinyl wallpaper? There are no secrets in this and there is no need to invent anything new. Just read the instructions included with the glue and check with the seller for details.

- Putty. It will be needed if in the wall after removal old decoration will be revealed large cracks and significant damage.
Preparatory work
Before gluing vinyl wallpaper, you must carefully prepare the wall surface.
And although such large-scale work with perfect alignment as in the case of using paint is not required, there are still some things that need to be done:
- Removing the old cladding:
- We wash off the paint with a special chemical composition.
- We knock down the tiles with a hammer drill.
- Remove the wallpaper with a sharp metal spatula, after moistening it with water.

- We fill in possible cracks and noticeable irregularities.

- We prime the wall. Don’t give up on this step, even if it seems expensive and unnecessary to you. The primer creates a polymer layer that increases adhesion, protects the surface from physical influences and reduces its porosity.

Sticking
Now let's figure out how to glue vinyl wallpaper:
- We dilute the adhesive mixture with water according to the instructions indicated on the package.

- We measure the wall, add a few centimeters and mark the resulting length on the unfolded roll.
- Cutting off right size according to the applied marks.

- Apply glue to the back side of the canvas. It is noteworthy that if products with a non-woven base are used, then this step is not necessary.

- Next, apply the adhesive to the wall.

- We apply the canvas to the surface and smooth it with a brush, removing all the air from under it.

- In the process, you will definitely come across the following question: how to properly glue vinyl wallpaper in the corners? The fact is that the corners in a room are almost never even enough, which is why you will not be able to make even joints there. Therefore, you should apply the canvas so that it covers the problem area and extends onto the adjacent wall by at least 10 cm.
Conclusion
We have looked at how vinyl wallpaper is glued. The process is absolutely not complicated, but it requires care and attention. Follow all the recommendations above and you will succeed.

The video in this article will provide additional information. Good luck with your wallpapering!
When it comes to renovation, the question arises of how and with what to decorate the walls of apartment premises. The most optimal choice Will wallpaper it. It is best to choose vinyl ones because they have large number advantages, and also very attractive in appearance. They have a long service life, basically all types of these wallpapers are easy to wash. Some can only be wiped with a damp cloth to remove any resulting dust, while others can be wetted and even cleaned with a sponge. In order to choose exactly the detergents, it is best to consult a competent seller specialty store. Or you can inspect the packaging yourself and find identification marks that indicate the degree of resistance to moisture.
Immediately before hanging vinyl wallpaper, difficulties arise, namely, what tools you need to have in order to easily hang wallpaper, what stages the gluing process includes, how to properly prepare the walls, and many other similar nuances. This article will reveal the answers to these questions.
Required Tools
Before you begin the gluing process itself, you need to make sure that all the tools are available and prepare them so that they are at hand at all times.
You will need the following tools:
- a special brush used to prime the walls;
- brush and roller for covering wallpaper with adhesive mixture;
- a special lint-free roller is necessary for rolling seams;
- special soft spatula for uniform smoothing of the fabric;
- masking tape;
- cotton napkins or rags to eliminate excess glue that has come out;
- a small brush will be needed to lubricate the wallpaper;
- a stationery knife for even cutting, scissors will not work;
- a spatula or spatula made of wood for pressing and straightening uneven areas in small areas.
With these tools, gluing wallpaper will be easier and more convenient. The main thing is to have them on hand.
Preparing the walls
There is no need to ignore this point, since preparing the walls is important stage. Thanks to the competent and careful preparation walls wallpaper covering will last a long time and delight you with its beautiful appearance.
Initially, you need to remove a layer of old wallpaper, if any. After which it is necessary to prime the walls, it is best if this is done using a special primer, which is oriented towards deep penetration. If suddenly there is no such thing, then diluted adhesive mass will cope with this task. After the walls are primed they need to be coated special means, which prevents the occurrence of fungi and the development of microbes.

After time has passed, when all the layers have dried, professionals advise drawing a line the entire height of the wall and using it as a guide for gluing the first strip. You should not focus on the corner of the room, as it may be uneven, which may cause problems with the design. To be 100% sure that the drawn line is perfectly straight, you need to use a special building level.
As soon as everything preparatory stages the walls are finished, it is necessary to isolate the premises from current and remove all existing sockets and switches. This will allow the canvas to lie perfectly on the wall surface. There is no need to neglect this and do it as before, just cut a hole for this or that element. This will result in an uneven pattern and all the beauty of the canvas will be lost.
Important! Vinyl wallpaper should always be glued only to well-dried walls. To be sure, you can attach polyethylene to the prepared wall for a day using masking tape, and if after this time moisture has formed on it, this means that the wall requires more time to dry.
The room where finishing work it is necessary to isolate from the air flow, namely, tightly close all windows and doors, turn off heaters and air conditioners. You can ventilate the room only after the vinyl wallpaper has dried thoroughly.
Step-by-step instructions for gluing vinyl wallpaper

How to glue vinyl wallpaper on non-woven backing?
Non-woven vinyl wallpaper has a number of features that you should know:
- apply glue only to the wall;
- no need to allow gaps during application adhesive solution, and its layer should be thick;
- gluing should be done from an even angle;
- wallpaper is glued only end-to-end and not in any other way;
- The strip applied to the wall must be smoothed strictly from the center to the edges.

The non-woven base contains a large amount of cellulose, making the fabric denser and heavier. To properly glue such canvases, it is better to use glue for vinyl wallpaper on a non-woven basis. On store shelves it is referred to as vinyl glue. It is produced on the basis of methylcellulose and is completely PVC-free. As a rule, it is considered universal and is suitable for any type of vinyl wallpaper.
If wallpaper of this type is planned to be glued in a room with high humidity, then it is better to purchase polyvinyl acetate glue. It will ensure reliable adhesion and long service life.
Required time to dry non-woven vinyl wallpaper
Wallpaper with non-woven backing has different drying times. First of all, it depends on the manufacturing method. For example, wallpaper made using hot embossing requires an average temperature of approximately 25 degrees and a humidity of no more than 60% to dry completely. Then you should wait 48 hours until it dries completely.
If the canvas has decorative finishing, then they may require a longer period, in some cases a week.
Rules for gluing paper-based vinyl wallpaper
The key to success in gluing paper-based vinyl wallpaper is the correct adhesive. It is important that its composition is of high quality, this will avoid the formation of bubbles and unevenness. And it will also serve them for a long time. It is best to choose glue from foreign manufacturers. They certainly have a higher price category, but the costs will definitely pay off high quality. It is important that the adhesive mass has the ability to quickly set to the surface, but not instantly.

The glue must contain compounds that are aimed at preventing the formation of mold and fungi.
High-quality glue has the following characteristics:
- when the adhesive mass is diluted, no lumps or clots of unknown origin should appear; if this occurs, then it is better not to use it, as this can lead to unevenness;
- does not dry out after a day;
- can be stored for years in an unopened package;
- must not contain harmful substances;
- easy preparation of the mixture.

Before gluing paper-based vinyl wallpaper, you need to carefully level the wall surface.
Divided into types:
- putty;
- plaster;
- drywall.
The stages of gluing wallpaper with a paper backing are no different from other types of vinyl wallpaper.
Drying wallpaper with paper backing
How quickly this type of wallpaper dries depends on many factors. First of all, a significant point is the well-dried, prepared surface of the walls. If it was not dry, then the drying time of the wallpaper will be increased several times.
The best option is if the room temperature is approximately 20 degrees and the humidity is no more than 70%. If the temperature is lower and the humidity is high, then you will have to wait quite a long time for the walls to dry. In addition, this can lead to peeling and deformation of the canvas.
Important! It is possible to ventilate and carry out further finishing work only after the coating has completely dried.