How to make an electronic combination lock. Electronic door locks: selection and features of the device Do-it-yourself electronic lock on the front door
By purchasing a mechanical lock, you can save money, because it is an excellent budget option. But if there is a need for increased reliability and efficiency, it is recommended to choose electromagnetic type models. They are installed on entrance doors in private houses or apartments. Such locks differ from mechanical locks that operate on electricity; although the energy consumption is insignificant, they still add up extra kilowatts. Electromagnetic locks can also be powered by batteries. This will make installation easier since you won't have to run a wire to the nearest power source.
Varieties
This category of locks is divided into two subgroups: electronic and magnetic. The first type of devices must be programmed independently. This is done in different ways. Some products are equipped with a circuit for receiving digital combinations, the operation of which is based on manual entry using a keyboard. Others require reception of a special radio signal that comes from a key programmed with a specific code.
Electronic locks
In order for the locking system to function smoothly, it requires electrical power. Some models are equipped with a special display. The buttons on the lock have different designs– conventional push or touch.
The magnetic design also requires power from the mains or batteries, but its operating principle is completely different. The main detail in this system the magnetic key becomes. He is precisely considered the carrier of the code. It looks like a large tablet or keychain. To unlock the door, use this key to touch the plate, which receives the signal, after which the mechanism is activated, and door design opens.
You can assemble an electronic door lock with your own hands. First you have to find the tools and parts that are needed for manufacturing. The choice of such elements depends on many factors; there is no universal set of parts and tools.
Lock components
Electronic locks consist of several components:
- Locking device. If this element is mortise, it is attached directly to the canvas itself, and the overhead element is attached on top of the structure. The lock is equipped with a body, inside it there are crossbars that hold the doors in the “closed” position. There is also an electric motor that drives the crossbars. Some models have door handles on the body.
 Electronic lock locking device
 - Locking plate. It is mounted on the jamb, with its help the bolts are held in the “closed” position.
 Electronic lock strike plate
 - Control unit. Contains a device that processes the input signal to operate the lock. This unit also includes batteries that are connected at the moment when the electricity goes out. The block is connected to a power source - a socket.
 Control unit
 - A device that is designed to read information from the used key.
Electric locks are divided into:
- code;
- biometric;
- built-in invisible locks.
An electronic code device opens the door when you enter a code using special buttons on the panel. A biometric lock is triggered when it recognizes a fingerprint or retina. The invisibility lock opens using a signal from a special key fob.
 Coded electronic lock
 Electronic locks are often equipped with a special closer, which allows the doors to close smoothly and silently. This system increases the operational period of the locking mechanism, connects to the intercom, and it, in turn, can open the doors remotely.
Electronic lock placement
The installation of mortise and overlay devices is different. The latter are often used for installation on input metal doors, wickets or garage doors. To properly install such a device, you will need:
- construction pencil or marker;
- square;
- screwdriver;
- electric drill with drills of the required diameter;
- measuring tape.
These tools will help you do correct markings on the plane of the canvas and at the location of the mechanism. The first stage is placement of the device. To do this you will need to perform the following manipulations:
- Retreat from the floor level according to the standard 90-110 cm. Apply a mark in this area. Then mark the location of the locking mechanism, housing, and fasteners.
- The marking can be simplified - take the body, attach it to the canvas, and trace it with a pencil.
- In those places where there are marks for fasteners, drill holes with an electric drill. Drills use a little smaller in size than bolts.
- Then make a through hole in the place where the housing and the reading mechanism are connected. Install and secure the housing in the prepared area.
Now it's time to place the strike plate that supports the locking bolts. They are installed in the same way as the housing, according to a predetermined plan:
- Make markings on the side of the door, on the jamb. When the location of the bar has been determined, it is important to consider the area where the lock will be installed. The best place to start is to close the door and mark where the bolts are located. Place marks for fasteners.
- Using an electric drill, make holes for the bolts of the required diameter.
- Attach the striker to the prepared area so that the crossbars fit into it exactly. If they are tight and catch on the bar, adjustment will be required as friction is unacceptable.
After this, you need to install a reader and other equipment, without which the lock will not work. To do this, it is important to adhere to the following rules:
- The reader is installed on the back side of the sash. Mount it as close as possible to installed lock so that during contact opening the device can be connected to the locking mechanism using wires.
- The control unit connected to the network adapter is located next to the active power source indoors.
- The electrical wires that connect all these parts are placed in special corrugated tubes or boxes. This will protect the devices from influence high humidity, and the appearance of the door will become aesthetically attractive.
Electronic mortise lock
It will not be possible to install such a lock quickly; this task is much more difficult. To perform the installation correctly, you will need to make recesses in the canvas and on the box to accommodate the housing and the strike plate.
 Mortise electronic lock
 - remove the fabric from the loops;
- make markings for the recess; it should be slightly larger than the dimensions of the lock itself (2 or 3 mm);
- chisel or using electric drill recess on the frame and door leaf;
- If any irregularities or nicks have formed, clean them thoroughly;
- if the doors are metal, you will have to use a special tool.
After installing the lock case and other devices, you can connect the lock. Everything you need for this is included in the kit. If there is no connection diagram, then the Internet will help, where you can find a suitable method and connect in the correct way.
How to make an electronic lock yourself is shown in this video:

This project is modular, i.e. you can connect/disable different elements and get different functionality. The pictures above show an option with full functionality, namely:
- Locking mechanism. Serves to OPEN and CLOSE the door. This project explores the use of three different mechanisms:
- Servo. There are big ones, there are small ones. Very compact, and coupled with a heavy deadbolt - an excellent option
- Electric car door lock. It's a big and powerful thing, but it consumes crazy currents.
- Solenoid latch. Good option, because it closes itself
In the firmware settings you can select any of three types(setting lock_type)
- Button inside. Serves to OPEN and CLOSE the door from the inside. Can be placed on the door handle (palm side or finger side), on the door itself, or on the jamb
- Button outside. Serves for CLOSING the door, as well as for WAKING up to save energy. Can be placed on the door handle (palm side or finger side), on the door itself, or on the jamb
- End cap to close the door. Serves to automatically close the lock when the door is closed. It could be:
- Tact button
- Hall sensor + magnet on the door itself
- Reed switch + magnet on the door itself
- Secret access reset button. Used to reset the password/enter a new password/remember a new key/combination, etc. May be hidden somewhere in the case
- LED to indicate operation. RGB LED, red and green colors(when mixed they give yellow):
- The green light is on - the lock is OPEN. Lights up so you don't forget to close the door
- Yellow is on - the system has woken up and is waiting for a password to be entered
- Flashing red - low battery
Any of these elements can be excluded from the system:
- We remove the limit switch. In the firmware in the settings we also disable it (setting tail_button). Now you have to press a button to close the lock.
- Remove the external button. In the firmware in the settings we also disable it (setting wake_button). Now the system does not need to be woken up, it wakes up on its own (energy consumption is slightly higher). And now we don’t have a close button on the front of the door, and we need a limit switch. Or the lock is a latch
- Remove the internal button. This option is suitable for cabinets and safes. You don't need to change anything in the settings
- We remove the LED. You don't need to change anything in the settings
- The access reset button can be unsoldered after the first use, or the code can be rewritten to suit your needs
- Door closed, press OUTSIDE - wake up, wait for password/RFID tag/electronic key/fingerprint input
- The door is closed, the system is awake, waiting for the password to be entered. The time can be adjusted (setting sleep_time)
- The door is closed, a password/tag/key, etc. has been entered. - open
- The door is closed, press INSIDE - open
- The door is open, press OUTSIDE - close
- The door is open, press INSIDE - close
- The door is open, the LIMIT is pressed - close
The lock is designed to operate on battery power in a low energy saving mode (enable disable: setting sleep_enable), namely:
- Wake up every few seconds, monitor the EVENT (optional option if there is no button outside. You can enable it in the settings wake_button)
- Every few minutes, monitor the battery voltage (on/off setting battery_monitor)
- If the battery is discharged (the voltage is set in the setting bat_low):
- open the door (optional, can be configured in the firmware open_bat_low)
- prohibit further discovery and closing
- When you press a button, the red LED flashes
- stop monitoring the EVENT (i.e. password entry/label, etc.)
When the system is not sleeping, press the password change button (hidden button). We find ourselves in password change mode:
Enter a password consisting of numbers ( MAXIMUM 10 DIGITS!!!)
- When you press *, the password is written to memory and the system exits the password change
- When you press #, the password is reset (you can enter it again)
- If you do not press anything for 10 seconds, we will automatically exit the password change mode, the old password will remain
When the system is not sleeping (woke up by the button or sleep is disabled), press * to enter password entry mode
If the system sleeps and periodically wakes up to check EVENT, then press * and hold until the red LED lights up
Password mode:
- Password processing is done in such a way that the correct password is only counted when the correct sequence of numbers is entered, that is, if the password is 345, then you can enter any numbers until the sequence 345 appears, i.e. 30984570345 will open the lock because it ends in 345.
- If the password is entered correctly, the door will open
- If you do not press anything, after 10 seconds the system will return to normal (standby) mode
- If you press #, we will immediately exit the password entry mode
- If you press the secret password change button in password entry mode, you will also exit it

The article will tell you about the designs of electronic locks available on the market, from it you will learn the principle of operation of locking mechanisms, the types of electronic lock control systems used. Reading will help you do right choice electronic lock.
The use of electromagnets and servos has allowed us to change the understanding of the design of locks. The new generation of locking mechanisms is used to move the bolt or create downforce electrical impulse received on command (usually 12 V DC). This made it possible to use electromechanical locks in the locking part of the door, which differ in design from classic mechanical locks, which generally increases the security of the home from entry by unauthorized persons.
With the help of microprocessor control systems associated with electromagnetic or electromechanical locks, access to the premises of a certain circle of people is easily organized, remote control door locking mechanism or opening the door without a classic key. All this is almost impossible to implement using standard mechanical locks.
Due to the simplicity of their design, electromagnetic and electromechanical locks are able to safely withstand tens of thousands of opening-closing cycles, which is beyond the capabilities of conventional mechanical locks.
Based on the principle of organization of the locking mechanism, modern electromechanical locks can be divided into the following main groups:
- Electric deadbolt locks.
- Invisible locks.
- Electric motor locks.
- Electric latches.
- Electromechanical locks.
Based on the control systems installed in them, locks can be divided into four types.
Radio controller

These systems can recognize both specialized key fobs and work on standard ones. Wi-Fi frequencies or Bluetooth networks. In the latter option, a standard tablet or smartphone can be used as a “key”.
Code keyboards

The simplest and most common technical solution for electronic lock control systems. To activate the lock mechanism, you only need to enter a specific code, so there is no need to additionally purchase different types of keys.
The main “disease” of this control system is the erroneous operation or failure of the digital remote control keys, which is due to the peculiarities of its design. Over time, the contact plates oxidize and may not close the contact or distort the supplied signal, which leads to erroneous operation of the buttons. Therefore, all locks with keypads require regular maintenance.
Contact key controllers

One of the most common solutions on the electronic lock market. The lock allows you to memorize a certain amount contact keys made in the form of a keychain or plastic card with magnetic tape. The system has a high degree of reliability.
Proximity key controllers

This system allows you to work with special radio-magnetic cards, which are activated remotely (at a distance of 10-15 cm from the reading device).
Electronic lock combining control using a code, contact key and radio key fob
Let us consider in detail all types of electronic locks, their advantages and disadvantages.
Electromagnetic locks
Electromagnetic locks are less similar to classic mechanical locks than other electronic locks. They consist of three main parts:
- Electromagnet plates.
- Reciprocal metal plate.
- Control systems.

These electronic locks were found wide application as a locking mechanism on metal entrance doors. The microprocessor system that controls them operates both in intercom mode (reads and processes information from the keyboard and remote handsets) and analyzes information from contact keys.
Advantages
Thanks to the high reliability of the electromagnetic lock in combination with the significant force of attraction of the plate to the lock (50-500 kg), such a door guarantees a sufficient degree of protection of the premises from third-party penetration. Installed electromagnets and street part Electronic lock control systems are protected from moisture, which increases their reliability.
Electromagnetic lock for 230 kg
After being disconnected from the power supply, electromagnetic locks can operate for a short time on a battery connected to the control system. After the battery is discharged, the electromagnetic lock will automatically open.
Flaws
The disadvantage of this system is the poor noise immunity of the communication lines of the control system with handsets installed in each apartment feedback, which can lead to the failure of the entire system during a severe thunderstorm.
Self-repair and installation of this system is rarely done, since it involves a large amount of work installation work followed by setting up the control system.
Electric deadbolt locks
This type of lock is similar in appearance to a classic mechanical deadbolt lock. Can be completed various systems control, which ensures its versatility.

The system includes an electromagnetic bolt wire that can be used to both open and close the door. Some models, thanks to built-in spring return mechanisms, ensure automatic closing or opening of the lock in the event of a power failure.
Advantages
The electromagnetic mechanisms installed in these locks are highly reliable, significantly exceeding mechanical locks of similar class. A number of models are equipped with a door condition monitoring system, which eliminates spontaneous operation of the locking mechanism when it is open.
All models are easy to install and configure; installation and maintenance work does not require any special knowledge, which led to their high popularity.
Flaws
Inability to open the door if there is no power to the lock.
Since this lock consists of an electromagnet, return springs and electronic system control, its repair is reduced to checking the functionality of the magnet and the condition of the springs, and maintenance is limited to lubrication of moving parts and replacement of bushings and return springs. When the lock is equipped with a control system that works with contactless keys or with radio control, they can be used as “invisible locks”.
Invisible locks
This type of locks is specially designed for hidden installation. Both electronic deadbolt locks and compact latch locks can be used as these locks. Invisibility locks can be installed in different parts door leaf, or be built into standard mechanical locks, which significantly increases their resistance to burglary.

The lock comes complete with a control system that reads signals sent via a radio channel. Radio networks can be used as a signal source for opening and closing an electronic lock.
The lock is powered from a separate power supply (usually 12 or 5 VDC). Auxiliary battery power supplies are used to independently power the lock during a power outage. When purchasing an invisibility lock, you need to pay attention to the condition of the locking tongue, best option- when the tongue is initially retracted.
Important: if there is no power for a long time, the self-closing lock will not be able to be opened.
Advantages
This lock is quite simple in design and contains a minimum number of working components, making it easy to set up and, if necessary, repair.
Flaws
Cannot be used as a separate locking mechanism due to the simplicity of the design.
Electric motor locks
This type of locks is no different in its capabilities from electric deadbolt locks. Its main difference is the use of a compact electric motor to move the locking mechanism.

A feature of some locks that use an electric motor as a driving element is their integration into a single control unit. Control units can process information both from the keypad and from various types of key fobs.
These electric motor locks are installed directly on classic mechanical locks with a cylindrical cylinder. With their help you can easily and with minimal costs time and effort to convert a classic mechanical lock, replacing the conventional lock cylinder with an electric motor one.
Example of an electric motorized invisible lock
Advantages
Low power consumption and, as a result, the possibility of long-term operation when powered by classic AA batteries.
Disadvantages also include the complexity of the mechanism, which requires regular maintenance, including maintenance of the locking mechanism, controlled by a mechanical and electrical drive.
Operating principle of an electromechanical lock
Ready-made solutions based on various types of electronic locks:
| Manufacturer, lock type | Locking mechanism type | Lock body type | Control | Price, rub. |
| ATIS LOCK electronic lock with contact keys | electromagnet and mechanical key | overhead | remote from intercom, contact key fob | 4000 |
| Electronic lock ATIS AM 280 on key fobs | electromagnet | mortise | 4000 | |
| Electric deadbolt lock AB700A on key fobs | electromagnet | mortise | remote from intercom, radio key fob | 4200 |
| Electronic lock ATIS AM 280 on cards | electromagnet | mortise | remote from intercom, card | 4600 |
| Universal coded electronic lock AM 280 | electromagnet | mortise | code keypad, magnetic key fobs, cards | 5730 |
| Electromechanical motor lock "Dori-4" Classic | electric motor | overhead | code dialing keyboard | 9370 |
Thanks to the simple combination of electric locks with various types control systems, you can create an access system of any complexity that provides high level burglary protection.
The ability to open remotely or process wireless radio signals of various frequencies by the control system and simplicity of design are the main advantages of electronic locks over mechanical ones. The simplicity of the design of actuators and the versatility of control systems increase the reliability of systems built on their basis.
We have added to our section useful homemade products for the home: do-it-yourself unpickable invisible lock.
Thieves have long learned how to open a mechanical lock of any complexity. It’s more difficult with a combination lock, but they find ways to bypass all its secrets.
However, you can open the lock only if you know the location of the unlocking device, for example a keyhole, door button, etc.
Realizing this, invisible locks without a keyhole and keys were developed, where the unlocking devices are made in the form of coded or infrared radio key fobs, GPS radiotelephones, etc.
It would seem that it is impossible to open such a lock. However, they open.
For example, they scan the key fob code with special devices. We have learned how to do everything, even rob ATMs by reading the code of a bank card.
All these systems have a common drawback: the device (key, key fob, etc.) is concentrated in one place, after identifying which the thief opens the lock.
Finding a key for it is not a problem, choosing a code too, the key fob can be scanned.
The proposed lock differs from famous topics that the unlocking elements of the lock (hereinafter referred to as the keys) are spaced apart, duplicated many times, and the lock can only be opened when all the keys are activated.
Since the keys can be spread over a considerable distance, this lock is especially convenient for summer cottages, where thieves most often trade.
One of the keys can be placed, for example, in a separate standing toilet. It would never occur to anyone that by visiting the toilet, a person opened the house.
It’s hard to imagine how you can open such a lock without knowing the number, operating principle of the keys spaced apart and their location, especially since the lock itself is not visible from the outside of the door.
Design and principle of operation
The lock (Fig. 1) consists of a housing 1, in which a DC electric motor 2 DPR 42 12V is placed. 2500 rpm, which is connected by screw 5 to crossbar 3.
The screw thread pitch is 0.3…0.5 mm. At the nominal engine speed, the bolt moves 20 mm. in one to two seconds.
The lock closes and opens with a simple click.
The crossbar has an annular groove into which balls 8 fall when it moves. The balls serve as a transmission link between the crossbar and microswitches 6 and 7. The microswitches are designed to stop the engine. When the next ball enters the groove, the corresponding switch turns off the engine. The distance between the switches determines the stroke of the bolt. Pin 4 prevents the bolt from rotating.
 Fig.1
Fig.1
The lock control is shown in Fig. 2. The lock is open as in Figure 1.

Designations: P - 12v relay. with two changeover contacts kP1 and kP2. Bell button K5. Microswitches K2 and K3 operating in antiphase. When one is on, the other is off.
Electric motor M. Toggle switch K4. Reed switch GK. Blocking contact K1. circuits - 12v.
Closing the lock
To close the lock, you must close the door tightly. In this case, the previously open blocking contact K1 closes (Fig. 3)
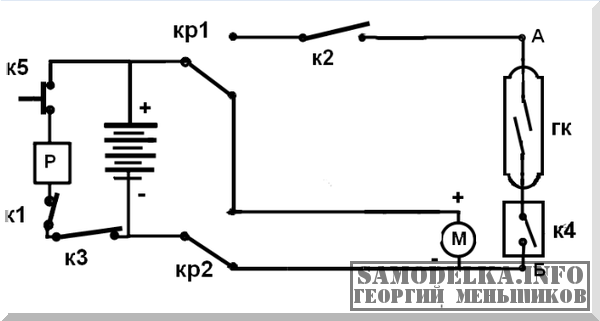
Fig.3

Contact K1 is two metal plates attached to the door and one that closes on the door jamb. (Fig.4).
The contact prevents the lock from closing when it is open or not tightly closed. After closing the door, you need to press the K5 button located on outside doors. In this case, relay P is activated, transfers contacts KR1 and KR2 to the position shown in Figure 3 and turns on the engine M.
After one or two seconds, the motor will move the bolt to the position shown in Figure 5 and open contact K3. Relay P will be de-energized, contacts KR1 and KR2 will take a neutral position and turn off the engine. Fig.6. The castle will be closed.
 Rice. 5
After closing the lock, button 5 is disabled by contact K3. Any manipulations with this button that may interest a thief, long presses or even broken wires will not prevent you from opening the lock and repairing the damage.
 Fig.6
Fig.6
Opening the castle
To open the lock, you need to connect (short-circuit) circuit points A and B (Fig. 7).
 Fig.7
Fig.7
You can do this in various ways. For example, turn on the contact of the K4 toggle switch and bring the magnet to the main reed switch. (Fig.7).
The reed switch can be hidden under the door trim. Or use regular lighting as K4. If you screw in the lamp, the circuit will close. There are many options. There is a wide field for imagination here. Only one thing is important. It is necessary to space the keys (series-connected elements) farther away and, if possible, disguise them.
The opening phase of the lock is shown in Figure 7. After turning on the engine, the bolt that has moved to the open state (Fig. 1) will open contact K2 and turn off the motor.
 Fig.8
Fig.8
Now you can open the door by opening contact K1. The circuit returned to its initial state (Fig. 2). By closing the door and pressing K5, you can close the door again according to the algorithm described above.
Note
For proper operation lock, the direction of rotation of the motor must be consistent with the direction of the thread of screw 5. For a right-hand thread, in the opening phase of the lock, the motor must rotate counterclockwise when viewed from the shaft.
Every person thinks about the safety and security of their own property. To do this, it is important to choose a high-quality locking device. Many people choose an electric lock, which meets any requirements and is considered a reliable device. However, the price of such a product is higher than that of mechanical analogues. Therefore, not every person is ready to shell out a large sum for the purchase and installation of an electrical structure.
The simplest electric lock design available for self-made and installation
There is a way out of the situation - this is a homemade electromechanical lock. Made electric version with your own hands guarantees reliable protection, as well as cost savings, which is important. At the same time, making an electric lock is not difficult. It is enough to decide on the model and adhere to a number of recommendations.
Attention! One of the main advantages is the absence of the need to go outside to open the door. Electrical design operates in automatic mode, and its mechanical component guarantees manual opening as needed. A card or an ordinary version is used as a key.
The operating principle of an electromechanical structure?
The principle of opening an electromechanical device is based on the use of a solenoid. It goes like this:
- Voltage is applied to the solenoid contacts.
- Next, the spring retainer is reset.
- The working bolt enters the lock due to the action of the spring on it.
- The lock opens.
To close the lock, the process is reversed. From inside the room, the mechanism is operated using a special button or using a control mechanism. The lock opens mechanically from the outside. A special key is used for this.
 Installed electric lock intended for gates or wickets
 How to choose the right product?
Choosing an electromechanical lock is not difficult. To do this, consider some features. The first thing people pay attention to is the type of mechanism. It can be overhead or mortise. At the same time appearance product is similar to the mechanical design.
They also pay attention to which side the product is mounted on. In accordance with this, designs are left-handed and right-handed. It is worth considering the preferred method of unlocking and locking, as well as the features of the process. The following design options are available:
- Electrical blocking.
- Motor.
- Solenoid.
- Electric strike.
If you purchased the lock or made it yourself, it’s time to start installing it. It is better if the work is entrusted to an experienced professional. But if desired, they do everything themselves.
 Components of a high-quality electric lock required for installation
 It is important to remember that the safety of use directly depends on the correctness of installation work. The complexity of installation is determined by the selected locking element. The overhead product is easier to install. The operating algorithm in this case is as follows:
- Markings are made on the gate or door leaf. It involves identifying the places where the fasteners are located. Use an ordinary pencil.
- Holes are drilled in the canvas in accordance with the markings, which are used for installing fasteners.
- Install the locking device and secure it carefully.
- Install the counter plate.
- Check the correct functioning of the element and, if necessary, adjust the position.
This completes the installation of the overhead electromechanical structure. The mortise mechanism has a complex installation, but you can handle it yourself. The algorithm in this case comes down to the following steps:
- Markings are made on the end part of the door leaf. To do this, apply a lock and trace it taking into account the holes for fasteners.
- Next, a special niche is cut out in metal structure. It turns out to be a special “pocket”.
- A lock case is installed in it.
- The places where the device is attached are marked on the canvas and cut out.
- After the holes are made, the lock body is secured. Use ordinary self-tapping screws for this.
- Additional structural elements and a square rod are placed in specially prepared holes.
- Perform marking and installation of the striker plate.
- Check the functionality of the product.
 Electromechanical lock with electronic and manual opening
 Attention! Checking the operation of the device comes down to assessing the quality of the electrical part. It is important to ensure that the lock and strike plate are mounted at the same height. The lock bolts must fit into the holes prepared on them without sagging or “clinging.” Only in this case do we talk about correct installation work.
Advantages and disadvantages of electromechanical design
Electromechanical products, the installation of which is done by hand, have advantages and disadvantages. The main advantages include:
- High reliability.
- Burglary resistance. Without electricity and a key, it will not be possible to open the mechanism. The electromagnetic design is vulnerable in this regard.
- Durability of service.
- Simplicity and high speed repair work if necessary.
- Availability of backup battery, which is convenient during operation.
- Possibility to supplement the product with a special additional power source. This will increase the reliability of the device.
- It is possible to combine the product with other security systems, including an intercom.
There are also some disadvantages. Firstly, the likelihood of failures during operation. They become possible in cases where moisture gets into the product or there is low temperature air. In general, these shortcomings have now been practically resolved. This is done using the installation protective enclosures and auxiliary elements, which has a positive effect on the operation of the product.
 Simple design electromechanical lock, installed with your own hands on the gate
 A simple and high-quality electromechanical lock with your own hands is a feasible task for every person. There are no difficulties in this, so you can safely do everything yourself. This will also allow you to be proud of your own skills and abilities. The electromechanical design will ensure reliability and protection of the home, as well as comfortable operation. Now you don't have to go outside to open the door.