How to install a split system at home. How to install the air conditioner in the apartment
How to connect an air conditioner
When users ask this question, they can mean two different meanings:
- How to connect an air conditioner or how to connect split system units to each other;
- How to connect the air conditioner to the mains.
You need to know that there is an "interblock" connection of wires and a "power" connection of the device. In this article, we will explore both of these issues.
Answer to the first question:
In addition to the fact that the blocks must be correctly positioned and fixed, it is also necessary to correctly connect them together. In general terms, for a split system to work, you need:
- Bring the drainage where required (most often to the street, very rarely to the sewer). The indoor unit has a drainage outlet that needs to be “built up” and brought out along with the main communications;
- Connect power to the desired unit (this will be the answer to the second question);
- Connect the two blocks with communications. Let's look at this in more detail below.
What communications are meant, and what needs to be connected specifically.:
- thin copper tube (in thermoflex);
- thick copper tube (in thermoflex);
- interconnect cable. Most often it is a five-core cable. The essence of its connection is to connect the wires to the external unit to the same terminals as to the internal unit. Usually in the instructions for the air conditioner there is detailed description. The figure below shows the wiring of one air conditioner;


- rarely comes with air conditioner additional interblock (two-core) wire. It will also need to be connected accordingly.
Answer to the second question:
There are two main ways to connect the air conditioner to the mains
- plug into a socket. In this way, small domestic air conditioners with a cooling capacity of up to 4 kW are connected. Do not plug other electrical appliances into the same socket;
- through the machine. Air conditioners with a cooling capacity of more than 4 kW must be connected via an automatic machine. And also all inverter air conditioners it is desirable to connect also through the machine, so that the phasing is observed.
 Inverter air conditioners most often have a network connection to an external unit. Air conditioners on / off (non-inverter) are most often connected to the network through an indoor unit. In this case, the indoor unit may have a wire with or without a plug. The wire has three cores - yellow-green ("ground"), blue ("zero"), brown ("phase").
The figure shows the connection of the outdoor unit. The left block is an "interblock" connection (4 wires in this case). The three-phase power supply of the air conditioner is connected to the right block (power supply).
Important for all air conditioners: If the indoor unit of the split system does not have a wire with a plug, then when connecting the power (to the desired unit), phasing must be observed. The neutral wire must be connected to the "N" terminal, and the phase to the "L" or "P" terminal.
The question of whether it is possible to install an air conditioner with your own hands disturbs the minds, especially the owners of brand new split systems, who have already managed to get acquainted with the prices for the installation of climate equipment. Indeed, numerous air conditioner installation companies rate their services quite highly, referring to the complexity of installation, the need to use expensive highly specialized equipment and the mandatory highly qualified specialists. You can't argue with the last statement. Only newly minted owners of air conditioners are still interested in the possibility of self-installation, firstly as a perspective real savings on payment for installation services (we are talking about a rather large amount), and secondly, as an opportunity to consolidate their own skills and learn something new. Is it possible to blame the desire of our man to get to the bottom of the issue in order to understand how to install the air conditioner on his own and do the installation himself, no worse than a real master? If the desire is accompanied by the ability to realistically assess the level of one's skills and capabilities, then there is no price for it! The information we have provided on how to properly install an air conditioner will help you realistically assess the amount of installation work and balance your skill level with the required one.
Before reading the detailed installation instructions, please read the list necessary equipment.
Necessary tools and equipment
- Perforator with drills.
- Electric drill.
- Vacuum pump.
- Pipe cutter.
- Rolling.
- Reamer (beveler).
- Level.
- torque wrench.
- Manometric manifold.
By using vacuum pump remove moisture and air from the system
A locksmith's tool for installing air conditioners will also come in handy (pliers, screwdrivers, a hammer, etc.)
Choosing a place for installation
When choosing an installation location for both indoor and outdoor units, consider the following points: it is important to consider the possibility of free access to the device (for in-line work on cleaning and replacing filters).
Consider also the shortest possible communication between the indoor and outdoor units (it's not so much about the economic benefit of using fewer Supplies how much in reducing the efficiency of the entire system with an increase in the length of interunit communications). Do not place the indoor unit above a cabinet or tall furniture (obstructing the flow of cool air will cause the unit to work less efficiently). For the same reason, keep a minimum distance from the ceiling and walls (15 cm). Coordination of the installation of the air conditioner with the neighbors is also very desirable, in order to avoid misunderstandings in the future. The installation of an external unit does not create any special problems for residents of neighboring apartments, but it is very likely that someone may not like the noise of a running fan or dripping condensate. And the last point, the most obvious - the flow of cold air should not create discomfort for people in the room, so consider the direction air flow during installation. After the locations of the blocks are determined, we proceed to the installation work.
- installation of the indoor unit;
- fixing the outdoor unit;
- drilling a channel in the wall;
- laying and connection of connecting communications;
- circuit evacuation;
- connecting the air conditioner to the mains;
- system start.
Installing the indoor unit correctly
The indoor unit of the split system is mounted on a special plate supplied with the device. To provide reliable operation block and prevent condensate from flowing out of it afterwards, it is very important to fix the plate evenly. Therefore, to determine a strict horizontal when marking, you must use the level. In the marked places, dowels are driven into the holes pre-drilled with a perforator. Then, using self-tapping screws screwed into the dowels, we fasten the mounting plate and install the indoor unit on it.

At the installation site of the indoor unit is attached mounting plate
Installing the outdoor unit
The outdoor unit is placed on pre-installed brackets outside the building, usually under or to the side of a window for ease of maintenance. For effective airflow, the distance from the block to the wall must be at least 10cm. If it is not possible to fix the brackets from the window, then for the work you will need to rent an aerial platform or use the services of climbers.
Interblock communications - how to do it?
A hole in the wall for the passage of communications is drilled using a perforator with a drill with a diameter of 4-5 cm. If the inter-block route includes a drainage pipe for draining condensate, then the channel must be made with a slope (5-10 degrees towards the street). It is advisable to hide the section of the route from the indoor unit to the point of entry into the wall in the wall. When chasing, a lot of dust is generated, so if the room has already been renovated, then it is better to lay the track outside, closing it afterwards decorative box.

Interconnect communications can be hidden in a decorative plastic case
The inter-unit communication route includes copper tubes of the freon line, power supply and equipment control wires, as well as a drainage pipeline (condensate from the indoor unit, according to the rules, must be discharged into the sewer, but many simply take it outside). Required length wiring and pipelines is determined by measuring the total length of the route (plus a small margin of 30-50 cm).
For cutting copper pipes OK it is necessary to use a pipe cutter, and not a grinder or a hacksaw, in order to avoid the formation of sawdust, which can subsequently lead to a breakdown of the air conditioner. Before installation, the pipelines are placed in a heat-insulating shell; to prevent debris from getting inside, the openings of the pipeline are closed with plastic plugs. All components of the track are stacked together, rewound with vinyl tape, after which the track is installed in place.
After laying the inter-unit communications, they begin to connect the wires and the freon line. The installation manual for the air conditioner must contain a wiring diagram, which must be followed in the work.
The length of the tubes is adjusted (cut off right size), then you need to remove the burrs (we chamfer with a reamer). After threading the nut, each end of the tubes is flared by rolling. Then the edges are connected to the fittings of the indoor and outdoor units, tightening the nuts with a torque wrench (the connections must be absolutely tight).

After checking the tightness, air is removed from the line using a vacuum pump, the gauge manifold makes it possible to control the pressure
Having finished connecting the route, they check the tightness of the line and “vacuum” it (remove moisture and air) using a vacuum pump. To do this, a vacuum pump is connected through the gauge manifold to the service port of the outdoor unit, which, pumping air out of the system, creates a vacuum in it. This process lasts about 20 minutes (depending on the volume of the circuit). After the pump is turned off, the pressure change is observed for half an hour, if the pressure gauge needle does not deviate, then the system is tight. Only after a thorough check of the tightness is it possible to open the taps of the outdoor unit and fill the circuit with freon. Attention, freon leakage can cause compressor failure, but more importantly, the extremely harmful effect of freon on human body.
So, the system is assembled and filled with refrigerant, it remains to connect the air conditioner to the mains and check its operation. The connection diagram of the air conditioner is simple, for most household split systems, the power supply is connected to the indoor unit, for this you just need to connect an outlet to it.
Now you have general idea about how to install the air conditioner with your own hands. It was about the installation of a split system, as the most efficient type of household air conditioners. The video instruction below will help you figure out how to install the air conditioner.
Installation of a mobile air conditioner does not require the intervention of highly qualified specialists: it is only necessary to place the device within 2m from the window (to remove hot air), and then connect it to the network.
In the hot summer, the room where the air conditioner works becomes a blissful oasis that you don’t want to leave. Realizing all the advantages of cooled air, while the city is melting from the heat, people begin in advance, even in winter, to take care of installing this wonderful device in their home. After reading the forums with reviews, choosing and buying the right model, you are faced with the following installation-related dilemma: do it yourself and for free or call a private master. If you chose the first option, then read the article, where we will show you how to install an air conditioner in an apartment on your own, and also provide photo and video materials as visual instructions.
There are many types of air conditioners for an apartment, the most famous is called a “split system”, the installation of which will be discussed later. It consists of 2 blocks: internal - evaporator, and external - condenser, which are connected thanks to electric cables and 2 copper tubes through which freon flows. A plastic tube branches off from the inside, designed to drain condensate.
Video tutorial where you will learn about the right tools and the most common mistakes allowed during installation:
Step-by-step instruction
First you need to install outdoor unit. It's good if you have an apartment outdoor balcony. This will provide unlimited access to the air conditioner. If you decide to install an air conditioner on a glazed balcony, then the condenser is mounted on outer wall at home, in which you pre-make holes. Anchor bolts and reliable brackets will help to fix the outer part of the system to the surface. To protect the device from precipitation, build a visor over it.
Before you install an air conditioner in your apartment with your own hands, read the following tips:
- the surface for fastening must be flat and strong;
- living on the ground floor, mount the unit at a height of at least two meters so that it does not become a target for thieves;
- when choosing brackets, keep in mind that they must withstand a weight that is 2-3 times the weight of the equipment;
- living on the upper floors, but not having a balcony (loggia), you will have to use the services of climbers (pictured below) or a car with a special ladder in order to install air conditioning in the apartment from the facade.

By setting outdoor unit, we drill a hole in the wall necessary to connect the cables and refrigerant pipes that connect the disparate parts of the split system. Next, a "waterproofing glass" is mounted, where we lay the wires and tubes. The next step is to install the indoor unit of the air conditioner in the apartment on your own. Before you designate the place where you place it, read the following recommendations:
- the footage between the indoor and outdoor units should be no more than seven to thirty meters (the specific figure depends on the model of the system itself);
- the body located in the apartment must be located from other things (in relation to furniture) at a distance of not less than three meters;
- to avoid wind and sickness, refrain from installing air conditioning over the bed and the place where you work, as well as over radiators, heaters, fireplaces, etc.
Classification of indoor units:
- Ceiling
- floor standing
- wall
When installing wall and ceiling air conditioners we fix sufficiently strong brackets on which we fix the device. With a floor device, everything is much simpler: it does not need to be fixed at all, but only put in a specially designated place in the apartment.
Important! If the floor unit is not level, then all the drops of condensate will be on the floor. Place it properly right away, because once the air conditioner is installed, the case cannot be moved anywhere!
Next comes the process of gating special holes for wires and tubes that connect the indoor and outdoor units. In many cases, the walls, ceiling, and occasionally the floor are shredded. If this process is difficult for you, then just put the communications in a plastic box that will not disturb the interior of the apartment.

When connecting blocks with wires and tubes, use fittings. Tubes with freon are forbidden to unwind at the joints and bend 2, 3 or more times. Be sure to drill your own line for the drain hose in order to drain condensate from the indoor unit, for example, to the street. Having connected the system, we carry out vacuuming of communications to eliminate unnecessary moisture and air from them. This process is carried out only with the help of specialized equipment. Next, you yourself need to think about a separate power supply for the air conditioner in the apartment. To do this, you need to the device (in strobes), and you need to install a separate machine in the switchboard. Cables are placed in strobes. 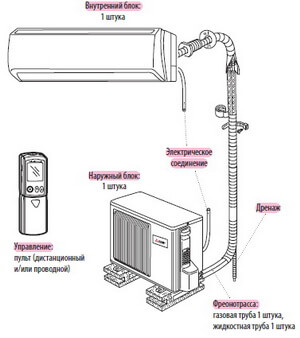
Check if you managed to install the air conditioner with your own hands at home. To do this, use a specific test program that is activated when the device is turned on for the first time. A positive result will be when the technique will function well, without vibrating the case.
This article will discuss how to install an air conditioner with your own hands. Experts strongly recommend preparing the climate device for intensive use in advance. Installation of air conditioners is a responsible and rather complicated event from a technical point of view. With a certain desire, practical skills and a theoretical base, installation work can be done by hand.
The efficiency and duration of the operation of a split system depend on how accurately the installation rules are followed. Wrong place, incorrectly selected equipment for installation, its inconsistency specifications operation, violation of technology - all this can eventually lead to a breakdown of the unit. And even the most expensive devices fail without revealing their potential.
Properly organizing the whole process will not work if you do not have an idea about the principle of operation of this climate apparatus.
- 1. High-pressure refrigerant (freon) is supplied through a nozzle, the diameter of which corresponds to the outlet pipes.
- 2. He's heading to inner part evaporator, where it gradually expands, and after some time it completely boils. The generated steam actively absorbs heat.
- 3. In the process of absorption, condensate is certainly released in the form of water, which settles on the surface of the radiator.
- 4. Moisture is transferred to the tank, and then discharged outside the walls of the house.
- electrical tester;
- bicycle and vacuum pumps;
- pipe cutter;
- perforator;
- indicator;
- example;
- pipe flaring kit.
- choice of location for the installation of the unit.
- installation of brackets on which the unit will be installed.
- Initially, the installation of the external (outdoor) unit of the unit is carried out.
- then the indoor unit and other elements of the system are mounted inside the object.
- remoteness from the side wall - from 30 cm;
- distance from the ceiling - at least 15 cm;
- to the nearest large object that disrupts the movement of air masses - from 150 cm.
- 1. The fixing points of the brackets are indicated and marked with a level.
- 2. Holes are formed under the anchor bolts.
- 3. For communications, it is necessary to prepare a through hole, its diameter should be at least 8 cm. It is better to make mounting recesses and recesses in the space between adjacent bricks, this will not only simplify the work, but also make them visually neater.
- the outdoor unit of the air conditioner should be blown by the wind from all sides (if possible);
- the body is better placed under a canopy;
- upper floor residents apartment buildings they can be placed directly on the roof;
- the maximum line length is 15 m, if this value is exceeded, then cold losses increase.
Show all
The principle of operation of the unit
All models of split systems offered for sale are built and operate according to the same principle. They consist of a compressor and an evaporator unit. To connect them, special pipes are used. The outdoor unit is mounted outside the wall.
Unit device
An evaporator is installed inside the room. More productive and expensive models equipped with several with a common compressor.
The principle of operation of the air conditioner at home:
If the installation of the air conditioner is done professionally and correctly, the compressor will constantly pump out freon vapors from the internal chamber, while the internal pressure increases in parallel. As a result, the refrigerant heats up, which contributes to its transformation into a dense fog.
The refrigerant is redirected to the condensation chamber, where it is cooled by an integrated fan, transforming into a liquid. In this state, it is sent to the evaporator (through the nozzle) and everything closes in a circle.
note! If you install an air conditioner inside a room near a heating device, then the energy consumption will increase significantly, and the device itself will most likely fail after a few months of operation..
Even ordinary dust can lead to breakage of the climate unit. Wet cleaning not only necessary, but also prescribed, and thorough, regular and thorough. Indoors, it is strictly forbidden to put any products or objects on the unit itself. It is also impossible to cover it with a tablecloth.
Scheme of work
Do-it-yourself installation of an air conditioner necessarily involves sealing all connecting elements and joints, which will eliminate the likelihood of refrigerant evaporation. Experts recommend placing the outdoor unit in such a way that it is lower in level than the indoor unit. Standard mounting air conditioner involves the location of the outdoor unit in a cool place, in the shade.
The device and principle of operation of the air conditioner


Tools and preparations
Do-it-yourself installation of an air conditioner cannot be done without pre-training tools:
Required Mounting Tools
This is just a basic set of accessories necessary for the installation of air conditioners. Additionally, you will need a full coil of copper tube (note that its ends must be rolled initially, at the factory). Any visual defects (dents, scratches) are simply not acceptable.
note! Installation of air conditioning systems is impossible without making holes in the walls, damaging the exterior and interior finishes, so the work should be carried out in parallel with the repair.


Step-by-step instructions for installing the climate system
After purchasing the climate unit and preparing the necessary tools, you can proceed to the main pool of work. The installation scheme is quite simple:
note! In the process of performing the relevant work, it is extremely important to strictly observe safety standards, especially when it comes to a height of 2-3 floors. Knowing how to install the air conditioner yourself should not go against the precautions.


The choice of a place for the installation of the unit is no less important than the purchase of the climatic device itself. Experts advise taking into account a number of requirements when choosing a place for the indoor unit:
Unit placement options
As for the placement of the outdoor unit, the balcony is considered the ideal place, but on condition that it is open. In the case of a glazed loggia, you can stop at the option of mounting on the fence, with sufficient bearing capacity this design. We recommend that residents of the first and second floors place this part of the split system above the window so as not to cause inconvenience and level the likelihood of theft.
note! In the case of a private house, no strict recommendations are provided.
Choosing a place for the unit
If there are several air conditioner units, then the minimum distance between them should be at least 1.5 m, optimally - 3 m. A number of manufacturers do not regulate this value and you can select it yourself. But it is better to refuse the “sandwich” option, in which neighboring blocks are located with the back side to each other.
The distance between 2 blocks indoors is from 6 m. More is allowed, but in this case, refueling with refrigerant cannot be avoided. It is better to invest in the specified value.
Where to install the air conditioner
Installation of brackets for air conditioning
Brackets for installing the unit
So, where is the best place to install an air conditioner? – The climate control unit is fixed in an unhindered access zone. Balcony air conditioner installation best option. This type equipment requires periodic and high-quality maintenance.
Experts strongly recommend placing the outdoor unit on the north or east side. Installation of a window air conditioner is often performed at the bottom of the balcony. This zone is considered the best, because it allows you to freely open the window, service the unit. The sequence of actions is simple:
Bracket dimensions
The brackets are installed in accordance with the preliminary marking, adjusting them according to the level and screwing in the anchor bolts. It is necessary to pay attention to the fact that there should be about 10 cm of free space between the base of the wall and the air conditioning unit. Gaps must be carefully sealed. After making sure that this block is securely fastened, the installation steps continue, but already inside the room.
ATTENTION! Don't skimp on brackets.
Brackets for air conditioners. What is the difference?
Outdoor unit fixing
Starting to fix the outdoor unit, you need to make sure that the wall is structurally reliable and durable. Large models can weigh more than 50 kg, and in some cases more. Household climate units weigh about 15 kg, and there are no problems with their fastening. Experts advise to provide a margin of safety for all fasteners and walls at least 2 times.
Advice! If your house has external insulation, you should make sure that the brackets are fixed not to it, but to the wall itself.
AT last years in the segment of private development, such material as aerated concrete is especially popular. With all their positive qualities it is not able to provide sufficient strength for mounting the air conditioner. The same is the case with the ventilated facade.
note! During the installation process, it is extremely important to ensure a horizontal level for the product, while you can use the building level. The slightest deviations are fraught with improper circulation of the refrigerant.
Proper fixing of the outdoor unit
Professionals pay close attention to the competent arrangement of the drain for condensate drainage. In accordance with the rules and regulations, this tube must be connected to sewer system. That's just our compatriots in the vast majority neglect it, completely in vain.
The outdoor unit should be at least 10 cm away from the wall surface. It is required to ensure high-quality blowing of the unit. If you do not withstand it, then the device may completely fail. Remember that any activities associated with the installation of the outdoor unit are associated with a high risk to health, since these are high-altitude work.
Fixing the indoor unit
Professionals categorically prohibit placing the indoor unit behind curtains, near electrical appliances, above the battery. Self installation air conditioner in specified places is fraught with failure of the processor of the device. Having decided on the place, it is imperative to check the wall for other communication solutions (heating pipes, plumbing, electrical wiring).
Fixing the indoor unit
Direct installation of a window air conditioner is possible only if there is a free area. First of all, a metal plate is mounted: at least 10 cm must be retreated from the ceiling, and about 7 cm from the base of the wall. Distances are marked with a pencil. Holes are made for fasteners, and the plate is securely screwed.
Fixed plate for indoor unit
The further installation scheme involves fixing the indoor unit on an already attached plate. A hole is made in parallel in the wall for laying a copper cable, condensate hoses, pipes, and electrical wiring. Standard includes all necessary products, solutions and elements.
Electrical connection
Electrical connection diagram
The indoor unit functions only if it has its own wiring, the cross section of which must be at least 1.5 square meters. mm. A mandatory requirement is the presence of a shut-off machine, especially if it is the installation of industrial air conditioners. The wiring is connected to the shield only when it is fully laid: to neutral wire connect a yellow wire with a small green stripe.
note! In order to determine the phase and zero, it is most effective to use an indicator.
The rules for installing an air conditioner require the connection of individual units using insulated stranded wires, previously passed through a hole in the wall. Each climate control unit comes with instructions that clearly indicate the wiring diagram and sequence.
Answering the question of how to properly install an air conditioner, professionals invariably state that the key to the success of this entire event depends on the quality and literacy of laying copper pipes. They are cut in such a way that there is a small margin (about 0.8-1 m) for bends.
Pipe laying
It is simply not possible to bend them, since dents, wrinkles will form, and the metal may even crack.
note! The installation of industrial air conditioners, as well as household ones, involves the use of special pipe benders. They allow you to maintain the structural integrity of the tubes. For window air conditioners this moment is the key to effective functioning.
Only after this, the tubes can be covered with polyurethane foam hoses, which play the role of thermal insulation. As for the traditional foam rubber, it is completely unsuitable in this context, due to the short service life. Flanges for threading are worn solely on the fact of pipe insulation.
Installation and installation of air conditioners is carried out with mandatory flaring, while the process itself requires utmost care in order to eliminate the risk of grooves and microcracks. Be that as it may, but spare parts and necessary tools should always be at hand. On rolling, the nut should be placed easily, but when tightening, it is better to use a torque wrench, which eliminates the likelihood of small particles being squeezed out of the machined area.
Further, it is enough to fix the corresponding pipeline at each fitting. A small piece of pipe in a reinforced casing is attached to the drain pipe (for such cases, it is better to use heat-shrinkable tubes).
Advice! An important component of the successful installation of an air conditioner at home is the presence of drainage pipe located at the maximum possible distance from the bearing walls.
The next step is to insert pipes into the holes in the wall, while they should be placed as evenly as possible. At the wall, the canvas is fixed with clamps. An air conditioner with installation outside the home must be mounted extremely securely. Small holes fill mounting foam. To check the tightness, you can use a soapy solution.
Vacuum system
To install air conditioners, it is necessary to evacuate the system. Even if the activities are carried out at home, this is indispensable, since moisture and fine dust are removed as part of the evacuation. During the installation of the air conditioner, connections and threads are sealed, otherwise it will not be possible to remove air from the unit. A vacuum pump is used to pump out air for 20-40 minutes.
vacuuming
After the installation of the air conditioner is completed, the refrigerant in the cylinder is supplied to the system. A small adapter is attached to it, and then a pressure gauge. The filling of the air conditioning tank is independently carried out taking into account and correcting for pressure. Upon completion of the process, the disconnector is activated and the system enters the test mode.
note! The uniform circulation of cold air indicates that everything is done correctly. The air conditioning unit can be used for its intended purpose.
Results
Now you know how to install the air conditioner yourself. This work is quite feasible. Naturally, this is not a simple and easy task. The key recommendation is to strictly follow the instructions and if any defects occur, they must be eliminated in a timely manner. In this case, the air conditioner will work efficiently for a long time. Be sure to watch the video on installing the air conditioner from A to Z.
In the hot summer, people begin to understand what they lack in home improvement.
Air conditioning allows:
- get rid of problems such as heat and stuffiness;
- support desired level temperature in the room, as comfortable as possible for a person and household appliances.
Unlike fans, causing drafts and leading to colds, modern air conditioners maintain a predetermined temperature regime in automatic mode without problematic movements of air flows.
household appliances according to their design, they are divided into two main classes:
- monoblock;
- multiblock devices.
Monoblock plants consist of one working unit and are divided into the following main types:
- Window. Such devices must be installed in window opening. Modern systems are produced with a power of 1.5-6 kW, can have additional system air heating, automatic temperature control and remote control. The price of this air conditioner from 12000 rubles and higher, depending on the configuration.

- Monoblock air conditioner mobile type designed for floor installation and can move around the apartment. He does not require special installation; the only condition is that the air outlet hose must be brought out. The hose has a diameter of up to 15 cm and a length of up to 2 m, which limits movement in the distance to the window.

- rooftop devices, which are rarely used as domestic installations.
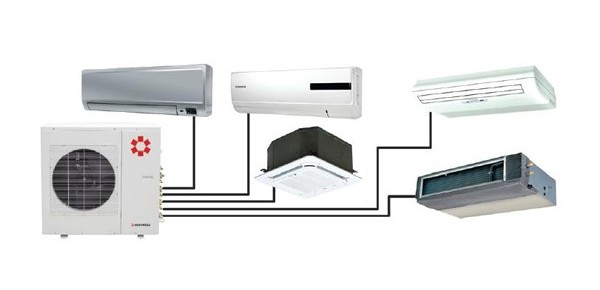
Multi-block structures are represented by split systems different installation with two or more blocks. They have an outdoor unit containing a compressor and are installed outside the room, and one or more indoor units for air distribution.
- The most common type of split system is wall variant indoor unit. It connects electrically and hydraulically to the outdoor unit and is fixed to the wall anywhere in the room. Such devices are produced with a power of 2-7 kW and are able to cool a room ranging from 12 to 75 square meters. m. The distance between the elements (pipeline length) is selected up to 7 m.

- Unlike simple split, providing 1 indoor unit, the multi-split system is based on an installation of 2 to 5 internal devices, which may have different design and power (within 2-5 kW). Such a system allows you to distribute air conditioning throughout the apartment, without cluttering the outer surface of the wall with additional blocks.
Air conditioner power calculation
The choice of air conditioner power. This important parameter device depends on the volume of the room.
- S- the area of the room;
- H- ceiling height;
- q- heat transfer coefficient of the walls (for the sunny side q=40, for the shady side - q=30) with the addition of 10% for the heat generated by people and household appliances(except for the kitchen).
For example, for a room with an area of 30 square meters, a height of 2.5 m, facing the sunny side of the house, the power should be 30 x 2.5 x 40 x 1.1 \u003d 3300 watts. Standard power range of split systems: 2; 2.6; 3.5; 5.3 and 7 kW. Consequently, you will have to choose an air conditioner with a capacity of 3.5 kW.
How to choose the right air conditioner
With the onset of the summer season, many are wondering: which air conditioner to choose? When selecting, in addition to power, We recommend that you pay attention to the following characteristics:
- electricity consumption, the length of the freon line;
- weight;
- drainage features, design;
- important - the presence of automatic temperature control, remote control, the presence of fittings for fastening;
- and, of course, the price of the device.
Watch our video on how to choose the right air conditioner:
The principle of operation of the air conditioner
All household split systems have a similar operating principle:
- The air is cooled by coolant(freon) at the moment of transformation into gas in the evaporator chamber picks up a large number of heat.
- Vacuum pump gaseous freon is pumped out of the chamber and enters the condensation chamber, where again turns into a liquid.
- Then a new cycle begins, and so it repeats constantly. It should also be taken into account that in the evaporation chamber when freon evaporates, water condensate is formed, accumulating at the bottom of the chamber and requiring withdrawal (drainage).
A feature of the split system is remote separation of the location of the condensation chamber, compressor and vacuum pump, and the evaporation chamber.
Due to the fact that all elements that emit noise (compressor, pump) are located in the outdoor unit and taken out of the room, it is ensured silent operation.
Freon is distilled through annealed copper tubes through the indoor unit, where the evaporation chamber is located and the air is cooled.
The energy consumption of the system can be reduced by the following measures:
- the minimum length of the freon line;
- good drainage of the evaporation chamber;
- exclusion of heating of the outdoor unit under the influence of direct sunlight.
Energy consumption decreases when the outdoor unit is placed lower inner element, just as when heated, any liquid itself rushes up, which means that it does not have to be promoted artificially.
The tightness of the entire system is important - any microscopic defects can lead to freon volatilization.
Installing an air conditioner and a split system with your own hands
Installing a split air conditioner includes the following main steps:
- Preparatory work.
- Installation of outdoor and indoor units.
- Freon piping.
- Mounting drainage system.
- Installation of the electrical circuit.
- Filling refrigerant and sealing the system.
- Test and launch.
For mounting  do-it-yourself air conditioner, you must prepare the following tool in advance:
- perforator, electric drill and screwdriver;
- rolling set;
- vacuum pump and gauge manifold;
- pipe processing tool - pipe cutter, scraper, reamer, pipe bender;
- Screwdriver Set;
- a set of socket and wrench keys;
- Adjustable wrench;
- tester;
- level and plumb;
- Bulgarian.
How to choose a humidifier? What is the use of this device, and is there any harm? Details.
How to choose and install it yourself? Let's figure it out.
How much does it cost family budget using an electric boiler to heat a private house? .
When installing the device yourself, you will need next material for installation and equipment:
- for freon route: copper tube (two sizes); return nuts for tubes (two sizes); material for thermal insulation of the route;
- for electrical installation: cable, circuit breaker at least 25A, connecting (terminal) block, RCD, PVC electrical tape, corrugated pipe for cable;
- for the drainage system: hose for outdoor and indoor units, fittings for connection to the sewer system and connection;
- for fastening: brackets for the outdoor unit, mounting plate for the indoor unit, anchor bolts, dowels and screws, rope (cable) to hold the outdoor unit during installation;
- for filling and sealing: freon bottle, silicone sealant;
- auxiliary elements: plastic boxes for pipes and drainage (60-100 mm) and cable (20-30 mm), clamps, pipeline fasteners, screws, dowels.
Preparatory work
The preparatory phase includes a number activities without which you can not start work:
- preparation of the mounting kit;
- studying instructions;
- checking the availability of all details;
- determination of the place of attachment of blocks;
- route marking; clarification of the possibility of the power grid.
Installation work must begin by reading the instructions by use. Without instructions, where the specified parameters of the device are given, quality installation impossible. If the instruction is lost, then you should find an air conditioner similar in model (company office, service centers, Internet).
The instructions specify the following parameters:
- operating current;
- permissible length and diameter of the pipeline;
- drainage requirements specific installation requirements;
- type of refrigerant and its working pressure;
- mass of blocks.
Block placement

When determining the place where it is necessary to install an air conditioner in an apartment, certain rules must be followed.
- The internal one is installed close to the ceiling, but not closer than 15 cm.
- There must be a free gap of at least 10 cm around the block.
- During installation, the unit should be hung obliquely at an angle of up to 5 degrees.
- The location of the element should allow free supply of pipes and cables, and be away from heat sources.
- The distance to the block from the window should not exceed maximum dimensions set for the length of the freon route.
- The outdoor unit is installed on the outer side of the wall below the indoor unit, but no more than 3 m.
- Its location must be chosen so that the installation is easy to carry out from the window opening.
- The length of the pipes from the block to the entrance to the room should not exceed 1 m.
- During installation, the outer element is moved away from the wall by 10 cm. It is forbidden to install the unit near the gas pipeline.
Planned block installation sites are marked with chalk or a marker with mounting brackets. Then between them piping route is marked for freon and power cable. noted mounting location of electrical distribution box. Drainage systems are being marked s and diverting it into the sewer.
Wiring and laying a freon route
 Installation of the system consists in fixing the blocks, laying and fixing the pipeline, electrical wiring and drainage system.
The pipeline and cable along the wall can be laid in three ways:
- penalty;
- plastic box;
- corrugated hose.
Penalties allow you to make a hidden route, but require a lot of time and effort. For laying all highways in concrete, a standard channel size 40 x 60 mm.
Chasing is carried out using a grinder, puncher or wall chaser. The easiest and most high-quality way is to use a wall chaser, which allows you to make a channel in one pass, but the cost of such a power tool is high. More a common method is to cut 2 longitudinal slots with a grinder followed by sampling of concrete between the slots with a perforator.
An easier laying method is a plastic hose or box. They are attached to the wall with dowels, for which holes with a diameter of about 8 mm are drilled in the marked places. To draw a route through a wall, it breaks through hole with a diameter of 5-8 cm using a perforator.
Installation of the drainage system

Proper installation - draining the air conditioner into the sewer, but this is only realized when the location is close sewer pipes. Most often, the drainage hoses are simply brought out (the volume of condensate is small and is released in the form of drops). A feature of laying drainage is the need to ensure the self-flow of water, i.e. the hose should be lowered by 3 cm for every 1 m of gasket length.
Electrical connection
The power cable for the units is located in corrugated hose or strabe pierced in the wall. It is pulled through the wall into the same hole as the tubes. Along the outer wall and in the wall hole wiring is located in the corrugation. The channel for laying inside the wall has dimensions of at least 10 x 10 mm.
The outlet of the electrical circuit of the air conditioner from the main electrical network is carried out in the nearest junction box, if the section of the supply wires allows. Most often, necessary into an existing channel extend additional cable(wire) of the desired section. A terminal block is installed in the junction box, in which the connection is made.
Introductory RCD is installed on the electrical panel with a circuit breaker for a current of at least 25 A.
The figure shows circuit diagram air conditioner connections:

Split system installation

The outdoor unit is mounted on brackets, the dimensions of which must take into account the weight of the device, as well as weather factors (snow, icing, wind). Brackets are attached to anchor bolts, and holes in the wall for them are punched with a puncher. Usually brackets are included. It is recommended to install a canopy over the outdoor unit.
To install the indoor unit pre-on wall fixed with dowels mounting plate included with the air conditioner. Holes for dowels are drilled with an electric drill or punched with a puncher. The block itself, according to the installation technology, is installed with an inclination at an angle of 3 to 5 degrees to direct the cool air down.
When laying copper pipes, special attention should be paid to their bending. To avoid deformations, bending should be carried out using a special device - a pipe bender. The permissible bending diameter is 20 cm. The tube must be cut with a pipe cutter, and the cut end must be processed with a scraper.
A heat-insulating hose made of polyurethane foam is put on the pipes(flex). Threaded flanges (back nuts) are installed on the ends of the tubes, and the end is rolled with a reamer. The flanges are mounted on the fittings of the blocks and tightened, but so as not to deform the soft copper base of the tube.
Special attention - the thread of the flanges must be directed towards the end, and when fastening the cold outlet of one unit must not be connected to the hot outlet of another.
Charging refrigerant and completing the installation
The final stage of installation of the air conditioner includes filling the system with refrigerant, sealing and testing.
After the installation is completed, the power supply is connected and the system is charged with freon. 
- air is pumped out using a vacuum pump;
- then the system is filled with freon from a cylinder, where it is under pressure.
The tightness of the structure is controlled by a manometric manifold.
If the collector shows no pressure increase within 60 minutes, then the tightness is considered normal; otherwise, the sealing of the joints should be checked. The easiest way to check is soap suds. The broken joints are sealed by applying silicone sealant.
Testing is carried out when turned on different modes. Switching on is done using circuit breaker, and the test mode is set on the air conditioner.
To learn how to install the air conditioner yourself, see the video:
Rules for the use of air conditioners
When using the air conditioner in Everyday life you should follow some rules:
- it is impossible to direct a strong stream directly at a person, so as not to cause a cold;
- it is not recommended to allow a temperature difference between adjacent rooms of more than 10 degrees;
- recommended optimum temperature- 20-22 degrees;
- you should periodically turn off the device and ventilate the room to restore the ozone content;
- it is recommended to apply;
- it is necessary to carry out preventive measures - replacing filters, adding freon, cleaning the system.
It is forbidden to turn on a faulty air conditioner: sparking in places of electrical contact, clicking inside, cable heating, refrigerant leakage.
air conditioner installation cost
Installing an air conditioner with your own hands requires certain costs - the purchase of fasteners, refrigerant, auxiliary materials. In general, all costs should not exceed 1000 rubles.
Installing an air conditioner by a specialist can be produced without spending your own time and effort, but will require at the lowest prices from 6000 rubles. By time installation of a split system will take no more than 8 hours in the presence of the right tools and materials.