Method of pouring polymer floors, consumer reviews and prices for materials. Do-it-yourself polymer self-leveling floor - types, technology and video on the device Make a self-leveling polymer floor yourself
Self-leveling polymer floors are a very popular and practical covering, which has many advantages. They are a liquid polymer mass that is poured onto the base, and after hardening it becomes smooth and durable. The presented material can be used at home, as well as at industrial facilities.

Among the advantages of self-leveling floors are the following:
- The absence of joints and seams that reduce the decorative properties of the coating.
- High degree of environmental cleanliness.
- Tightness.
- Resistance to moisture, biological factors, corrosion.
- High level of strength.
- Possibility of choosing different shades and textures.
- Hygiene, so the mixture can be poured even in children's rooms and hospital rooms.
- Easy to clean, and you can use different types of floor cleaning detergents(even chemical ones).
- Antistatic.
- Resistant to temperature changes. The presented coating can withstand fairly high temperatures.
- Possibility of pouring the mixture with your own hands.
The video will clearly explain the advantages of the coating:
As for the disadvantages, there are only a few of them: the fairly high cost of the material, as well as the unusually difficult dismantling of the polymer layer.
Classification of polymer coatings
Before you start pouring the mixture with your own hands, you need to decide what they are:
Based on the material used
- . They are characterized by low cost, good hardness and strength. However, under strong mechanical stress they are capable of cracking, as they are considered quite fragile;
- . They are resistant to temperature changes, can withstand heavy loads and do not crack even after a strong impact. However, their cost is quite high;
- Methyl methacrylate. Such floors are quite difficult to fill with your own hands, but they harden extremely quickly (in 25 hours). Thanks to this property, the time required for floor repairs is significantly reduced. However, they also have some disadvantages: poor resistance to negative influence chemicals.

Depending on layer thickness
- Thin-layer. Most often they are used to equip garages, parking lots, and storage rooms. The layer thickness is only 0.25-0.4 mm. Such a coating practically does not peel off during a targeted impact, and is also able to withstand traffic;
- Average thickness - 1.5-2.5 mm. Used in production premises and commercial buildings. They are quickly installed and hardened. Such mixtures have a rich range of shades;
- Thick-layer. The layer thickness is 5-8 mm.

Depending on properties
- Cement-polyurethane. The thickness of the coating is 5-8 mm. They are used in areas where very strict requirements are imposed on cleanliness, for example: in the kitchen, in workshops food industry, medical laboratories. This coating performs its functions well in a fairly wide temperature range: from -40 to +1200 °C;
- Antistatic. Such floors are ideal for photo studios, electronics production shops, and research laboratories;
- Frost-resistant. They are thin and can be used in areas where there is high humidity and low temperature;
- Highly filled. They have maximum thickness– 5-10 mm. The mixture contains quartz sand, which allows the coating to withstand heavy loads;
- Deactivated. Most often they are used in buildings where work with nuclear reactors is carried out.
Pouring technology
Necessary tools and materials for installation
In order to install, you need to collect the following devices and materials:

Preparatory work
You can pour the mixture with your own hands, but the surface of the base should be well prepared before doing this. In most cases, polymer mixtures can even out significant differences in height, but it is better not to have them. If there are any defects, chips, or protrusions in the base, then it is advisable to remove them.
We have a very detailed video here about all the nuances of preparing the base for pouring a self-leveling floor:
In order for the filling to “take” well, the base must be treated with sandpaper. In addition, you should cover the floor with a primer solution. Subsequently, the poured layer cannot be dismantled independently without special equipment, so it must be poured extremely carefully and carefully.
Filling the rough and finishing layer
To fill a polymer floor with your own hands, you need to complete several steps:

When pouring the second layer of the mixture, it is necessary to leave a technological gap around the perimeter of the room. It will subsequently be filled with a special sealant designed for polymer coatings.
More clearly about the technology self-installation in the video:
As you can see, installing such a floor covering with your own hands is quite simple, even if the technician has no experience working with such a mixture. However, all work should be performed carefully and carefully.
IN recent years The demand for polymer floors has increased several times. This popularity of the material is due to the good technical and decorative properties of the coating. Installing polymer floors with your own hands is quite simple if you strictly follow the recommendations of experienced specialists, which are presented below.
General information about polymer mixtures

Self-leveling coating is polymer composition, which is used as finishing rough foundation. It can be laid on mineral, wood, ceramic and even metal surfaces. For residential premises, polyurethane mixtures are most often used, since they have good aesthetic characteristics, as well as excellent thermal insulation.
All types of finishing filling solutions are divided into two large categories:
- Leveling – applied and leveled manually using a spatula and a needle roller;
- Self-leveling– solutions that are liquid in consistency and spread over the coating with virtually no auxiliary tools.
The thickness of the laid “liquid” coating can vary from 1 to 9 mm. According to many experienced craftsmen, for residential premises a layer of 1.5-3 mm will be optimal.
Preparatory stage

How to make a self-leveling polymer coating on the floor yourself? Before you begin directly pouring the polyurethane solution, you need to prepare a rough base. The main requirement for coatings for self-leveling floor installation is evenness. To check the “horizontalness”, use a fairly long ruler and a building level. If the height difference per m2 exceeds 3-4 mm, you will have to think about additional leveling of the base.
How to prepare the base? Depending on the type of rough covering, there are several methods of preparing the floor, namely:
- For concrete pavements
- The humidity of the cement screed should not exceed 4%;
- Using a Schmidt hammer and a Dean apparatus, you need to find out the tear strength of the base - at least 1.5-2 MPa and the compressive strength of the material - at least 20-23 MPa;
- When installing a new screed, it is desirable that its “age” be at least 27-30 days;
- When repairing an old floor, you need to free the base from paint, previous finishing coat, glue and stains;
- After this, potholes and chips in the screed are repaired, bumps and cracks are eliminated;
- Minor irregularities can be eliminated with a grinder, and cracks can be eliminated with an adhesive solution;
- Then using building level it is necessary to check the “horizontalness” of the concrete screed again.
- For wooden coverings
- IN in this case humidity allowed wooden floors, logs and plywood at 10%;
- The subfloor is cleaned of old coating and baseboards, varnish, paint and oil stains;
- For high-quality cleaning, it is advisable to use a metal scraper, a grinder and a spatula;
- Any cracks on the surface are cleaned with sandpaper and then puttied;
- If possible, the floor is leveled using a cement screed or plywood sheets of various thicknesses.
- For ceramic coatings
- You can also install polymer self-leveling floors on ceramic tiles, but first of all, you need to check the coating for the presence of tearing elements;
- If a dull sound is heard while tapping the tiles, the torn tile must be removed and treated with glue and re-attached to the covering;
- The ceramics are degreased and treated with a primer, after which all tile joints are puttied.
Preparation of a polymer solution

One of the most important stages of work is preparation. bulk mixture. The “spreadability” of the solution during the pouring process will depend on the quality of the mix and consistency. To properly prepare the mixture, it is advisable to rely not on the recommendations of “experienced” people, but on the instructions provided by the manufacturer on the packaging.
How to make a high-quality solution?
- Water is poured into the prepared container according to the instructions;
- Then add dry polymer mixture;
- Knead the liquid mass for at least 10 minutes using construction mixer or a drill with a butterfly attachment;
- The prepared solution should be free of any lumps or inhomogeneities.
How to check if the mixture was prepared correctly? For those who are encountering the process of pouring a polymer floor for the first time, a “spreadability” test will be useful. It will allow you to determine whether you did the kneading correctly or not:
- Cut the bottom off the small plastic lid;
- Place it on the floor and pour the polymer composition inside;
- Carefully lift the lid;
- If the mixture spreads evenly and forms something like a glass surface, you have prepared the solution correctly.
How much mixture will you need?
One of the main issues when installing a self-leveling floor is calculation. required quantity solution. On average, processing a m2 of well-leveled base will require no more than 500-600 g of mixture. In this case, the thickness of the “liquid” layer will be approximately 1 mm.
To more accurately determine the required amount of material, you can use the following expression: y + (y1-y2)/2 = x, where:
- x – coating thickness;
- y1 – distance from the highest marking point to the base;
- y2 – distance from the lowest marking point to the base;
- y is the permissible thickness of the polymer mixture indicated on the packaging.
Floor markings and wall coverings

How to make a polymer floor with your own hands? Before pouring the solution, it is necessary to mark the base. This is done in order to install pendulums that control the “horizontalness” of the applied mixture. In addition, even if self-leveling compounds are used, they will still have to be directed to the corners of the room.
How are markings made?
- Pendulums are installed on the surface of the subfloor at a distance of approximately 1 m from each other;
- When installing the pendulum near a wall, the minimum distance should be at least 10-15 cm.
To prevent the finishing coating from cracking during operation, it is advisable to glue damper tape around the perimeter of the entire room. Even in the case of linear expansion, polymer materials will not “press” against the wall, which will not lead to their deformation. The width of the tape should vary from 7 to 10 cm.
Application of polymer solution

About a day after priming the subfloor, the polyurethane solution is poured. How to fill?
- The prepared solution is poured onto the coating from a bucket at a small height from the floor;
- To level the mixture, use a fairly wide spatula, and the thickness of the layer is adjusted using a squeegee;
- The next operation of pouring the solution is done close to the treated area to result in a seamless monolithic coating;
- The remaining amount of solution is poured in the same way;
- To prevent air bubbles from remaining in the coating, it is rolled with a needle roller;
- At the final stage, experts recommend covering the floor with polyethylene to avoid uneven drying of the solution and its cracking.
The process of applying the polyurethane composition to the prepared base is shown in more detail in the video material. To protect the coating from mechanical stress, an additional layer of varnish is applied over the solution.
Review of manufacturers
For high-quality installation of polymer floors, professionals recommend using building mixtures only from trusted manufacturers. The best of them include:
- Litokol is an Italian company that produces dry polymer mixtures of high strength and wear resistance. They contain modifying substances that improve the physical and mechanical properties of the coating;
- Ivsi is one of the best manufacturers“liquid” floors add fractional sand and mineral components to the mixture, due to which the solution consumption is significantly reduced;
- Bergauf is a company specializing in the production of coatings with improved adhesion properties (more than 1.2 MPa). Acrylic and polymer additives included in the raw material improve the spreadability of the solution over the coating. Enough liquid formulations penetrate into the smallest pores on the base and create a perfectly smooth polymer coating.
Recently, new types of floor coverings have appeared on store shelves. An innovative discovery was the appearance of polymer self-leveling flooring, which appeared relatively recently on the market of construction and finishing materials.
Its path began with application in industrial premises where increased dynamic loads are used.
But they are also often used where aesthetic appearance and environmental friendliness are required, such as the food production sector, sanatorium and medical institutions, and so on. This type of flooring is poured, after hardening it becomes an absolutely flat surface and has no seams.
It looks like linoleum, which is why sometimes self-leveling polymer flooring is called “ liquid linoleum" Thanks to its phenomenal properties, beauty and practicality, it has become widespread not only in industry, but also in general household consumption.
Types and classification of self-leveling floors
The most basic classification is by composition, and so they are divided into:

One of the advantages is that work can be carried out in cold weather and is not susceptible to low temperatures. There are also disadvantages, poor resistance to chemicals active substances, and high cost.
- Polyurethane floors– shows resistance to everyday household damage. They are used in unusual cases when flexibility and elasticity with a combination of strength come first.
Due to its elasticity, it can withstand any dynamic impacts without cracking or deformation. Also resistant to damage by chemicals.

IN industrial buildings Usually the first types of self-leveling floors are used. The following types of polymer self-leveling flooring are widely used for finishing residential premises.
The following type of classification according to layer thickness:

There is also a classification, depending on the properties:

Advantages and disadvantages of self-leveling floor
Like everyone else building materials, self-leveling floor has its advantages:

But, like all materials, they have their drawbacks:
- Very high cost
- Due to all its positive properties, it is very difficult to dismantle a self-leveling finished polymer floor; the use of specialized equipment will be required.
Preparation for pouring a polymer self-leveling floor
As with any floor covering, surface preparation, tool preparation, and ready-mix preparation are required.
We start with surface preparation. We remove garbage and vacuum. We carry out a visual inspection for defects, chips, cracks, and height differences.
We eliminate defects, if any. minor defects We use putty; if there are rough uneven areas, we use floor screed. We are waiting for everything to dry.
During the mixing process, an endothermic reaction occurs, you should be careful and careful. We take a mixer or a drill attachment and mix the components, after which we pour the finished mixture onto the prepared surface.
Polymer floor pouring technology
The pouring process consists of three stages:
- Stage – Preliminary or base layer.
- Stage – Finishing layer.
- Stage – Varnish coating.
And so we start by pouring the preliminary layer. The pouring process is best done by two people: one prepares the polymer mixture, the second smoothes it, and removes the air from the finished solution.
In most cases, an epoxy polymer mixture is used as a subfloor, with the addition of quartz sand or granite sand. Pouring the solution usually starts from the far corner; pouring in stripes is recommended.
 For a perfectly flat surface, it is possible to use beacons, which are pre-set using a level. The finished solution is poured onto the prepared surface, distributed evenly with a rule or a metal spatula.
Afterwards, an aeration roller removes air bubbles that form when mixing the components. Filling along a rope is also possible. The thickness of this layer should not exceed 1-2 mm. Drying time is approximately one day.
After the rough coating has completely dried, you can begin finishing pouring. It is important to wash the instrument thoroughly after each use to avoid mixing.
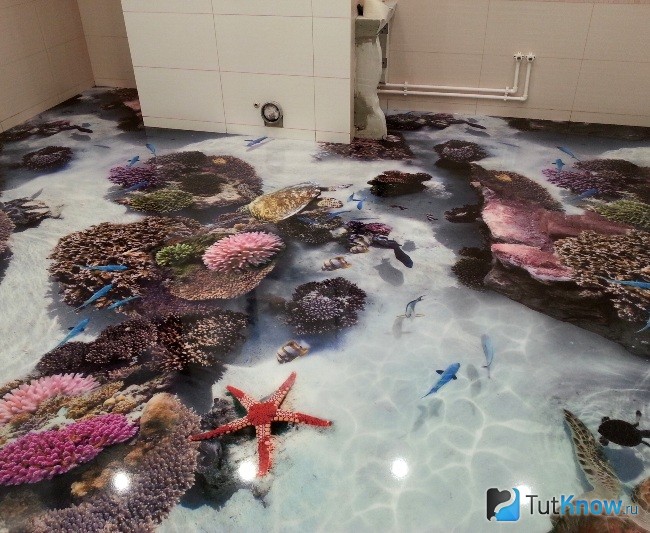
At your discretion, you can use decorative elements. The elements can be coins of different denominations, buttons different forms and sizes, small river pebbles, seashells and much more.
It is also possible to use stencils, landscapes and drawings painted with paints. And recently the use of 3D films. The process of pouring the final layer is no different from the process of pouring the preliminary layer.
After fine coating When it dries completely, apply a special varnish. That's it, the floor is ready after the varnish has dried. Professionals warn that drafts and direct sunlight do not have a beneficial effect on the drying process of the poured floor.
It is also necessary to strictly maintain the time between pouring each layer. When pouring a floor with your own hands, we recommend that you watch video lessons on how to properly install a polymer self-leveling floor.
Prices for polymer self-leveling floors
The price will depend on the manufacturer, brand, region and place of purchase.
Now we will look at the average cost of one kilogram of the mixture:
- Polyurethane mixture – 230-260 rubles.
- Epoxy mixture – 250-280 rub.
- Methyl methacrylate mixture – 340-380 rubles.
- Cement-based mixture – 310-340 rubles.
It is important to know what the price is for square meter polymer self-leveling floor, consists of the price of the primer, preliminary layer, finishing layer, and if required, the price of decorative elements and varnish. The thickness of the layer also affects the cost.
On average the price is per 1 sq.m. and layer thickness 1-2 mm. material is:

Depending on the complexity, the number of decorative elements, the volume of work, the use of 3D films - the price of work per 1 sq.m. varies.
And others wooden materials on a solid base, metal, after applying a special primer.
In this article we will talk about how to make self-leveling polymer floors in an apartment, as well as in a garage.
Types of polymer bases
The synthetic coating used in homes, apartments and offices is based on one of the polymers.
Epoxy resin - together with additional components creates a durable, abrasion- and chemical-resistant coating.

A smooth, elastic floor can withstand any deformation.

Methyl methacrylate floors are created by mixing acrylic resins and hardeners. They are highly resistant to ultraviolet radiation and moisture resistance; with the help of dyes, unique color combinations. The floor hardens in 2 hours, and its service life is up to 40 years. Despite all the positive characteristics, this type of self-leveling floor is rarely used, the reason for this was the high cost and harmful fumes that arise during the pouring process.
Features and Benefits:
- Hygienic and easy to care for.
- Resistance to mechanical stress.
- Seamless filling technology.
- Possibility to make polymer floors yourself.
- Variety of colors.
- Immunity to chemical reagents.
- The high hardening speed of the self-leveling floor reduces repair time.
- Durability of use.
Preparing the base

The main requirements for preparing the base are correcting defects and cleaning the surface. If there is old coating, it must be completely removed. The entire area of the subfloor is thoroughly cleaned of debris and dust (you should use a vacuum cleaner). After cleaning, existing defects become clearly visible. Existing cracks and cracks are puttied, the protrusions are knocked down. In the best way surface treatment is considered an application grinding machine. If the polymer floor has to be poured onto ceramic tiles, its surface is deprived of smoothness with sandpaper or sandpaper.
It is necessary to measure the horizontal level of the base: if its difference does not exceed 4 mm, then you can start making a polymer floor. If there are significant fluctuations in the level, the surface will have to be leveled with a sand-cement screed and further work postponed until it dries.
In the vast majority of cases, poor-quality pouring of a self-leveling floor is caused by a poorly prepared base, which causes peeling.

After the screed has dried, a thorough primer is required, which increases adhesion between the base and the self-leveling floor, and also reduces the absorption of the polymer mixture, and, therefore, the consumption of the expensive composition. It is better to apply the primer in two layers, leaving a break of at least 4 hours between them. The composition is applied with a roller. To prevent the liquid mixture of the self-leveling floor from leaking near the wall, this area is taped with damper tape. Also installed along the perimeter of the room wooden slats, which will save space for the expansion joint.
Preparation of the solution

To work you will need:
- Drill with attachment.
- Wide spatula.
- Roller with a needle insert on a long handle.
- Big bucket.

It's time to prepare the working solution. This process is described in the instructions on the package to obtain excellent result The manufacturer's recommendations should be strictly followed. To create a polymer floor you will need two components, one of which is a hardener. Mixing takes place in a large container. During the reaction, heat is generated, so it is recommended to lower the container where mixing is carried out in advance into a container with cold water to slow down the reaction somewhat.
Beginners can mix the composition in a bucket, pouring two components alternately. An attachment with spatulas is selected for the drill, and a low mixer speed is used when working. The mixing process takes about two minutes.
Installation
The floor should be poured at a temperature not lower than +10°C; at a lower temperature, chemical processes will slow down and the polymer will not spread well over the surface of the base. High temperature will cause the components to cure too quickly and will not allow for a quality pour.

During the curing process, the floor should not be exposed to drafts or direct sun rays. The top layer of the polymer coating should not dry before the rest of the mass, otherwise cracks will appear.
The liquid polymer is poured in a corner far from the entrance and is helped to spread over the surface with a wooden leveler. The work is carried out in strips, without stopping, the composition quickly hardens in the container. It’s good to involve an assistant in this process, because it will be difficult for one person without experience to do everything. During the pouring process, the solution is rolled with a needle roller, which removes air bubbles. The work ends at the entrance to the room. You should not walk on fresh composition, otherwise shoe marks will remain.

After the composition has dried (the process, depending on the polymer, takes several hours or days), the wooden planks around the perimeter are removed, and the seams are filled with sealant and covered with plinth. The final layer of the self-leveling floor is a coating of two layers of varnish, it gives the surface shine and smoothness, and also increases wear resistance. Using various types varnish: matte, colorless, glossy or colored - you can achieve the desired effect.

- thin-layer polymer paint coatings;
- concrete impregnation;
- thick-layer polymer coatings with sand.
The most economical option for self-leveling flooring is polyurethane impregnation. This is one of the most reliable types of garage coatings. Externally it resembles varnished concrete. To obtain a more attractive floor covering, color markings can be applied to it.

The first step is to clean the rough surface. If the floor was wooden, then you need to dismantle it along with the logs. By clearing the base of debris and dust, you can evaluate the quality of the subfloor. If there are cracks and chips on it, then this is bad signal, indicating the destruction of the material. All damage to the screed must be repaired.
In some cases, before pouring the self-leveling floor in the garage, you need to perform cement screed. This is advisable if the floor is very broken, there are large differences in height, or if there is no screed as such.

If you do need to make a screed, then pay special attention to the arrangement of waterproofing. In addition, to improve the strength characteristics of the floor in the garage, which is very important in this room, make reinforcement. To do this, you can use galvanized mesh laid in a solution.
After the screed has dried or the existing subfloor has been cleaned, it needs to be primed. For what?
- The primer will improve the strength of the base.
- This ensures adhesion of the screed to the polymer floor.
- Protecting the surface from the appearance/reproduction of microorganisms.
Apply damper tape around the perimeter of the garage, which will serve as a shock-absorbing layer. This is done to the height of pouring the polymer floor.

Now you need to install the beacons/guides. If you have a small garage, then you can use corners, pipes or metal profiles as guides. Place them so that the top edges of the guides are in the same plane. For these purposes, you can use long self-tapping screws. Divide the floor into square/rectangular sections. Screw the screws into the tops of the rectangles/squares. To do this, you first need to drill out the tie and insert it into the dowel holes. The beacon should be raised as needed. Do this with a solution.
Now you should prepare the polymer mixture according to the instructions provided by the manufacturer. Mix it thoroughly. For this you can use electric drill with a special mixer attachment. It is important that the drill operates at low speeds, otherwise many air bubbles will form in the mixture. And this will negatively affect the quality of the polymer floor.

Pouring the polymer is quick because it dries quickly. That's why best method to complete this work - prepare the mixture based on a rectangle/square, aligned with the markers - fill it and level it.
After pouring is completed, you need to roll the mass with a spiked roller. In this way, air and excess moisture trapped in the polymer will be removed. The self-leveling floor can only be used when it is completely dry. The time it takes depends on the temperature in the garage.

There is no need to dry the floor artificially. When the room warms up, a crust forms on the polymer. In this case, the thickness of the self-leveling floor will remain viscous. As a result, the floor in the garage will simply sag over time under the weight of the car.
The work of installing a polymer floor has many complexities and nuances, but it is quite possible to do it yourself. Training videos will help you follow the technology.
Video
The process of pouring the self-leveling floor can be seen in the video below:
Photo


Features of the use of polymer floors in premises, types of coatings used, their disadvantages and advantages, preparation and installation on their own.
Contents of the article:
Polymer floors are a modern and ergonomic covering for all types of premises. It is applied using the pouring method and a perfectly flat surface is obtained. If the work is done correctly, the finished floor will feel like tiles to the touch, and appearance looks like linoleum. The thickness of such a product can range from 1 to 7 mm.
Main types of polymer floors

On the market modern building materials You can find several main varieties of this coating, which differ in their characteristics and application:
- Epoxy urethane floor. Indispensable in rooms with high traffic intensity. It has great strength, but retains a certain level of elasticity.
- Polyurethane floor. Resistant to chemicals and temperature changes. This surface does not collect dust and looks perfectly smooth and aesthetically pleasing.
- Epoxy resin floor. It is characterized by high resistance to abrasion, as well as exposure to alkali, oil, acid, and moisture. Due to sanitary and hygienic standards, it cannot be used in all types of premises.
- Methyl methacrylate floor. It has significant installation requirements. At the same time, the resistance to external influences is somewhat worse than that of other types of coatings. Because of this, this mixture is the least popular.
Advantages and disadvantages of installing polymer floors

To the most important positive aspects benefits from using such a coating include:
- Ease of use thanks to a perfectly flat surface.
- Temperature resistance. This floor is not afraid of frost, drafts, or heat, so you can successfully install a polymer floor in a garage or even in a sauna.
- Increased strength (wear resistance). Any type of polymer flooring lasts much longer than a number of other floor coverings.
- A variety of interior solutions and application possibilities - pay attention to this when carrying out renovations indoors.
- There is no need for waterproofing.
In addition, this type of surface can hardly be called natural. Many potential customers are concerned about the environmental safety of this type of coating. There are rumors that self-leveling floors emit resins that are undesirable for human health.
And here’s what experts say about this: of course, polymer flooring is not natural natural material. But all the volatile substances it contains evaporate during the polymerization (hardening) stage. After a week, that is, the period of complete hardening and readiness of the floor, it becomes 100% safe even for children's health.
According to sanitary and environmental characteristics self-leveling polymer flooring is not inferior to many more familiar ones natural materials. This is evidenced by the corresponding sanitary reports and quality and safety certificates issued for this type of coating.
Tools and materials for pouring polymer floors

What tools and materials are needed to independently pour any types of polymer floors:
- The polymer material itself is factory-packed;
- Tank (bucket, basin, other container) for mixing;
- Wide construction spatula;
- Roller for painting;
- Masking tape (adhesive tape);
- Construction level;
- Electric drill with mixing attachment.
Preparatory work before pouring a polymer floor

The service life and external characteristics of the future coating will depend on how correctly the work on preparing the surface for pouring is carried out. In other words, if you want the floors to please the eyes of the inhabitants for a long time, pay the greatest attention to preparation. Neglecting this stage can lead to the fact that an incorrectly laid coating will be subject to deformation and subsequent destruction over time.
You should start with the fact that different types reasons are presented different requirements. So, wood covering it is necessary to sand and also make sure that it is always dry. But such floors should not be primed.
A concrete floor or cement screed has a different porosity. Since they absorb moisture well, such a surface must be primed. You will also need a sealant to seal as much as possible of any cracks and seams.
If there is old concrete on the floor, you will have to remove the most top layer, and then sand the surface thoroughly. After sanding, use a vacuum cleaner to remove any raised concrete dust and particles.
At the stage of preparing the room and floor surface, you also need to worry about the ambient temperature. This directly affects the properties of the poured mixture and its drying. It is normal if pouring is done at a temperature of 5 to 25°C, and the humidity should be approximately 60%. If these conditions are not met, the floors will take longer to dry.
To ensure that the future floor has an ideal structure, a priming procedure is carried out before pouring it. The primer fills any, even the smallest pores and prevents the entry of oxygen, which will increase the service life of the coating.
Some craftsmen add a little dry sand to the soil solution to increase the adhesive properties of the solution. In addition, in this case the finished solution acquires a slight roughness, and it becomes easier to work with.
The primer is applied in an even layer using a construction roller. If required, reapply another primer layer. To do this, you need to wait until the starting layer has completely dried, which is 12-16 hours on average.
Features of pouring a polymer floor with your own hands

Necessary mixing information working mixture and its preparation is always placed by the manufacturer on the packaging of its products. It is better to purchase materials from one brand.
Before pouring the future floor, it is necessary to carefully prepare the base ( basic level). If it is a board, then you should check each of them and secure them so that none of them dangles. All cracks must be sealed cement mixture and sealant, otherwise the finished solution will flow into them and lead to unevenness of the coating as a whole.
The thickness of the self-leveling polymer floor is based on whether it will be self-coated or will serve as a base for other material on top of it. With its help, differences in surface levels of up to 30 cm are eliminated. Most often, the height of the finished polymer floor is 10 mm or slightly less.
Pour into a container prepared in advance (usually a basin or bucket) warm water, after which the dry solution is poured. It is important to maintain all proportions so that the coating has all the necessary qualities after drying. The finished solution should not contain air bubbles or lumps of any kind. Its consistency is somewhat reminiscent of liquid kefir.
The prepared solution is gradually poured onto the base of the floor and spread evenly over the entire surface with a construction spatula. It is important to work with a partner because you need to distribute the solution as quickly as possible. One more point: to move around the room you need to use special spiked shoes. To do this, you can take any old shoes and attach them to a piece of board using tape. Self-tapping screws or nails are pre-filled onto each board.
After the solution is distributed over the surface of the room, it begins to be carefully processed paint roller. It is necessary to pay attention to ensure that all air bubbles are removed as much as possible - in this case it will be possible to achieve the most even, smooth, glossy surface. It will take no more than 40 minutes to complete the work, since after this period the solution begins to set and it will be incorrect to carry out further work.
The technology for the production of polymer floors should be organized in such a way that for each square meter of floor surface in a room, the average consumption of dry matter is approximately 1.5 kilograms. To fill, you need to prepare protective gloves and goggles to protect yourself from harmful fumes. The room must be well ventilated - this way the resins will evaporate much faster and the solution will dry out better.
After 2-3 days have passed after pouring the main polymer layer, you can begin leveling the floor. This is the finishing part technological process. The thickness of the last layer should not be more than 3 millimeters. After the finishing layer has completely dried, they begin to varnish the finished surface. It is best to use polyurethane-based varnish. This will create additional protection for the floor and increased durability to the aggressive effects of alkalis, acids, paints.
It will take about two days or more for complete hardening - it depends on climatic conditions indoors. After the top layer has completely dried, you can begin to apply the decorative layer of coating.
Another good thing about polymer floors is that they can be used in a wide variety of decorative elements. Absolutely any desired drawing based on different colors and shades. With well-organized work and careful study of the instructions, you can independently obtain a result that will not be inferior to the work of an experienced master.
Caring for polymer floors indoors
Caring for this type of coating is not particularly difficult - as if you had to take care of ordinary parquet. Usually the classic dry or wet cleaning to keep it clean.
Used for cleaning polymer floors household chemicals, which has a significant acid content. This product is applied to the floor surface for 5-10 minutes and then removed. After this, the floors are washed with plenty of water. If there are stains from various pollutants on the surface, they are treated separately.
As for the treatment of polymer floors in industrial and commercial premises, the intensity of their use can be much higher. In such cases, there are barely visible cracks on the floor into which dirt particles accumulate. They cause the floors to become dull and lose their former attractiveness. Therefore, you first need to remove accumulated dirt and dust using devices high pressure. Next, the floors are washed, after which they can be varnished to give them the same glossy look.
However, in cases where floors will frequently be exposed to harsh chemicals, they require additional protection. The installation of polymer floors at this stage will be as follows: before pouring, the surface is covered with a special protective polish. It will require updating every 6 months. But you cannot leave detergents and other aggressive agents on the surface of polymer floors for a long time, since they are susceptible.
Polymer poured flooring has proven itself well in rooms where people walk barefoot or wear light shoes. It is recommended to fill floors with polymers in the bathroom, shower, kitchen, bedroom, and so on. In corridors and public areas, the coating will wear off faster due to contact with dirt and sand particles on shoes. In such cases, the floors will have to be restored more often, which is associated with additional costs.
How to pour a polymer floor - watch the video:
Thus, self-leveling polymer flooring is a finishing-type coating that allows you to achieve a perfectly smooth and absolutely flat surface that is resistant to abrasion and impact. This type of floor covering to a certain extent is still novel for the domestic customer. They take advantage of this construction companies And repair teams in order to receive a larger reward for services. But making polymer floors with your own hands is not so difficult if you follow these tips and approach the pouring process carefully.