Do-it-yourself sawing machine. DIY jigsaw machine - simple modifications! From a mechanical jigsaw to an electric one one step
Many people have known the fun of cutting with a jigsaw since childhood. The technology is simple. But despite the apparent ease and simplicity of the work, you can get very beautiful lace from wood or plastic. This is a very slow process that requires persistence and patience. To make work easier, jigsaw machines were developed. They are functionally divided into two groups: with manual and electric drive.
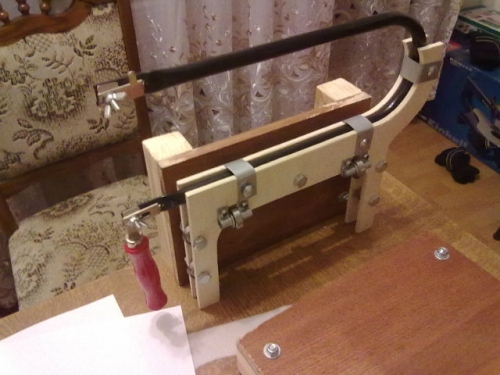
Jigsaw device with muscle drive
A homemade machine is easy to make. You can find many drawings of this plywood product. Using a jigsaw, your own hands and improvised tools, a simple but functional device can be assembled in a short time.
The scope of application of jigsaws is extensive. They are used for sawing figured products from a variety of different materials. Machines are also necessary for cutting lumber. At the same time outer contour the workpiece remains undamaged. If you use different nail files, then homemade jigsaw will process perfectly natural wood, plywood, chipboard, plastic, metal, in particular aluminum.
Examples of do-it-yourself drawings of a jigsaw machine, which operates using muscle power, were repeatedly cited in various Soviet-era magazines.
Files for such a jigsaw machine are produced in the form of a flat blade.
Main parts of the machine:
- Bed (A).
- A work table with a slot for a saw (B).
- A large drive pulley that acts as a flywheel (D).
- Small drive pulley. The drive is combined with a crank mechanism (D).
- Levers (B).
- A pedal that spins the flywheel through the crank assembly (E).
- Saw tension unit (G).
The master, constantly pressing the pedal with his foot, spins the flywheel. Through the belt, the movement of the flywheel is transmitted to the second pulley. Which, in turn, causes the crank mechanism with the saw blade to move.
If the flywheel is correctly balanced, without distortions and with a uniform, correctly selected mass, then the file achieves good smooth running. A similar machine for cutting plywood allows you to quickly produce many simple, similar products. The time and effort required for sawing is significantly reduced.
With this machine design, the size of the initial workpiece is limited. It depends on the length of the levers (B). When complicating the pattern, it is necessary to rotate the product around the saw.
Since foot drive does not ensure a completely uniform stroke and limits the freedom and imagination of the master, then most often such machines are replaced with electric ones.
Construction of a jigsaw machine
An electric band jigsaw is a universal household device for making souvenirs, furniture, and various interior items. There are many options for manufacturing such machines. But the main elements on which the quality of the product and ease of use depend are the electric motor and the blade.
Main design elements:
- Saw blade.
- Crank mechanism.
- Drive part.
- Belt tension unit.
- Stand or work table.
- Various auxiliary elements.
Design and principle of operation
Conversion from a hand jigsaw
 The first step is to make a working table for the mechanism. Suitable for these purposes metal sheet or thick plywood. Holes for the cutting tape and fasteners are drilled and sawed out in the worksheet.
The jigsaw table is then placed on a regular table. Once secured, the guide rails can be assembled. To reduce vibration, just cut rubber gasket the right size and place it between the jigsaw table and the main surface.
The above design is convenient in that it can be easily disassembled and can be used again as a hand jigsaw.
Since the standard device has springs that tension the saw, a rocker arm is necessary. One edge of the rocker arm is attached to the cutting element of the machine, and the second is under tension from springs. These simple steps will easily turn an ordinary jigsaw into a machine.
When operating the device, it is important not to forget to turn off the pendulum stroke before starting cutting.
Assembly from a sewing machine
 You can also quickly and easily assemble a homemade jigsaw from a sewing machine. Moreover, this device has interesting feature- regulator of the stroke of the nail file, since sewing machines have a speed switch.
First, at the bottom of the machine you need to find a thread weaving knot. To do this, several screws are unscrewed. The cotter pin located inside is knocked out and the drive shaft, which is connected to the thread weaving complex, is removed. After completing this procedure, the top panel is unscrewed. The groove along which the needle rode widens slightly to accommodate the saw blade. The files themselves are shortened slightly to the length of the needle. To fix the saw itself, you can make an adapter. But the easiest way is to grind top part cutting blade and sharpen the bottom. After which you can insert the nail file into place of the needle and get to work.
When working with jigsaws of any type, you should not forget about safety rules. Do not leave the device turned on for a long time without supervision.
If the master long hair, then it’s better to pick them up or use a special cap. It is better to roll up the sleeves on clothes. The room should be well ventilated. In the room where carpentry work is carried out, a first aid kit with emergency aid for cuts must be kept.
A tabletop jigsaw is an indispensable item for any owner who is used to doing household work on his own. Electric jigsaws are especially good for residents of the private sector, hobbyists manual labor And country holiday. The desktop electric model has gone quite far from its prototype, an ordinary manual jigsaw. A desktop jigsaw makes it easier and faster to cut, not to mention improving quality.
Concept of a tabletop jigsaw
A jigsaw is a saw, which is characterized by reciprocating movements of the saw blade, which acts as a working body. It has a ski designed to guide the saw blade when moving along the surface that is being processed, and makes movements at a frequency of up to 3000 vibrations per minute.
This instrument was invented in 1946. Its creator is Albert Kaufman, who replaced the needle in a sewing machine with a blade. The instrument went on sale already in 1947. A manual jigsaw has a body with a flat platform and a handle. The main difference between an electric jigsaw and a manual one is its greater functionality and cutting quality.

Inside there is an electric motor and a special mechanism that drives the blade. IN stationary jigsaws there is no handle, and the platform is located on top. At the front of the mechanism there is a guide, at the bottom there is a retractable blade that moves and makes cuts.
The tool works as follows: a tabletop jigsaw file is securely secured with clamps in the slide. The reciprocating movements have a frequency of up to 3000 strokes and can be adjusted. The support platform allows the jigsaw to focus on the part being cut, so the work is carried out very accurately.
The purpose of a desktop jigsaw
A jigsaw is an integral part of every workshop and every hobbyist. Its thin file can successfully cut plywood, copper, iron, thick boards, brass, and steel. Tools come with motor, foot or manual drive and are more productive. An electric jigsaw is simply indispensable for carpenters, wood workers, furniture decorators, and drywall workers who produce complex parts.
An electric jigsaw can make straight and curved cuts on workpieces with complex shapes and various sheet materials without disturbing the external contour. Most often, tabletop jigsaws are used for cutting wood and wooden slabs, figures with complex outlines from laminate and plasterboard, plastic blanks, also for cutting sheet metal.

The benchtop electric jigsaw makes clean cuts in complex shapes and works on small
details. Due to the stable and fixed position during operation, it is achieved high precision cutting The file has a stable motion thanks to the tension system and guides, which manual jigsaws lack. Large size the table makes it stable, so the precisely specified sawing direction is maintained.
Types of jigsaws
Today, the power tool market offers a wide variety of jigsaws, which differ in the nature of their application, technical specifications, type of power supply and design features. IN construction stores You can buy a desktop jigsaw to suit every taste and budget.
It is difficult to classify by design features, because each manufacturing company strives to provide its products with features that are designed to facilitate and improve the operation of the tool. In this regard, the shape of the handle is a significant parameter.
There are two established types of handles - mushroom-shaped and D-shaped. A jigsaw with a staple handle requires one-handed operation. This increases the possibilities of using a jigsaw, but has a somewhat negative effect on the quality of cutting the material.

Mushroom-shaped handles allow for more accurate cuts when holding the jigsaw with both hands, having previously secured the workpiece to be cut. The choice of a jigsaw with a certain handle shape depends on the financial capabilities and personal preferences of the buyer. You should choose the jigsaw that will be more convenient to work with.
Household jigsaws are not intended for intensive use, but the low price of a desktop jigsaw and the power that is enough for household needs make them indispensable in the household.
Professional jigsaws are characterized by high wear resistance and the possibility of daily long-term (up to 8 hours) use. The significant power of such jigsaws makes it possible to process materials of large thickness. Expanded equipment and improved characteristics are reflected in the price.

Among professional jigsaws, industrial jigsaws also stand out, which are characterized by greater adaptability to complex operations and drive features - for example, increased power supply voltage. Industrial models are machines that are designed for the woodworking industry.
Depending on the type of power supply, there are mains and cordless jigsaws. Network models are powered from a power supply network with standard voltage. If productivity is important to you, then you should choose a corded power tool.
Cordless jigsaws provide independence from the presence of sockets and greater mobility during operation. When purchasing a battery model, you should pay attention to the type of battery. Elevated performance characteristics inherent in lithium-ion batteries. The battery capacity is responsible for the operating time without recharging.
Advantages of desktop jigsaws
The tabletop electric jigsaw is stationary structure, therefore this type of cutting tool has many advantages. Modern models can work with wooden materials 40-50 millimeters thick. The working body is a narrow saw, which makes vertical translational and reciprocal movements. Due to the peculiarities of the notching of the teeth and the mechanics of the movements of the saw, the material is cut out by moving upward.
A tabletop jigsaw allows you to cut out complex decorative parts, make longitudinal, straight, inclined and transverse cuts. The wide tabletop allows you to process large parts and make cuts inside wide workpieces. Reliable fastening protects the housing from unnecessary vibrations and allows the material to be well positioned, so the motor can operate without overload.
The advantages of desktop jigsaws include good accuracy and clarity of cuts, high safety and ease of use, wide customization options depending on the material and the required detail of the cut workpieces.

If you need to cut out parts small size, a manual jigsaw will not be very convenient. It is quite heavy, so you will have to hold it with one hand and guide the workpiece with the other. A table jigsaw does not have this drawback. Perhaps the inconveniences are the large size and the difficulty of working with large parts.
A tabletop jigsaw is a kind of mini-machine for cutting workpieces. If you purchase a jigsaw in a store, most likely it will provide the ability to select power and adjust the frequency of saw strokes. However, you can make a simple homemade tabletop jigsaw, and very quickly. You will need a hand jigsaw, a few screws, a small piece of plywood and just an hour of work.
Making a tabletop jigsaw
A carefully made jigsaw will be little inferior to one made in a factory, and in some respects even superior to it. Assembling such a jigsaw is not difficult if you have necessary materials. Next we will describe simple diagram such manipulations.
The design of the jigsaw includes the following components: handle, switch button, insulating washer, power cord, frame, heating filament, screw clamp and earring. First you need to make a frame. You will need a duralumin pipe with an outer diameter of up to twelve millimeters.
You can also use textolite with a thickness of at least ten millimeters or thick plywood for the base. But keep in mind that the lighter the frame, the more convenient the jigsaw will be to use. Be sure to provide a channel so that you can lay the power cord later. Most best shape a frame is one whose sides are tilted 45 degrees.

Next you need to make an earring. It is made of copper sheet one millimeter thick. After this, it is attached with screws to the frame where it connects to the handle. In this way, the screw, wing nut and shackle will form a clamp in which the heating filament can be fixed. The thickness of the duralumin sheet should be up to 0.8 millimeters. It is necessary to make pressing cheeks from it, between which there is a switch button.
After this, you need to cut a gap in the plywood that the saw can fit through. It can be done using a drill. To do this, you need to drill holes along the marking line and smooth out the transitions. Instead of plywood, you can use plastic, metal, plexiglass and others. Next, you place and drill mounting holes on the plywood and jigsaw base plate.
Then you need to secure the jigsaw with screws to the plywood base so that the file can fit through the gap. You attach the structure to the table using a clamp so that the file is pointing upward. You can also secure the platform in any way possible.
The jigsaw file remains a regular one, but the possibilities for good cutting are expanded by freeing up your hands.
You can use a nichrome spiral from any household heating device (iron, for example) as a heating filament. It must be secured with tension between the ends of the frame bends. In order for the thread to heat up, you need to apply a tension of about 14 V. To control the operating mode, you can use a rheostat.
The current is determined by the thickness and length of the nichrome thread. Using a rheostat, you can set the optimal current strength (no more than 3-5 A), which will affect the temperature to which the filament is heated. Before starting work, it is necessary to determine the current strength. But keep in mind that if too high strength The material being cut can be caught by the flame, but if it is insufficient, it will not be taken. A self-made desktop jigsaw will allow you to cut out shapes with complex contours from various types materials.
Rules for using a desktop jigsaw
When working with table jigsaw You must adhere to some rules:
- When cutting, do not press too hard on the tool, otherwise it will best case scenario the needle will break, at worst, you will ruin the work.
- Replace saw blades from time to time. An old saw can damage and destroy the surface of the material.
- If you work with organic glass and non-ferrous alloys, the surface of the product must be moistened with water. This operation will speed up the process and extend the life of the saw.
- If you are cutting a surface with a thickness of less than one millimeter, place a sheet of wood or plywood under the material being processed.
- Before cutting, it is necessary to secure the material. It is better not to make long cuts by hand; the line may turn out to be crooked.
- To cut different materials, appropriate blades are required, with a special pitch and length.
- Rotate the tool by turning only the back of the tool.
- When cutting laminate, tape is applied to the cut line, which protects the material from chipping.
- If there is a need for curved cuts, set the jigsaw pendulum to minimum.
If you have not yet fully understood how to make a tabletop jigsaw, watch a video about this procedure. This tool allows you to cut complex parts from wood and other materials, make longitudinal, inclined, straight and transverse cuts. Using a jigsaw, you can process large parts, wide workpieces and small products, which is not superfluous at home.
After several unsuccessful attempts to cut out complex shapes electric jigsaw, I decided to make a homemade tabletop jigsaw using drawings from the network. It will be very easy to cut complex shapes of small sizes from lightweight materials.
To assemble a jigsaw machine with your own hands from a jigsaw you will need:
- electric jigsaw
- sheet of plywood and boards for support
- wood screws
- bolts with nuts
Tools: drill, sandpaper, clamp, tape measure.
Step 1: Cut out the lid and base


Draw two 250x300 mm rectangles on a sheet of plywood and cut them out with a jigsaw. These rectangles will be the base and cover of your machine. Carefully sand the surfaces of the rectangles, especially the one that will be the lid.
Step 2: Making the front pillars


Show 4 more images


Measure the height of the jigsaw from the sole to the handle so that the jigsaw fits in the machine box; the stands must be greater than this distance. My jigsaw is 18 cm high, so I made 20 cm long posts from the board. Then I pressed the two pieces together with a clamp and sawed off 5 mm from them on both sides so that both posts were the same height.
Now the racks can be screwed to the base. To prevent the wood from cracking, you need to pre-drill holes for the screws and countersink them.
Step 3: Attach the jigsaw to the lid


Show 7 more images


- Remove the soleplate from the jigsaw using the supplied hexagon. There is already one hole in the cover, you just need to drill three more so that there is a mounting hole in each corner.
- In the central part of the plywood cover, mark the place where you will attach the jigsaw sole and the hole for the jigsaw blade.
- Now you can drill four holes in the plywood, countersinking them with a countersink bit so that the screw heads are flush with the surface. All that remains is to make a hole for the file.
- Now put the sole back on the jigsaw skis, and attach the plywood cover to the sole so that the file fits into the hole provided for it.
- Insert a washer into the widening of each mounting hole, insert bolts into the holes and tighten them on the other side with nuts. It was a little difficult to tighten the bolts, so I secured the head of each bolt with a flat head screwdriver and turned the other side with a wrench.
Step 4: Install the jigsaw on the base


Lower the cover with the jigsaw onto the base with the stands and secure it on top with screws, having previously drilled holes for them. Be sure to countersink these holes to prevent the wood from cracking when screwed. The jigsaw should not touch the base and should have a good grip on the lid. Therefore, the screw heads must be flush with the surface of the cover, otherwise they will unscrew while the jigsaw is running.
From the remains of the board, I made two additional rear posts, so the machine became much more stable.
Step 5: Modification of the machine

At this stage, the machine is quite functional; it is enough to simply secure it with a clamp on the tabletop and you can work.
I identified two features of my jigsaw:
- the blade moved a little to the sides, especially when working at high speeds.
- The blade width was wider than standard jigsaw blades, making cutting particularly thin holes poor.
Step 6: Reduce the width of the canvas


A narrower blade will give you the ability to cut fine curves and make it easier to cut rounded corners.
- Pull the saw to the maximum, do not forget to turn off the jigsaw from the mains.
- Mark the point where the blade exits the housing. Below this point nothing needs to be removed.
- Remove the file from the jigsaw and grinding machine grind the canvas to the desired width. When sanding, dip the file in cool water so that it does not overheat, otherwise the metal will lose its hardness and the file will no longer be able to cut through anything. A change in color is a sign of overheating of the metal.
- Once you have the desired blade width, place the file back into the jigsaw.
Step 7: Making a guide for the file


The guide will prevent the blade from moving to the sides during cutting, especially at high speeds.
I made the guide from a small strip of PVC plastic. At one end of the strip, use a jigsaw to make a small slot at an angle to the middle of the strip. We secure the strip behind the file by screwing it to a wooden L-shaped piece mounted on the lid of your machine. The guide can be lubricated with oil for better movement.
Remember:
- The guide should never be higher than the blade at the lowest point in the blade's path.
- The guide limits the size of the material you are going to cut due to its height and mounting point on the surface. Therefore, it is better to fix the guide as high as possible (taking into account the previous remark), and move it as far away from the canvas as possible, with a slope to the side as soon as possible.
Step 8: Conclusion


With a little effort, you will have an almost real tabletop jigsaw. It, of course, will not replace a real machine, but given its zero cost, it is an excellent option.
The article will primarily be useful to those people who often work with wood as a hobby, without making money from it. The author presents quite budget project desktop jigsaw, which can be assembled in one day, with minimum costs for materials.
To create the machine you will need the following materials:
- Working manual jigsaw;
- Plywood;
- Self-tapping screws and bolts with nuts;
- Guides for furniture drawers;
- Two bearings;
- Compression spring;
- Spray paint;
- Self-adhesive paper.
Materials and tools are standard, available in every workshop.
Step 1. Body.
The first step is to create a body for a manual jigsaw from plywood. Here you need to think in advance where the holes for the switch and speed controller will be located.
It should look something like this:

Step 2. Tabletop.
It is better to take a thick piece of chipboard with good coverage, since the workpieces being processed will rub against it during operation of the machine.
A hole for a saw blade is drilled in the chipboard. The jigsaw itself will be attached to the back of the tabletop.
A stem for attaching the boom is also made from furniture guides:

Here's what it looks like assembled:

And the tabletop is attached to the body:

Step 3. Arrow.
The boom itself will be made of two furniture guides. They are bolted together to increase rigidity.

The boom supports are made of chipboard. Before painting and installing them, the point at which the boom is attached to the support is measured. Before doing this, they need to be installed in their place:

After this, it is necessary to drill holes in the support for seats bearings.

Step 4. Painting.
The prepared supports are spray painted.

While they dry, the machine itself is covered with self-adhesive tape.

Step 5. Assembly.
Bearings are inserted into the supports and screwed into place.

The boom mounting axis will be made of two bolts screwed into the guides as shown in the photo. The diameter of the bolts is selected in accordance with the diameter of the inner race of the bearing.

The bolts are tightened securely, after which the two halves are screwed to each other.

This clearly shows how the boom will be secured in the supports:

The boom is installed in its place and secured with nuts.

Next you need to install the garter spring. It is necessary in order to return the arrow to its original position after the jigsaw pulls it down. This is how the saw will move back and forth. It must be adjusted so that it is not too soft (this will complicate the operation of the machine) and too hard (this can lead to overheating of the jigsaw motor).
How to secure it is shown in the photo:


Then, from a thin strip of metal (1 mm), it is necessary to make fastenings for the file to the arrow. They must rotate freely on the axis, since during operation the boom changes its angle of inclination to the jigsaw, and if they are static, this can lead to breakage of the saw.
This is what the mounts should look like:

The boom supports are additionally reinforced with a long bolt, it can be seen in the photo:

Step 6. Electronic part.
Since access to a manual jigsaw is limited, it is necessary to place the controls on the outside of the body.
To adjust the rotation speed of the jigsaw electric motor, the author used a phase power regulator. Here is its electrical diagram.
A tabletop jigsaw machine will be useful to every craftsman who cuts out thin parts. However, it is not always possible and meaningful to purchase a full-fledged machine. In that case, get down to business and make it yourself!
The structure of a jigsaw machine - what lies inside?
Jigsaw machines are more related to special tools than to devices that are needed as to an experienced master, and for the amateur who manages the garage. Their purpose comes down to a special task, namely cutting out complex curved contours from sheet materials. A special feature of such machines is the execution of cuts without violating the integrity of the external contour. Most often, sawing occurs on wood and derivative materials (plywood, chipboard, fiberboard), although modern machines equipped with appropriate saws can also work with other materials, for example, plastic or plasterboard.
Such equipment has found application in music industry(production musical instruments) and, of course, in the furniture room. Those who like to make things in their own workshop also buy such units. The structure of a traditional jigsaw machine, designed according to all the rules, looks like this: work surface, on which the saw is mounted, hides the drive (electric motor) and the crank structure underneath. The tension mechanism can be located either below or above the machine.
To process a part, it must be placed on the workbench. Many models have the ability to rotate it at different angles to make bevel cuts. Stops and guides on the surface, as well as swivel mechanism can have markings, which greatly simplifies and speeds up the work. The length of the cut depends on the length of the work table - most models are limited to 30-40 cm. Electric motor power is an important, but still far from the most fundamental factor, since the machine has a huge reserve of unclaimed power. For example, for a home workshop or even small production An “engine” of only 150 W is enough.
The crank mechanism is much more important detail, because in in this case It is on this that the quality of transmission of the drive’s torque into the translational and reciprocating motion, directed in the vertical plane by means of a saw, depends.
Standard jigsaw machines are considered to be devices with an amplitude of movement of around 3-5 cm and a vibration frequency of up to 1000 per minute. Many models provide a change in speed mode for different materials. The jigsaw itself is usually made up to 35 cm long and is capable of sawing material up to 10 cm thick. The width of the files can vary in a fairly wide range - from very thin two-millimeter to coarser ten-millimeter, with a thickness from 0.6 mm to 1.25 mm.
Even the thickest and widest file will easily break if you do not provide sufficient tension along the entire length of the file. Leaf and coil springs are used for this. Quite often, such machines are equipped with an air pump, which cleans the cut from sawdust by blowing it, as well as a drilling unit. The latter device is especially useful, because in this case the master does not need to be distracted by the connection electric drill and drilling a hole - everything happens on the working plane of the machine. Of course, you have to pay for convenience!
How to make a jigsaw with your own hands from a manual jigsaw?
On the Internet you will find many different designs homemade machines, but most of them come down to repurposing into this device. By using your ingenuity and watching the video, you can easily make a homemade jigsaw from this tool. The jigsaw only needs a little modification. In fact, it plays the role of a machine drive and a crank mechanism, but the rest needs to be thought out and implemented.
Of course, manufacturers are trying to please consumers in this area as well, offering their own platform options for quick and convenient remodeling, however, in reality only you can make a device that suits your needs. So, the first step is to make a support table, for which they most often use sheet metal. You need to make a beveled oblong hole in it for the saw blade and holes for fasteners (countersunk screws are recommended), and attach the jigsaw to the bottom of the support table.
This structure can only be strengthened wooden table. You can go beyond this and install guide rails. The convenience of such a device lies in the fact that in addition to performing functions that are not entirely inherent to it, you can always disconnect the drive and with a slight movement of your hand turn it back into a manual jigsaw! If you constantly need this tool for work, it makes sense specifically for the machine - it will be cheaper than spending money on a real machine.
Advantages and disadvantages - we continue to modify!
But such a unit inherits not only the advantages of the tool, but also its disadvantages, in particular, the file is too wide for filigree work, which significantly limits the curvature of the lines. If there is a need for this, there will be a way out. So far, our machine differs from the classic jigsaw unit in the absence of springs that would ensure sufficient tension on the file. But it’s quite easy to build a simple rocker, which on one side will be under the tension of springs, and on the other, fixed to a nail file.
There is another option - to clamp the nail file between two guide rollers, but the first option is still more reliable. Be sure to turn off the pendulum action on your jigsaw before using it. homemade machine. There is another design - if your tool is powerful enough, then it can only serve as a drive in a structure of two rocker arms, between which a nail file is stretched. The movement is transmitted through a file attached to the lower rocker.
Machine from a sewing machine - giving a second life to old tools!
If you inherited a foot or hand weapon from your grandmother or mother sewing machine, consider yourself the owner of an excellent jigsaw! Of course, for this you need to “work a little magic” on the machine. First, remove the thread weaving device, which is usually located at the bottom of the machine. There is nothing complicated about it, just unscrew two bolts. Then we knock out the cotter pin and remove the drive shaft leading to the thread weaving mechanism.
Having unscrewed the top panel that protects the mechanisms, it is necessary to expand the slot in which the needle went. Be guided by the needs and width of the nail file that you will use in your work. Files for a jigsaw of this kind also need to be slightly modified, namely cut to maximum length needles that could be used on this machine. Having ground off the upper teeth and sharpened the lower part to the point, all you have to do is insert the file into the needle holder and test your machine in action!