How to install an aluminum heating radiator yourself. DIY heating radiator installation
Self-installation heating appliances is a task for which you need to carefully prepare. The slightest violations of a process that seems simplest to an amateur often lead to negative emergency consequences. Therefore, it is advisable to entrust the replacement of batteries in city apartments to plumbers, on whose powerful shoulders the entire burden of responsibility will fall, and in a private house, installing heating batteries with your own hands can be successfully done by the owner. However, in order to avoid having to repair floors and re-glue wallpaper after a hot “flood”, you should familiarize yourself with information about the basic rules and nuances of installation.
Preparatory stage of work
The first step is to find out what type of wiring was used to organize the heating system. The owners who arranged it themselves should know whether the heating network provides heat to their country property.
Before installing a radiator, you should find out whether there is a single-pipe or two-pipe heating circuit in the house; the choice of parts and their quantity depend on the wiring diagram
Parts required for installation
Depending on design features details are selected. For a battery built into a single-pipe heating system, it will be necessary. This element will allow, in the event of any malfunction, to turn off only the device equipped with a bypass without shutting off the entire heating system, which is extremely undesirable in frosty weather.
The connection diagram and type of radiator also determine the number of connecting and functional elements required for proper installation. Adapters, couplings, nipples, and corners are selected according to the diagram and dimensions.

An inexperienced performer should not get carried away with parts for installing a radiator that are unnecessarily difficult to install: 1) corners, 2) radiator stop valve, 3) “American”, 4) valve with American
The future installer will also need shut-off valves. It is recommended to choose the radiator type shut-off valves, without getting carried away with overly complex ball valves with “American” design, which require professional skills from the performer. Ensuring tightness without experience is problematic. To connect the battery to the pipeline, you will need fittings with threads corresponding to the size of the radiator and pipes. A sleeve will also be screwed onto the leads, which is then twisted and inserted into the battery.

With the help of squeegees, it is easier and easier to connect the radiator to the heating circuit - there is no need to weld the joints of the supply line and the pipeline
It is important to note that when purchasing for installation, you must first check whether the included brackets match the type of material from which the walls are built.
In order to be able to bleed air from the battery, it must be equipped with a Mayevsky tap. Usually it is included in the factory configuration, but if it is not available, you will definitely need to buy it.

An important part necessary for the correct installation of the heating radiator is the Mayevsky tap, which is necessary to bleed air from the device
How to calculate location?
Those wishing to install the radiator themselves should know that the sections of pipes leading to the devices must be positioned with a slight slope directed towards the direction of movement. In the case of a strictly horizontal installation, as well as in the case of a slight misalignment in the installation of the radiator, air will “collect” in steel or cast iron batteries. It will have to be constantly blown out by hand to avoid a decrease in heat transfer.
It is desirable that the central axis of the radiator coincides with the axis passing through the center of the window opening. Deviations of 2 cm are permissible, which are absolutely not visually detectable. This recommendation is not a strict requirement.
The list of strict rules:
- The supply elements to heating devices must be located so that the slope is 0.005; it is recommended to increase it to 0.01. That is, one meter of pipeline must be inclined towards the circulation by at least 0.5 cm. The angle of inclination should be calculated according to the length of the installed pipe sections.
- From the floor plane to the battery 6-10 cm or more.
- From the bottom line of the window sill to the top line of the radiator 5-10 cm.
- From the wall surface to the radiator 3-5 cm.
When installing the radiator prerequisite is compliance with horizontal and vertical directions.

Norms and rules for installing a heating device: distances from the floor, walls, window sill
In order to increase the performance of the radiator, a specialized shield made of heat-reflecting material can be installed on the wall behind it before installation. You can simply coat the wall surface with a composition with similar properties.

For aesthetic and technological reasons, radiators in one room are located on the same level
Marking batteries with brackets
The sectional principle of selecting heating devices allows you to accurately determine the number of sections required to heat a room with specific technical specifications. Information about payment rules must be found and studied before purchasing. But according to the installation rules, 1 m² of radiator heating surface area is equipped with one bracket.
Brackets for mounting radiators: homemade on top, factory on bottom, if desired home handyman he will be able to make it with his own hands, by analogy with factory-made battery mounts
So here's what you need to do:
- Taking into account the above rules, we mark the installation points of the brackets.
- Before drilling holes, check all distances again.
- We insert dowels into the drilled holes, into which we then screw the fasteners.
If the markings were done correctly, the battery will “lie” tightly on all installed supports, firmly resting on each of them. Further installation of the radiator with your own hands involves connecting the device to the communication system.
Tools and Supplies
The performer will need torque wrenches with dimensions that allow high accuracy observe the dynamometer torque. Since the coolant moves through the system under pressure, insufficient tightness will lead to the appearance of a jet from the connection point. Excessive tightening will cause thread failure with similar consequences. Therefore, you should carefully follow the instructions included with each device. They indicate the value of dynamometer torques.
You will need to stock up on sealant, tow soaked in oil paint, or special sealing tape.
The installation process itself
Before starting work, it is necessary to completely shut off the heating circuit, drain the water from the system, and the pump will help remove any remaining water efficiently. Using a level, carefully check the battery hung on the supports vertically and horizontally.
- You need to unscrew all plugs from the device.
- Connect a valved bypass, which is only required for a single-pipe circuit. To connect to a two-pipe circuit, a bypass is not needed; only a squeegee with a valve connected to it is used for connection.
Using threaded connectors, we connect the battery to the system, using tow or another sealant to seal the joints (if you have experience in welding, the joints between the connectors and the pipeline can be welded).
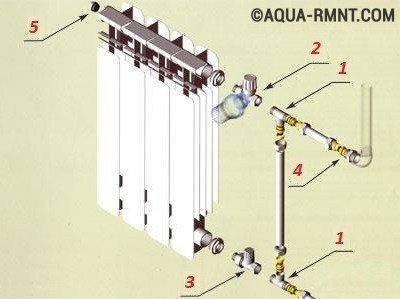
A bypass is required for connection to a single-pipe circuit - connection diagram: 1 - tee for metal-plastic pipes; 2 - direct control valve; 3 - direct shut-off valve; 4 - adapter for metal-plastic pipes; 5 - rotating valve for air release
It is important to note that until the installation of the devices and devices is completed, there is no need to remove the packaging shell.
Installation is complete, but more is needed. To do this, you will need to call a plumber. Both his experience and the device will be useful, which does not make sense to buy for the sake of installing several batteries.
Specifics of installing a cast iron radiator
No matter how intensively innovative battery manufacturers promote their aesthetically pleasing ultra-light aluminum and bimetallic products, many cast iron adherents remain. The material, which is not pleasing with grace, retains heat for an incredibly long time, gradually transferring it to the heated space. Those wishing to learn how to properly install a heating radiator made of heat-intensive cast iron should familiarize themselves with the specific design features of the device and its installation:
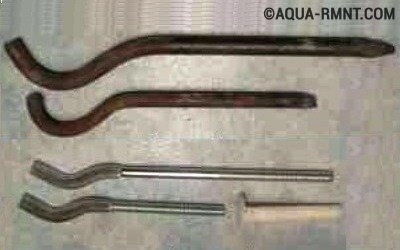
- Before installation, the cast iron battery will need to be unscrewed, the nipples adjusted, and then the device reassembled. Disassembly is carried out on a workbench, using a pair of radiator keys inserted into the nipple holes. To increase the applied force and to secure it, a crowbar is inserted into the eye of the key intended for unscrewing the lower nipple. To avoid distortion, both nipples located at the top and bottom are unscrewed at the same time. It is more convenient to do the work together. When unscrewing a cast iron radiator, pay attention to the direction of the thread. WITH different sides radiator made of cast iron threads with opposite direction. Unfolded? Remove the section.
- By analogy, you need to screw together all the sections, and then group them in strict reverse order into a single device with the number of sections required to heat a particular room. The assembled battery must be tested and, if a leak is detected, adjusted to problem area nipple.
- Wall-mounted cast iron batteries can be fixed on brick and foam concrete walls. Walls made of wood will not support the weight, so the owner wooden house Radiators with special floor supports will be needed. However, supporting fasteners must also be installed on the walls.
- Since private houses mostly have single-pipe heating, a bypass is installed. The connection diagram must include a Mayevsky tap and corresponding shut-off valves.
Connection to the pipeline is made using threaded fittings. IN wooden buildings welding machine It's better not to use it.

Unscrewing and assembling technology cast iron batteries: a – nipples grip the threads of sections (2-3 threads); b – tighten the nipples, join the sections; c – install the third section; d – two radiators are grouped

The difference in the schemes for attaching a cast iron battery to walls made of different building materials:
A) wooden wall: 1) support bar, 2) stand
b) brick wall: 1) window sill, 2) niche, 3) brackets
Whether or not it is worth saving on installing batteries is a personal matter for the owner. Essentially, there is not a single particularly difficult moment in the installation technology. By strictly following the sequence, knowing the rules, having studied the information on how to install a heating radiator, you can safely get down to business with hands that confidently hold radiator, torque wrenches and other tools. True, confidence alone will not be enough to achieve success. Strict adherence to installation rules and the formation of impeccable tightness, guaranteeing a complete absence of leaks, will definitely help.
When starting to independently install heating devices, you should keep in mind that there are many nuances in this matter, so it is impossible to do without thorough preparation. Even if you make a small miscalculation, this can subsequently lead to quite serious emergency consequences. For this reason, the installation of batteries in city apartments must be performed by qualified plumbers, on whose professionalism the quality of the work performed will depend.
If we're talking about about a private house, then the owner himself can easily handle this work. Moreover, you need to remember that such work as installation of heating radiators involves some risk, which may require floor repairs and new wallpapering if the batteries cannot hold hot water. To avoid such situations, it would do well for every owner of a private home to know about the key rules and features of installation.
Preparatory stage of work
The first question the owner must answer is: what type of wiring was used for the current heating system. If the owner of a private house has done this work on his own, then he should know that there are only two options here: one-pipe or two-pipe.
Parts required for installation
When starting to select elements for installation, you should proceed from the design of the selected system. In the event that the battery is connect to single pipe system , you will have to prepare a bypass. With its help, the owner will have the opportunity, if a problem occurs, to turn off the installed device without having to turn off the entire heating system, which can lead to negative consequences in winter.
Depending on which installation scheme and type of radiator is chosen by the owner, the question will be decided regarding the number of necessary connecting and functional elements that will be required to complete high-quality installation radiator pipes. When choosing adapters, couplings, nipples and angles, you should focus on the existing diagram and dimensions.
Shut-off valves will be required to complete the work. It is best if the owner deals with the radiator type of shut-off valves. But buy ball valves with “American”, different complex design, is undesirable, since they can only be installed correctly by a specialist with the necessary skills. Not everyone is able to carry out the connection work in such a way as to comply with the tightness requirement. The procedure for connecting the battery to the pipeline requires the use of pipes, which must have the same dimensions as the battery itself and the pipes. The drive is used together with the bushing, which is wound on them. After connecting the first, the sleeve is placed in the battery.
If you are planning to install cast iron radiators, then first you should check whether you can install the brackets supplied with the radiator on the wall, where the main attention should be paid to its material.
You should remember that you will have to remove any remaining air from bimetallic radiator heating. You can do this only if you have a Mayevsky crane on the battery. Most often it is included in the factory package, however, if it is not assembled, you must definitely purchase it.
How to calculate location?
During self-installation heating batteries you need to keep in mind that you need to pay attention correct placement of pipe fragments, which will be connected to devices. They should be installed at a slight slope in the same direction in which the water in the heating system will circulate. If the installation is carried out exactly horizontally, this will lead to air accumulation in the radiators. Moreover, a similar phenomenon can also be observed when the radiators are installed with a slight distortion.
In this case, the owner will be forced to regularly remove the air manually, otherwise the heating efficiency will not be optimal. During work, you need to pay attention to ensuring that there is correspondence between the central axis of the bimetallic heating radiator and the axis passing through the center of the window opening in terms of their location relative to each other. Even if there is a presence here deviation of 2 centimeters, then this will not greatly affect the battery efficiency. Therefore, if you neglect this recommendation, it will not lead to irreparable consequences.
If we talk about the rules that must be complied with, then the following must be included among them:

During installation work bimetallic batteries heating it is important to fulfill the requirement on compliance with horizontal and vertical device placement.
In order to maximize its efficiency as a result of operating a bimetallic heating radiator, it makes sense to place a shield made of heat-reflecting material behind it on the wall before installation. You can also do it differently by applying to the surface of the wall special composition, which has similar properties.
Marking batteries with brackets
 If when choosing heating device pay attention to the sections, this allows you to quite accurately calculate the optimal number of sections, which will be enough to create an optimal temperature regime taking into account existing conditions.
It will be useful, even before purchasing a bimetallic heating radiator, to find out by what scheme the calculations should be carried out. As for the installation features, there should be completed next rule: for each square meter The area of the heating surface of the battery should be one bracket.
In general, all actions at this stage will boil down to the following:
- First you need to mark the future locations of the brackets, keeping in mind the rules described above.
- Before you start creating holes, you should once again make sure that the calculated distances are correct.
- When the holes are ready, dowels should be placed in them, into which the fasteners themselves are already inserted.
If the labels were selected suitable places, then the radiator will “stand” on installed supports, evenly distributing the load between them. After this, all that remains is to connect the heater to the communication system.
Tools and Supplies
 To correctly install radiators, the owner must prepare torque wrenches of certain sizes that will allow him to withstand the torque with the utmost precision. Considering that pressure is constantly present during water circulation in the heating system, if there are signs of a leak, you can notice a stream of water from the problem area.
If the constriction turns out to be too tight, then this will lead to thread failure, which will end with similar problems. In this regard, all operations must be performed strictly following the instructions supplied with the radiator. From them you can find out what the dynamometer torque indicator should be.
Among the required materials that will be required during execution installation work with your own hands, you need to highlight the following:
- Sealant;
- Tow previously soaked in oil paint, which can be replaced by a special sealing tape.
Installation process
The procedure prior to installing the radiator is to cover heating circuit. Also need remove residual water from the system, for which it is best to use a pump. Using a level, you need to find out how correctly the vertical and horizontal requirements for the battery placed on the supports are met.

The procedure for installing a radiator with your own hands comes down to manipulating the pipes. To solve the problem of sealing joints, you can use tow or other sealing material.
Please keep in mind that when installing aluminum, bimetallic and steel radiators remove the packaging possible only after completion of installation work.
At this point, the installation of the radiator can be considered complete. Next, it remains to perform crimping. It is best to have this done by a qualified plumber. The owner will not be able to carry out this procedure independently not only due to the lack of necessary experience, but also special equipment, the cost of which is quite high. Thus, any owner can install a heating radiator with his own hands. The video, which shows key operations, will help even beginners avoid mistakes.
Conclusion
Modern radiators can improve the quality of heating a room. At the same time, installing heating batteries with your own hands is not a task that an ordinary owner cannot solve on his own. For the most part errors when performing this work associated with violation of recommendations.
Therefore, if you familiarize yourself in advance with the features of installing a heating radiator, watch a video that demonstrates the installation process by qualified specialists, prepare necessary materials, then you can install it in your home even without the help of a specialist new battery.
Install the heating radiator yourself in country house It's not always as easy as it seems. If installation techniques are violated, owners are guaranteed to have problems and expensive equipment will fail. How to correctly install a heating radiator according to the diagram? Instructions with photos and videos will help you avoid common mistakes.
Engineers have come up with a huge number of heating radiators
Installing a heating radiator with your own hands, in the form O
To an inexperienced person, it seems that all radiators have the same design and type of connection. However, batteries differ not only appearance, and also the materials from which they are made, the method of connection. When starting to install a radiator, it is recommended to carefully read the instructions for it, familiarize yourself with the technical parameters and manufacturer’s recommendations for connection.
Engineers have come up with a huge number of heating batteries. However, the most widespread and popular following types radiators:
- Steel. Installed in most Soviet houses. They have thick metal walls, due to which they give off heat for a long time if the heat supply suddenly stops. Steel radiators designed specifically for multi-storey buildings and easily tolerate high hydraulic pressure in the system. They can easily tolerate extreme pressure fluctuations. The disadvantage of steel batteries is that filling them requires large volumes of water, which not every pump can pump.
- Cast iron. According to reviews, such batteries can last 5-6 decades, but look like new. However, when installing them, great attention should be paid to the installation method. Cast iron radiators are heavy even when not filled with water.
- Aluminum. Their advantage is considered to be excellent heat transfer, but aluminum does not tolerate water hammer in the system. The use of process water with aluminum radiators is not recommended, since the liquid has poor chemical composition disables them.
- Bimetallic. Made from a combination of different metals. For example, the pipeline is steel, and the radiator on it is aluminum. Thanks to this, engineers were able to combine the most best parameters different radiators. According to reviews, such radiators are not cheap, for which they are criticized.
For country house or dachas, experts recommend giving preference to bimetallic radiators, and for wooden ones country house– aluminum. However, if the owner wishes, any type of installation can be done.
Radiator connection diagrams, video:
Do-it-yourself installation of heating radiators in a private house, diagrams A
Before you start building your own at the dacha, you need to study the installation methods and decide which one will be used in your home. We offer a list of the most popular schemes, namely:
- lateral, one-sided connection - the simplest and most common type of installation. In this case, the heat supply pipe is attached to the radiator from above, and the outlet through the lower pipe. When connecting the radiator in reverse, with the heat source supplied through the lower pipe, a decrease in room heating is observed. In addition, distant sections may not warm up as they should;
- the lower connection of both pipes is used in new ones, modern houses. This type of installation is chosen in cases where the pipeline needs to be hidden in a wall or floor;
- diagonal installation is the most best way installation of radiators with a large number of sections. In this case, the coolant is supplied through the upper pipe on one side, and the outlet through the lower pipe on the other side;
- serial connection is used in private houses with low pressure in the system. With this connection, the radiator usually does not warm up enough, and repairs involve completely turning off the heating in the house.
We suggest that you familiarize yourself with the radiator installation diagram:


Basic rules for connecting a radiator yourself And
To avoid difficulties during the installation of heating batteries, you can call a specialist to your home. A specialist will quickly assess the situation and scope of work. Experienced locksmiths will do the job not only quickly, but also efficiently. However, you can handle all the work yourself, which will save you some money. To install the radiator correctly, we recommend taking into account the following rules:
- The heat source must be installed exactly in the center under the window. Otherwise, the heating efficiency will be significantly reduced.
- The width of the radiator should always be proportional to the width of the window sill.
- The heating radiator is installed at a height of about 10-12 cm from the floor.
- The distance between the window sill and the top edge of the radiator should not exceed 5 cm.
- A space of 2 to 5 cm is left between the battery and the wall.
Before starting work in an apartment building, you should make sure that there is no water in the system. It is important not to forget to drain the coolant from old radiators. After all this, you can dismantle the used ones.

To an inexperienced person, it seems that all radiators have the same design and type of connection, but this is not the case
- using dowels, 2-4 brackets are mounted to the wall, depending on the size of the radiator;
- a Mayevsky valve is installed at the top of the radiator to bleed air;
- the radiator itself is installed on the brackets;
- The system is sealed.
Regarding the Mayevsky valve, home owners have a question: which is better - mechanical or automatic? You can ask the manufacturer what type of valve is recommended for installation, but reviews show that automatic valve Mayevsky works more efficiently, since air is removed from the system without our participation, and the service life of the radiators is significantly increased.
Video about installing a heating radiator with your own hands:
Are you interested in installing a heating radiator yourself? It is not difficult to cope with the work if you study the types of connections and choose the right radiator. Watch the video, study the manufacturer's diagrams and recommendations to avoid common mistakes that beginners admit.
For any type of radiator there is general rules for placing them indoors. There is also a certain sequence of actions that must be followed. The technology is simple, but there are many nuances.
How to place batteries
First of all, recommendations concern the installation location. Most often, heating devices are installed where heat loss is the most significant. And first of all these are windows. Even with modern energy-saving double-glazed windows, it is in these places that the most heat is lost. What can we say about old wooden frames?
If there is no radiator under the window, then the cold air descends along the wall and spreads along the floor. Installing a battery changes the situation: warm air, rising up, prevents cold “draining” onto the floor. It must be remembered that in order for such protection to be effective, the radiator must occupy at least 70% of the width of the window. This norm is prescribed in SNiP. Therefore, when choosing radiators, keep in mind that a small radiator under the window will not provide the required level of comfort. In this case, there will be zones on the sides where the cold air will go down, and there will be cold zones on the floor. In this case, the window may often “sweat”, condensation will form on the walls in the place where warm and cold air collide, and dampness will appear.
For this reason, do not try to find the model with the highest heat output. This is justified only for regions with a very harsh climate. But in the north, even from the most powerful sections there are large size radiators. For middle zone Russia requires average heat transfer, while southern regions generally require low radiators (with a small center distance). This is the only way you can fulfill the key rule for installing batteries: blocking most of the window opening.

In cold climates it makes sense to arrange thermal curtain and near front door. This is the second problem area, but it is more typical for private houses. This problem may occur in ground floor apartments. The rules here are simple: you need to place the radiator as close to the door as possible. Choose a location depending on the layout, also taking into account the possibilities of piping.
Rules for installing heating radiators
- The heating device must be located strictly in the middle of the window opening. When editing, find the middle and mark it. Then to the right and left you set the distance to the location of the fasteners.
- The distance from the floor is 8-14 cm. If you do less, it will be difficult to clean; if you do more, zones of cold air will form below.
- The radiator should be 10-12 cm away from the window sill. With a closer location, convection worsens and thermal output decreases.
- The distance from the wall to the back wall should be 3-5 cm. This gap ensures normal convection and heat distribution. And one more thing: at a short distance, dust will settle on the wall.
Based on these requirements, determine the most suitable radiator size, and then look for a model that satisfies them.

These are general rules. Some manufacturers have their own recommendations. And take it as advice: before purchasing, carefully study the installation requirements. Make sure that all conditions suit you. Only then buy.
To reduce non-productive losses - due to heating the wall - attach foil or a thin foil heat insulator behind the radiator on the wall. Such simple measure will save 10-15% on heating. This is how much heat transfer increases. But keep in mind that for normal “work,” there must be a distance of at least 2-3 cm from the shiny surface to the back wall of the radiator. Therefore, the heat insulator or foil must be fixed to the wall, and not just leaned against the radiator.
When should radiators be installed? At what stage of system installation? When using radiators with side connections, you can first hang them, then start laying out the pipeline. For the lower connection the picture is different: you only need to know center distance pipes In this case, radiators can be installed after the repair is completed.

Work order
When installing radiators with your own hands, it is important to do everything correctly and take into account all the little things. Experts advise during installation sectional batteries use at least three fasteners: two on top, one on bottom. All sectional radiators, regardless of type, are hung on mounts with an upper manifold. It turns out that the upper holders bear the main load, the lower one serves to give direction.
The installation procedure is as follows:

We tried to describe in as much detail as possible the entire technology for installing heating radiators. It remains to clarify some points.

The most common. They are used for lateral connection heating devices any type, sectional, panel, or tubular (click on the picture to enlarge its size)
Mounting the radiator to the wall
All manufacturers require installation of heating radiators on a prepared, level and clean wall. From correct location holders depends on the efficiency of heating. A skew in one direction or another will lead to the fact that the radiator will not heat and will have to be rebalanced. Therefore, when marking, be sure to maintain horizontal and vertical lines. The radiator must be installed level in any plane (check with a building level).

You can slightly raise the edge where the air vent is installed (about 1 cm). This way the air will predominantly accumulate in this part and it will be easier and faster to release it. Reverse tilt is not permitted.
Now about how to position the brackets. Sectional radiators of light weight - aluminum, bimetallic and tubular steel - are hung from above on two holders (hooks). If the batteries are short, they can be placed between the two outer sections. The third bracket is placed at the bottom in the middle. If the number of sections is odd, place it to the right or left on the nearest section. Usually, when installing hooks, mortar sealing is allowed.

To install the brackets, holes are drilled in the marked places, dowels or wooden plugs are installed. The holders are secured with self-tapping screws with a diameter of at least 6 mm and a length of at least 35 mm. But this is standard requirements, read the passport for the heating device for more details.
The installation of the holders is different, but not radically. For such devices, standard fasteners are usually included. There can be from two to four of them, depending on the length of the radiator (it can be three meters long).

There are brackets on the back panel with which they are hung. To install the mount, you need to measure the distance from the center of the radiator to the brackets. Set aside a similar distance on the wall (preliminarily mark where the middle of the battery will be located). Then we apply fasteners and mark the holes for the dowels. The next steps are standard: drill, install dowels, attach brackets and secure with self-tapping screws.
Features of installing radiators in an apartment
The given rules for installing heating radiators are general for individual systems and for centralized ones. But before installing new radiators, you must obtain permission from the management or operational company. The heating system is common property and all unauthorized alterations have consequences - administrative fines. The fact is that with a massive change in the parameters of the heating network (replacing pipes, radiators, installing thermostats, etc.), the system becomes unbalanced. This can lead to the entire riser (entrance) freezing in winter. Therefore, all changes require approval.

Types of wiring and connections of radiators in apartments (click on the picture to enlarge its size)
Another feature is of a technical nature. If it is vertical (one pipe enters through the ceiling, goes to the radiator, then comes out and goes to the floor), when installing the radiator, install a bypass - a jumper between the supply and discharge pipelines. Paired with ball valves, this will give you the opportunity to turn off the radiator if desired (or in an emergency). In this case, no approval or permission from the manager is required: you have turned off your radiator, but the coolant continues to circulate through the riser through the bypass (that same jumper). You don't need to stop the system, pay for it, or listen to your neighbors' complaints.
A bypass is also needed when installing a radiator with a regulator in an apartment (the installation of the regulator also needs to be coordinated - it greatly changes the hydraulic resistance of the system). The peculiarity of its operation is that it blocks the flow of coolant. If there is no jumper, the entire riser is blocked. Can you imagine the consequences...
Results
Installing heating radiators with your own hands is not the easiest, but also not the most difficult task. You just need to take into account that most manufacturers give guarantees only if the heating devices are installed by representatives of organizations that have a license to do so. The fact of installation and crimping must be noted in the radiator’s passport, the installer’s signature and the company’s seal must be present. If you don’t need a guarantee, your hands are in place, it’s quite possible to handle it.
The efficiency of the heating system of an apartment or private house depends not only on the power of the heat sources. Correct installation of heating radiators will reduce the cost of heating the room, make it more productive and improve the microclimate.
Regardless of what system you use, whether autonomous or centralized, where the radiator will be located - in an apartment or house, the rules for installing heating radiators are the same. There are three options for radiator placement:
Types of heating systems
There are three options for radiator connection systems - serial, single-pipe, two-pipe and collector (parallel). They differ in the wiring diagram. Depending on what system is installed, it is necessary to select the type of batteries. It is important to remember that incorrect connection of heating radiators leads to a decrease.
Correct installation of heating radiators in a niche
It happens that in apartment buildings there is a niche for old cast iron radiators. This method of installing heating batteries is ineffective, but sometimes there are no other options. Therefore, let's consider it too.
- The distance between the side and back walls The niche to the radiator should be at least 5 cm.
- Air access from below should not be difficult, as well as its exit from above. The distance from the bottom and top of the radiator to the walls should be more than 10 cm.
Decorative lattice should promote convection. An overlay made of diagonal strips is best suited. It is better not to cover the gap in the lower part of the radiator with a grille to ensure optimal air convection.
If the niche is made in a parapet located along the wall, it top part better close decorative grille, and not a continuous overlay.
The battery in the niche under the window should be located so that there is a distance to the window sill. It should be twice as large as the window sill protrudes from the wall. For example, if the window sill extends 15 cm beyond the wall, the distance from it to the niche should be 10 cm.
Read also:
How to properly recess batteries into the wall without heat loss
The radiator in the niche under the window should be positioned so as to ensure good air convection. There should be at least 10 cm between its top and the edge of the niche.

How to properly install a battery under a window
The greatest heat loss occurs through windows. That's why correct installation batteries under the window are especially important.
- The radiator must be located exactly in the middle of the window - so it will cut off cold air and will not allow it to spread throughout the apartment.
- The installation height of the radiator from the floor should be 5-10 cm. If the gap is larger, a layer of cold air will form. If less, it will be difficult to clean under the battery.
- The distance from the wall should be at least 5 cm so as not to impede air convection. Otherwise, the battery will heat the wall of the building and not the room.
If the radiator is equipped with air cutoffs (see photo), the distance from it to the window sill should be more than 5 cm. If the window sill is wide and protrudes beyond the radiator, for every 1 cm of this difference you need to add 2 cm to the gap between it and the battery.

For radiators without an air cutter, the minimum distance to the window sill is 10 cm plus 3 cm for every 1 cm of protrusion. Installing heating radiators under the window close to the window sill will interfere with air convection. And this will lead to a decrease in heat transfer.