What screws to use to secure plastic windows. How to install a plastic window with your own hands
Replacement decision wooden windows on plastic has all the advantages, since modern double-glazed windows are much more functional and reliable. The correct installation of them is of considerable importance, for which several methods are used. The most popular of them is installation on anchor plates.
Most often, one of two methods is chosen for installing plastic windows:
- Direct screwing of the frame into the opening using screws.
- Use of anchor plates.
The first option is considered more complex, because involves complete disassembly of the structure, including removal of the sashes (both fixed and movable). This makes it possible to drill the profile without interference, attaching it to the walls of the opening with self-tapping screws. After installing the frame, the window is reassembled: this procedure includes adjusting the sashes, installing fittings and double-glazed windows.
This kind of work is quite labor-intensive, so most novice craftsmen prefer the faster second method. At the same time, it is important to remember that structures with an area of more than 2 m² are recommended to be installed only directly (this option is more reliable).

The material used for making anchor plates for plastic windows is galvanized steel with a thickness of 1.5 mm, for which the stamping method is used. The products are equipped with a series of round holes for mounting screws. To allow pre-assembly bending, the plates in some areas are equipped with a guide notch. The depth of the bend directly depends on the thickness of the installation gap: it is selected according to the installation site.

The most convenient way to fix anchor plates is to use 40x5 mm mounting screws on windows. To secure the flexible plates in the opening, you will need plastic dowels and locking screws. Each anchor must have at least two attachment points. Here you will need 50x6 mm screws.
There are three main types of window anchor plates:
- Rotary.
- Fixed.
- For wooden windows.
Rotary products used in situations where fastening a window block in an opening is difficult for one reason or another. Thanks to rotary mechanism the plate is positioned on that section of the wall that provides the most durable fit.

If everything is done correctly (accurately align the turn signal and the outer bent teeth), the product will be fixed as securely as possible. In this case, there is no danger of profile deformation. The presence of a rotating element and the ability to bend the element makes it possible to use different mounting angles. Most often, arched, trapezoidal and polygonal systems are installed in this way.
Using a simple fixed anchor plate installation of plastic windows inside the opening is carried out, with the possibility of selecting optimal angle fastenings To improve the strength of fixation, some models additionally have a claw hook.

Regarding anchors for wooden windows, then to install plastic systems they are not used.

The ability of anchor plates to quickly provide reliable connection between window block and the wall is their main advantage. As a result of this, it is possible not only to save time and effort, but also to withstand seasonal and daily temperature fluctuations (this is fraught with deformation of the structure).
This type of fastening has other dignity :
- Easy to install. Unlike fastening through the frame, plates eliminate the need for complete disassembly window system. This speeds up installation work by at least half.
- Selection of the optimal fastening site. Movable mechanisms allow you to fix the window at the most convenient angle.
- Possibility of installing the block exactly level. By adjusting the tension of the side screws, you can achieve precise positioning of the frame in space. In this case, there is no need to add pegs or adjust the openings.

- Speed of dismantling work. If necessary, the plates are unscrewed and the window is removed. This happens much faster than with through bolts.
- Possibility of reinstalling the block. Since the profile is not drilled, the window system on plates can be reinstalled in another location.
- Use on walls made of different materials. In addition to concrete and brick surfaces, anchor plates adhere well to wood, foam concrete, gas silicate blocks etc. They are especially convenient in cases where multi-layer walls are used in the house: rod fasteners (screws, anchor bolts) are powerless in such situations.
- Possibility of camouflage. Anchor devices open up the possibility of using platbands, window sills and overhead slopes that well mask installation gaps. In this case, there is no need to recess the plates into the surface of the slope, followed by sealing the resulting depressions with plaster or putty.
- Reliability of fastening. The plates withstand significant operating loads well, including strong wind and recoil when opening the doors.
- Cheap fasteners.
The anchor plates have weaknesses :
- Restrictions on the weight of the window structure. Reliability of fastening to the plates is guaranteed only for small and medium-sized window units. It is better to install heavy structures (most often balcony type) by screwing them through the frames. This also applies to cases where several rows of windows are located on top of each other.
- Danger from frequent opening of the doors. In this case, the window frame experiences additional loads, which can negatively affect its integrity. Those doors that open very often are recommended to be additionally reinforced with bolted fastening.
- Violation of decorativeness. It is not always possible to disguise the anchor plate. First of all, this applies to cases of using plaster or putty as the final finishing of slopes. It is not always possible to embed fasteners into the slope surface, especially when it comes to concrete walls.
Before you start, you need to acquire the following tools:
- Impact drill or hammer drill.
- An electric jigsaw or a hacksaw for metal.
- Hex wrench for adjusting fittings.
- Anchor plates.
- Measuring devices (level, tape measure).
- Fastening materials (screws, self-tapping screws).
- Silicone sealant.
- It is prohibited to fix windows on assembly adhesive, foam, etc. Only self-tapping screws are allowed to be used as fastening materials.
- Drilling must be done very carefully, avoiding contact between the drill chuck and plastic frame. To avoid damage, it is recommended to use a long drill bit and a special plastic backing.
- Activation impact mechanism It is advisable to use only on concrete walls.
- A brick wall with vertical voids is drilled at the joint interblock sections.
- Screws can be screwed in using a screwdriver. Particularly convenient are models that have a built-in movement limiter, which allows you to control the depth of immersion of the self-tapping screw into the frame.
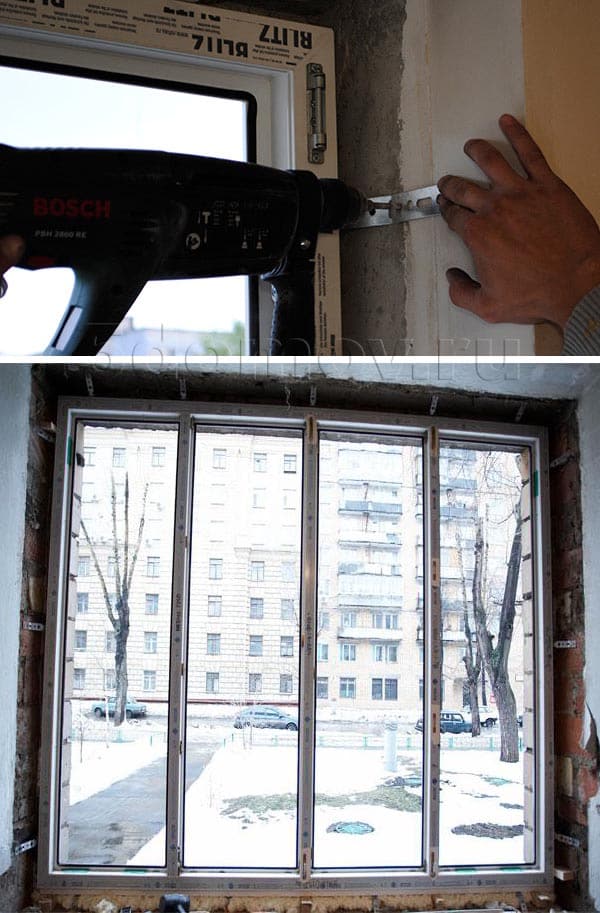
Installation of anchor plates
The first step is to install the anchor plates. The optimal distance between individual fasteners on the frame is no more than 100 cm. It is recommended to equip windows of considerable height with an additional fastening unit. The distance between the outer plate and the corner of the window should not exceed 25 cm, otherwise this may result in loss of stability of the block. Before marking, the outer plane of the frame is freed from the protective film. There are special protrusions in the profile for installing the toothed elements of the plate.

To make the fastener more reliable, it is reinforced with a window screw. Next, the plates are installed in the same way along the entire profile, observing the above recommendations for the distance between separate elements. When bending the plate in the notched places, you need to ensure that the first bend is adjacent to the frame, and the second is above the wall mounting point.
Frame installation
Installation window frame must be accompanied by compliance with all proportions and distances. The distance from the frame to the opening ranges from 20 to 35 mm. Narrow openings have to be equipped with additional mounting spaces for fasteners.

Having prepared the opening, the frame is inserted into it. Correction of its vertical position is carried out by driving wooden or polymer pads up to 30 mm thick under the horizontal sections.

Having exposed the structure, you can fix it to the opening. Dowels of 6x40 mm are usually used on brick and concrete walls, and 42x45 mm on wooden walls. To avoid distortions, it is recommended to follow the sequence when fastening. It is best to secure the bottom corners first, which will allow the frame to be level. The top fastening is carried out at the final stage. It is recommended to secure each anchor plate with two bolts.
Foam laying
Having completed the basic installation work, need to be filled in polyurethane foam gaps between the frame and the walls of the opening. It is better to fill large gaps in two passes, with a pause of 1.5-2 hours. There are several types of polyurethane foam available for sale: different characteristics. When choosing suitable option They focus mainly on the weather characteristics of the region. Most often, there are instructions on this matter on the packaging.

Insulate inner part assembly seam it is best to use polyurethane foam, construction sealant or butyl-based vapor barrier insulation tape. It is recommended to lay the foam very carefully: a lack of material will not allow you to achieve good tightness of the room, and an excess amount threatens deformation window profile. After hardening, the foam protruding beyond the cracks is cut off using sharp knife. It is better to do this after 48-36 hours.
Installation of window sill and ebb
According to the rules, the window sill can be installed 24 hours after foaming the cracks: this gives time for the material to dry well and set. In practice, this recommendation is often ignored (especially if the installation team is working). When choosing a suitable window sill, you need to consider only those options whose width exceeds the thickness of the outer wall. Plastic product easily cut to length electric jigsaw or a hacksaw for metal.
Having adjusted the window sill, it is leveled and secured. The void that forms underneath must be filled with foam by placing several weights (cans of water, bricks) on the surface. The product is left in this position until the next day.

In parallel with the window sill, the installation of the low tide is carried out. It is inserted into a niche under the main frame and screwed onto the window sill strip. As a result of this, it is created additional protection from external moisture entering the room.

Exterior finishing
Having installed plastic window on anchor plates, it is necessary to issue external slope. In this case, both decorative and practical purposes are pursued, because uncovered foam tends to gradually deteriorate when exposed to weathering. The simplest option is to use plaster or starting putty for this. When applying the solution, it is important to ensure complete coverage of the installation joints. Regarding interior decoration slope, it is usually carried out at the same time as the general repair of the premises.

Conclusion
When choosing an option for attaching a plastic window, it is recommended to choose anchor plates. This is especially true in cases where installation work is carried out by beginners. As you work, it is important not to rush, carefully following the recommendations outlined above.
You can also watch some videos
Reading time: 10 min.
Plastic windows have a number of advantages over their wooden counterparts, which is why they have gained wide popularity. An important aspect of proper window installation is the choice of technology and fastening system. Fasteners for plastic windows are responsible for sound insulation properties and service life.
Types of fasteners for installing plastic windows
There are several types of fasteners for plastic windows. Each of them has a number of advantages and disadvantages, which determine the appropriateness of use in each specific case. They are divided into the following types:
- Anchor dowel. It is most rational to use fasteners with a diameter of 10 mm. The hardware ensures reliable fixation of the frame. The length of the dowels depends on the installation location and the characteristics of the walls.
- Nog. It has become widespread in Europe; it is difficult to find high-quality fasteners in domestic stores.
- Anchor plates. Each type of window is equipped with a specific type of mounting plate, but there are universal models. Sometimes the plates are not screwed into the frame, but snapped into place.

Previously, wood screws were used to install windows, but such a system has a low reliability indicator. Their only advantage is their low cost, but you should not skimp on window installation. The choice of window fasteners should be based on the features of the system and the skill level of the technician.
Anchor or anchor dowel

Fastening windows with anchors for installing PVC windows is carried out by professionals. Structurally, the device consists of three parts: an internal sleeve, a threaded screw and a sleeve. The movement of the screw along the thread leads to expansion of the sleeve by the sleeve, due to which the fastening provides a high degree of reliability. In some cases, a significant fixation force is a disadvantage, since it is very difficult to dismantle such a system: reinstalling windows or replacing them will require serious physical and time costs. In addition, installation should be carried out by an experienced specialist.
The anchor dowel is not suitable for use in apartments with multilayer walls. The spacer will not be able to secure itself and the fixture will fail. The walls of panel houses of the P-44 series have an air gap with thick insulation; it is impossible to fasten the frame with an anchor in such a wall.
The dimensions of the dowel differ, but experts prefer devices with a length of 10-20 cm and a thickness of 0.8-1 cm. The choice of size is based on the distance from the frame to the slope. The anchor is mounted in the internal cavity of the system directly under the glass. As a rule, the frame has a thickness of 40 mm, the minimum length of penetration into the wall should also be at least 40 mm; these calculations must be taken into account when purchasing hardware. The best option– 110-160 mm.
Dowel or screw for concrete

It is a standard screw, which provides less reliable fastening than in the previous case, but it is easy to dismantle if necessary. The disadvantage of the product is the difficulty of installation in insulated walls. Fastening a plastic window with a dowel is used if the window opening is made of concrete or brick.
The size is selected according to the same principle as the size of the anchor dowel. The most rational solution would be to purchase a screw with a thickness of 8 mm and a length of at least 100 mm.
Anchor plates

Disputes over this type of fastener have not subsided for many years, but leading window manufacturers have abandoned screws and dowels in favor of plates. The product comes in two types: non-rotating and rotating (the long section changes the angle of inclination). The installation technology is distinguished by its simplicity and speed of implementation: the plate is attached to the end side of the window, and the second edge is fixed to the wall with a simple plastic dowel. The advantages of the method include the following:
- no need for through drilling of the frame;
- if there is reinforcement or other obstacle in the wall, then the product can be easily rotated at the desired angle; there is no need to drill a second hole;
- This is one of the few mounting options that are suitable for fixing into the walls of P-44 series houses.
Many home craftsmen claim that such a system is unreliable because it is not able to withstand serious wind load, but this assumption is wrong. About 90% total load accounts for the polyurethane foam. When using another type of insulation ( mineral wool or foam plastic) preference should be given to screws and dowels.
Size range includes various options. As in previous cases, 10-20 cm will be enough, but in order to save money, preference is given to plates 12-13 cm long. Experts recommend ordering the fastening system along with the window, which will guarantee the quality and reliability of the fixation.
Basic window mounting methods

Before you start installing a plastic window, you need to understand its structural elements and consider the features of the PVC system. Depending on the manufacturer, products differ in reinforcement configuration, shape cross section, the number of air chambers, the design of the double-glazed window. Depending on these indicators, the installation method is selected. Two options are available: fastening plastic windows with anchor plates and dowels through the frame.
Recently, new developments have appeared that replace wooden and plastic analogues; their installation has a number of distinctive nuances. The fastening for mounting soft windows consists of a grommet, a rotary bracket, a silicone strap and a French lock.
Using a plate
Once the structure is aligned with the opening, plates or brackets are attached to the frame and wall. Later they will hide behind the window sill and finishing. Positive qualities method:
- simplicity and high speed of installation, which is especially noticeable when using standard-type anchor plates - these devices fit into special grooves at the end of the profile;
- no need to drill the frame;
- suitable for fastening plastic windows in a wooden house;
- the window is secured without preliminary disassembly;
- the absence of holes ensures tightness and preservation of thermal insulation properties.

In terms of resistance to wind and weight loads, the method is inferior to the first. Therefore, installing windows on the upper floors apartment building carried out using dowels and other types of anchors.
Installation of a window frame on an anchor
In this case, the frame is drilled through. The hole in the frame must be aligned along the axis with the hole in the wall. The fastening device is inserted into the frame and tightened, its upper part is hidden behind a double-glazed window or a slightly open sash. The advantages of this method include the following factors:
- high installation accuracy;
- reliability of fastening.
Significant disadvantages:
- Installation of the system requires mandatory disassembly: it is necessary to dismantle the double-glazed window and glazing beads. These are unnecessary problems for a master without experience and skills.
- By drilling holes in the frame, the thermal insulation properties. Under certain circumstances, this causes the window to fog up.
Main stages of window installation
Window installation consists of several successive stages. Each of them must be approached as responsibly as possible, taking into account the recommendations of specialists. The process begins with measurements and ends with installing the window sill and finishing the opening with plastic slopes.
Taking measurements

First of all, you need to contact a company that produces and sells windows. Ideally, a specialist should come and independently determine the size of the plastic windows. This will be a guarantee of high-quality and correct manufacturing. In case of errors, all the blame will be placed on him, so the company will compensate for the damage. Serious organizations include the cost of measuring the opening in the price of the products.
The calculation is carried out taking into account the configuration of the place where the metal-plastic structure will be installed. Measuring a window with a quarter assumes that on both vertical sides and on top the frame protrudes by a quarter, that is, 15-25 mm, taking into account the gap for the mounting foam. Dimensions are taken as follows:
- From below, above and in the center the distance between the opposite surfaces of the slopes is measured. It should be noted that the window must fit into them at least 15 mm, so 40 mm is added to the result. This indicator allows you to determine the width of the future product.
- The approach of the frame part remains the same. As a rule, openings do not have a lower quarter, since a window sill and external ebb are installed in its place. Their installation requires a special profile.
Measurements from the outside are taken from the top quarter to the point where the ebb is inclined in relation to the outer corner of the opening. 20 mm is added to this value and the profile height is subtracted, and the sealing gap must be taken into account.
Measuring a straight window without a quarter is much easier to do. The opening is measured horizontally and vertically at its widest points. Height is the difference between the size of the opening, the upper installation gap and the thickness of the profile along with its gap. Without the profile, the installation gap will be 40 mm. General value is the height of the opening minus 60 mm.
You can determine the window width using a simple mathematical formula. The indicator consists of the difference between the widest point of the opening and two sizes of the installation gap (on average 20 mm).
Preparing tools and consumables

It will take at least 3 days to make a window. At this time, you can start preparing the tools and necessary auxiliary materials. The speed and quality of work depends on this. For installation you will need:
- perforator;
- screwdriver;
- screwdrivers;
- roulette;
- building level;
- drill for metal;
- rubberized hammer;
- spatula;
- pencil or pen;
- hacksaws for wood and metal;
- anchor plates, dowel-nails;
- self-tapping screws for fastening the window;
- sealing tape;
- thermal insulation;
- polyurethane foam;
- silicone based sealant.
The set may vary depending on the configuration and features of the product. The cost of these materials and tools is significant, so it makes sense to use the services of a competent craftsman.
Removing the old window

After preparatory activities You can go straight to work. This process begins with dismantling the old window frame with glass. It is performed in the following sequence:
- The largest sashes are removed, and the glass is first removed.
- The windows are removed from the panels, sometimes it is difficult to do this without using force.
- The windows are removed from their hinges using a pry bar (you need to lift them up).
- To dismantle the frame, you should start from the central post; saw it in the middle with a hacksaw.
- All parts of the structure can be easily removed using a pry bar and a nail puller.
- After this they move to the windowsill. If he doesn't give in, he can be knocked out from the street.
- The side posts can be sawed off, and the top one can be removed without difficulty.
The window opening must be cleared of debris and dust. If necessary, defects in the concrete casting are corrected, mortar residues are removed, etc. A hammer drill is used for this. With its help you can make grooves for the future window sill.
Preparing windows and components for installation

If the installation method “with unpacking” is chosen, then you need to agree in advance with a company representative so that the structure is sent unassembled. Otherwise, you will need to disassemble it yourself. To secure a PVC window, you need to make holes for fasteners. The drill diameter is 10.2 mm, the device is inserted into a screwdriver or hammer drill (no impact mode).

The protective coating is removed from the outer surface of the frame. If you plan to install mosquito net, then you need to prepare brackets for it. The elements are mounted on self-tapping screws directly into the PVC profile. At the junction of the quarters of the opening with the frame, PSUL tape is glued.
Installation using anchor plates has a number of distinctive features. The blind sash does not need to be disassembled; it is enough to do this with the opening parts. Of course, this will negatively affect the ease of installation, since the weight of the structure will be impressive. Plates are applied to the designated fixation points. They are equipped with hooks that perfectly match the profile elements on the frame. For reliable fixation, the fastening site can be hammered with a soft hammer until a characteristic click is heard, applying moderate force.

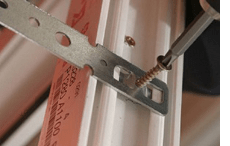
There is a hole in the center of each plate; a self-tapping screw is driven into it for fixation with the profile. The plates are installed at right angles to the frame profile, and then bent so as to ensure a tight fit to the opening.
Fixing the window frame in the opening
The quality of fastening a plastic window in an opening depends on its correct location. You can align the structure in the horizontal and vertical planes using building level. The tilt is adjusted using special wedges made of plastic or wood.

Installation using the “unpacking” method involves making holes through ready-made channels in the frame. This technology It is actively used in practice, but for this the master must have experience. If the hammer drill hits an obstacle, it will cause beating, which will cause damage to the PVC profile. For safety, use a hammer drill to mark the centers of future holes, dismantle the frame and proceed to full drilling.
The anchor is inserted into the hole through the cavity of the frame, knocked until it stops and screwed in, and the force must be moderate, otherwise the head will damage the surface of the frame. When using dowel nails, the plastic element is first inserted, and only after that the expansion type nail is driven in. The head is lubricated silicone sealant and is closed with a plug.

Installation using anchor plates is much easier. The main thing is that they fit snugly to the opening; for this you need to set the necessary bend. Holes are made in the wall directly through them. The fastening system is secured with dowel nails.

Foaming gaps and moisture protection device
After securing the frame and before foaming the gaps, you should install the remaining parts of the window. As the foam expands, lightweight design may become deformed, which will lead to difficulties during assembly.
Then the bottle is inserted into a special gun with a thin and long tip. Foaming is carried out from the bottom up in a uniform and dense layer. You cannot save on foam. If the gap thickness is more than 20 mm, then the space is filled in two passes, with a pause of 2-3 hours between them. This approach is a guarantee of high-quality work. Polyurethane foam has excellent thermal insulation properties but she is exposed negative influence humidity and direct sun rays, therefore, one day after application, slopes need to be installed.

The foam is covered with a diffusion membrane to ensure the removal of excess moisture and protect the product from penetration from the outside. WITH inside PPE is used - the film has vapor and waterproofing properties. The foil side should be directed towards the room for thermal protection.

Window assembly and sashes adjustment
Double-glazed windows are inserted into place, glazing beads are mounted in established sequence. For convenience, a rubberized hammer is used. It is important to ensure that the beads fit smoothly and make a characteristic click. Next, the shutters are mounted and the functionality of the mechanism is checked in the ventilation and full opening mode.

The sash is adjusted relative to the horizontal plane by bevelling and loosening the fastenings. To fix the problem, you need to insert a hex key into the window hinge. Clockwise turns move the sash to the required distance. Vertical adjustment is carried out using a hinged loop located at the bottom of the frame. First you need to remove the protection cap. Clockwise rotation raises the sash, counterclockwise lowers it.

Installation of window sill, ebb and plastic slopes
The window sill is mounted on polyurethane foam, glue, brackets or homemade devices. As the latter, home craftsmen use direct suspensions. Some window designs involve pairing the frame and window sill. If it is not available, a panel is placed under the frame profile to ensure a complete connection. The window sills are installed after the window sill is installed.

The location of the ebb tide is covered with a vapor-permeable membrane to protect the polyurethane foam. PSUL tape is glued around the perimeter of the opening, thanks to which the inclined ebb will have support, providing an additional barrier to street moisture .

The tide is attached to the profile of the plastic window using self-tapping screws. A distance of 10-15 cm is maintained between each of them. Problem areas are covered with plaster and silicone sealant. The slopes of plastic windows are finished last, plastic sheets mounted on a prepared structure.
Additional recommendations from specialists on the installation and operation of plastic windows
Many users are faced with the problem of condensation forming on windows. To eliminate it, you need to ensure the movement of warm air flow to the glass surface. Systematic ventilation reduces the humidity in the room, which reduces the likelihood of fogging several times, this is especially true for rooms such as the bathroom and kitchen. Experts recommend installing a ventilation system in your home. If you attach a thermometer to a plastic window, you can control and minimize the temperature difference.

It is periodically necessary to clean the drainage channels; they remove excess moisture from the internal cavity of the windows. After installation, you should get rid of debris, traces of putty, and polyurethane foam. The use of sharp instruments is strictly prohibited. It is recommended to use a plastic spatula and a vacuum cleaner.
Products made from PVC profiles do not require special care, but following certain rules will help increase the life and ease of use of windows. The main requirement is for the composition detergents. Preference should be given to special substances intended for plastic and glass surfaces.
Contact with acetone, gasoline, or solvent damages the profile surface.
Installation and fastening of plastic windows is an important and responsible moment that requires certain skills from the master. If you have the tools and knowledge, you can perform the installation yourself. However, if unsuccessful, the manufacturer may deny the warranty. Calling a specialist will incur additional costs. For high-quality installation of plastic windows, you should choose a trusted company.
Hello readers! I haven't written on the blog for a long time. The season for installing and adjusting windows before winter has begun. Everyone wants to stay warm.
So, many clients are interested in how we attach plastic windows. I’ll say right away that there is no single fastening.
It all depends on where the window is installed. Therefore we can use anchors or plates. In general, I got tired of answering the same questions and I decided to put them in one article, a link to which they will give to all their new clients.
I hope you find this information useful too. Read, get acquainted.
The choice of fasteners for windows primarily depends on the material of the wall into which you will mount your window:
- Brick;
- Tree;
- Aerated concrete, foam concrete, cinder block;
- Concrete.
Secondly, on the type of construction and technical specifications installation:
- Loggias;
- Entrance doors;
- Windows;
- Stained glass.
How to fix plastic windows. Types of fasteners
1. Anchor or frame dowel. It happens with a diameter of 8 mm, but practice shows that optimal diameter frame dowel - 10 mm. In my opinion, the most reliable and convenient fastening for windows.
Available in different lengths: 72 mm, 92 mm, 112 mm, 132 mm, 152 mm, 182 mm, 202 mm. Used as follows:
A hole is drilled in the window frame using a metal drill with a diameter of 10 mm. Then, using a hammer drill, a hole is drilled in the concrete, directly through the frame.
I consider this optional. Therefore, as for the dowel head, there is even a special decorative plug. And the fastening strength in both cases is almost the same.
For each type of window profile, especially popular ones, they produce certain type anchor plates. But since, according to the technology, the plates need to be screwed to the window frame, you can use any window plates (only for the sake of economy, of course).
 By the way, regarding screwing the plates into the frame. There are so-called crab plates. That is, they cut or snap into the profile.
So, if there is a quarter in the opening, many installers do not screw such plates. The window will not fall out, and this is the most important thing. After all, a quarter holds the window.
It must be said that there are cases (nowadays less often) when window installers, grossly violating installation technology, do not use fasteners at all. Simply fix the window with wedges and fill it with polyurethane foam.
I hope such cases will pass you by.
3. Wood screws. Used for attaching windows to wood. The cheapest fasteners, and this is probably the only plus.
4. Screw for concrete. I think it is only used in Europe. I went to the professional store “Fixtures” in St. Petersburg, where you can buy a lot of things, and talked with the sellers. They don't have these screws.
How to attach plastic windows to brick?
 Brick is good material for the construction of buildings. But attaching plastic windows to brick is sometimes problematic. What exactly is the difficulty?
If you use a frame dowel, then it is better to drill holes in the frame for this dowel not in advance, but in place.
This is necessary in order to get the anchor directly into the middle of the brick, and not into the mortar between the bricks. Of course, no one does this (by the way, neither do I). After all, this is a waste of time.
Frame dowel, it is advisable to choose the maximum long length(minimum entry into brick 6 - 10 cm). If the brick is hollow, then use the 202nd anchor.
You can use anchor plates in brick if you are sure that the brick is not hollow. But even solid brick can be of poor quality. And it will be very difficult for a non-professional to attach the plate into it.
How to attach plastic windows to wood?
 The ideal option for fastening windows for wood is anchor plates. And no one can convince me of this. Frame houses or timber, plates only.
From my bitter experience I will tell you how I fixed windows with screws in top part boxes in a timber house. And there was a casing, and a gap of about 4 cm. A year later, the timber began to shrink, and these screws, together with the timber, went straight into the double-glazed windows.
As a result, several double-glazed windows were replaced under warranty. Got the money. After this incident, if I use screws, then only in exceptional cases, and only in the side parts of the window frame.
By the way, even during construction frame houses, professionals do not recommend using hardened screws. Wood is a living material and when moved, screws break, and a nail, for example, bends. The same principle applies to the anchor plate.
Anchor plates for wooden houses are good for the following reasons:
- Quick installation;
- Compensates for thermal expansion;
- They do not affect window structures during shrinkage.
How to attach plastic windows to aerated concrete?
The aerated concrete wall is loose. Can be mounted on a frame dowel with a maximum length of 202 mm. This is the easiest and fastest way.
But it is more correct to attach plastic windows to anchor plates through a special dowel for aerated concrete. It's a little longer and more complicated. In addition, you need to buy or have a hex bat in your arsenal.
How to fix plastic windows in concrete?
If you mean concrete good quality, from which, for example, lintels are made over window openings, then drilling such concrete with a diameter of 10 mm under a frame dowel is a bit difficult, but it is possible.
In this case, it is better to use anchor plates. But it is more efficient to attach panel and block houses to a frame dowel. It's more reliable and faster.
At the beginning of the article, I said that the choice of fasteners for windows also depends on the type of structure. So I want to talk about this type of glazing of loggias and balconies.
As a rule, the window fasteners fall into the very edge of the top concrete slab or into the edge of a brick bottom and side wall. Therefore, attaching loggias to the edge of the wall using a frame dowel can be quite dangerous.
Anchor plates are a great way out of the situation.
And finally, I would like to say about the big advantage of anchors, which is at the same time a disadvantage for anchor plates.
When the window frame is attached to anchors, at the time of drilling you level only one vertical plane. And you adjust the second vertical plane after inserting the anchor.
When fastening with anchor plates, you will have to set two vertical planes at once and only after that make holes with a hammer drill. This requires certain skill and skill.
Installation of plastic windows is not as long and complicated a process as many people think. Those who personally decide to install a window structure and do not have sufficient experience have to deal with the difficulty of choosing fasteners.
The hardware products market offers various types fasteners for PVC windows, which have their advantages and disadvantages. From the right choice The quality of installation and the service life of the window depend. GOST allows the use of three types of mounting elements:
Concrete screw (dowel)
Anchor bolt (frame anchor)
Anchor plate and dowel
A clear answer to the question “which is better?” no, all options have received the support of professionals to one degree or another. Let's look at the features of each of them.
Screw for concrete
Many experts consider (aka turboprop, dowel) the most reliable and convenient to use. It is used without a dowel and is screwed into the pre-installed drilled hole. Variable serrated thread ensures reliable fixation in the material.
Dowel size for window and door frames is 7.5x152 or 7.5x132.
Advantages this method the ability to easily dismantle the fasteners in case of replacement of the translucent structure in the future. Disadvantage: impossibility of installation in multi-layer walls (with insulation zone).
(aka anchor dowel) is a reliable professional fastening consisting of three parts: a screw, a sleeve and a cone nut. A hole is also drilled for it in the wall and window profile. When the screw is screwed in, the sleeve wedges and the anchor is firmly fixed in the base. The dowel has a countersunk head, which does not have to be recessed into the profile hole; you can simply cover it with a decorative cover.
But there is one drawback anchor bolt: it, like a self-tapping screw for concrete, cannot be used on multi-layer bases, such as, for example, walls with insulation in panel houses. It should also be taken into account that the anchor dowel is difficult to dismantle, so try not to make mistakes when installing the window.
When choosing the length of the frame anchor, you should take into account the distance between the frame and the wall, the width of the profile, as well as the established norms for the drilling depth for fasteners:
Concrete and solid brick– 60 mm
Slotted bricks and porous blocks – 80 mm
The types of fasteners considered are intended for through installation of plastic windows (the fasteners are inserted into the wall through a PVC profile). The third method allows installation without violating the integrity of the frame structure.
 Fastening the frame to window opening using anchor plates. This is the only thing possible option for houses with multi-layer walls and when glazing loggias, when it is extremely dangerous to install expansion anchors into the edge of the wall. In combination with polyurethane foam this type fasteners ensure reliable fixation of the window structure and compensate for temperature shifts of the frame.
They are attached at one end to the frame with self-tapping screws, and to the wall with a pair of dowels no less than 40 mm long. This option is most preferable for beginners, as it eliminates the risk of damaging double-glazed windows and, if something happens, allows you to easily redo the work.
Important! Fastening elements should be located along the entire perimeter of the sterilized package at a distance of about 150 mm from corners and imposts, the standard spacing from each other is 600 mm.
In the Krepkom online store you can purchase any of the types of fasteners discussed above for installing window units. Choose based on your preferences, wall material and the characteristics of your window openings.
Articles about products
Coziness and a comfortable microclimate at home are created primarily not by interior items, furniture and textiles, but by quality installed windows. Correct installation eliminates the occurrence of drafts, accumulation of moisture and the appearance of fungus on slopes and walls.
The choice of fastening elements is based on the wall material and the design of the window opening. These can be construction screws, anchor bolts, expansion metal or plastic dowels, anchor plates.

Anchor plate options
Anchor plates are used for installation as metal-plastic windows so and wooden double glazed windows. Any window installation technology has the main goal of redirecting all force influences (wind, window weight, building load) from the plane of the glass unit to the wall.
The plate is a metal strip 25-30 mm wide with guide notches along which it bends during installation. The plank has several holes for fastening with anchors (screws, self-tapping screws) in the desired position. Plates are stamped from thin sheet steel with a thickness of 1.2 mm, 1.5 mm, 2 mm in various modifications and treated with an anti-corrosion zinc coating. It is important to select the right size anchor plate for each profile.
Features of using plates and their types
Fastening to an anchor plate has no alternative when installing a window profile in an opening with a “loose” wall component - these are three-layer walls, adobe blocks, wooden beams, hollow brick.
There are two types of anchor plates:
- rotary;
- non-rotating.
Plates with a rotating unit are used if fastening in the opening itself is not possible. Installation on a rotary anchor is used for arched, trapezoidal and polygonal windows.
A conventional fixed anchor is designed to fasten a window in an opening, but the angle of fastening can also vary.
Advantages of anchor plate
The ability to quickly create a strong and, at the same time, elastic connection between the window and the wall using a plate is the main advantage of this type of fastening. Seasonal and daily temperature deformations of the window do not affect the durability of the installation of the anchor plate.
Other advantages anchorage windows on the plate:
- There is no need to disassemble the profile and drill through it;
- possibility to select the attachment point;
- ease of leveling the window plumb or level;
- absence of large mounting holes;
- preventing natural moisture from entering the profile and seam;
- when dismantling the window, the plates are easily unscrewed, unlike anchor bolts;
- the window can be reinstalled again;
- low cost of fastening;
- Window installation time is halved compared to installation with bolts.
The advantages of installing windows on anchor plates are so tangible that they are used everywhere when working with any wall materials.
The only case where this type of installation may not be acceptable is when installing very heavy balcony sections to the full height of the wall, or placing several rows of windows directly above each other. IN in this case The planned load on the fastenings may be too high and the anchor plates should be placed on the anchor bolts.
Installation of PVC windows on anchor plates
Installation of PVC windows or balcony blocks begins with calculating the operating load. The type of opening and closing of windows affects the supporting force, the overall traction effect on the hinge mechanism and determines required quantity plates for installation. Having prepared everything consumables, let's begin the installation:
- Remove from outside window frame shipping film;
- Install the toothed “claws” of the anchor plate into the special protruding parts on the profile. Use a self-tapping window screw as an additional fastening.
- Screw the plates around the perimeter of the entire profile, maintaining a distance of 150-200 mm from the corners of the frame. The further distribution step of the plates is 500-700 mm.
- Bend the plates at the places of the notches so that the first fold is at the junction with the frame, and the second at the place of attachment to the window opening.
- Place the frame on rigid supports. They should be not only in the corners, but also under each section of the window. Use wedges to secure the frame vertically.
- Using a level, accurately adjust the frame in all planes and firmly secure the plates in the opening using two anchors.
- Moisten the installation seam with water using a spray bottle.
- Insulate the installation joint internally using polyurethane foam. Take into account its expansion properties so that it does not protrude onto the profile itself. The following materials are also suitable for internal insulation: construction sealant (mastic), vapor barrier sealing tapes based on butyl material.
- Creation of an external insulating layer: finishing the slopes with plaster or facing with dense protective materials (stone tiles, facade bricks).
Video about installing a window on anchor plates