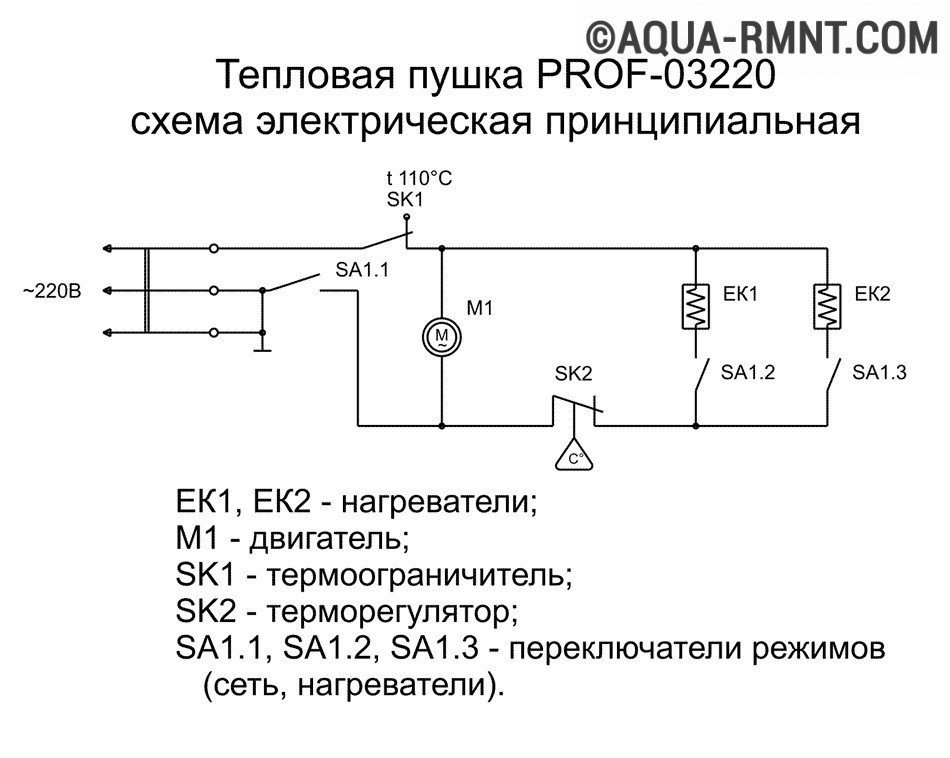
DIY waste oil heat gun. Garage waste oil heat gun
In my garage for two years now winter season Thermal heater runs on waste oil self-made. During all this time, it was improved and became the desired design that was the most convenient. I must say that I was very pleased with it. But there were two drawbacks.
Firstly, the heater was too powerful for my 24 sq. meters. 45 minutes after starting the furnace at minimum power, the garage became warm, and after another 15 minutes it became hot. I had to start and stop the oven several times during the day, which you will agree is not at all convenient.
Secondly, the heater had terribly low efficiency. This was due to the single-breasted design and small heat exchanger area.
I made different designs and have some experience. I really wanted to make a design for myself, taking into account all the considerations, comments and experience. Prepare the sleigh in the summer and the cart in the winter, as they say, and get to work.
The photos show that my structure underwent various changes, it was done along the way. There was an idea to make this heater work from one fan, but trial tests showed the unviability of such a design. Or rather, it is viable, but the pressure of the blown air for blowing becomes so weak that the heater loses its most important quality - “bullet” hot air into the far corner of the garage, or wherever you want.
After trial run this heater, I was a little surprised by the result.
My first thought is that Damn eats twice as little as the old one, but has three times more heat than the old one!!! Hurray!!!
As it turned out, due to the good heat exchanger, the heater turned out to be so economical that old block control (from which I launched it) simply did not have the opportunity to make the feed lower than required! It started to give fuel from 1.6 volts, and the new gun could work and asked for a lower supply. The second pleasant thing was that it provides heat almost immediately after starting! And that's great. There was no longer any need to turn on the blowing fan after some time, so that the heater had time to heat up, as required by the old design. Which means it’s easier than an electrician.
I note that for the simplicity and reliability of the design, I specifically use all 220 volt fans.
Because they are reliable, economical, simpler for the control unit, durable, quieter than similar 12 or 24 volt ones.
The air supply line was specially hidden in a box to make the heater more neat and aesthetically pleasing to the eye.
Sorry for the heap of writing, but I think those who are interested will be interested in the details.
Material used for the stove sheet metal 2 mm thick. For heat exchanger 1.5 mm For casing 1.2 mm. Yes, of course, 2 mm is not enough for a stove. But I decided for myself that it won’t be difficult for me to redo it if it burns out somewhere, the heater is completely disassembled. But it’s very interesting to me to see where the zones are most loaded with temperature. So this heater is something like a test sample. And the conclusions after observation can be useful for the following designs.
This furnace can operate on waste oil, any vegetable oil(cheburechny waste), fuel oil, waste printing ink, oil and diesel fuel.
The evaporation bowl needs to be cleaned approximately once every 20-50 hours of operation of the heater. I think the design with the bowl is better than without it. There are a lot of designs floating around on the Internet.
Slag in the form of a dry residue and pumice-like slag from mining is much easier to clean from the bowl than from the bowels of the furnace. But the inside is always clean and tidy. The bowl needs to be changed once a season, because... it burns due to temperature. Last winter (heater of an old design) I cleaned the bowl only 4 times. And in two seasons I brewed a new bowl once. So, judging by previous experience, the design is very unpretentious.
If a little water gets into the furnace with the waste, you can hear it rustling in the bowl, but nothing bad happens. If there is too much water it just goes out. Since this is a closed evaporative design and the fuel is supplied in small quantities, which is much safer.
Here's a video for clarity.
By the way, you need to install a steel chimney corrugation, aluminum rattles.
Thanks everyone for your attention. Good luck everyone!
Attached images


Which are often used for drying basements and garages, heating warehouses, and they are also used for unfinished buildings. So necessary in everyday life It is quite possible to make the device yourself, you just need to first decide on the choice of fuel.
How to make an electric version of a heat gun?
It is considered the simplest design among the available options for such devices. It doesn't require a lot of money to make it. When used, no harmful substances are released.The heating element of the device is an air heating element, which follows the curves of the body.
The design of the gun is a hollow cylinder, on one side of which there is a fan, and on the other an electric heating element. Passing through it, the air heats up and enters the room. This device can be used in any enclosed space that has electrical outlets.
To make a heating apparatus you will need:
- spiral of any heating device. The one located on the old one may be suitable electric stove or iron;
- fan;
- asbestos pipe or sheet metal for the heater body;
- switches;
- terminals;
- low power electric motor;
- wires;
- pads for attaching the spiral.
- Trim the spiral to enhance its heat transfer.
- Fix the spiral in the asbestos pipe on one side, and fix the fan on the other.
- Attach the wires that will connect to the network to the spiral.
- Connect a rheostat that regulates the degree of heat.
- Place the propeller on the electric motor and mount it into the pipe.
How to make a heat gun from improvised means can be seen in the video:
Manufacturing a gas heat gun
Just like the previous version, this design has a cylindrical body made of metal. According to the laws of aerodynamics, a circular cross-section is optimal, and metal has high thermal conductivity, due to which heated air is transferred from the body to the room.
Guns are divided into two types:
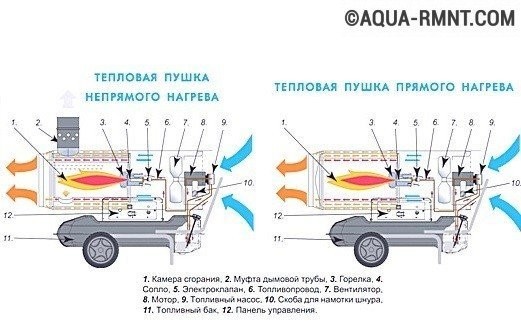
- Direct heating . Inside the cylinder there is a gas burner with round, it is blown from all sides by a fan. The output heat is mixed with combustion products and exits through the gun body from the opposite side. It turns out that gases also enter the room, which many homeowners are not happy with. Such devices can only be used in garages, workshops or outbuildings with large areas, where they cannot harm a person.
- Indirect action . It has a built-in indirect system that separates flue gases, the heat from them is transferred to the blown air in a specially designed heat exchanger. Thus, gas and air do not come into contact with each other. After heating, the air leaves the heat exchanger through the second opening in the housing. Burnt products are discharged through a side pipe connected to the chimney pipe.
Such a device is powered by liquefied gas. It cannot be connected to the central gas supply line without the appropriate permits. The fuel supply is controlled using a gas valve, which guarantees the safety of the device.

Progress gas gun with your own hands the following:
- Lengthen gas burner using a pipe of suitable diameter.
- Enlarge the burner opening by 5 mm, as well as the gas supply opening by 2 mm.
- Make a heat exchanger, it should be in the form of a pipe, insert an extension cord from the burner into one end.
- Secure the structure with clamps.
- Cut a hole for hot air to escape into the room and weld a pipe of the required diameter to it.
- Install a fan on the opposite side of the pipe.
- Drill a hole for igniting fuel. Provide a control valve.
Do-it-yourself diesel heat gun
For those rooms where it is not possible to conduct electricity, if heating is necessary during the cold period, diesel fuel heaters are used. A model of such a gun is more difficult to make than previous types, but following step by step instructions It’s quite possible, you just need to have basic welding skills.The diesel gun consists of two bodies:
- the lower tank is for fuel;
- the upper device acts as a combustion chamber, which ends with a fan.
Progress of the diesel gun:
- Complete the lower body. It should be no more than 15 cm from the top. To prevent it from overheating, you need to choose a material with low thermal conductivity. If you don’t find a suitable one, you can take a metal tank and wrap it with heat-insulating material.
- Make the upper body. A wide section is suitable for it. steel pipe. Attach the injector with the fuel pump to it. Install protective nets at its ends.
- Make a combustion chamber. Its installation is carried out in the center of the upper body of the gun. The chamber is made in the form of a metal cylinder, the diameter of which is chosen to be 2 times smaller than the dimensions of the body.
- Install a connecting tube through which fuel will be supplied and ignited, after which a filter is installed.
- Weld a vertical pipe through which the combustion products of diesel fuel will be discharged.
This unit is designed to heat a room with an area of 600 m2; to refuel it you will need about 10 liters of liquid fuel.
Do-it-yourself wood-burning heat gun
The unit in question is made from an old gas cylinder, which retains its usual horizontal position, with a separate chamber for heating the air forced into it.The operation of a heat gun is as follows:
- Fuel is loaded into the combustion chamber.
- As soon as the air heats up, the fan will turn on, which will be connected to the heating chamber pipe with a hood.
- There is a horizontal partition inside the cylinder; due to the fact that it absorbs the greatest thermal load, the air heats up quite quickly.
- Hot air coming from the second pipe can heat any point in the room.
The blowing device in this device is a fan, the choice of which depends on the area of the room: for a small room, a cooler located in a computer system unit is suitable. For medium-sized housing, you can use domestic fans located in hoods.
Progress of the wood-fired cannon:
- Cut from the cylinder top part, this must be done along the weld seam. For a more powerful design, it is necessary to trim the top below the weld seam. Before doing this, you need to unscrew the valve, and to prevent the remaining propane from exploding, fill it with water. If this is not done, then working with an angle grinder will be dangerous.
- Make additional parts. Cut a circle of about 300 mm in size from metal; it will act as a partition. For the doors you need to frame them in the form of a strip 80 mm wide. If the material remains, then small strips can be cut from it, which will be used for heat exchange fins.
- Make a grate, adjusting the length of its rods to the size of the cylinder, then place it in its lower part.
- Cut openings to accommodate loading door. The door frame is inserted into them; they are a welded structure made of strips. You should first prepare the doors by welding hinges and handles to them.
- Make an air chamber. Place the prepared metal circle instead of the cut off upper part and weld it tightly. Attach a fan in it and weld the fins.
- Install the chimney pipe.
DIY waste oil heat gun (video)
Even already used liquid can become an excellent fuel for a heating device. The following video describes a device that uses the Babington burner principle:A homemade gun is a heat exchanger that has two doors: one in the front part and the other in the side for cleaning the chamber. A whole blowing system is connected to it; a standard fan No. 2 is used for it. After heating inside the gun chamber, air is supplied to the room at a temperature of 60 to 90 degrees.
The modular system of the unit makes it possible to replace any of its components without dismantling the entire structure. The stove is lit manually - for it to work, you need to create an optimal pressure of 1 to 3 kg/cm2. The video demonstrates the process of ignition and combustion of the gun.
You can make all of the above options for heat guns yourself if you have the desire and the necessary materials at hand. They can effectively heat any home, the main thing is to choose an option using available fuel so that heating occurs economically.
Waste oil from engines and other devices is a very popular fuel for heating garages and even homes. Putting recycled materials to good use is always a pleasure. And in the case when this issue concerns energy resources for heating, this is also beneficial. The role of the “first violin” in this situation is played by the furnace during testing with your own hands. Other names for this device are: heat gun, heat generator and air heater.
Any flammable oil can be used as fuel. Diesel, machine, transmission, vegetable, confectionery. Absolutely anything. A waste oil furnace with a water circuit is also made from recycled materials: pieces of metal, old oxygen or gas cylinder or pipe cuttings different diameters. The purpose of this article is to talk about how such furnaces are designed and how to make such a unit yourself.
Do-it-yourself used oil stoves are quite popular among motorists. It heats small rooms well with few requirements for aesthetics and cleanliness. This unit is perfect for a garage, workshop, small country house and other similar buildings.
Homemade furnaces for mining have the following positive aspects:
- low cost and simplicity of design;
- low requirements for the quality of combustible materials;
- good heat transfer performance;
- periodic kindling in winter time do not in any way affect the unit itself;
- compactness and mobility;
- no need for complicated installation.
For reliable and uninterrupted operation of such a garage stove, you only need a good chimney.
The disadvantages of this device include low efficiency and the unpleasant odor of oil vapors that occurs during certain operating modes. It is also worth mentioning the appearance of stains on the floor or clothing that appear during direct contact with the waste. However, making a supercharged furnace more efficient is within the capabilities of any self-taught craftsman; we will tell you how to do this below.
The standard design of the stove is made in such a way as to heat the air. In order to provide heat to a home, a stove of this design is rarely used: oxygen is burned from the hot metal walls, and the air is dried. But for heating technical or production premises this design is ideal due to its ability to quickly raise the room temperature. Such stoves can often be found in garages, car washes, greenhouses, warehouses and other industrial and technical premises.
Design and principle of operation of an oil furnace
The design looks like two tanks, upper and lower, connected by a perforated pipe. They are offset relative to each other's transverse axis. Many people believe that tanks should ideally be cylindrical in shape, but in practice it turns out that rectangular ones are absolutely not inferior to them. In order for the structure to be installed on the floor, its structure is provided with legs. The furnace structure is shown in the diagram below:

The operating principle of the device is pyrolysis combustion of heavy fuel. Many people know that engine oil ignites at fairly high temperatures, and to burn it at home you will need to turn it into vapor. To create this effect, you will need to fill the bottom tank with waste through the hole about halfway, and then ignite it. But for this you will need a light fuel such as solvent or gasoline.
As gasoline burns, the waste heats up and begins to evaporate, as a result of which the vapors ignite and the furnace begins to “work.” The lower tank is the primary combustion chamber, where the fuel is partially burned due to the supply of air through the hole. To regulate the intensity of the process, a special damper is used, with the help of which the air flow is partially blocked. Maximum fuel consumption is 2 l/h, in temperature support mode – 0.5 l/h.
A do-it-yourself stove is equipped with a vertical gas duct, which has large number holes for the passage of secondary air. The combustion products that enter the perforated pipe mixed with waste vapors are burned well in it and inside the upper tank. After this, the flue gases exit the stove through the chimney pipe, going around the partition. Their temperature is quite high, and in order to save most of the heat along with the gases, it is recommended to carry out the following actions:
- lay the chimney along the wall through the entire room, making a slope towards the stove, this is a proven method, the walls of the pipeline have good heat transfer;
- mount a water circuit, an economizer, immediately behind the pipe, connecting to it a small tank, a battery, and a couple of heating radiators.
With a water circuit, an oil furnace can only operate in constant mode. If you intend to use it only periodically, then it is recommended to use antifreeze as a coolant. Thus, you can increase the efficiency from 40%, like a stove, to quite serious 50-55%.
What materials and tools are needed?
Any craftsman with the skills to work with a welding machine can easily and quickly make a stove with his own hands. First you need to prepare materials by checking the drawings of the waste oil furnace.

Acting according to this detailed instructions How to make a stove, all that remains is to assemble the prepared parts. To perform the work you will need a standard set of tools and accessories:
- welding machine;
- Bulgarian;
- drill with a set of drills;
- a set of metalwork tools;
- measuring devices.
After the assembly is completed, be sure to check the tightness of both containers and the quality welding seams, since over time the mining can seep through the smallest pores and defects. It is quite easy to perform this operation yourself; there are many methods. You can soap the joints and apply compressed air inside the tanks, or coat the seams with kerosene and visually identify defects.
For heating a medium-sized room, power oil furnace needs to be increased, the design described above will not be enough. Using a similar method, power cannot be increased indefinitely, but options still exist. For example, a furnace equipped with two afterburning chambers, a retractable firebox and a separate fuel tank, as shown below:

How to make a furnace for burning waste from a pipe?
If the body is already ready, the manufacture of the furnace is simplified. The operating principle of this device is based on evaporation in a plasma bowl. It is capable of delivering up to 15 kW of heat (it heats an area of about 150 m2). It is impossible to increase heat transfer by making any design changes (increasing the air supply or volume of the furnace); you can disrupt the thermal regime by receiving more fumes in return for more heat, and this is unsafe.
If you have welding skills, you can independently make a furnace out of a pipe that runs on waste oil. Instructions on how to make a stove using waste oil:
We make the body:
- You will need a thick-walled pipe with a diameter of 210 mm, a wall thickness of 10 mm and a height of 780 mm.
- A bottom with a diameter of 219 mm is cut out of 5 mm sheet steel and welded on one side.
- The legs are welded to the bottom (bolts may be suitable for their manufacture).
- A viewing window is made from the bottom at a distance of about 70 mm. It will serve to track combustion and warm up the bowl at the “start”. Sizes are made based on personal preference for comfort. The door is made from a cut piece of pipe, first welding a thin collar. It must still close hermetically; for this, an asbestos cord is laid around the perimeter of the door. You can also use furnace casting, in this case the dimensions of the window must be cut to fit it, it will be bolted directly to the body, the presence of an asbestos cord is also required in this case.
- The smoke exhaust pipe is welded on the opposite side, 7-10 cm away from the top. It is made from pipes with a diameter of 108 mm and a wall thickness of 4 mm.
Making the lid:
- A circle 228 mm in diameter is cut out of a 5 mm sheet of metal.
- A side is welded from a strip 40 mm wide and 3 mm thick along the edge.
- A hole with a diameter of 89 mm is made in the center of the lid, another hole with a diameter of 18 mm is made on the side, it will serve as another viewing window. For him
a lid is made that will simultaneously serve as a safety valve. - A pipe is made to supply fuel and air.
- To do this, you will need a pipe with a diameter of 89 mm, a wall thickness of 3 mm and a height of 760 mm.
- 9 holes with a diameter of 5 mm are drilled around the circumference, at a distance of 50 mm from the edge.
- Two more rows of holes with a diameter of 4.2 mm are made 50 mm above these holes, 8 holes in a row.
- Having retreated another 50 mm, 4 rows of holes are made, 3 mm in diameter, numbering 9 pieces.
- Using a grinder, slots are cut 1.6 mm thick and 30 mm high; they should be located on the same side. There should be 9 of them around the circumference.
- A hole with a diameter of 10 mm is cut from the other end of the pipe, at a distance of 5-7 mm from the edge.
- A fuel supply pipe with a diameter of 10 mm and a wall thickness of 1 mm is inserted into the resulting hole. It should end flush with the air supply pipe. The length and bending angle depend on the location of the fuel container.
- The finished air and fuel supply pipe is welded to the cover. It is set in such a way that it does not reach the bottom of the case 120 mm.
- A piece 30 mm long is cut from a pipe with a diameter of 133 mm and a wall thickness of 4 mm.
- A circle with a diameter of 219 mm is cut from a 2 mm steel sheet.
- It is welded to a piece of pipe, this will be the bowl for supplying fuel.
- Assembly.
- The bowl is mounted inside the housing at a distance of 70 mm from the bottom. This way it will be possible to observe and light it from the lower inspection hatch.
- Install the cover with the fuel/air supply device.
- The chimney is mounted on the smoke pipe. They use a pipe with a diameter of 114 mm, a wall thickness of 4 mm and a height of at least 4 meters. The part remaining in the room need not be insulated, but the part that will go outside is better insulated. The chimney must have a strictly vertical position, any inclined sections are excluded.
- Tests can be carried out after the oil tank is installed. To do this, place a little paper in a bowl, fill it with fuel and set it on fire. As soon as the paper is almost completely burned through, the oil supply is cut off.

It is not without reason that this drawing of a furnace operating in mining is given with such a detailed indication of materials. These are the details that need to be used. The result of operating such a stove with a fuel consumption of 1 - 1.5 l/h can heat a room with an area of 150 m2.
Features of supercharged oil furnace
Warm up private house with an area of 100 m2, a furnace operating on exhaust will help, the design of which has a built-in forced air injection into the combustion zone. These advantages are obvious:
- increased power;
- high fuel combustion efficiency;
- You can increase the efficiency of heat use by automating the device;
- efficiency.
It is somewhat more difficult to make such a stove during testing; in addition, this design directly depends on the stability of the power supply. In areas where power outages are common, special measures will be needed to ensure uninterrupted power supply using generators.
A home-made supercharged furnace operating in mining is a closed cylindrical vessel, inside of which there is a familiar afterburning chamber, which looks like a pipe with holes. At the bottom of the structure there is a door that provides access to the firebox and ignition. A chimney pipe is welded to the top of the cylinder, and using a conventional cut-in through the side wall or top cover, a forced air supply is provided in the form of a pipe with holes.
At the bottom of the vessel there is fuel (exhaust), which is supplied automatically as it is consumed. Feeding methods can be very varied: using a float mechanism or from a container using a submersible mechanism, it all depends on personal preference. The figure shows a diagram of a furnace with air injection, a water jacket and fuel supply using a float valve.

Using a small amount of solvent or gasoline, the waste is ignited at the bottom of the container, and then the blower fan is turned on. As soon as the fuel warms up, it begins to release vapors that are burned with excess oxygen. As a result, a powerful torch of flame is formed, which spreads in all directions as seen in the photograph.
Advice. This design is distinguished by one feature: due to the strong flame, the bottom of the vessel becomes very hot. If it is necessary to heat one room, a blowing fan is installed outside opposite this zone. In cases where it is necessary to heat an entire house, the stove is equipped with a water jacket.
Combustion products leaving the furnace container can reach quite high temperature, about 400 0С. As in the previous design, in order to reduce heat loss, the chimney must be equipped with a heat exchanger connected to the heating system through a storage tank. This will help increase the efficiency of the furnace to 80 - 85%.
How to make a simple supercharged stove?
In order to make a supercharged exhaust furnace, you will need an old propane tank. Holes for the chimney and door are cut out in it, and you will also need to cut in a pipe for air supply; its diameter does not play a big role, but for us 50 mm would be ideal.
The holes in the pipe are made with a diameter of 9 mm according to the same principle as in a conventional stove. You will also need to make a lid with a seal from asbestos cord. To do this, you will need to cut off the top of the cylinder; for convenience, handles can be welded to the lid.
In order for a homemade furnace operating in mining to function in different modes and could be adjusted and equipped with the necessary automation. To do this, you will need to purchase a controller with temperature sensors, which is connected according to a circuit with the fan. In this case, it becomes possible to control the heating temperature by reducing or increasing the performance of the supercharger.

Quite often, such a design is made without forced air supply. All work directly depends on the draft in the chimney, and regulation is carried out manually using a damper. Now you know how to make a working furnace with your own hands, having the drawings. And how it works in real conditions can be seen in the video:
Heat guns are auxiliary devices used to maintain comfortable temperature regime in conditions of production of repair and construction work. But their application is more extensive: the devices are also used for household needs, and in everyday life they use a lot of structurally interesting homemade products.
We will tell you how to assemble a waste oil heat gun with your own hands. The article we propose presents the most popular schemes and provides recommendations for the competent implementation of developments. Tips for safe and trouble-free operation of manufactured units are provided.
Heating devices related to heat guns are technologically constructed according to a single principle. The design of such installations usually consists of a heating module and a fan installed in a single housing.
The design of a heat gun manufactured in industrial production. Compact, safe, convenient device, thanks to which you can get required heat in a short time of operation of the device
A common design option is electric. In this case, an electric heating element is used as a heater. However, there are also heat guns, where heating is carried out by other heat sources, for example, burners that burn machine oil.
At the level household use often associated with ordinary ones. But a design such as a potbelly stove differs significantly from a heat gun, since it does not provide for a system of forced distribution of heated air.
The operating principle of a large group of heaters combined technical term“heat gun”, discussed in the article dedicated to the device and types of the unit.

A homemade stove-stove powered by liquid fuel, namely waste machine oil. The design is questionable in terms of safety and not entirely convenient to use. But based on such structures, craftsmen make heat guns
True, home craftsmen who create equipment manage to attach a ventilation module to stoves, thereby achieving the effect of a heat gun. Let's consider the popular design with heating using waste oil, which is often made with your own hands.
Processing as an inexpensive fuel
Used machine (technical) oil seems to be an effective fuel for domestic heating installations. This type of energy resource allows you to save on electricity consumption and at the same time receive the required amount of heat. But from an environmental point of view, burning waste oil is equivalent to chemical emissions.

Used engine oil is an ideal fuel for homemade household stoves and heat guns. Turning to this type of fuel allows you to solve two problems - saving money and recycling waste.
However, no one pays attention to the environmental aspect. The main thing is to get cheap heat. In addition, self-made waste oil guns are often technologically dangerous equipment.
There are many examples when several private garages burned out at once for the reason that one of the car owners did not have enough heat, and he decided to solve the problem with a homemade cannon during testing.
Therefore, when deciding to manufacture such a heating system, you should approach the matter with full understanding. Everything needs to be calculated design options, protect personal property and the property of others.
Instructions for project implementation
The circuit design of one of the popular designs of a heat gun operating on waste oil involves the use of an ordinary steel pipe D = 219 mm as a housing.
A pipe wall size of 10 mm is quite sufficient for long-term operation of the device. A piece of pipe 780 mm long is closed at the ends with steel caps.

Diagram for assembling a simple heat gun with your own hands: 1 – oil tank; 2 – dispenser with tube; 3 – top cover; 4 – viewing window; 5 – side of the top cover; 6 – hatch for maintenance; 7 – air pipe; 8 – bowl for oil; 9, 10, 11 – holes of different diameters (3.5 – 5 mm)
Moreover, the lower lid is welded tightly, and the upper one, increased in diameter to 226 mm, is equipped with lower sides and is made removable. At the bottom of the body pipe there is an oil bowl made from a pipe D = 133 mm and complemented by an upper side.
The top cover of the gun body is equipped with two holes. One for the viewing window, the second for the air supply pipe. The air pipe of the heat gun is made with your own hands from a metal pipe D=89 mm.
This structural part, according to the diagram, is passed with tension through the central hole of the upper cover of the housing and is fixed on it (scalded).
The air supply pipe is fixed in such a way that when installed cover the distance between its bottom and the bottom of the oil bowl in the body pipe did not exceed 50 mm.

Option for manufacturing an air pipe. Distribution and hole diameter play a role important role in the operation of this part of the heat gun design. The thickness of the metal is also important, determining the durability of the pipe
The air pipe is also complemented by an oil line - a copper tube small diameter(6-10 mm), which runs inside the air channel, in its central part. The free part of the tube remaining outside is connected to an intermediate container - a waste oil supply regulator.
At a distance of 80-100 mm from the top cover, a hole D = 100 mm is cut out on the wall of the body pipe and an outlet is welded. This is a pipe designed to connect the chimney. And on the opposite side of the body, in its lower part, a hatch with a diameter of 100-120 mm is made for maintenance (ignition). The hatch is located on the same level as the oil bowl.

A variant of the final product is a waste oil heat gun. However, it makes more sense to make the top cover removable, which simplifies not only system maintenance, but also technical repair if necessary
To carry out work on the manufacture of such a home cannon that functions in testing, it is enough to have on hand a welding machine, a standard set of plumbing tools and pipe material according to the dimensions of the diagram.
You will also need a steel sheet and metal corner for support legs. The process mainly consists of welding prepared parts. Preparing structural elements does not take much effort and time.
Operation of the manufactured heater
Operating principle homemade stove-stove on used oil is simple. Through copper tube a portion of machine oil is supplied inside. Fill the bowl in the bottom area of the pipe with fuel and set the contents on fire through the bottom hatch.
Close the hatch and observe through the observation window. Let it flare up operating temperature, after which a constant dosed (drip) supply of mining is turned on.

Preparing a homemade device for launch. The cover with the air pipe is placed on the stove body, after which all that remains is to fill the system with oil, ignite the liquid fuel and adjust the drip flow of waste
By adjusting the drip dosage, the operation of the device is adjusted so as not to overheat the body. As the oven heats up, the oil entering the dosing tube will heat up. The characteristic of the fuel ignition point will change.
It is clear that in such conditions it is extremely difficult to achieve precise adjustment without automation. Therefore, if there is no automation, an oil heat gun cannot be left unattended.
Types of waste oil schemes
From the point of view design features There are two types of heaters operating on waste oil:
- Direct burning.
- Isolated combustion.
Similar characteristics underlie the division into subgroups. Direct combustion designs are more efficient, but during operation they emit combustion products along with heat that are harmful to health.

Direct combustion installation diagram for industrial production: 1 – combustion chamber; 2 – oil burner; 3 – burner nozzle; 4 – valve with electric drive; 5 – supply tube; 6 – fan; 7 – electric motor; 8 – pump; 9 – power unit; 10 – container for oil; 11 – control panel
A direct combustion device is easy to make with your own hands. Moreover, there is an opportunity to implement a mobile project. Similar guns are produced at the industrial production level. You can make a device with your own hands based on an industrial design.
To work you will need:
- Container of suitable shape and size.
- Lightweight metal pipe (stainless steel).
- Axial fan.
- Miniature fuel pump.
- Burner for industrial oil.
The oil container is equipped with wheels and a handle. Inside the steel pipe, in its rear half, a fan with a fuel pump, a fuel supply and injection system, and an oil burner are mounted.
The front half of the pipe (inner part) of the heater is equipped with additional protective plates. A flame limiter is installed directly at the outlet. That's the whole structure.

Isolated combustion installation diagram: 1 – combustion chamber; 2 – chimney pipe; 3 – oil burner; 4 – burner nozzle; 5 – valve with electric drive; 6 – supply tube; 7 – fan; 8 – electric motor; 9 – fuel pump; 10 – power unit; 11 – oil tank; 12 – control panel
An insulated combustion heat gun is manufactured using almost the same principle. The difference with the first design is noted only in the addition of a chimney pipe to the front area and the creation of an isolated combustion chamber.
When installing a combustion chamber inside a pipe, the diameter of this part of the structure is made one third smaller than the diameter of the housing. Due to this design, inter-pipe channels are formed. The air blown through them comes out heated through the nozzle.
Features of the operation of homemade products
It is not difficult to get heat from a waste oil gun. Another question is how to use all this equipment in order to eliminate spills of used oil and the risk of fire. Therefore, during the manufacture of such structures, special attention should also be paid to waste storage facilities and the furnace supply system with this working fluid.

An attempt to equip a homemade heating installation using used machine oil with electronics. However for reliable system automation, it is necessary to install several sensors and use multi-stage scheme control
It is advisable to use sealed containers for fuel storage. metal containers, equipped with a dosed supply system. It is permissible to place vessels with machine oil only in places remote from sources open fire, including at a distance from a homemade stove.
It is not recommended to use used oil as fuel if it contains even a small amount of water. A mixture of engine oil and water has “explosive” properties when burning.
Getting into the burner nozzle, such a composition ignites and is ejected with high speed in the form of a mass of burning oil drops. This uncontrolled process often causes a fire.

A compact, convenient and also mobile heat gun operating on liquid fuel. A direct alternative to homemade devices. The cost of such an installation is not so high that you can completely ignore the purchase option and make a gun yourself
Homemade direct combustion heaters are sources of carcinogenic substances. It is prohibited to use such installations indoors.
If an assembly with an isolated combustion chamber and exhaust of combustion products outside the room is used, measures should be taken to reduce pollution environment. For some, all these requirements seem like a “fifty letter”, but a true designer should not ignore generally accepted rules.
In general, a heat gun is, of course, a worthwhile thing. Provided that you assemble a homemade product that is truly high-quality in all respects, the use of such devices is not prohibited. However, the assembly effective system proportional to the cost of an industrial-style unit.
About how heat guns that can operate on various types fuel, you will learn from the contents of which we highly recommend that you familiarize yourself.
Conclusions and useful video on the topic
You can learn how to make a heating device for a garage and increase its efficiency in the following video:
If there are not enough opportunities or desire to make a heat gun with your own hands, you can simply contact specialty store, choose the appropriate device and buy without unnecessary movements. The advantages are obvious: guarantees, operational safety, high efficiency actions with low consumption of flammable material.
The need to quickly heat a large or small room does not arise very rarely. Sometimes you need to heat a garage, dry a cement wall, warm up a cellar, shed, garden house, dacha, etc. In this case, a do-it-yourself heat gun may be the best solution. Making such a device is not so difficult, but you can choose suitable look fuels: electricity, diesel fuel, liquefied gas in cylinders, etc.
It is difficult to name a more convenient and simpler device for heating rooms than a heat gun. She represents a powerful heating element and a fan enclosed in one housing. Such a device heats the air and quickly distributes it throughout the room. To warm up small room It will take just a few minutes, and heating a large room will not take too much time.
The body of the heat gun must be covered on both sides with grilles that will allow air to pass freely. This is a mandatory element of all industrial models
The design of a heat gun is very simple, so a properly manufactured device almost never breaks. Various fuels can be used to operate the device:
- electricity;
- liquefied gas;
- diesel fuel;
- kerosene;
- gasoline, etc.
The efficiency of a heat gun depends on the power of the device. For domestic use, a device with a power of 2-10 kW is quite suitable. For large rooms you will need a heat gun with a power of 200-300 kW.
Unit #1 - electric heat gun
An electric heat gun is perhaps the simplest and safest heater option. If there is access to electricity on the site, you should make just such a unit. It will be useful both during construction work and later, for various household needs both in the house and on the site.
Materials and tools
To make an electric heat gun you will need:
- the frame on which the structure will rest;
- metal case;
- heating element (heating element);
- fan with electric motor;
- switch or control panel;
- cable for connecting the device to the mains.
The body of the heat gun can be made from a suitable piece of pipe or from a sheet of galvanized iron. To work, you will need a metal tool and, possibly, a welding machine. This device received the name “cannon” due to the similarity of its cylindrical body to an ancient weapon. However, the heater body may also have a square or rectangular cross-section if it is easier to manufacture.
Please note that the body of the product can become quite hot during operation. You should choose a heat-resistant or fairly thick metal for the housing. In addition, it makes sense to apply a thermal insulation coating to its metal parts.
When choosing a suitable heating element and fan, you should remember that the heating temperature depends on the power and number of heating elements. The fan rotation speed does not affect the amount of heat, but the higher it is, the more evenly the resulting heat will spread throughout the room. Thus, the heating element is responsible for the heating temperature, and the fan rotation speed is responsible for the quality.
To reduce costs, the heating element can be removed from an old iron or other household appliance. Sometimes it makes sense to shorten the heating element to increase the heating temperature. A suitable electric motor with an impeller can be found in older models of vacuum cleaners.
Build process
To assemble an electric heat gun correctly, it is recommended to first draw up a diagram of the electrical circuit of the device. You can already use ready-made circuit, one of the options is presented below:
For proper installation of an electric heat gun, before starting work, it is recommended to draw up electrical diagram, reflecting on it the connection of all elements to the electrical network
The electric heat gun should be assembled in the following order:
- Prepare the body and support.
- Install a heating element (or several heating elements) in the center of the body.
- Connect the power cable to the heating elements.
- Install the fan and connect power to it
- Connect the power wire, wiring from the heating elements and the fan to the control panel.
- Place a protective grille on the front and back of the housing.
During the assembly process, it is necessary to carefully insulate everything electrical connections. Upon completion of assembly, a test run of the device is performed. If it works without failures, you can use the gun for its intended purpose.
Unit #2 - diesel fuel heat gun
Where access to electricity is limited or impossible, diesel fuel heaters are often used. It is somewhat more difficult to make such a heat gun yourself than an electric model. You will need to make two buildings and work with a welding machine.
How does this design work?
The bottom part of a diesel heat gun is the fuel tank. The device itself is placed on top, in which the combustion chamber and fan are connected. Fuel is supplied to the combustion chamber, and a fan blows hot air into the room. To transport and ignite fuel, you will need a connecting tube, a fuel pump, a filter and an injector. An electric motor is attached to the fan.
The combustion chamber is mounted in the center of the upper body of the heat gun. It is a metal cylinder, the diameter of which should be approximately two times smaller than the diameter of the body. Diesel fuel combustion products are removed from the chamber through a vertical pipe. To warm up a room of about 600 square meters. m may require up to 10 liters of fuel.
Build process
The lower body must be at least 15 cm from the upper part. To prevent the fuel tank from overheating, it should be made of a material with low thermal conductivity. You can also use a regular metal tank, which will have to be covered with a layer of heat-insulating material.

The diagram clearly shows the design of a heat gun running on diesel fuel. The device should be mounted on a strong, stable frame
The upper body must be made of thick metal, this can be a suitable piece of wide steel pipe. The following must be secured in the housing:
- combustion chamber with vertical outlet;
- fuel pump with nozzle;
- fan with electric motor.
Then the fuel pump is installed and removed from the tank metal pipe, through which fuel is supplied first to the fuel filter and then to the injector in the combustion chamber. The upper body is closed at the ends protective nets. The power supply for the fan will have to be taken care of separately. If you don't have access to electrical network, the battery should be used.
When using a diesel heat gun, it is important to adhere to safety regulations. Even at a distance of a meter from the body, the directed flow of hot air can reach 300 degrees. It is not recommended to use this device in indoors, since diesel fuel combustion products may pose a health hazard to people.
In addition to the unit running on diesel fuel, other types of liquid combustible materials are also used for heat guns, for example, waste engine oil. Interesting option such a device being tested is presented in the following video:
Unit #3 - gas heat gun
The design of a gas heat gun is in many ways similar to the design of a diesel unit. There is also a combustion chamber built into the housing. Instead of a tank with liquid fuel, a liquefied gas cylinder is used.
As with diesel fuel, great value has a removal of combustion products, since in homemade devices it is impossible to ensure complete combustion of gas. The air that enters the room heats up upon contact with the combustion chamber. Exhaust gases leave the device through an outlet led to the street. This indirect heating system is safer than open flame heating.
Indirect heating heat guns are equipped with a closed combustion chamber, which prevents contact between open fire and air - this design is more complex, but safer than direct heating models
To increase heat transfer, longitudinal plates can be welded to the combustion chamber body; usually 4-8 of them are made. In this case, the dimensions of the combustion chamber with additional plates must be smaller than the diameter of the housing so that the chamber does not touch its walls and does not overheat the body of the heat gun.
The body of a gas heat gun becomes very hot during operation, so it must be covered with a layer of thermal insulation to avoid possible burns or fire.
To create a gas heat gun you will need the following elements:
- liquefied gas cylinder;
- burner;
- gearbox;
- metal case;
- fan;
- device for remote ignition;
- frame for mounting the housing.
The gas cylinder is connected to a reducer, which ensures a uniform supply of fuel to the burner. The air around the combustion chamber heats up and the fan blows it into the room. The procedure is almost the same as in the manufacture of a diesel heat gun. The device is clear gas heater shown in the diagram:

This diagram clearly demonstrates the design of a heat gun operating on liquefied household gas. The fan must be powered

With a gas heat gun, you should only use cylinders that are filled with gas using professional equipment. In cylinders filled in a makeshift way, leakage may occur
During the manufacture and operation of a gas heat gun, it is recommended to adhere to the following rules:
- Gas supply pipes at connections must be carefully sealed.
- It is imperative to install a remote ignition device, since manual ignition can lead to an explosion.
- Make sure that the gas cylinder is always at a sufficient distance from the heater, otherwise the cylinder will overheat and the gas will explode.
- Never use homemade cylinders with a gas gun.
- Do not leave the operating device unattended for a long time.
Another important point- the ratio of the power of the gas gun and the size of the heated room. You should not use a device that is too powerful in a small room, as this can easily cause a fire.