Greenhouse frame made of boards. DIY greenhouse made of wood
Affordability of polycarbonate, unique operational properties make it an indispensable component in the construction of closed ground structures. Another component of greenhouses is the frame.
Comparisons of iron, plastic pipes and wood do not reveal a clear winner: each of these materials has advantages and disadvantages. But if you ask yourself what a novice summer resident will like, the answer will be clear - a wooden greenhouse under polycarbonate with your own hands. Wood is a material with a lot of positive qualities.
The advantage of wooden frames
The main advantage of wood is ease of use. The construction of a wooden frame from timber is accessible to anyone who knows how to hold a hammer, hammer nails and screw in screws. The strength and durability of high-quality and properly processed wood is not inferior to plastic pipes. Attaching polycarbonate to beams is much easier than to arches. Simple installation, ease of replacing parts, relatively low price - all these are the advantages of wooden structures.

Less weight compared to iron allows you to make do with a lightweight foundation, and ease of processing will help you independently set the length, width, and height of the greenhouse necessary for growing crops.
Building a durable structure
Wooden greenhouse structures are exposed to the destructive effects of sunlight, insects, moisture, fungi, and microorganisms. The durability of a building depends on the processing methods, the type of wood, and its quality. Protective treatment available to any summer resident is:
- superficial - staining;
- penetrating - impregnation with antiseptics.
Using a blowtorch, you can carry out heat treatment - light firing.

Choosing a wood species
Types of wood are divided into: soft - easy to drive a nail, hard - difficult to process. It is better to use coniferous trees to construct frames. You can buy timber on the market.
- pine is a durable, soft, light wood. When dry, it hardly warps, and is also easy to process, paint, and impregnate;
- Spruce is close in structure to pine, but differs in a significant number of knots. Hence the difficulties in processing and high-quality impregnation with an antiseptic. The low content of resinous substances allows the paint to dry faster.
- larch is a high-density structure, the products are very durable.

Drawings of a wooden polycarbonate greenhouse
Having the drawings in front of your eyes, it is not difficult to determine the size, quantity and cost of the required building materials. Project displays dimensions structural elements, attachment points. Based on the graphic image, a plan is drawn up for the sequence of work for the construction of a greenhouse (or, in scientific terms, the construction of protected soil). It includes:
- foundation construction;
- frame installation;
- lining of sidewalls, roof.
It is better to draw up a drawing of a wooden greenhouse in relation to the installation site, the choice of which is made taking into account certain features.
Choosing a suitable site for construction
The yield of greenhouse crops largely depends on the location of the greenhouse. When choosing a place to build a greenhouse for polycarbonate, you should be guided by the rules of agricultural technology. Lighting promotes plant growth and fruit ripening. You cannot install a greenhouse in the shady part of the garden, next to the house or outbuildings. When attaching a structure to a house, you should pay attention to the movement of the sun. The best option there will be a wall in the east-west direction.
Accumulation of water and frequent frosts make the lowlands of garden plots unsuitable for installing closed ground structures. Hills with light loams look preferable. When installing the greenhouse on a slope, the surface is leveled. Installation of a wooden structure on clay soil, where moisture accumulates, will lead to rapid rotting and deformation of the frame. Heavy loams are improved by adding humus, compost, sand - a bucket per square meter. m - for autumn digging. The greenhouse is raised 20-30 cm above the ground due to the foundation. Installing the structure away from home is not justified - watering and connecting the necessary communications are difficult.

Construction material
The material for building the foundation is determined by the type of greenhouse and the condition of the soil. Creating a reliable foundation will require the use of concrete, concrete blocks, sand, gravel, crushed stone, cement, brick, wood, and reinforcement.
Laying the foundation
A significant discrepancy between the foundation and the structure leads to deformation and destruction of the greenhouse.
When choosing a laying method, it is necessary to take into account the type of greenhouse: winter or seasonal, service life: long or short-term, size.
If frequent frame transfers are not planned, then the foundation should be made permanent. It will give the greenhouse stability, protect it from the adverse effects of precipitation, and have a positive effect on productivity. Wooden, comparatively lightweight design, can do without a capital foundation. A small greenhouse, covered with polycarbonate, can be installed on strip foundation from timber. Simple installation and dismantling will allow you to quickly move the structure around the site.
A beam with a cross-section of 150x150mm, treated with an antiseptic, is laid in a trench 20 cm deep, the size of the greenhouse being built. Ruberoid will serve as protection against the effects of soil moisture. The rows of beams are connected with metal pins. Significant protected ground structures will require a stronger foundation. Concrete strip foundation is considered inexpensive and practical option. A ditch 30 cm deep and 35 cm wide is dug along the perimeter of the proposed structure. The bottom is covered with a 10 cm layer of sand. Anchor bolts with a diameter of 12 mm are installed in the poured concrete along the entire perimeter. After hardening, 2 rows of bricks, roofing felt and a wide base beam are laid on the concrete, leaving free space for the anchor bolts.

Construction of the frame
Lower wooden elements The greenhouse frame must be impregnated with an antiseptic, and parts of the outer side must be treated with bitumen. Knock down the structure according to the shape of the foundation and secure it with anchor bolts to a wide base beam.
Racks are installed in the corners using timber: for lightweight greenhouses 50x50 mm, for large structures 100x50 mm is better suited.
The upper parts of the corner posts of the wooden frame of the greenhouse are connected to each other. Then vertical supports are placed along the entire perimeter at a distance of 1 m from each other, using parallel strapping. The parts are fastened together with metal corners. In a long greenhouse made of wood and polycarbonate, made with your own hands for growing tomatoes, it is better to provide 2 doors on opposite sides. Vertical supports are installed for them with a distance of 100 cm, allowing the cart to be rolled in. For better ventilation of the covered structure, vents are provided at the intersections of transverse and longitudinal structures.

The ridge beams and rafter elements are fastened with plywood overlays reinforced with metal corners.
Covering a wooden greenhouse
The correct connection of polycarbonate with a wooden frame will be the key to the long-term use of a closed ground structure. There are several mounting methods:
- profile - connecting profiles are installed on the frame into which polycarbonate panels are inserted;
- point - fastening occurs directly to the frame;
- mixed - a combination of the first two types.
When installing, it should be taken into account that with temperature changes from - 30°C to + 30°C, the size of the polycarbonate sheet changes by 4.88 mm.
The following means will save carbonate sheets from premature thermal destruction: profile connections, provided gaps, holes exceeding the diameter of the fasteners by 2-3 mm, thermal washers. It is better to carry out work on covering the greenhouse with polymer boards at a temperature of 18-20°C. Covering the wooden frame is accompanied by preparatory process cutting, drilling holes, end sealing.
Standard polycarbonate panels are 6 meters long and 2.1 meters wide. You can cover a wooden structure with whole sheets if the dimensions match. An example is side frame structures. The cutting lines dividing the polycarbonate into separate parts of the skin are marked with a marker. Cutting is carried out using electric jigsaw or a construction knife. Remains of plastic sawdust that have fallen inside the cells must be removed using a pump or vacuum cleaner.

Drilling holes is a crucial moment. A properly prepared workplace, which should be level, clean, and dry, will help to avoid damage to polycarbonate. The edge of the polymer sheet is freed from protective film by 5-8 cm. The holes, after aligned markings, are drilled at a distance of 40-50 cm from one another, without touching the cells between the plates.
When all the necessary holes are made, the ends of the polycarbonate are sealed with tapes that protect against the penetration of insects, microorganisms, and moisture into the cells.
Covering a wooden frame with blanks is easy. The main thing is to check that the panels are laid correctly with the light-protective layer facing outwards and to provide a temperature gap of 5 mm.
Installation of doors and windows
The design of a wooden greenhouse covered with polycarbonate retains heat well, creates the preconditions for an increase in temperature, and therefore must include doors and windows. The purpose of the closed ground structure, the size, and the crops planted influence the design of the door. A long greenhouse has two wide (100 cm) entrances, allowing you to freely transport garden tools and ventilate the room. The polycarbonate blank is fixed to a door frame made of 50x50 mm beams. Handles are attached to the door and hung on the hinges. The presence of windows reduces the possibility of plants becoming infected with fungal diseases and promotes fruit set (high temperature and humidity lead to sterilization of pollen).

The design and size of the window allow the use of half-beams measuring 30x50 mm. The parts of the opening structure are connected using a tongue-and-groove method or an end connection with self-tapping screws is used. Metal corners will give the window additional reliability.
The most popular models of wooden frames
Growing vegetables in greenhouses is an integral part of gardening. Long years of use of closed ground structures have made it possible to select best models, successfully used on garden plots. Popular types of wooden frames are:
- small standard design;
- wooden greenhouse according to Mittlider;
- wooden greenhouse under polycarbonate;
- film design;
- portable greenhouse for foundation blocks.
Small standard design
The small dimensions of the standard structure, 6x4 m, make it possible to manage simple foundation. To build it you need:
- Dig a trench 0.5-0.8 m deep.
- Drive metal corners into the corners - 100 mm.
- Cover with a layer of sand, crushed stone, compact it, lay down any unused materials: garden path slabs, pieces of concrete curb, red brick.
- Roofing felt is spread on top.
- A frame made of timber - 15x15 cm - is attached to the metal corners, on which the frame is erected.
- The finished and secured structure is sheathed with polycarbonate sheets.
Wooden greenhouse according to Mittlider
The large dimensions of the structure according to Mittlider (length - 12, width - 6, height - 2.7 meters) require a reliable foundation, namely a strip foundation - 20x30 cm. A prerequisite for a greenhouse according to Mittlider is location from east to west. The ventilation sashes of the south-facing windows prevent the penetration of the cold north wind, providing light and warmth. The design of the transoms in the upper part of the roof promotes natural air circulation, which helps maintain the necessary level of carbon dioxide to nourish the filling fruits.

The strength of the frame is ensured by the frequency of the posts installed every 70 cm. The construction of the frame will require significantly more material than for a conventional greenhouse of the same size. However, it's worth it. The significant size of the greenhouse provides an optimal microclimate for plants. Sudden changes weather does not particularly affect temperature regime inside.
Wooden greenhouse under polycarbonate
Growing high-quality seedlings of vegetable crops, especially cabbage, requires greenhouses, which can be of various sizes. The following dimensions are considered convenient for work: width 90-110 cm, height 80-100 cm, length - depending on the area. The structure can be single-pitched, gable, or with a flat roof.
It is important, especially for a lean-to greenhouse: the structure should be located from east to west.
To build a wooden greenhouse you will need:
- boards - thickness 30 mm, width 200 mm;
- bars - 50×50mm:
- slats;
- mounting angles;
- antiseptic.
The construction of a gable greenhouse begins with leveling the surface. The boards are cut to the required sizes and the frame is knocked down. The inside of the structure is treated with an antiseptic, dried, and sheathed with roofing felt. In the middle of the ends of the box, racks are installed - a 50x50 mm block - which are fastened with corners. (If the greenhouse is longer than 2 m, it is necessary to provide a middle post for the ridge beam).
A ridge beam - 50x50 mm - is laid on the posts, secured with screws and corners. Then frames are made from square slats - 20x20 mm, according to the size of the sidewalls. Polycarbonate is attached to the frames. The finished structure is connected to the frame.
Portable greenhouse on foundation blocks
A do-it-yourself polycarbonate greenhouse on a wooden frame is a fairly lightweight structure that can be moved to another location during operation. Therefore, the foundation should also involve simplified excavation and transfer. Small ones are suitable for this. concrete blocks- 20x20x40 cm or lawn block - curb 500x70x211mm. Depending on the size of the greenhouse, a trench 60 cm deep is dug and the bottom is filled with sand. Blocks are placed in the corners and in the middle of all sides. A wooden beam - 150x150, impregnated with an antiseptic - is laid on them. The free space between the structure and the ground is filled with sand. Roofing felt is spread on top. An existing or newly built greenhouse can be installed on such a foundation.
Types of designs and drawings
The wooden frame and polycarbonate give room for imagination, allowing you to build greenhouses of any configuration:
- arched;
- domed
- single-pitched
- pyramidal
- gable
Make a greenhouse with the required functionality and required sizes A drawing will help. A well-executed plan includes calculation of the amount of materials, determines the order of assembly, and the dimensions of structural elements. Display on paper simplifies the choice of the shape of the structure being built and makes it clear. Additional information about a particular configuration helps you make the right decision.
Arched
Designs of this type are characterized by ease of assembly. Making the frame and installing the greenhouse will take a maximum of 2 days. Carbonate bends easily and does not require sealing of new seams. Transoms for ventilation are easily mounted between the transverse and longitudinal ribs.
Arched greenhouses can withstand significant snow and wind loads.
A curved surface is less reflective sun rays, providing access to uniform light. Condensate moisture internal surfaces flows down the walls without getting on the plants. Coating thick cellular polycarbonate makes it possible to use in winter. Maximum use of space inside. The ceiling semicircle facilitates the installation of lighting and sprinkler installations.

Arched structures are easily expanded by adding new sections.
Domed
The main purpose of protective soil structures is to maximize the yield of vegetable crops.
The complexity of constructing a domed wooden greenhouse, the consumption of materials and the resulting minimum usable area give an understanding: the building does not meet its intended purpose.
Inside the greenhouse you have to place beds of irregular configuration. Installing trellises becomes a pointless exercise. There is no need to talk about ease of use. Dome-shaped greenhouses have one advantage - they are a decoration of landscape design.
Single-pitch
For garden plots of a small area, lean-to structures on closed ground are more suitable. Structures of this type are installed as extensions to houses, outbuildings, and permanent fences. The greenhouse is located on the south side of the standing building. The length of the lean-to structure corresponds to the size of the wall. Height and width - depending on the number of beds of crops grown. The slope angle depends on the climate. The disadvantage of wall-mounted greenhouses, especially with a south-server orientation, will be poor lighting.

Pyramid
Passion for the secrets of the East has led to the appearance of pyramid-shaped greenhouses in garden plots. The construction of an unusual structure is carried out in compliance with special requirements. The base is a square with equilateral edges of a strictly defined length. The ribs of the frame must converge at the top - always above the center of the base. The frame is installed strictly taking into account the cardinal directions. The entrance is on the north side. An error in proportions (calculations require taking into account the ratio of the base - 1.57, and the ribs - 1.49 to the height) deprives the pyramid of its miraculous properties. Claims that the pyramidal design promotes plant health and increased yield have no scientific evidence. But even if this were so, the design itself is not suitable for producing a large harvest.
It’s probably good to grow seedlings and germinate seeds in a pyramid. It will serve as a decoration for the landscape.
Gable
Gable structures continue to be the most used in garden plots. There are two types of greenhouses:
- seasonal - used from spring to autumn;
- winter - heated.
Seasonal closed ground structures are divided into stationary and portable. Stationary ones are erected on a buried foundation. Portable, lightweight - installed on surface or freely removable bases.

Winter greenhouses are durable structures, covered with polycarbonate, on a solid foundation, with lighting and heating. Vegetables and herbs are grown all year round. One- or two-month breaks are necessary to replace soil and repair failed structural elements.
Advantages gable greenhouse time-tested.
The simple design makes it possible to construct it from easily processed materials - wooden beams. The durable structure reliably withstands wind and snow loads. The area of closed ground is used to the maximum. Convenient care of crops - the possibility of increasing the doorway makes labor easier. The height of the structure allows you to work without bending. The height of the gable greenhouse promotes uniform heating and free ventilation, which makes it possible to grow any vegetable crops and even combine plantings.
The time spent on building a closed ground structure pays off handsomely. Growing garden crops becomes maximally adapted to the individual characteristics of the owner. The width of the passages, the length of the trellises, windows, doors - everything corresponds to the exact purpose. A do-it-yourself wooden greenhouse under polycarbonate, in addition to significant cost savings - it is cheap to build - also satisfies the need to feel like the creator of a small but own space.
Why made of wood?
Wooden structures have several important advantages and in particular:
- cheapness– a frame made of this material, made by yourself, is cheaper than ready-made option made of galvanized profile;
- durability– the design lasts at least 5-7 years, and in regions with a temperate climate three times longer;
- environmental friendliness– wood has a beneficial effect on the microclimate inside the greenhouse and does not emit harmful substances into the atmosphere.
What to cover with?
We didn't mention these advantages of a wooden frame as reliability and stability, i.e. the ability to withstand any coating, from light agro-film to fairly heavy glass.
There are many different options for covering timber frame greenhouses.
Each type of coating has its pros and cons; let’s look at them in more detail.
Polyethylene film
Pros:
- accessibility - the product can be found in any market and building materials store;
- low cost.
Cons:
- short period of use;
- insufficient permeability to sunlight;
- low strength (breaks quickly);
- poor thermal insulation performance.
Glass
Pros:
- excellent light transmission;
- resistance to sudden changes in temperature;
- good thermal insulation;
- resistance to aggressive environments;
- ease of care.
Cons:
- a certain complexity of the glazing process;
- significant weight and, accordingly, increased requirements for the frame;
- fragility and vulnerability to strong wind, hail;
- insufficient protection against UF radiation.
Polycarbonate
Pros:
- ease;
- strength;
- ability to transmit up to 80% of solar radiation;
- versatility (it can be bent and used to cover frames of any shape).
Cons:
- quite complicated installation;
- gets very hot in hot weather;
- Low-quality polycarbonate becomes as fragile as glass after 1-1.5 years of use.
IMPORTANT! the choice of covering material depends on the region of residence, the types of vegetables grown, the preferences of the owner and his budget.
Selection of timber
 At your nearest carpentry shop you can purchase wooden beams for building a greenhouse frame.
It's better if he is made of wood industrial grades , for example, pine or larch.
Expensive wood species (oak, beech) are difficult to process, are expensive, and do not last much longer than conifers.
Even cheap wood can be brought closer to ideal in terms of characteristics if it is chosen and prepared correctly.
Criteria for choosing timber:
- absence of cracks, chips, large knots, and signs of rot;
- humidity indicators are not higher than 22%;
- ideal geometry (the beam must be smooth and straight).
If these requirements are met, the greenhouse frame will be durable and resistant to temperature changes. The beam for the base should have dimensions of 100 x 100 mm; for racks 50 x 50 mm.
IMPORTANT! All wooden elements of the greenhouse must be carefully trimmed and treated with an antiseptic composition to prevent rotting and the appearance of insects. Before assembling the frame, they can be soaked in drying oil to make them look beautiful. Ideally, it is advisable to paint the finished wooden structure.
Selecting a location
One of the main questions gardeners ask is: where exactly to place the greenhouse. The best option is an unshaded place that is located at a sufficient distance from country houses and large trees. In other words, you cannot allow shadow to fall on the structure even for a single hour a day, as this will negatively affect the yield of vegetables.
IMPORTANT! the door should be located on the leeward side (not on the north side and not on the side from which the wind most often blows).
Greenhouse dimensions
The time has come to decide what exactly we will build. So, this will be a stationary greenhouse with the following parameters:
- Dimensions in plan – 2 x 5.4 m; wall height – 1.5 m;
- rafter roof, 2-slope;
- strip foundation, reinforced;
- film coating.
The design is calculated for use in the warm season. Sizes selected based on the width of the polyethylene film sleeve– 3m. When covering the finished frame, the film does not have to be cut and adjusted.
Foundation structure
Question: how to build a greenhouse with your own hands from wood? not so simple. It is necessary to solve many intermediate problems - from the location of the greenhouse to the choice of covering material.
 Which foundation to choose, concrete or brick, arranged in a columnar manner, everyone decides for himself.
In our case, this is a monolithic strip foundation.
A small trench 55-60 cm deep is dug under it, along the perimeter of the future structure, into which M 200 or 250 concrete is poured.
Using formwork, it is necessary to raise the tape above ground level to a height of 25-30 cm.
Foundation can and should be reinforced to increase its strength characteristics and protect against subsidence. You should also take care of waterproofing, so that in the future the structure can be used not only with a wooden frame and a film coating, but also, for example, with a metal frame and a polycarbonate coating.
DIY wooden greenhouse
Wood is a traditional material for Russia, and the ability to work with it is in our men’s blood. Therefore, problems should not arise during the manufacture of the frame. This is what it should look like:
Frame diagram
Photos of the step-by-step construction of a wooden greenhouse made of timber with your own hands are presented later in the article.

(Fig. 1 Scheme of a wooden greenhouse frame)
The design has a trapezoidal shape ( the most common and easiest to implement arched form). Please note: in the picture, the greenhouse has two ends, in one of which the entrance door will be installed in the future. For this purpose, the top board of the end wall will be cut. This is what the frame looks like in assembled form at the summer cottage:
Construction of a greenhouse on the site

(Fig. 1a Construction of a greenhouse on the site)
Step 1: Attaching the support beam to the foundation
Before thick timbers are attached to the foundation as a base for the frame, we recommend place a fine mesh netting under the future greenhouse to protect against moles and other rodents. A small mouse can cause a big commotion and scare you greatly with its sudden appearance. A few words about the supporting beam - it should be slightly wider than the one from which the frame itself will be made. It is also necessary pre-treat with antiseptic compounds. It is secured to the foundation using metal corners (they are installed at the pouring stage), anchor bolts, and reinforcement.
IMPORTANT! the base should be composed of a single piece of timber, and not of sections connected to each other. The stability of the future structure depends on this.
Step 2: Making the Wall
After the wooden base is attached to the foundation, we move on to assembling the frame and begin by constructing the wall. This is a rather labor-intensive process, especially for those who are doing this for the first time. However, if the material is of high quality and the measurements are taken accurately, installation is not difficult.
Assembled greenhouse wall

(Fig. 2 Greenhouse wall assembled)
In the picture in front of you is a diagram interior wall assembled (dimensions 5.4 x 1.5 m). As you can see, grooves were chosen for ease of assembly. They are not only more convenient, but also safer, since they increase the resistance of the finished frame to wind loads. To attach walls to other frame elements (rafters, vents, ceiling joists), you will need self-tapping screws, metal profile, corner, clamps. The number of walls with the above parameters is two.
Step 3: Arrangement of the rafter system
During production rafter system cannot do without grooves. Moreover, you will need more of them than for the walls. However, you should try to complete them all so that the roof plane is level and wind load for film coating was the smallest.
Now let's decide on the length of the rafter leg. If people of average height will use the greenhouse, its length should be 1.27 m. If you are tall, increase the length of the rafter leg to 1.35 cm.
Such precise numbers and strict restrictions may raise eyebrows. In fact, everything is simple: the width of the polyethylene film sleeve is 3 m, i.e., when unfolded, 6 m. Therefore, the sum of the lengths of two rafter legs and two racks should be about 5.8 m. This will allow you to get by with the amount of covering film 6 x 6 m, without residues and waste.
On one side of each pair of rafters a wooden corner (fastening part) and a crossbar are attached. The number of rafters corresponds to the number of racks. This is what a rafter pair looks like:
Rafters

(Fig. 3 Rafters)
Step 4: Installing the Ridge and Wind Boards
The rafter system is considered complete and acquires the specified strength only after installing the wind boards and roof ridge. They are attached at the very end and must certainly be made from solid timber(as well as the foundation bars for the frame). In the diagram below, these three boards are highlighted in dark brown:
Fastening solid material wind boards

(Fig. 4 Attaching solid material wind boards)
IMPORTANT! Horse and wind boards it is necessary not only to position it correctly, but also to carefully process (sharpen and sand) so that the area adjacent to them polyethylene film did not tear on a poorly prepared surface.
Step 5: installation of doors and windows
Since our greenhouse is small, only 5.4 m in length, one entrance door (at the end) and one window (at the same or opposite end) are enough for it.

(Fig. 5 Door and window)
You can see a very detailed and thorough construction of a greenhouse made of wooden beams in this video:
It is impossible not to mention another advantage of a wooden frame with a rafter roof system. The design allows you not to waste time and money on making trellises, but to tie plants directly to the rafters.
Without a greenhouse it is difficult to achieve a good harvest heat-loving vegetable crops. Despite the fact that today you can find a wide selection of ready-made sets of greenhouses and hotbeds on sale, interest in creating them yourself is growing year by year.
If you find an error, please highlight a piece of text and click Ctrl+Enter.
Assortment ready-made solutions for closed ground is represented mainly by products made of plastic or metal supports. Those who want to install a wooden structure on their site will have to make an effort and make a greenhouse with their own hands from wood or lumber. It is necessary to determine the optimal model, draw up a drawing, prepare materials and select the location of the building. Further construction technology depends on the type of foundation used and design features greenhouse
Advantages and disadvantages of timber frame greenhouses
Before building a wooden greenhouse made of polycarbonate or film-coated, it is necessary to evaluate the positive and negative characteristics wooden frames. In addition, you should decide in advance on the shape of the future structure, taking into account the dimensions of the site and the purpose of the building.
Greenhouse made of wood, "house" type
Types of wooden greenhouses
The variety of wooden greenhouses is classified according to three criteria:
- form;
- covering material;
- deepening into the ground.
Based on the configuration of the walls and roof, the following types of greenhouses are distinguished.
Gable. Buildings with straight sides resemble a house. The design is popular due to its versatility and practicality. Plus - the snow does not linger and does not create a load on the frame. The downside of the “house” is large heat losses through the north side.
A variation of the gable model is “Dutch” with inclined walls. This solution expands the area for planting crops.
Tent. Build round greenhouse made of wood is difficult due to the large number of parts and joining angles. Externally, the greenhouse looks impressive. The downside is that to rationally use the space you will have to create shaped beds or make shelving. Plus - good lighting throughout the day.

Tent shape made of wooden slats
Tunnel. Traditional modification of arched arches. Advantages of a semicircular vault:
- versatility - suitable for low-growing and tall crops;
- ease of maintenance;
- ease of shelter due to the absence of corners;
- uniform light distribution;

Spacious arched greenhouse made of wood
The main disadvantage is complexity self-assembly.
Single-pitch. One side of the greenhouse is the wall of a permanent building. Pros: compactness, accessibility and the ability to supply heat from the house. Cons: limited area and lighting.
Cover options for a modern wooden greenhouse made of wood:
- film - low price, rapid wear, condensation formation;
- glass - high thermal insulation and light transmittance, resistance to high temperatures, difficulty in installation and fragility;
- polycarbonate – strength, durability, flexibility, ease of installation.

Lean greenhouse near the wall of the house
A wooden polycarbonate greenhouse protects plants from UV rays.
The previously discussed modifications are of the ground type. Recessed buildings are winter thermos greenhouses that go 2-3 m underground. The main advantage is maintaining an optimal microclimate and saving heat.

Wooden greenhouse-thermos
What to consider when building a greenhouse
Despite the emergence of new materials, the demand for wood does not fall. Arguments in favor of a wooden greenhouse:
- availability of lumber;
- environmental friendliness - regardless of operating conditions, wood does not emit toxic or toxic fumes;
- ease of processing - no expensive equipment is required for assembly;
- sufficient margin of safety - untreated wood will last about 5 years, and a protected and well-maintained wooden frame will last more than 10 years.

Flower greenhouse made of wood and glass
However, we should not forget about the disadvantages of using wood to build a greenhouse:
- susceptibility to rotting;
- ease of ignition;
- difficulty in dismantling and moving to a new location;
- the appearance of shadows from wide beams and wooden beams.
To minimize the shortcomings of the building, it is necessary to competently approach the selection and pre-processing of wood.
Preparing for the construction of a wooden greenhouse
Initially, you should decide on a location, prepare lumber, develop a construction diagram and lay the foundation. The proposed drawings with photos will help you design and make a permanent structure from boards or timber.
Choosing a location for a greenhouse on the site
Before you build a greenhouse out of wood with your own hands, you need to choose the optimal location for the greenhouse. Ease of use, the possibility of supplying communications, the speed of ripening and the abundance of fruiting of vegetable, fruit or flower plantings depend on this.
A number of factors are taken into account:
- landscape of the area;
- soil characteristics;
- orientation to the cardinal points;
- proximity of communications.
Landscape characteristics. Experienced gardeners It is recommended to place the greenhouse:
- Closer to home. Newcomers try to move the greenhouse away so that it does not become an obstacle and take up space in the middle of the site. However, over time it becomes clear that maintenance is complicated, and the supply of communications is difficult due to the large distance from the house.
- On a flat base. If you have to install the greenhouse on a slope, then the surface will have to be leveled and soil will have to be poured into the recesses.

Flat area for building a greenhouse
Soil composition. A wooden structure cannot be placed on swampy and sandy soils - accumulating moisture will cause rapid deformation and rotting. Clay soil should be compacted with gravel, and a fertile layer of black soil should be poured on top.
Side orientation. Sufficient illumination of a wooden greenhouse is given priority. Optimal locations:
- east-west direction - for large farmland;
- north-south or east-west orientation - suitable for small buildings.

The main landmarks are the cardinal directions
Wind direction. The factor largely determines the heat loss inside the greenhouse. Cold gusts of wind increase heating costs in winter. It is necessary to study the wind rose diagram of the area and choose the calmest place.
Ways to reduce wind load:
- erection of a fence (up to 1.5 m high);
- attaching a wooden structure to the wall of a house.
Availability of communications. You need to think in advance about how to install electrical wiring and ensure the functioning of the water supply and heating systems.
Choosing wood for the frame
The optimal material for the construction of wooden greenhouses is larch. The structure of wood is characterized by high density, which determines its main qualities: strength and resistance to rotting. Over time, the material “hardens” rather than softening.
In addition to larch, pine and spruce are suitable types of coniferous wood for building a greenhouse. Pine timber is quite lightweight, withstands moisture, is commercially available and inexpensive. However, his mechanical strength inferior to larch, so the supporting beams and frames must be more massive.

Glued laminated larch beams - durable wood for construction
Spruce logs do not contain enough resins, so without proper antiseptic treatment putrefactive processes will quickly begin in the tree. Deciduous wood you can use: oak, teak, hornbeam and beech. The wood is very dense, so its processing is complicated and requires the use of carpentry machines.

Treated dried oak timber
To build a greenhouse from boards with your own hands, blanks for frames with a cross section of 50*50 are suitable if the width of the structure does not exceed 3 m. Spacious models up to 6 m are built from beams 80*80 mm or logs with a diameter of 70 mm.
Types of designs and drawings
The greenhouse design should show the main dimensions, places of fastening of elements and the general assembly diagram. When building a wooden greenhouse with your own hands, it is better to choose a gable or wall model - they are easier to implement.
The nuances of choosing the size of a building:
- The standard width is 2.5 m. Two parallel beds of 90 cm each are set up, and free space is allocated to the path.
- In a 3.8-4.3 m greenhouse, it will be possible to organize three ridges and two passages.
- The length of a wooden greenhouse is limited by the size of the plot.
- The height of the building above the passage is from 2 m, near the walls – 1.3-1.5 m (depending on the type of plants).
Possible solutions for a wooden frame.
Option 1. Standard gable model: width – 3 m, length – 4 m. Base – strip foundation made of brick.

Drawing of a gable model made of wood
Option 2. A greenhouse made of wood with a house with a plywood wedge for installing a transom.

Design with a transom according to the "Mitlider" type
Option 3. Recessed “thermos” with wooden frame. The width of the greenhouse is 2.85, the elevation above the ground is 130 cm, taking into account the height of the foundation.

Underground greenhouse-thermos
Option 4. Sloping lean-to with water heating from the house. The slope angle is 13°.

Wall-mounted model with heating
Option 5. Scheme for assembling and placing a film shelter on a wooden arched greenhouse. The width of the structure is up to 3 m, height – 2.2 m.

Assembly of an arched greenhouse made of wood and film
Wooden greenhouse foundation
It is unacceptable to install a wooden frame on the ground - the lower elements will quickly deteriorate due to dampness. Therefore, even for small and light wooden greenhouses, the construction of a foundation is mandatory. There are two options: columnar and strip base.
Columnar is erected from pipes filled with concrete, pieces of piles, bricks or reinforced concrete blocks. The pillars are installed at a distance of 1-1.2 m, and a timber frame is laid on them. For frame structures without strapping, a fundamental pillar is mounted under each vertical post.

Columnar brick foundation
Technology for laying strip foundations:
- Prepare the site: clear of debris, level.
- Apply markings according to the dimensions of the greenhouse. Determine the boundaries of the foundation - the width of the tape is 30-35 cm.
- Dig a trench 30 cm deep and fill the bottom with sand (10 cm).
- Install formwork from boards 2 cm thick, height 25 cm above ground level. Connect the side elements with ties and secure with jibs.
- Mark the fill line using a water level.
- Install a reinforcing belt made of rods with a diameter of 5-6 mm, the grid spacing is 20 cm.
- Fill the trench with concrete, leveling the surface according to the markings.

Prepared formwork from boards
Leave the foundation for 2-3 weeks; in hot weather, the concrete must be wetted periodically to prevent cracks from appearing. After removing the formwork, waterproof the strip base bitumen mastic or roofing felt.
Making a greenhouse with your own hands
Various types of structures can be erected on a prepared strip foundation wooden structures: greenhouses under film or modern polycarbonate shelter. To simplify the task and allow for transfer, a columnar base made of timber or blocks is used.
Wooden frame for film
Brick racks will serve as the foundation, followed by timber lining. All work can be divided into several stages.

Wooden frame for film
Stage 1. Fixing the supporting beam. Before building a wooden greenhouse with your own hands, the prepared lumber must be treated with an antiseptic compound, for example, Biosept. A solid beam with a cross section of 10*10 cm is used as the basis of the frame. It is not advisable to use pieces of wood for strapping - this reduces the stability of the future building.
Stage 2. Manufacturing of side walls. Cut the wooden elements according to the diagram: length - 5.4 m, height of the racks - 1.5 m, number of crossbars on one side - 9 pcs. Join the parts into a single sheet using grooves.

Wall panel assembly diagram
Connect the walls with rafters, doors and ceiling joists using self-tapping screws and metal corners.
Stage 3. Construction of the rafter system. The length of the rafters for the proposed greenhouse will be 1.27 m; for tall people, the value can be increased to 1.35 cm. The calculation is made in accordance with the size of the film covering 6 * 6 m.
Under the given conditions, the sum of two side posts and two rafter legs will be about 5.8 m, which means that it will be possible to do without waste and film residues.
A rafter pair is assembled from two racks, a wooden corner and a crossbar. The number of rafters is equal to the number of side posts - 9 pcs.

Assembling the rafter pair
Stage 4. Installation of the roof and door. Assembly order:
- Install rafter pairs.
- Attach the roof ridge and wind boards - the elements are made from solid wooden beams.
- Prepare the door frame and window frame.
Stage 5. Sheathing the frame. Stretch the film and distribute it over the frame mesh. To prevent the material from “sailing” in the wind, the film should be secured with wooden slats, packing tape or pieces of old linoleum - the clips are secured with staples or small nails.

Upholstery of a wooden frame with film
Greenhouse made of wood under polycarbonate
More difficult option– an insulated greenhouse made of polycarbonate and wood, built with your own hands. Base – tape concrete foundation, dimensions – 3.6 * 3.3 m, height above the aisle – 2.5 m.

Insulated polycarbonate building
- board – 100*50 mm;
- metal corner;
- polycarbonate;
- wall corrugated sheeting;
- plywood – thickness 12 mm;
- metal ridge;
- silicone sealant, wood antiseptic;
- door fittings.
Step 1. Laying the strip base (the technology is given above).
Step 2. Assembling the side, front and rear front walls. The side panel consists of 7 racks (850 mm) and parallel strapping of 3.590 m each. The elements are fastened with self-tapping screws.

Schematic design of the side
The rear wall includes 6 supports (850 mm), two trims - 3.1 m.

Rear wall drawing
Assemble the front side according to the sketch.

Front side design
Install all walls on the foundation, securing with anchor bolts. Fasten the parts together with metal corners and self-tapping screws.
Step 3. Installation of roof gables. Work progress:
- According to the drawing, cut out the details of the front and rear gables.
- Place the workpieces on a flat surface and fasten them with screws through mounting plates.
- Check the structure for strength and install it one by one on the erected frame.

Sketch of the front and rear gable
Step 4. Assembling the roof is performed in the following sequence:
- Installation of a wooden ridge beam 3,490 m long.
- Preparation of the lower and upper rafters.
- Connecting rafter elements to each other using plywood overlays.

Assembling the rafter system
Coat the wooden frame with paint and protective impregnation.
Step 5. Insulation and sheathing. Sew up the vertical sides of the greenhouse with corrugated sheets and insulate them from the inside thermal insulation material(foam or mineral wool).
Upper part cover the frame with wave or cellular polycarbonate. To fix the first option, figured wooden slats are used, the second is attached directly to the frame.

Sheathing with corrugated sheets and polycarbonate coating
Portable greenhouse on foundation blocks
To be able to transfer a wooden greenhouse, two conditions must be met:
- the most lightweight frame;
- arrangement of a “collapsible” foundation with fastening mortgages.

Option for a portable greenhouse made of wood
The foundation blocks will serve as such a base, on which a frame made of 150*150 mm wooden blocks will be mounted.
Construction technology:
- Dig a ditch 60 cm deep.
- Place a cushion in the trench from sand and gravel mixture.
- Lay concrete blocks around the perimeter of the structure, install embeds and fill with concrete.
- Prepare the strapping elements - treat the wood with a persistent antiseptic, cover the outer and lower parts of the beam with bitumen.
- Secure the harness frame to the mounting screws.
- Build a wooden frame and fix it to the base beam.
- Install jibs in the corners of the greenhouse. Coat all wooden parts with antiseptic.
- Make a template rafter and cut the rest according to its pattern.
- Assemble and install trusses and mount the ridge.
- Cover the frame of the greenhouse with film or polycarbonate sheets.

An example of using embeds in fundamental blocks
Wooden greenhouse made from window frames
A popular frame option for wooden greenhouses is old window frames. The performer is required to lay a solid foundation and securely fasten the improvised “skeleton” of the greenhouse.

Scheme of strapping and installation of frames
Algorithm of actions:
- Prepare materials. Remove the fittings, remove old layer paint, dismantle the glass temporarily so as not to damage it during the installation process. Cover gaps and cracks silicone sealant.
- Install a timber frame on the foundation and treat it with bitumen.
- Erect vertical posts from wooden beams 150*150 mm in the corners.
- The beams are additionally secured with lower and upper trim.
- Sequentially install the window frames, fixing them to the trim elements with self-tapping screws.
- Foam all gaps between transoms.
- For additional fixation with inside Nail the frames with supporting vertical bars.
- Erect rafter system, and cover the roof with film.
The step-by-step technology for assembling a greenhouse with your own hands is shown in the photo.

Fixing window frames and installing rafters
Video: building a greenhouse with a wooden frame
Videos clearly demonstrate the progress of construction work different types wooden greenhouses.
Video: Building a greenhouse with your own hands from wood and polyethylene
Video: Construction of a country greenhouse from window blocks
Video: Nuances of assembling a wooden frame, mounting the frame on a strip base
Homemade greenhouse made of wood - great option for the beginning summer resident. The construction of a simple gable or single-pitch model does not cause any difficulties. The main thing is to choose the right wood, process wooden blanks, build a foundation and adhere to assembly technology.
As you know, increasing productivity is the main task for any gardener. And here you cannot do without a normal greenhouse or greenhouse. But too expensive designs are not profitable, and cheap ones are not durable. The most acceptable option is wooden polycarbonate greenhouses.
Wood is the most the best option during the construction of such structures. The price of such a building is quite affordable for almost any owner. And most importantly, the structure pays for itself in an average of 1 season.
Gardeners, summer residents and, in general, people living on the land, at the everyday level, are excellent at using traditional plumbing and carpentry tools. This skill is quite enough for a greenhouse made of wood and polycarbonate, built with your own hands, to become your pride for many years.
Note! To be precise, a greenhouse is usually called a structure that has additional, artificial heating. The rest, similar structures, are correctly called greenhouses.
Choosing a site for construction

When making a greenhouse project made of wood, you should start with choosing a location.
We provide several tips that can act as instructions for...
- Naturally, the main requirement for placement is as much sunlight as possible.
- The second, important recommendation is that it is better to place rectangular buildings from north to south, along the longitudinal axis. With this orientation, the north wind is not scary for the greenhouse.
- It is also recommended to build closer to home.
- If the site already has outbuildings for tools, sand, sawdust, etc. Plan closer to them.
- If this is a dacha, with the traditional 6 acres, then there is not much space there and the structure can be attached to the house, but from the sunny side.
- A permanent wooden greenhouse next to trees is not appropriate, as they will grow and provide shade.

Let's start construction
When making a project for a wooden greenhouse, it is better to break everything down step by step so as not to get confused. This instruction will also be executed in the form of a step-by-step plan.
Laying the foundation
The frame of a greenhouse made of wood is a relatively lightweight structure; it does not require a powerful, permanent foundation. But we are considering a structure that should last at least 10 - 15 years, and for it a light but solid foundation is already desirable.
As a rule, a strip, strip-column or columnar type of foundation is laid.
In private construction, greenhouses 3m by 6m are more common. We will also take these dimensions as a basis.
- If your soils are fairly stable, . First, make markings using fishing line and pegs. Check the geometry by diagonals; if they are not the same, the structure will be crooked.
- Next, you should dig a trench about 30 cm deep if you chose the strip option and 20 cm if you are laying a strip-column foundation. Foundation width 20 – 30 cm.
- We put up the formwork, fill in a small pillow, 5 – 10 cm, from sand and crushed stone and compact it.
- Many people advise pouring a low foundation and laying several additional rows of brick on top. But we believe that it will be easier to lay a reinforced foundation higher, since as a result we get a monolithic concrete bath. It retains moisture better and you can even change the soil to black soil.
- Next, when you knit the reinforcement, insert vertical beacons from the reinforcement or anchor bolts at intervals of 1-1.5 m. For subsequent fastening of the harness.
Important: during installation of the reinforcing frame, corner connections should be made from bent, at 90˚, reinforcement bars. If you do it end-to-end, the corners may tear later.
- If the soil is not stable, make a strip-column foundation.
- The general perimeter is laid in the same way, but in the corners drill holes 1 - 1.2 m deep.
- Asbestos-cement pipes are inserted into the pits, or you can simply roll up a pipe from roofing material in several layers, insert it into the pit and reinforce it.

- Next, fill everything with the solution and wait for it to harden, which is about a month. In hot weather, water the foundation daily to prevent cracking.
- For columnar foundation It’s enough to drill holes in the corners, make a cushion, lay pipes, reinforce them, set up beacons for attaching the piping and fill it with concrete.

Making the strapping
- The frame is a base made of wooden beams on which the wooden frame for the greenhouse is based.
- Initially, for tying, you can take a profiled beam with a section of 100x100 mm. And knock it down with a monolithic, quadrangular structure.
- The connection at the corners is traditionally made in half a tree.
- If the timber is made from freshly sawn wood, it may subsequently move due to temperature changes. To avoid this, you can make a 100x100 mm timber for strapping by connecting two separate 100x50 timber with screws or nails.
- The option of prefabricated timber is also convenient because it can be assembled from short timbers, plus attaching a frame for a greenhouse made of wood, with such a base is much more convenient.
- Since the harness is the base of the entire structure and is in direct contact with the foundation. And in the absence of a foundation, directly with the ground. The timber must be processed.
- One of the most available options, saturate the wood with waste machine oil, as a result you will protect the base for another 10 - 15 years. Plus, the oil does not give off an odor, unlike creosote when using sleepers.
- Before installing the piping, waterproofing should be laid on the foundation, usually roofing felt with bitumen.
- We fasten the harness to the foundation using the reinforcement beacons left earlier in the foundation.

Installing walls
- The first thing to start with is installing corner posts. For them you can use 50x50 mm timber, this may be enough. But we advise making more powerful corner posts, making them in the form of a corner, connecting 2 beams, 100x50 and 50x50. In the long run it is more reliable. And then it is more convenient to attach such a corner to the base.
- Next, when making a wooden frame of the greenhouse from polycarbonate, you should connect the corner posts at the top with 50x50 timber. If possible, connect with a solid block and then install transverse vertical struts in increments of 50 - 70 cm.
- If there are no bars of the required length, do it gradually. Install vertical spacers and, sequentially, fill the top bar on them.
- You can make wooden frames separately and then assemble the walls like a construction set, a greenhouse from wooden frames, is convenient because, if necessary, it can be easily disassembled and it is convenient to carry out fragmentary repairs, but it requires more material, and as a result, it is more expensive.
- Two vertical supports for mounting doors are made at a distance of 80 cm; it is better to make them reinforced, from 2 planks, especially the support on which you plan to hang the doors. And don't forget on the opposite side for ventilation.
- There are vents in the side walls and roof, at your discretion, but each vent increases the cost of the structure.

Making a roof
How to make a wooden greenhouse is half the battle, we already know, now let’s move on to the roof.
- We will consider the traditional option gable roof, with a ridge at the top.
- The roof should be planned depending on the amount of snow in your area. If there is a lot of snow, do not spare material and make a roof with steeper slopes.

- If the winter is not very snowy, you can get by with a flat option.
- If your greenhouse is made of wooden frames, then the roof can also be made collapsible from wooden frames. Then it will be possible to remove the roof altogether for the winter.
- But there is a risk in collapsible wooden roofs; they can collapse over the winter.
- In any case, first we make the roof frame. A 50x50 mm block is quite suitable for this.
- We place the top beam first; we will mount the ridge of our roof on it. To do this, we knock down the rafters at the beginning of the structure and at the end.
- Next, if there is a solid block, we connect both structures.
- If there is no solid strip, then we stretch it between installed structures several strings of fishing line and along them, gradually, we build up the upper beam and install the roof rafters under it.
- For our 6 meter structure, lay 2 intermediate slats, 2m apart, between the side walls, horizontally at the top. Place a spacer on them in the middle under the top beam of the roof.
- Or you can simply install 2 wooden posts supporting the roof, if they do not interfere with you in the middle of the building.
- In the case where the roof will be assembled from frames on the ground and then laid in sections, you will need to make a gap between the ridge and rafters equal to the thickness of the frame.
- The frame, in this case, should be placed under the ridge and then attached to the side wall.

Sheathing with polycarbonate
Pay attention! Since we are building a greenhouse from wood, the polycarbonate for it must have a thickness of at least 4 mm. Plus standard sheet, 2.1m wide and 6m long. Must weigh at least 10kg. If less, then you are offered polycarbonate intended for other purposes.
You can attach sheets in different ways, but the most common way is this.

- The sheets are fastened using a special profile; it has the shape of a lying letter “H”. This profile has options for fastening directly to the supporting post and then polycarbonate is inserted into it. Or just end-to-end, between the sheets.
- The polycarbonate is closed at the end with a U-shaped profile. But between the sheet and the U-shaped profile, it is imperative to lay a vapor barrier tape. We categorically do not recommend using adhesive tape for these purposes, as there will be no air circulation and condensation will begin to settle.
Tip: in the end U-shaped profile you should drill ventilation holes in increments of 30 – 40 cm.

- Mount polycarbonate vertically to allow moisture to drain out.
- Polycarbonate sheets should be bent strictly perpendicular to the internal honeycombs, otherwise there is a high probability of the sheet breaking.
- To install sheets, you should purchase self-tapping screws equipped with sealing washers. Do not use ordinary self-tapping screws for wood. Water will get into the honeycombs and if frost hits, the sheet may tear.
- A special tape is placed between the polycarbonate sheet and the wooden stand for sealing.
- The holes for the screws need to be made a little larger than the screws themselves. For example, if you have 5 mm screws, then make the holes 6 mm. When heated, polycarbonate is slightly deformed and by making a reserve you give the opportunity to compensate for the shift of the sheet.
- Mounting holes should not be made too close to the edge of the sheet. The minimum distance from the edge is 40 mm. Otherwise, there is a high probability that the edge of the sheet may burst due to stress.
- Polycarbonate sheets should be cut with a regular construction knife. If you have a thick sheet, you can use a jigsaw, but after finishing the cut you should carefully shake out the sawdust from the honeycomb.

Conclusion
Now, dear reader, you have an idea of how to build a greenhouse out of wood, and with your own hands. As you can see, this is not difficult and is quite accessible to any person who has basic skills in working with plumbing and carpentry tools. And most importantly, it is a great pleasure from a large harvest that you will treat your family and friends to. Good luck to you.
The video presented in this article clearly shows how to build a lightweight greenhouse without a foundation.

Appearance of a polycarbonate greenhouse
At almost every dacha plot, the owners grow their own produce. But sometimes you want vegetables much earlier than they ripen outside. To speed up the ripening time of your favorite crops, greenhouses are used. You can purchase ready-made greenhouses, or create a structure yourself. In order for the premises to serve for a long time, pleasing the owners, it is necessary to carry out the construction in accordance with the instructions from specialists. Making a polycarbonate greenhouse with your own hands is quite simple, in just a few days, if you approach construction correctly.
Advantages of wooden greenhouses
Many people build structures using wood as the main material. In terms of costs it comes out cheaper than other components. Natural ingredients have always been considered more beneficial in terms of environmental friendliness.
Other positive aspects of wooden greenhouses:
- The work of connecting parts does not create any difficulties compared to other materials.
- It is convenient to secure the tree, and replacing parts if they are faulty is quick.
- The weight of the structure is small, but the stability is high.
- A greenhouse made of wood does not require special care, except for processing at the very beginning of wood construction special compounds from insect pests.
- Indoors, just like when using other materials, you can use automation for watering or other purposes.
- The design will have a pleasant appearance.
Construction of a greenhouse made of wood
To the greenhouse self-made served much longer, it is worth building a foundation before it is built. You can do without it, but if the greenhouse is large enough, has recesses or is in contact with the wall of the house, a foundation is required. A base is required if the room is located on a slope. The type of foundation is selected depending on the preferences of the owners. For longevity, you need to choose the right wood.
The best option is larch. The tree is resistant to moisture and is practically not attacked by insects and fungi. In addition, this rock becomes stronger over time, so in a few years the greenhouse will only become stronger. There is only one drawback: the high cost of the material. Oak is also good in its characteristics; it can be softer or harder, depending on the species. The price is also extremely high, which is why this wood is rarely used. 
Pine is often used for construction. It is optimal if you compare price and quality. Resistance to moisture, fungi, high strength. It will be necessary to periodically treat the wood with special compounds so that it is not exposed to external influences. The price is not that high, so purchasing the material is completely justified.
You can use spruce instead of pine. The characteristics are similar, but the latter is very soft, so it will not be possible to construct a large structure. A small greenhouse, up to 7m2 in area, can easily be tolerated by a tree. You cannot use birch or aspen. They quickly rot and warp when humidity rises.
Design and start of construction of a greenhouse
Before construction begins, it is necessary to complete a greenhouse design. To begin with, you need to choose a shape and a place where it will be located. There are several factors to consider:
- Location of the area where construction is taking place.
- The length and width of the area that is planned to be used for a greenhouse.
- The strength of wind and snow on the terrain. Depending on the loads, the type of roof is selected.
On the sketch you can indicate the dimensions of the structure and approximate data. 
After completing the sketch, drawings are drawn up. Everything must be calculated correctly, all necessary dimensions must be set, and fastener locations must be established. 
It is necessary to compose everything together, then divide the structure into its component parts: a separate diagram of the roof and frame is made from different angles, and data for individual components is indicated. 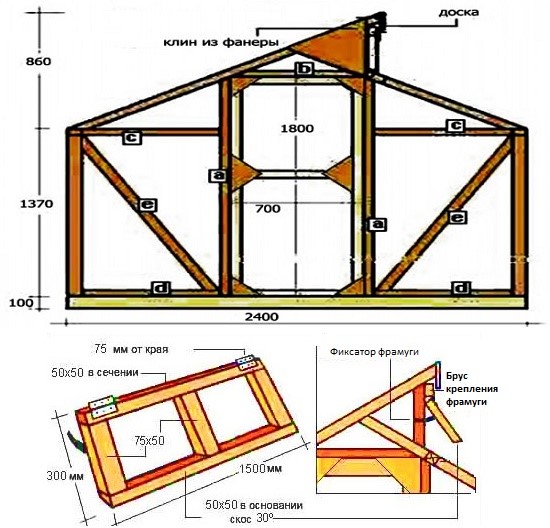
Bottom of the greenhouse
If you make a structure without a foundation, the foundation is laid out first. To do this, use an 8x15 cm beam. There is no need to lay it on the ground. Scraps are screwed around the perimeter of the frame metal corner at a distance of about 60 cm, the harness is turned over so that the corners are located at the bottom. Next, the structure is trampled down so that the distance to the ground is reduced to 5 cm.
It is necessary to carry out work using building level to control the horizontal. If on initial stage the result will be a bevel, the whole structure will not be even. A do-it-yourself wooden greenhouse, drawings of which are given in the article, is the optimal medium-sized option for construction. 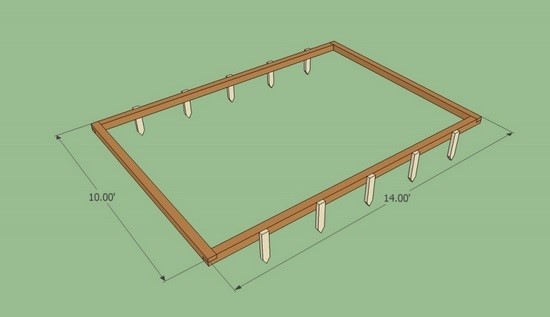
Next, the corner beams are installed. They are also controlled by a level and secured using corners or dowels. It is necessary to fix the racks so that they do not come loose. In the picture below this is done using wooden dowel. 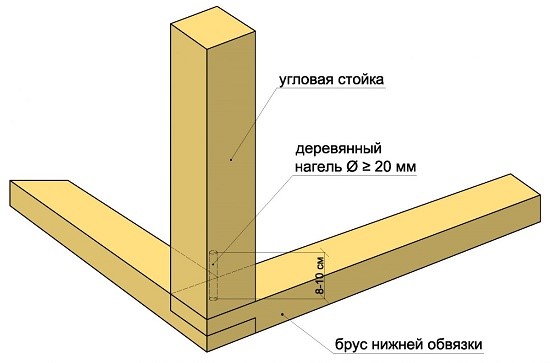
Next, temporary stands are inserted. They are joined using a notch, but after that it is necessary to secure them with the help of corners. 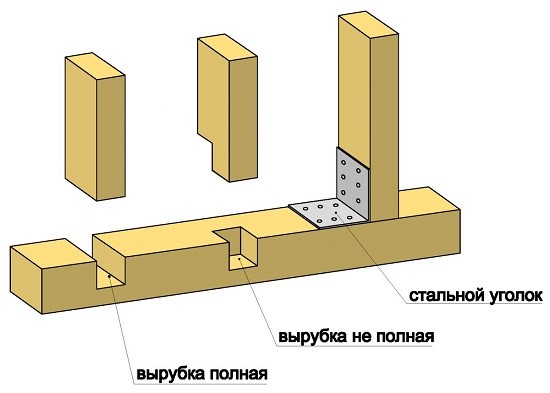
After this the installation is carried out top harness. It is done in exactly the same way as below, but the parts are joined by simply adjoining one to the other. Once the top is secured, the temporary fixation can be removed. 
Manufacturing of roofing, doors and windows
To make a roof, the rafters are first assembled. Then, using a corner, they are secured in the upper part, temporarily fixing them. 
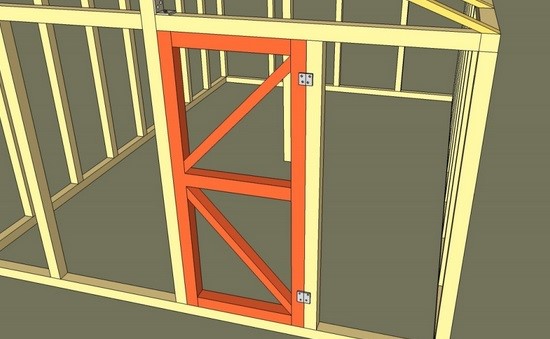
The door can be made very simply. A conventional frame, which is reinforced with several stiffening ribs. A pair of hinges are installed inside, which are hung on their second parts, fixed to the frame.
It is recommended to install many window frames on the roof. They are made from several parts, not separately, but directly on the roof. The picture shows how this is done. Next, hinges are installed on the frames where the transoms are secured. 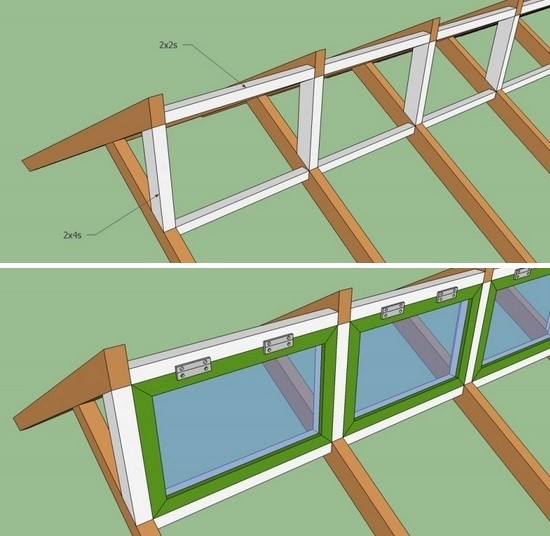
After the work has been done, it is necessary to strengthen the rigidity of the frame. To do this, additional triangles from boards are fixed on it. The resulting structure must be treated with a composition against microorganisms and moisture, and allowed to dry normally. 
The last step is to install the sheathing on the frame. It’s worth starting from the largest parts. Joints must only be in places where the boards pass. If the distance on the roof between the supports is large, you can perform additional lathing. The polycarbonate film is removed only after installation. Do not forget that polycarbonate sheets do not overlap.

The material must be mounted using special fasteners for this material. The edges are covered with special corners to provide protection from moisture and dirt. A do-it-yourself wooden greenhouse, the drawings of which were given in the material, is easy to manufacture and does not require special knowledge and skills in construction.