How to make an original alpine slide. Garden slides (42 photos): layout, size, shape and technology for constructing a rock garden
Today we will talk about one of the richest traditions in gardening and landscape design. Alpine slide or rock garden is beautiful composition from plants and stones garden plot. As you can easily guess from the name, this composition is created to imitate the picturesque slopes of the Alps - the central position is occupied by a rock, but it is all almost hidden by various tall and low plants (unlike a rockery, where the stones come to the foreground).
In this article you will learn how to make an alpine slide with your own hands and what plants are best suited for it. For your attention - step-by-step instructions and 35 photos!
Beautiful alpine slide in the country or in the garden
The creation of alpine slides today comes in a variety of styles and forms, including slides with artificial ponds and waterfalls. But the main secret of their attractiveness remains the combination of different plants that contrast with each other in height, color and leaf texture. Quite often, for a more expressive effect, a dwarf trees and shrubs, especially conifers. In general, the flowers and plants chosen are unpretentious, often found in the mountains. They like rocky soil and sunny places, need good drainage, but are not afraid of drought.

A small alpine slide is created with your own hands in several stages:
- Selection of plants and stones (actually thinking through the design of the slide);
- Selection of ideal drainage and soil;
- Directly creating an alpine slide at a dacha or on the site of a private house.
The best time to start this business is just mid-autumn. It is worth installing stones, filling up drainage and soil right now, so that over the winter they have time to “settle” and be ready for planting in the spring.
Plants for alpine hills: photos and names
As we said above, plants for an alpine hill should contrast and emphasize each other’s beauty. But so that your garden composition does not turn out to be clumsy and inharmonious, you should limit yourself to 3-5 types of plants and flowers.
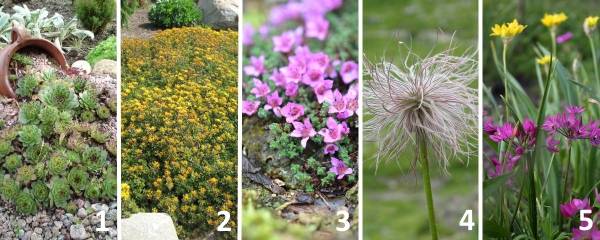
Here is an example of a popular combination of 5 alpine plants, which are widely used in gardening around the world:
- Molodilo is a perennial mountain plant with a pinkish-purple hue;
- Sedum 'Weichenstephaner Gold' is a plant with showy reddish stems that bears golden flowers in late summer;
- Saxifraga - fluffy low bushes with purple flowers(spring);
- Alpine lumbago - has attractively textured leaves and white flowers in spring followed by feathery fruit;
- Alliums are relatively tall flowers for an alpine hill with white, yellow or pink-violet petals.
If you want the alpine hill to transform throughout the season from spring to winter, then you can plant flowers on it that bloom in different times year.
Common spring- flowering plants for an alpine slide:
- Anemone is tender;
- Sieber saffron;
- The corydalis is dense;
- Iris;
- Cyclamen Caucasian;
- Grouse;
- Daffodils;
- Tulips;
- Mountain-loving onion;
- Colchicum and others.

Flowers for alpine hills that bloom in summer and autumn:
- Colchicum Agrippa;
- Autumn crocuses;
- Sternbergia yellow;
- Cloves and thyme;
- Saxifrage;
- Lumbago,
- Sedum.
All of them are quite unpretentious in care and easily take root in almost any soil. But, as elsewhere, the choice of soil and drainage for these plants has its own nuances, which we will discuss in more detail later.
How to make an alpine slide (step by step instructions)
You are already familiar with the main features of slides and plants for them, now it’s time to find out how you can make an alpine slide with your own hands.
Important point: Most alpine plants hate excess moisture. They tolerate summer heat much better than May thunderstorms. Therefore, you need to select in advance a suitable location and drainage for the alpine slide. Ideally, such a place could be the southern slope of an earthen embankment near your house or cottage.
High drainage will allow water to flow down the slope faster, and will also give plant roots good aeration and sufficient nutrients. Better drainage For your alpine slide, gravel, pumice, coarse sand or perlite can be used. Note that drainage and decorative stones should make up at least 50% of your rock garden, or even 90%.
As for the soil where you will plant the plants, there are no tricks here. Use the same soil that you have in your garden or garden, mixing it if possible with peat moss, rotted leaves, bark, compost or other organic amendment.
What you will need to make an alpine slide with your own hands:
- Container under the slide (if necessary);
- Large shovel for filling soil;
- A spatula or small spatula for planting;
- Crowbar for maneuvering heavy stones (if necessary);
- Drainage;
- Stones of all sizes;
- Priming;
- Compost;
- Plants for alpine hills.
By following the further step-by-step instructions, you can make a beautiful alpine slide in your country house or near a private house with your own hands.
Step 1: choosing a location for a rock garden
A rock garden can be built on level ground or on a slope. In the first case, you will either have to artificially create a small hill, or dig a downward slope, as in the photo below.

Alternatively, you can set up a miniature alpine garden in a stone trough, pot, garden vase or other container that has drainage holes. To prevent them from becoming clogged over time, they are filled with shards from old broken pots.
Step 2: cleaning the soil from weeds
This point must be completed if you use land from your own plot and do not buy it separately.
Step 3: laying the base and stones
Dig a hole at least 30 cm deep and lay a foundation of crushed stone or large stones in it. For reliability, the perimeter of the pit can be bricked (if you do not use large stones).

It should be filled, going from the largest “ingredients” to the smallest. A layer of gravel is laid on the crushed stone, then soil with compost. Small pebbles or mulch can also be used to decorate. top layer alpine slide.
Using several large rocks as a base for your alpine slide will allow you to use less gravel and other components in the future.

Step 4: backfilling of soil
When filling your alpine garden with soil, use some of the small rocks to create “pockets” for plants. They should resemble a horseshoe that will hold the soil and compost mixture. If possible, immediately mark these places with flags, since the top layer of the alpine slide - small pebbles or mulch - can hide them from your eyes.


Step 5: planting
Water the plant while it is still in its pot. Then remove it and carefully free some of the roots - especially if they are wrapped around a ball of soil. Place the plant in the planting pocket and cover the roots with soil. As a finishing touch, sprinkle small pebbles or sand on top, which will protect your DIY alpine slide from falling leaves and weeds.

Alpine slides (photo) - DIY landscape design
Finally, we invite you to take a look at some beautiful alpine slides in the photo. Who doesn't need a dose of inspiration to take on their own landscaping project? Thank you for reading Dekorin!


Also read: 


Also read: 


We will send the material to you by e-mail
A do-it-yourself alpine slide will help you create an original landscape design on the site of a suburban building. Step-by-step photos, diagrams and drawings will help you complete a high-quality project even in a day. Such structures are made using wild stones and unusual flowering crops. Carry out qualitatively installation work Certain rules will help, compliance with which will prevent alteration and disassembly of the created composition.
When installing a slide, you will need different stone blocks, sand mass, crushed stone and different types of perennial plants
First of all, you need to choose a suitable place for future alpine slides at your dacha with your own hands, photos of which can be viewed on the website. The best solution may be the choice of a site on the southwest or south side. A good option it is considered a place on a slope where low-growing crops can be planted among stones.
The basis for a small area can be a slope along the border of the territory or even along the edge. When choosing a space for a slide, it is worth considering the following factors:
- the slide must be visible from all sides, so this place must be open;
- the structure should be placed in a sunny and bright area where there are no tall trees;
- the structure is placed in a place isolated from the wind.

Useful information! When starting to build a structure, it is worth considering a suitable design style. Various landscape solutions involve the use of rocky gardens, ponds or bridges, which should be combined with a slide.
What time of year is suitable for creating a flower garden?
The work performed to install the slide practically does not depend on the time of year. It is not recommended to start work in winter time. The best period is considered to be autumn, when there is time before cleaning the area for the winter. A rocky structure after installation requires time for a certain shrinkage. After this, you can only start planting plants. If the plants are planted in the fall, then the construction of the main structure can begin in the spring. A high-quality alpine slide is created with your own hands using step-by-step photos and diagrams.

Features and rules when performing rock gardens
The rock garden is stylish decor dacha area. To decorate it, perennial plants are selected that have different flowering time periods.

When creating an alpine structure, you should follow the following tips:
- the structure is erected according to the project, which indicates the number of tiers and the placement of stones;
- is selected certain type stones and their placement;
- flowers are selected taking into account their blooming time, microclimate and color palette.
For your information! The Alpine hill is a small model of a real massif with undulating transitions from a rocky peak to flatter areas. It is important to respect the style of the structure, the size of its tiers, as well as the recreation of all conditions for mountain plants.

Related article:
Do-it-yourself Alpine slide: step-by-step photos, diagrams and construction features
Before starting work, landscape design is thought out. Do-it-yourself Alpine slides, photos of which can be seen in the photo gallery, require a special approach and a well-planned project. When choosing a suitable site for construction, the proximity of groundwater is important. If they are located close together, the strength and durability of the structure are threatened. The groundwater level is influenced by special drainage.

Soil and drainage preparation
To make a beautiful alpine slide with your own hands, step-by-step photo instructions and diagrams will help you complete the installation.


First of all, the drainage system is performed:
- To do this, dig a pit larger in size than the site;
- Before this stage, the terrain is marked, which is done using a coil of wire and special wedges;
- the height of the trench should not be less than 0.9 meters;
- the created depression is filled with crushed stone;
- the resulting layer is filled with water;
- then a sand and gravel composition is laid, which is compacted;
- the extracted layer of soil is cleaned and added on top of the constructed structure.
Stone laying can begin after the structure has settled. This may take about four months.
Useful advice! You can add crushed stone to the garden soil, and clay soil It's worth mixing sand.

How to place the stones?
An alpine slide is made from stones with your own hands. Step-by-step photos, diagrams and drawings will help you choose best project registration Before laying stones, it is worth preparing special mixture. In this case, coarse sand, loam from the garden and compost are used. Crushed gravel is also used.

A similar composition can be distributed over the drainage. After this, the mixture is moistened and trampled. Large stones are installed first, and then smaller ones. When constructing, you should use the following recommendations:
- layers of stones should be laid parallel;
- the upper stones must be installed on the lower blocks, but not on the soil, as this will cause the sculpture to skew;
- if you plan to plant plants with a powerful root system, then you should leave space between the blocks for them;
- voids should be filled with soil.

The stones must be laid so that the soil between them does not erode during heavy rainfall. Sandstones, limestones and basalt with granite are used in the construction of this structure. Experts do not recommend using shell rock or tuff.
Useful information! To retain moisture for plants, the surface of the rock garden can be sprinkled with gravel or stone chips.

Compacting the soil is a mandatory step before laying stones

Video: building a rock garden with your own hands
Do-it-yourself Alpine slides at the dacha: photos of the best compositions
Mountain structures can be used in various variations. Based on the photo you can choose the most interesting options:
- the composition of a valley in the highlands reflects the appearance of a high plateau, with large stones buried two-thirds into the soil and complemented by bushes of different heights and winding paths;

- large blocks are required when creating a rock cliff, in in this case dwarf fern is planted, mountain pine and juniper;

- if there is a slope, you can arrange a mountain slope, which is formed using dwarf pines and heather;

- the composition in the form of a gorge is characterized by complexity, while a landscape of different heights is used and the hillocks are lined with boulders;

- when constructing a ravine in a forest, a fontanel and perennials;

- if the area is constantly moist, then you can use a swamp composition, which is formed using a pond;

- An original solution is considered to be a cascading stream, along the banks of which primroses, ferns and irises are planted.

Useful information! The classic solution is a centric structure, in which bright flowers plants are combined with rocky elements. The basis is an area with natural elevation.
Do-it-yourself Alpine slide: step-by-step photos, diagrams of which are presented in this review, can be constructed using the following recommendations:
- the humped area is ideal for creating an unusual design;
- if cement is not used during construction, the structure can be reconstructed in the future;
- suitable height from 0.5 to 1.5 meters;
- limestone or sandstone is suitable for plants;
- It’s worth considering additional lighting.


With the help of a pond you can decorate any rock garden. Compliance with all the rules will allow you to create a stylish and original structure that will last for many years.
Thoughtful and stylish landscape plot with luxurious flower beds and rock gardens - the pride of the owner. The design of the territory is especially impressive if the alpine slide is made with your own hands. After all, most people are sure that such work can only be done professional designer. But in fact, with a little time, desire, as well as plants and the necessary materials, you can create an interesting rock garden.
A piece of the Alps on a summer cottage
The alpine slide in the country is becoming an increasingly popular decorative element for even small garden plots. After all, beautiful stone elevations look impressive and fit perfectly into any stylistic design of the space. Any alpine slide is a unique design object. There are certain rules for its creation, but the style, size, and features of the slides depend directly on the taste and creative idea creator. Probably even if you use it to create an alpine slide with your own hands step by step photos, two different designers will get different final options.
The base is stone. But not all piles of stones with vegetation growing among them are called alpine slides. There must be aesthetic appeal and harmony. There are several types of rock gardens:

DIY Alpine slides - where to start?
 Before you start directly creating a rock garden, you need to prepare for such work. After all, just based on photos, alpine slides in landscape design can be created quickly and easily with your own hands. The creation process is usually preceded by careful preparation, which includes several stages:
- We select a place for placement. The choice may fall on an uneven surface or a flat area if there are no natural irregularities. The size of the rock garden depends on the size of the plot. But it’s better if you can find a spacious and bright place to create a landscape design element.
- Sketch a sketch of the future rock garden. To do this, you can use a photo of alpine slides in the countryside, created by yourself. The sketch will help you ultimately get the result you originally expected.
- Buy everything necessary materials to create a slide. It is better to prepare stones, soil, plants and other decorative elements immediately so that work does not stop due to a lack of one or another component.
When choosing a location for the future rock garden, try to choose favorable angles. Such beauty cannot be hidden from everyone, it is important to show it off!
Choosing stones and plants for the rock garden
 Any alpine slide in the countryside is created with your own hands from several basic elements:

How to make an alpine slide yourself?
 So, everything is ready to create a beautiful rock garden. The most difficult thing remains - completing the slide on your own. In order for the result to soon delight you with its beauty, you need to follow simple recommendations:

When placing large boulders, be sure to leave some space between them, as the planted plants will need space to develop their root systems.
The best time to start creating an alpine slide with your own hands is in the fall. The soil will settle down over the winter, so in the spring it will be possible to fill up the voids that have arisen and plant plants. A competent approach will allow you to create a beautiful alpine hill in your garden.
Master class on creating an alpine slide - video
Secrets of successfully creating an alpine slide
 Each landscape designer has certain secrets that help him create stylish, spectacular and unique elements when designing a garden or park area. But all these nuances can be used by beginners. Just in the photo, a do-it-yourself alpine slide for beginners seems like a simple and laconic structure. In reality, it consists of selected elements, well-planned placement and several subtleties that help achieve a stunning appearance.
To make the first rock garden you created with your own hands look excellent, we share several secrets of its harmonious appearance:
- To create a hill, it is better to choose stones of the same type. Only in this case it is possible to achieve a natural appearance of the slide.
- The size of the stones should correspond to the area of the rock garden. The larger the size of the alpine slide, the larger boulders can be used.
- When choosing plants, preference is given to evergreen and low-growing species. In this case, the hill itself will not be lost in a few years behind the lush greenery of overgrown flowers and shrubs.
- They look ideal among stones, as well as cover and creeping species. It is better to choose flowering plants with small flowers that will not distract all attention.
- It is better to plant plants in small holes and cover them with soil and small stones. This will help prevent weed growth.
- Plants should be placed so that they do not block stone embankments.
Despite the fact that grass and flowers should not block the stones, in a rock garden the vegetation is always in the foreground.
 The choice of plants to create an alpine slide gives room for imagination, because this element of landscape design allows for a riot of colors, a variety of varieties, even a combination of opposites. Alpine slides imitate rocky areas, which are diverse in nature. The main thing is that the slide has a realistic appearance, and how steep, rocky and flowery its slopes will be depends only on the author’s imagination. And it is precisely this versatility that lies the very “zest” that has made alpine slides so popular in modern gardens.
We create an alpine slide ourselves - video
Alpine slide is a smaller copy of a mountainous area. Usually, in the central part of such a flowerbed, a cobblestone or several cobblestones are installed, which are a symbol of a mountain peak. Terraces are created on the slopes on which low-growing vegetation is planted.
In the natural environment, such areas are formed in the place where natural breaks appear rocks. Under the influence environment a fertile layer appears on them, on which plants subsequently grow. To recreate on your own garden territory or giving such a mountain landscape requires certain knowledge.
Suitable for such a large-scale structure as a rocky flower bed spacious plot. When building an alpine slide with your own hands, you should strive to ensure that the composition of vegetation and cobblestones looks naturally.
Video. Construction of an alpine slide
Making an alpine slide with your own hands
A hand-made alpine slide will decorate the entire local area. To decide on the design of your future rocky garden, you can study photographs of alpine slides. In order to create such a composition, you must adhere to certain rules and a certain order of work.

Step-by-step instructions for creating an alpine slide with your own hands
To begin with, determine the location. In order to do this, you need to pay attention to the lighting. An area that is illuminated for as long as possible is suitable for a rock garden. the sun. Also, the composition should be clearly visible from all sides.
- Designation base contour(sole) slides and removal of the top fertile layer to a depth of about 30 cm.
- Device drainage system . Bottom layer can be made from small gravel, pieces of brick, or, as a last resort, from construction waste. After this, a layer of sand about five centimeters thick is laid. A fertile layer of soil is laid on top of the sand. You can do without a drainage system if a slope with not too dense soil is chosen for arranging an alpine hill.
- At this stage we begin placement of stones And erection of the core slides. Of all the stones, the largest and most beautiful cobblestone is chosen. He will be the main one in the lower tier. The stone must be stable. To do this, you can add soil or gravel. The classic alpine slide at the dacha consists of an odd number of tiers. Moist soil is placed between these tiers, which must be compacted well.
Tip: when laying stones, you should avoid symmetry. You can leave spaces between the stones for planting or group stones next to each other. It is also necessary to immediately decide on support stones on which you can stand when caring for vegetation. They should be compacted and secured.
- Plant vegetation.
Plants for alpine hills - selection rules
Building an alpine slide with your own hands requires knowledge and certain skills. This especially applies to the choice of vegetation. First of all, you need to decide color palette rock garden. After this, you should draw a sketch of the future rocky garden. To follow up color scheme It is necessary to decorate the sections of the slide with the appropriate colors. Only after this can you start choosing a plant for an alpine hill for your dacha.

DIY Alpine slide. Photo
Look good short conifers . You can also use small shrubs, which bloom in spring and bear fruit in autumn.
Coniferous plants that are suitable for landscaping an alpine hill with your own hands
- dwarf spruce. This plant tolerates drought well;
- juniper. This unpretentious plant grows in shape like a cone. Foliage - green;
- thuja grows in the form of a bush. In good light it acquires a reddish-brown color;
- cypress- a plant with a golden top and a dark green base.
Deciduous plants for alpine hills
To garden an alpine hill with your own hands, you should not choose deciduous plant species. Since fallen leaves must be removed regularly so as not to harm other vegetation. The following plants are chosen for the slides:
- cotoneaster horizontal. This shrub with a dense crown has dark green foliage in the warm season, and by autumn it acquires a reddish tint. The plant blooms with small flowers;
- Iberis. A subshrub that does not lose its attractiveness throughout the season. The flowers, collected in umbrella-shaped brushes, are painted white, pink or purple. Later, fruits appear in their place in the form of pods;
- dryad. A miniature shrub blooming with large white flowers. The flowering period falls in July-August. Later, fruits of unusual shape appear in their place. They look like "fluffy balls".
Flowers for an alpine slide
To build a classic alpine slide with your own hands, use low, creeping, “carpet” plants. It is best to give preference to perennials. The following flowers can be used for landscaping:
- short-stemmed carnation. This low-growing, richly flowering plant with narrow gray-blue-green leaves is unpretentious. Suitable for landscaping open sunny areas;
- rock alyssum- a perennial whose leaves are gray-green. The peculiarity of this plant is that its leaves remain green even in winter. The multi-flowered panicle inflorescences contain small bright yellow leaves;
- looked younger- a perennial plant with a wide color palette of leaves. They can be green, silver, yellowish, pink, burgundy;
- saxifrage- traditional inhabitants of rock gardens. Flowering period is May-August. The five-petalled flowers are white, pink or yellow.
In order for the alpine hill at the dacha to delight you with its beauty every year, you should plant bulbous and corm flowers. Long-flowering crops are suitable to create a contrasting background. A well-groomed lawn will also be the ideal setting.
What to do if an alpine slide settles in the spring?
Sometimes an alpine slide made with a violation of construction technology can settle. There may be several reasons for this.
- Poorly chosen plot or lack drainage. It is better to arrange a rock garden on a natural hill or on an area with a slope. If the slide is placed on loamy or clayey soils, then it is necessary to make a drainage layer. For these purposes, you can use gravel or stones.
- Incorrectly selected substrate, vegetation And cobblestones. For an alpine slide with your own hands, it is better to choose the following mixture of soil: compost, sand and peat in equal proportions.

How to avoid flowerbed shrinkage
- take into account the slope of the site and soil type;
- make a drainage layer and allow the soil to subside in time;
- for planting, choose vegetation with strong rhizomes;
- correctly select vegetation, cobblestones and soil substrate;
- timely remove fallen leaves, dig up wilted plants, weed weeds.
Alpine slide made of conifers
To create rock gardens, not only traditional “Alpines” can be used, but also coniferous plants. Pines, thuja, shooting juniper, barberry, gray or Japanese spirea, and konica spruce are ideal for these purposes. IN classic version Only shrubs and trees should not be present. They should grow there in small numbers.
Stones for alpine slides
Natural flat cobblestones are suitable for such rocky gardens different sizes original form. You should also give preference to stones with a non-uniform surface, with all kinds of “inclusions”, recesses in which moss or small plant. Limestones, boulders, sandstones, granite, and slates look good.

Decorating an alpine slide with your own hands
Stones and vegetation are used to decorate the alpine slide. In order to position them correctly, you need to follow some recommendations, namely:
- they begin to lay stones from the bottom row, moving upward;
- for the top of the composition you need to choose the most beautiful cobblestone;
- for everyone large stone it is necessary to make a “foundation” from one to three flat stones;
- The stones should be laid in such a way that their tops are parallel to each other;
- several stones should be placed so that they can be walked on;
- after laying each row, lay a layer of earth, which is well compacted and spilled with water;
- The most beautiful cobblestone is installed at the top of the slide.
Rock garden and rock garden: differences and similarities
Rock garden and rock garden - two different ways flowerbed arrangements. A rockery is a flower bed of stones, most of which is occupied by stones of the same type. Cobblestones are laid parallel to each other or in random order. Chaotically placed stones imitate the natural environment. The rock garden also contains vegetation, but in the form of a background that plays a secondary role. In the alpine hill, bright vegetation comes to the fore.
DIY Alpine slide. Video instructions
Video. DIY Alpine slide
DIY Alpine slide. Video
Alpine slide with a waterfall. Video instructions
From this article you will learn how to build an alpine slide from available materials.
If the plot at your dacha is uneven, and the soil is poor and has stones, it can be beautifully arranged, moreover, without special costs- make an alpine slide. So where to start?
Where to start making an alpine slide?
Alpine slide.
Let's figure it out first what is an alpine slide. This is an artificial hill made of stones and earth, with flowering plants planted on it, which are typical of the Alps or Carpathians.
Recently, alpine slides and other styles:
- IN Japanese style , the hill is planted with Far Eastern plants
- In Mexican- cacti
The Alpine slide can be laid out in different ways:
- In the form of a stepped mountain slope
- Terraces
- Cliff
- Plateau
- 2 slides separated by a gorge
To make an alpine slide, it is important to adhere to the following criteria:
- Observe tiers (valley, 1, 2, 3 terraces)
- Presence of stones
- Plants should be planted short
- Contrast of plant species
The height of the slide can be from 1 to 3 m, depending on the size of the area on which the alpine slide will be created.
So that the slide will please you for a long time you, and you didn’t have to disassemble it before you had time to build it, you need consider the following factors:
- If you have a site in a lowland, and melt water stagnates for a long time after winter or rain, when building an alpine slide, you need to lay a thick layer of drainage so that excess water leaves and does not remain.
- To prevent the soil and stones on the slide from subsiding later, we carefully compact each layer poured during the construction of the slide.
- To prevent weeds from sprouting from below, from under the soil, before building a slide, we lay special geotextiles, and then drainage and sand, lay out stones, and fill them with soil.
- From moles and shrews that can destroy the slide, we save it with a fine-mesh galvanized steel mesh, laying it on geotextiles.
- The alpine slide is laid in such a place that it can be seen from different sides, it is advisable that there is a bench or canopy nearby.
- And if there is a hill, ravine or slope on your site, then you can arrange an alpine hill with a stream or waterfall.
- The contrast with the alpine hill is provided by a lawn or bushes, and if there is a fence nearby, then it needs to be hidden by climbing plants.
- If your alpine slide is varied - combining a rock, scree, and, for example, a terrace, then it will not get boring, and it will always be interesting to contemplate.
- To prevent the hill from being too colorful, no more than 5 plants differing in color are planted on it.
Stones


Suitable for alpine slides sharp stones (sandstone, granite, slate, limestone, dolomite). The slide should not be colorful, so we build it from 1-2 types of stones.
- We lay out granite, limestone and sandstone in the form of blocks and small pebbles, and sprinkle them with soil; the largest stone should be in the center.
- Clay and sandy shale are broken into tiles, and the hill can be laid out in the form of a terrace.
- If the alpine hill has a pond or stream, then you can lay out rounded pebbles along their banks, which can be found on the shore of the sea or river.
The simplest do-it-yourself Alpine slide in a country house or garden plot: step-by-step construction, diagram
There is not necessarily a lot of space for an alpine slide. The only thing is it is important that the new alpine slide fits into the existing landscape of your dacha.


To start laying an alpine slide you need to do the following:
- We draw the design of the future slide on paper and lay it out on the ground.
- We mark the location of the future alpine slide with pegs and fence it off with a cord.
- At the site of the slide, we first weed the grass, and then bayonet shovel, remove the top soil layer, 30-40 cm thick.
- We cover the resulting depression with fine-mesh metal mesh and geotextiles to prevent moles and weeds from getting through.
- We fill gravel, pebbles, crushed stone on top of the geotextile, broken brick(what is), 10 cm thick, compacted. This is necessary so that excess water drains away and the roots of the plants do not rot.
- On top of the large particles we pour small ones (sand), 5 cm thick, compact them and water them.
- We make soil for an alpine hill: we take chernozem soil, add sand, wood chips and pine bark, small crushed stone, peat, and mix everything. You cannot fertilize too much, otherwise the trees and bushes on the hill will grow large, and it will no longer be a hill, but a garden.
- We pour the resulting soil over the entire surface of the hill, and do not level it, but rather model “mountains”, “cliffs”, “valleys”, “paths” in a reduced form.
- Now we install stones on the hill and plant it with plants.


How to make and decorate a small mini alpine slide: diagram, description, photo

We start creating an alpine slide in early autumn. Before spring, when plants are planted, the stones and soil must settle.
The mini alpine slide will be about 1 m high.
Let's start making a mini slide:
- We mark the boundary of the future slide on the ground using pegs.
- We stretch the twine between the stakes.
- We tear off the grass and dig a pit 30-35 cm deep throughout the entire area, secured with twine, and cover it with a metal mesh with small cells and geotextiles.
- We make drainage: fill the bottom of the pit 10 cm with crushed stone and small pieces of broken brick.
- Pour coarse sand on top of the drainage, 10 cm thick, and water it so that there are no voids left.
- We install large stones, fill the space between them with crushed stone, and let it sit for about 1 month.
- We install smaller stones.
- Preparing soil for plants. We sort out the soil taken out of the pit, throw out the roots, and add to it an equal amount river sand and expanded clay.
- We fill all the spaces between the stones with soil, water them with a watering can so as not to wash out the soil, and leave them for the winter.
- In spring we plant plants.
How to make and decorate a beautiful flower alpine slide: diagram, description, photo
For alpine hills, choose unpretentious plants that bloom in spring, summer and autumn.


It's best to choose perennial plants with small flowers associated with mountains:
- Edelweiss, native to the Alps, grows up to 20 cm in height. Blooms in summer, June-July. Covers the slopes of the mountains.
- sedum- unpretentious hot pink or yellow flower. In the radius where it blooms, not a single weed will grow. Flowering occurs in autumn from September to October.
- Rejuvenated - fleshy green leaves, folded into a rosette, and resembling roses, and purple flowers, grow close to the ground, and reproduce by daughter rosettes. Blooms from July to September.
- Saxifrage in spring, with its small white flowers, it literally covers the ground like a rug. Prefers to grow in the shade.
- Lumbago or sleep-grass appears as one of the first flowers in spring.
- Small daisies different shades are able to decorate our rocky garden for almost the whole summer, since there are many varieties of these flowers.
- Early spring will delight us primrose lush foliage and flowers of different shades, you just need to take into account that it loves partial shade.
- Thrift alpine begins to bloom in June, the height of the bushes is up to 10 cm.
To prevent it from happening that there will be no flowers for a certain period of time, you need to draw up a diagram showing all the planned plants, indicating their flowering period.
In addition to flowering plants, miniature trees look beautiful: dwarf pine, spruce and cypress, as well as small shrubs: barberry, juniper, boxwood.

How to make and decorate an unusual alpine flower bed?


To plant an unusual alpine flower bed, you need to proceed as follows:
- At the very top of the hill we plant coniferous trees and bushes (dwarf pines, spruce, juniper, thuja).
- Below, between large stones, we plant plants with strong roots (irises, ferns).
- Then, in small holes, we plant flowers with a weak root system (armeria, edelweiss).
- IN narrow gaps Between the stones we will plant ferns, bluebells, and lumbago.
- To prevent the soil on the slopes from crumbling and eroding, we plant creeping plants (juvenile, star anise, phlox).
- Soapwort, lobelia, and bells will beautifully fall from the steep wall above.
- We plant bright flowers (tulips, poppies) near gray stones, and discreet flowers near bright stones.
- We separate some types of flowers from others with small stones.
- Climbing pyramidal plants look good next to plants with small flat inflorescences.
And so that the flowerbed slide looks good at night, we install storage lanterns between the stones; they accumulate light during the day and emit light at night.
How to make and decorate an alpine slide without stones or tires?
Alpine slide in a budget version - a slide made from tires. To make a hill from used tires, you will have to paint them with enamel or machine paint, and then stack them in a hill and plant plants.
Another option: do not paint the tires, but cover them with pebbles and plant flowers.
You can also make an alpine slide with ponds from old tires.


We build ponds:
- We select several tires of different sizes.
- We dig a pit according to the size of the largest wheel.
- We install the wheel in the pit and concrete the bottom.
- We cut off the upper part of the wheel with a jigsaw.
- Nearby, higher in level, we install a smaller wheel, concrete the bottom, and cut off the top with a jigsaw.
- We cover the inside walls of future ponds with waterproofing film, and line the outside with stones and pebbles.
- We install a pump to circulate water from one pond to another.
- We plant plants around that love moisture.
Using the same principle, by cutting small tires you can create a stream that flows into a pond.

How to make and decorate an alpine slide with a pond?


To build an alpine slide with a pond you need the following:
- We dig a pit about 0.5 m deep.
- We fill the bottom with sand, 0.1 m thick, and compact it.
- We lay geotextiles on the bottom, and on top of it waterproofing film(butyl rubber material). The service life of such film is 20-30 years.
- The entire pit should be covered with film and extend beyond it by 30-40 cm.
- We place stones along the edges of the pond so that the film is not visible anywhere.
- We fill the pond with water from a hose and spread the film in the water. The pond is ready.
How to make and decorate an alpine slide with a waterfall?
To build an alpine slide with a waterfall requires skill; a novice gardener will not be able to cope with this.

In order for the waterfall and pond to function correctly, the following nuances must be taken into account::
- Water should not seep into the ground
- To pump water for a waterfall, you need a pump, and accordingly you need to lay an electrical wire
- Plants need to be selected appropriately: dry-resistant at the top, moisture-loving along the banks
- The pond will need to be cleaned occasionally and the water drained in the winter.
A hole under the pond is dug along with the foundation of the slide. The depth of a pond for an alpine slide usually does not exceed 30 cm. A shallow pond is easier to clean, and pebbles are clearly visible in clear water.
- Only the part of the pond where the pump will be installed, with a power of up to 70 W, needs to be dug deeper. The pump is installed on a special stand, so it is less covered with silt, and so that it is not visible, it is covered with stones.
- At the same time, we lay an electrical cable to the top of the slide and check its safety.
- We extend the hose to the top of the slide and hide it between the stones.
- We lay the path where the water from the waterfall will flow with clay slate tiles in the form of steps.
- The following plants grow well near water: fern, fern, various mosses, annual flowering plants in flowerpots. It is advisable to take flowerpots of the same shade as the stones.
- It is advisable to place a waterfall with a pond on the north-eastern side of the site, so it will be in the shade for several hours a day, and the water will bloom less.
How to make and decorate an alpine rock garden from available materials?
Rockery is a garden of stones, plants and dwarf trees.
Rockery is not necessary alpine garden, it can be planted on flat surface and consist not of alpine plants, but of small ordinary ones.


There are 3 styles for recreating rockeries:
- Rockery in Japanese style, it is characterized by minimalism - a small number of stones with or without plants.
- Rockery in European style - a hill made of different stones, similar to a natural hill in temperate latitudes.
- Rockery in english style . It is characterized by the presence of a variety of evergreen plants.
It is important to remember that a rock garden cannot be built close to home. In winter, when snow slides off the roof, it can destroy fragile trees.
If you are arranging a rock garden and there is a fence nearby, you need to decorate it - plant it near it climbing plants, which will hide the fence.
We begin to lay a rock garden using improvised materials:
- Let's mark out the area for the future rock garden.
- We pull out all the weeds and grass.
- Remove 20 cm of soil with a shovel.
- For drainage, fill the entire space with a thin layer of crushed stone and small pieces of broken brick.
- On top of the drainage we pour soil consisting of garden soil, mixed with a small amount of sand and fine gravel.
- We take fairly large natural stones from your area on the side of the road or in a quarry, preferably the rock is of the same type, and bury them halfway into the ground.
- Small stones are also useful, we install them on large stones.
- First, we plant coniferous shrubs: dwarf spruce, thuja, juniper.
- Flowering plants need to be selected to bloom from spring to autumn: snowdrops, crocuses, tulips, phlox and others.
- To keep small stones in place, we plant saxifrage, juveniles, and sedums.
- All plants must be a suitable size (small).
- Additionally, we decorate the distances between the plantings by filling them with crushed stone.
- Next to the rock garden you can install a gazebo or a beautiful bench to relax and admire the beauty.
How to make a rocky hill from a large stone?


Suitable for the slide are those types of natural stones that do not weather, and from them salts and heavy metals will not pass into the soil. These could be stones that have been on your site or nearby for a long time: sandstone, limestone, granite, basalt, clay and sandy shale. Stones are needed, large and small.
If there are no stones nearby, you can collect them from a stone quarry.
Now we lay out the stones on the gravel bed:
- We start making the rocky hill from the bottom.
- First, we install the largest specimen of stone into the recess. If it wobbles, put crushed stone under it.
- We lay the rest of the stones from bottom to top, and deepen some. If the stones have any flaws, they need to be hidden by turning the stone so that it is not visible. We fill the distances between the stones with soil.
- In the upper part we install a sharp stone - the top of the mountain.
- The rocky hill should stand for about 1 month, less if possible, during which time the stones and soil will sag, and then it will be possible to plant plants.
Attention. When laying out the stones, you do not need to adhere to the same distance or size; the stones should be stacked in disorder, then the slide will look natural.
What to plant on an alpine hill?


Shrubs are planted on the alpine hill and perennial herbs . Plants on an alpine hill should be:
- Unpretentious
- short
- Perennial
Miniature trees and low-growing shrubs are suitable:
- Mountain and miniature pine
- Blue spruce
- Larch
- Barberry
- Korean fir
- Juniper
- cotoneaster
- Rhododendron
Perennial plants and herbs for alpine hills:
- Highlander
- Oregano
- Feather grass
- Heather
- Fescue
- Sheep evergreen
- Cuff
- Maned barley
- Fern
- Sagebrush
- Spurge
- Decorative cabbage
- Snowdrop
- Carnation
- Violet
- Chamomile
For an alpine slide you need to choose different plants, which will bloom all the time: from early spring to late autumn.
The brightest flowers are placed in the center of the slide.
Need for plants constantly look after: remove dried leaves, water, add soil if it has been washed out by rain.
Feed the plants need to Be careful not to use nitrogenous fertilizers, otherwise they will grow wildly, but we have an alpine slide.
Alpine slide with flowers, roses, juniper, moss: photo


- To create an alpine slide, they also use roses, But dwarf varieties : “Hummingbird”, “Meidi”, “Rosemary”, “Sonnenkind”. These varieties tolerate winter well, are resistant to disease, but love sunny areas and do not tolerate a lot of moisture.
- Delicate flowers, such as roses, go well with rough natural stone.
- Juniper also looks good in alpine hills along with roses. Alpine hill in a place unsuitable for cultivation
So, now we know how to arrange an alpine slide on our site.
Video: Pond with a waterfall - easy and cheap