Tools needed for the garage. Do-it-yourself garage accessories: all the most useful Do-it-yourself drill storage in the workshop
As soon as the owner of the house decides that it’s time to hang up the flower shelf that his wife has been reminding him so persistently for two months, it turns out that necessary tools gone somewhere. The situation is familiar, because usually hand tools, all these keys, hammers, screwdrivers, are stored so as not to be seen. We don’t use tools every day, of course, but the storage system needs to be organized correctly so that later we don’t have to look for, for example, a 12 key.
Storage options
Let's immediately decide that we will talk specifically about a workshop, which can be set up in a garage, a separate shed, summer kitchen, for enough spacious loggia or balcony. There are usually not many tools in the apartment, and the existing screwdrivers, hammer and pliers can be put in a specially designated box or bag, which can take place on the mezzanine or in the hallway.

If there are noticeably more hand tools, they need their own separate corner, in which you will have to put things in order. The main condition is that the place where the tools are stored must be dry, because metal parts They don't like moisture.
There are many benefits to a well-designed storage system. You will always know exactly what is and where it is, you won’t have to look for anything. If the tools are always in their place, you will remember in time that a month ago you gave your neighbor a nail puller that he needed for literally an hour. In addition, correctly positioned tools take up less space in the workshop, freeing up space for work.

First of all, you should decide whether you will buy ready-made shelves for tools, a metal mobile cabinet with drawers, or set up a workshop with your own hands from scratch. Let us immediately note that ready-made systems storage for hand tools They don’t always fit 100%; they often have to be remade to suit you.

Let's look at a few ideas for self-organizing the storage of hand tools in the workshop.
1. First of all, you should take care of the little things: nails, screws, bolts, which tend to get lost and scatter throughout the room. For their storage, you can adapt ordinary plastic bottles with the necks cut off, you can immediately see what is where. Small plastic boxes are also suitable, which are best labeled, noting that, for example, there are nails of a certain size here. It is convenient to place such containers for storing small items on a shelf above the desktop so as not to clutter it. But glass jars Should not be used in a workshop. There are too many heavy metal objects that could accidentally hit such a fragile container.


2. Magnet. Real craftsmen usually have a large magnet on their work table, to which small metal tools can be successfully attached. Now there are special magnetic surfaces and holders on which you can conveniently and easily store many tools and parts.

3. Plywood panel - the choice of old-school craftsmen. From pieces of bars on such a shield you can create an entire storage system that will not take up much space and will allow you to place almost all hand tools. The costs for such storage areas are minimal, and everything will be done according to the needs of the master.

4. You can also buy ready-made metal sheet with holes for tool holders. However, you can do this yourself. On ordinary nails or self-tapping screws in the right order saws, keys, and other tools are hung, the handles of which have special holes.

5. It is convenient to allocate separate storage for screwdrivers, for example, a regular school stand for pencils and pens.


6. You can adapt it to a small hand tool plastic boxes with compartments that are usually used in the kitchen for forks and spoons.
7. If you don’t really want to build panels and make shelves, you can move an old sideboard or buffet to the garage workshop. It has a lot of shelves and drawers where many tools can fit. The main thing is to lay everything out yourself so that you know exactly where the garden tools are stored and where the carpentry tools are stored.

8. For drills and bits of a certain size, it is better to buy a ready-made cradle - an insert with tools. Or drill holes in wooden beam, where the drills will go. And sign - 3, 4.5, 9 and so on, so that you immediately know the required size of the cutting tool.


9. When arranging storage areas in the workshop, you should take care of safety, especially if small children can get into the room. Piercing and cutting tools in this case, it is better to hang it higher on the wall, and keep chemical liquids securely in a cabinet with lockable doors.
10. A free-standing rack with holders for long handles of shovels and hoes is perfect for garden hand tools. Of course, you can just lean them against the wall, but remember the proverb about the same rake?

We state that organizing a workshop is not so difficult, it’s enough simple ideas many. Just prepare yourself for the fact that once you have to tinker in the garage a little longer, make some effort, but then there will always be something in your workshop strict order and there will definitely be no problems finding a screwdriver using a cross.
Almost every man has a set of tools in his home or garage. Therefore, it is worth keeping them in perfect order. A new review will tell you how best to do this. Surely everyone will be able to find in it examples of organizing storage space that interest him.
1. Plastic cans

Trimmed canisters are perfect for storing nails, screws, bolts and nuts. And in order not to dig around for a long time in search of what you need, it is better to label the containers.
2. Wooden shelf

Narrow wooden shelf with holes - a great place to store screwdrivers.
3. Stand

To prevent pliers from being scattered throughout the garage, make a special one for them. wooden stand.
4. Railing

A thin metal rod is perfect for hanging paint brushes.
5. Individual cells

From the leftovers PVC pipes You can make convenient cells for careful storage of small power tools.
6. Wooden shelving

Homemade wooden rack for storage wrenches will allow you to forget forever about the mess and tedious search for the right tool.
7. Open locker

An open wooden cabinet is perfect would be better suited for storage aerosol paints, which are most often randomly scattered in the garage.
8. Mobile stand

A small stand on wheels is perfect for storing hand tools. This rack is very compact and will always allow you to have the right tool at hand.
9. Wooden stand

A stylish wooden stand with a shelf, which is suitable for storing many of the most different instruments. Such a product will not only help organize hand tools, but will also become a real decoration for a man’s abode.
10. Homemade stand

An unnecessary pallet can be turned into convenient stand for storing garden tools, which often take up a lot of space in the garage.
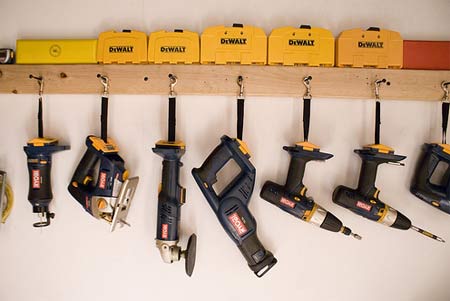
11. Hanger

Simple wooden block with metal hooks will forever solve the problem of storing power tools.
12. Clothes hangers

Simple manipulations with an ordinary clothes hanger will turn it into convenient organizer for storing electrical tape and adhesive tape.
13. Storage system

Forks, shovels, rakes, etc. gardening tools not very stable and also takes up a lot of space in the garage. Reliable wooden hooks on the walls will help you correctly place garden tools along the walls of your garage or shed.
14. Folding table

Homemade folding table made of wood and wall rack hand tool storage is a great idea for small garage owners.
15. Glass jars

Ordinary glass jars with metal lids are perfect for storing various small items. For greater convenience and reliability, the lids of the cans should be screwed to the shelves.
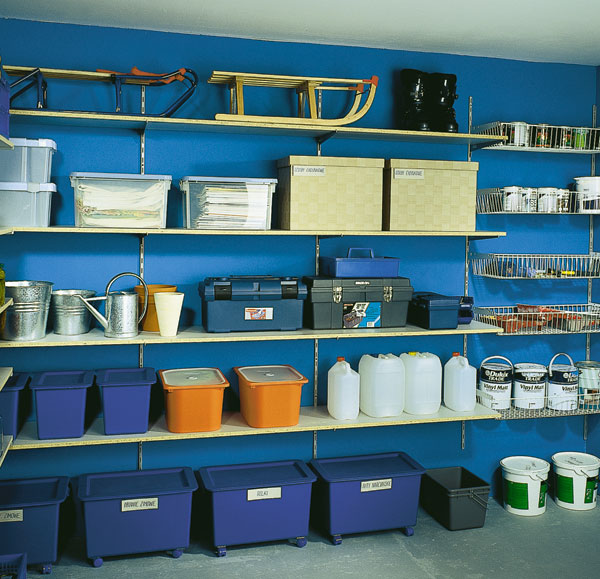
16. Vertical storage

The average garage looks quite cluttered. Will help solve this problem competent organization storage systems. Instead of another closet, equip the walls with various shelves and hooks, which will allow you to neatly place a variety of things, from tools to a huge boat and bicycles.
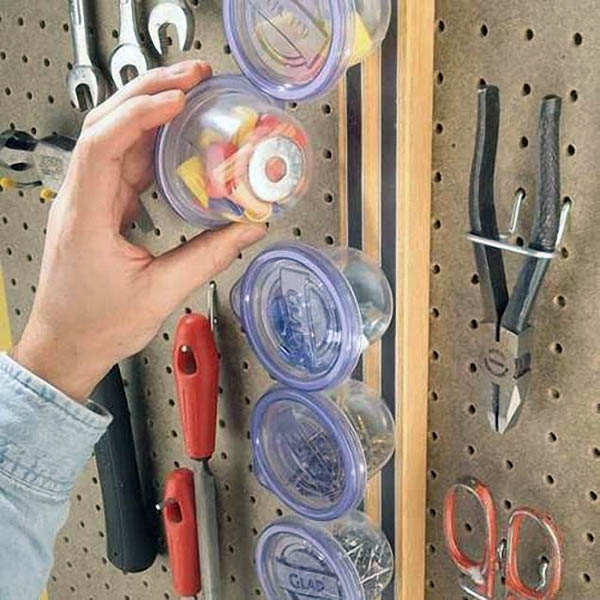
17. Magnets

Magnetic tape or individual small magnets - great idea for storing bits for screwdrivers, drills and other small metal parts.
Continuing the topic, we’ll tell you about anywhere.
Garage tools are indispensable items for every car owner. Quickly unscrew the bolts that secure the wheel, and then change it, drain and refill with fresh oil and antifreeze, even just clear snow or ice from the car windows - a tool that should always be at hand will help you do all this.
This includes gardening and construction equipment, often stored in such premises. This article offers recommendations on how to store tools in the garage correctly, and how to make some products with your own hands.
What tools are needed in the garage?
The garage is equipped with everything necessary based on the preferences of its owner. The specifics of performing repair or other types of work determine the presence of various equipment and tools in the garage. Despite the wide variety of jobs, it is advisable to have some garage tools in every room.
These include:
- Set of keys, better with a special ratchet.
- Set of heads.
- Screwdriver set.
- Pliers.
- Wire cutters.
- Round nose pliers.
- Torque wrench, which allows you to select the correct tightening torque and ensure high-quality fastening of the wheel, this is especially important when replacing it on a car.
- Set of mounts.
- Universal clamp.
- Retaining ring remover.
- Chisels.
- Magnet kit.
Makes it easier to do repair work also various electric and pneumatic tools.
These could be:
- Electric drill.
- Impact wrench.
- Bulgarian.
- Sander.
- Electric lift.
- Welding machine for complex repairs.
Car enthusiasts purchase many tools and devices at their own discretion, and some even make them themselves.
How to make a pipe bender
Owners of homestead farms often need to bend pipes or strips of metal, for example, when making their own greenhouse or laying a water supply system. There are many solutions to this problem. One of the options is shown in the photo.

To make a pipe bender you will need:
- Tree.
- Three polyurethane keel rollers for a boat trailer, which are fixed by goujons on the shafts to prevent rotation.
- Steel angles that hold the rolled pipe in a perpendicular position and prevent it from bending into a spiral.
- Stud and nut or threaded plate. These elements are needed to tighten the roller from below. Each time the pipe is rolled, the nut or threaded plate is tightened half a turn. If you need to make a bend of a small radius, but the circle is of the correct shape, you may need to make from 50 to 100 runs.
- Handle with bracket for rotating the pressure roller.

Pipe bender - bottom view
The order of work is as follows:
- Wooden blanks are cut out.
- Holes for the axles are drilled.
- Axles with rollers are assembled.
- Bearings for the axles are inserted into the vertical posts.
- The assembled units are mounted on the base of the pipe bender, and the guide angles are attached.
- Guide plates are fixed to the top of the base post.
- Going to upper part tool. A shaft with a roller and a handle are inserted, a pin or a long bolt is installed from below for the clamping nut.
When making a tool, special attention should be paid to the distance between the rollers. Each pipe has a minimum bend radius. The greater the distance between the rollers, the larger it will be.
In this case, less bending effort is required, and the end of the pipe will remain unrolled. The stroke of the pressure roller should be made as long as possible.
These points must be taken into account at the design stage and it is necessary to provide for the ability of the rollers to change their position if necessary. Therefore, in order for the pipe bender to be used repeatedly, the dimensions of the tool must be taken with some margin.
How to make a screw clamp
To attach a pipe bender to a workbench, as well as to perform other work, you will need various clamps. Price large quantity products different sizes quite high. Therefore, if you wish, you can make such designs yourself.
For making screw clamp you will need:
- Profile metal sheet, approximately 10 millimeters thick.
- Metal rod with M10 thread at one end.
- Several M10 nuts.
The manufacturing procedure includes:
- A bracket is marked on a sheet of metal. For this you can use finished product or prepare a template yourself, at your own discretion, taking into account the requirements of operating conditions and the required dimensions.
- The workpiece is being cut. In this case, it is better to use an acetylene torch or gas cutter.
- The edges are cleaned with an angle grinder and the burrs are removed.
- Several M10 nuts are welded on the smaller side of the bracket or a hexagonal rod up to 50 millimeters long with an M10 thread along the entire length in the center of the part.
- An M10 thread of the required length is cut on a round rod with a diameter of 10 millimeters.
- In progress protective coating All elements are coated with oil or nitro paint to protect against corrosion.

A homemade garage tool may have a more complex manufacturing process, which requires special equipment and skills.
Tip: Before use homemade instrument for a garage, you need to make sure of its quality, and most importantly, its reliability when working with it.
How to properly store tools in the garage
If it is quite difficult to make a tool for a garage with your own hands, then every owner of the premises can perform the correct and convenient placement of the tool in the garage.
In this case:
- For proper organization spaces where they will be located small details, you can equip several rows of long shelves along the wall (see), where you can then place garage tools.
- Large items are stacked in plastic containers, large capacity boxes or special boxes.
- Small fastening tool can be stored in homemade blocks using small food containers. A metal washer is glued to the bottom with superglue and attached to the wall through a strip with a magnetic strip.
- It is convenient to hang small tools available in the garage on hooks that are attached to a long wooden strip fixed to the wall.
- A special stand on the wall is perfect for storing frequently used tools.

- Metal brackets are made for hacksaws and bow saws, which can be nailed to the doors or screwed with small screws.
- Power tools in the garage are perfectly stored on racks (see) or shelves.

Tip: Store power tools in winter period should be in the packaging in which they are sold, these can be portable plastic boxes with a handle, which will protect the product from negative action moisture and mechanical damage.
- Garden tools with long handles can be attached to special metal hooks.
Tip: For mowers, wheelbarrows, concrete mixers and other large equipment special racks should not be made. And place metal hooks closer to the garage door.

- It is convenient to store a semi-automatic welding machine or another type of machine on a special cart. Its use has the following advantages:
- welding equipment is easy to deliver to the work site;
- there is a possibility to fix gas cylinder for welding, which does not have good stability;
- saving space in the room.

It is not at all difficult for a garage owner who knows how to handle welding to make such a design himself.
The video will show you how to secure the tool in the garage, correctly place different shelves, racks and other equipment to ensure convenient use of it. Convenient, serviceable and always at hand the necessary tool - comfort in the garage for any car owner.
The appearance of new equipment in a home workshop is always associated with a search for places to place it. In order not to constantly redo shelves or cabinets with your own hands, organize tool storage using a “flexible” system that allows you to change the location ready-made modules and easily add other blocks.
Start with beveled planks
The main elements of this universal system are horizontal slats:- Supporting, having a 45° bevel at the top edge and fixed to the wall.
- Suspended with a bevel on the bottom edge, mounted on removable panel or a locker.

Plan the placement of wall strips based on your needs. You can organize several levels of tool storage from floor to ceiling or use the space above the workbench by installing two or three support strips. Having decided on the total length of the slats, prepare flat lumber with a cross-section of 30x150 mm. Secure the boards to the workbench and position the disc circular saw at an angle of 45°.

Set the rip fence to 60mm to create different slats. Wider support strips will go to the walls, as they must withstand a greater load. For hanging individual components, narrower boards are sufficient.

Plan and sand the pieces, apply the finish, and install the wall pieces to the desired height. Align the boards horizontally and check that they are in the same plane. Use pads if necessary.

Tool storage various shapes Panels are better suited, and for equipment of the same type it is recommended to use shelf holders. Let us consider further examples of making such devices with our own hands.
Make a hanging panel
Lay out your tools on the table, leaving spaces between them. Take the dimensions of the future panel, taking into account the distance between the wall planks.
Cut out a rectangle of 5mm plywood with a hacksaw and cut boards with bevels along its width.

Assemble the hinged panel by fastening the parts with screws through countersinked guide holes.

Make markings for storing tools that can be hung on a pin.

Drill through the mounting holes and make recesses on the back side where the protruding nuts will interfere with the suspension.

Insert the studs with nuts into the holes and tighten the threaded connection.

You can also use bolts as pins, the heads of which will additionally hold the tool.

Having placed everything you need on the panel, hang it in place.

Add a hammer hanger
A homemade device for storing hammers consists of three parts: a holder, a block with a bevel and a backdrop.
First, determine the dimensions of the holder, depending on the dimensions of the hammers you have.

Cut a blank of the appropriate length and width from 12 mm birch plywood.

Mark the grooves on it and make through holes with a feather drill with a diameter the width of the cutout.

Saw straight lines and remove excess material. Sand the edges of the grooves with sandpaper screwed onto the tube.

This holder design is also suitable for storing pipe or rack clamps; you just need to calculate the dimensions of the cutouts and spaces of the holder bar.
Consider a convenient and accessible arrangement of tools and accessories. Store specialized accessories near the work areas where they are used. For example, planes are at the workbench, and next to the assembly table are clamps and screwdrivers. Inexpensive marking tools (rulers, pencils, squares, etc.) are useful to have in excess and store in different places so that they are always at hand.
As soon as the owner of the house decides that it’s time to hang up the flower shelf that his wife has been reminding him so persistently for two months, it turns out that the necessary tools have disappeared somewhere. The situation is familiar, because usually hand tools, all these keys, hammers, screwdrivers, are stored so as not to be seen. We don’t use tools every day, of course, but the storage system needs to be organized correctly so that later we don’t have to look for, for example, a 12 key.
Storage options
Let's immediately decide that we will talk specifically about a workshop, which can be set up in a garage, a detached shed, a summer kitchen, or on a fairly spacious loggia or balcony. There are usually not many tools in the apartment, and the existing screwdrivers, hammer and pliers can be put in a specially designated box or bag, which can take place on the mezzanine or in the hallway.
If there are noticeably more hand tools, they need their own separate corner, in which you will have to put things in order. The main condition is that the place where the tools are stored must be dry, because metal parts do not like moisture.
There are many benefits to a well-designed storage system. You will always know exactly what is and where it is, you won’t have to look for anything. If the tools are always in their place, you will remember in time that a month ago you gave your neighbor a nail puller that he needed for literally an hour. In addition, properly positioned tools take up less space in the workshop, freeing up space for work.
First of all, you should decide whether you will buy ready-made shelves for tools, a metal mobile cabinet with drawers, or set up a workshop with your own hands from scratch. Let us immediately note that ready-made storage systems for hand tools are not always 100% suitable; they often have to be remade to suit your needs.
Let's look at a few ideas for self-organizing the storage of hand tools in the workshop.
1. First of all, you should take care of the little things: nails, screws, bolts, which tend to get lost and scatter throughout the room. To store them, you can use ordinary plastic bottles with cut off necks - you can immediately see what is where. Small plastic boxes are also suitable, which are best labeled, noting that, for example, there are nails of a certain size here. It is convenient to place such containers for storing small items on a shelf above the desktop so as not to clutter it. But glass jars should not be used in the workshop. There are too many heavy metal objects that could accidentally hit such a fragile container.
2. Magnet. Real craftsmen usually have a large magnet on their work table, to which small metal tools can be successfully attached. Now there are special magnetic surfaces and holders on which you can conveniently and easily store many tools and parts.
3. Plywood panel - the choice of old-school craftsmen. From pieces of bars on such a shield you can create an entire storage system that will not take up much space and will allow you to place almost all hand tools. The costs for such storage areas are minimal, and everything will be done according to the needs of the master.
4. You can also buy a ready-made metal sheet with holes for tool holders. However, you can do this yourself. Saws, keys, and other tools with special holes in the handles are hung on ordinary nails or self-tapping screws in the required order.
5. It is convenient to allocate separate storage for screwdrivers, for example, a regular school stand for pencils and pens.
6. Plastic boxes with compartments, which in the kitchen are usually used for forks and spoons, can also be adapted for small hand tools.
7. If you don’t really want to build panels and make shelves, you can move an old sideboard or buffet to the garage workshop. It has a lot of shelves and drawers where many tools can fit. The main thing is to lay everything out yourself so that you know exactly where the garden tools are stored and where the carpentry tools are stored.
8. For drills and bits of a certain size, it is better to buy a ready-made cradle - an insert with tools. Or drill holes in a wooden beam where the drills will fit. And sign - 3, 4.5, 9 and so on, so that you immediately know the required size of the cutting tool.
9. When arranging storage areas in the workshop, you should take care of safety, especially if small children can get into the room. In this case, it is better to hang piercing and cutting tools higher on the wall, and chemical liquids to be securely locked in a cabinet with lockable doors.
10. A free-standing rack with holders for long handles of shovels and hoes is perfect for garden hand tools. Of course, you can just lean them against the wall, but remember the proverb about the same rake?
Let us state that organizing a workshop is not that difficult; there are plenty of simple ideas. Just prepare yourself for the fact that once you will have to tinker in the garage a little longer and make an effort, but then there will always be strict order in your workshop and there will definitely be no problems with finding a screwdriver using a cross.