DIY lamp in a jar. To create a lamp you will need
Today, handmade ideas - crafts - are becoming more and more widespread. self made based on your own creativity. By making a thing with his own hands, the author embodies his ideas, immediately receiving the result of his work, which gives a feeling of satisfaction and generates new feelings of inspiration. If you don’t find what you need on sale, but really want to have it, start creating yourself and realizing your ideas. Creative inspiration helps to turn an old, discarded item into a unique product, in a single copy, reflecting the individual taste of its owner.
One of the handmade ideas was the creation of objects that create comfort and a unique atmosphere of the home. So, despite the abundance of lamps and chandeliers of various configurations in stores, there are many unique and original devices lighting is made by home craftsmen. These include making a lampshade with your own hands from an ordinary jar. The resulting lamps are used to decorate interiors and perform their direct functions, both in a private house and in an apartment.
Most suitable material Glass jars are used to make lampshades at home. Glass is a wonderful material. It can be easily painted and decorated with various elements, which makes it possible to create an elegant and stylish lighting device.
Each of us has household Empty glass jars stand idle. Making a beautiful lampshade or combination of lamps from them is a great goal for any home craftsman.
Making a lampshade from an ordinary glass jar
Let's consider making a lampshade from a can using light bulb. For lampshades with electric lamps, glass jars with a screw-on metal lid are suitable. The jars can be of different sizes, as long as they fit the lamp. For lamps without electricity, simpler jars without threads are also suitable.
During the work we will need:
- glass jar with thread and matching iron cover,
- electric lamp,
- cartridge with electric wire,
- jute or cotton rope,
- transparent glue that can stick the rope to the glass.
You can choose a jar of a non-standard shape, which will give the product original look and will decorate any interior.
Important! It is better not to use an incandescent lamp. You need to choose light bulbs with minimal heating. You can use modern energy-efficient lamps. They heat up less and shine brightly. You can replace them with fluorescent or halogen ones. LED lamps are also suitable.
Tools you will need:
- to cut a hole in the lid - a drill with drills;
- pencil;
Stages of making a lampshade:
We mark on the cover the future hole for the lamp socket. Place the jar lid on a table or other flat place. We place a screw-on plug from the cartridge on its reverse side and carefully draw a circle around it with a pencil. internal hole stubs. The diameter of the resulting circle will be equal to the diameter of the cartridge.
In the tin lid we drill holes along the circle line, the more often the better.
- Squeeze out the center from the outside to the inside. If necessary, make cuts with a knife.
- We insert the cartridge into the hole in the cover and secure it with a plug.
- Apply glue evenly to the jar and glue a rope to it, winding it in a spiral from the top of the jar. Carefully cut the ends of the rope at an oblique angle.

- We insert the lamp into the socket and screw the lid with the socket onto the jar.
The simplest lamp with homemade lampshade ready.
You can try to make a different pattern from the rope, use rope of two colors. The rope winding must be tight enough to allow the light from the lamp to diffuse.
Since we have a simple lampshade, we can use a frame old chandelier to create an updated composition with an original design solution.
Making a hanging lampshade from glass jars
To create such beauty, you will need:
- five glass jars with threaded lids;
- lids for jars;
- five hanging cords;
- corresponding lamps with sockets (5 pieces).
- rope of required length
We assemble five lampshades using the above algorithm. All that remains is to connect them to the electrical wiring, and a nice ceiling composition from pendant lamps will make you happy.

How to decorate glass jars for lampshades
Beautiful lampshades are made from glass jars, decorated according to the author’s imagination. Banks can be decorated:
- yarn;
- various decorative elements;
- salt;
- lace, embroidered napkins;
- paint.
Let's consider decoration using glass elements, one side of which is flat. They are sold in sets for decorating aquariums and decorating transparent vases.
We use a regular liter jar, but other sizes can be used.
You need to prepare:
- universal transparent glue;
- brushes for applying glue;
- glass elements;
- bright colored ribbon;
- round flat candle.
Wash the jar thoroughly and dry it. You can decorate the surface of a jar with glass either by covering the entire surface or by following a specific pattern. But in any case, the action plan is as follows:
- Using a brush, spread the glue thickly onto the outer wall of the jar;
- We glue decorative elements onto the glue;
- Let the glue set and harden.
Then we decorate the lamp with ribbon, wrapping it around top part containers and tied beautifully with a bow. This will give the finished lampshade an elegant look. Place a candle in the jar and light it. The edges of the glass elements will shimmer with sparks of light. From such lampshades you can build a chandelier or a simple garland on a shelf.
An easier option is to tightly wrap colored yarn around the jar and tie the ends. The yarn can also be glued with aerosol glue.
If you wrap the jar tightly with thread, rope, or glue simple paper patterns (the same snowflakes) to the walls, and paint the outside of the jars with spray paint, you will get an interesting effect.
For “winter motifs” we use salt
If you smear a container with glue and roll it in salt, a picturesque “snowy” decor will appear on it. To give the lampshade a tint, you can add a little dry coloring matter to the salt and stir the mixture.
You can apply glue to the walls of the jar and sprinkle with salt. In any case, dry the product for a couple of hours, after which we fan the container with a brush, getting rid of poorly adhered particles. The jar can be coated with layers of spray varnish. Allow 20 minutes between coats. The lampshade is ready!

Perfect for creating beautiful lampshade once fashionable patterned napkins from a glass jar, crocheted. From these you can create a whole collection of candlesticks in a matter of hours. The main thing here is to glue the napkin evenly, without wrinkles.
The remains of lace glued to the surface of the jar will add sophistication to a lampshade made from a jar.

You can tint a glass jar without using a spray or brush. Just pour it to the bottom of the container acrylic paint selected color (to a depth of about 5 cm), and slightly tilting it, begin to smoothly and slowly twist it. The paint will spread evenly inside the can, and a beautiful glossy effect will appear on the outside.
Lampshade in the form of a pendant
An original lampshade in the form of a pendant made of a beautiful thick rope not only perfectly diffuses light, but also looks nice in the interior of any apartment.
In principle, any rope is suitable for such a lampshade - thick, thin, cotton, jute. All of them can be woven into a beautiful pendant using ordinary glass containers.
To create a lampshade we will need:
- Braided ropes 6-8 meters long.
- Glass or tin jar.
- Balloon.
- Masking tape.
- White felt.
- Scissors.
- Glue gun and set of sticks.
- Spray paint.
- Lamp socket with cord.
- Step one. Inflated balloon place it in a jar and secure it to the walls of the jar with masking tape.
- Step two. We heat up the glue and glue a piece of felt around the edge of the rope so that its threads do not puff up. Cut the end at an acute angle.
- Step three. Starting from the bottom, wrap the rope around the can. We turn the pasted felt end so that the cut part looks up. Gently apply glue to each layer of rope using a gun. We make sure that no leaks form, as with outside, and from the inside out (can glue the rope to the can).
We braid the rope over the ball. Leave a hole for the cord.

- Step four. We pierce the ball. We process the end of the rope: glue a piece of felt onto it and cut it along the felt. Carefully place the end inside the lampshade and glue it to the inside of the pendant.
- Step five. Slowly and carefully remove the jar, pushing it out if necessary with a rolling pin or ruler.
- Step six. Painting. We cover the borders of the area we are going to paint with masking tape. On paper tape We don’t skimp, we glue it large plot and in several layers. The spray will spray widely, and the paint may saturate the material of the tape and stain the area of the rope underneath it.
- We leave our work to dry. Then remove the tape, paint the remaining areas of the lampshade if desired, and let them dry.
We thread the cord and cartridge into the hole. The lampshade is ready!

Lampshade made from tin cans
You can also make a lampshade from tin cans. Containers for beer, coffee, and various drinks are useful for these purposes. Even tin cans can be used for small lamps. If we are going to make a chandelier, then we need to collect them so that there could be enough for the entire lampshade for the chandelier.
The advantages of these materials are:
- their availability,
- presence of a variety of shapes and sizes. So, tin cans are suitable for making a small lamp. To create chandeliers, large compositions where many “shades” are needed, it is recommended to use containers from fruit cocktails. A beer can will make a cute “shade” or night light;
- ease of material processing;
- short duration of time spent on creating the device;
- wide possibilities for creative decoration.
Tin containers can be used for the manufacture of:
- a kind of lampshade in the kitchen;
- lamp in any room of a private house;
- lampshade for a table lamp or floor lamp, wall lamp;
- lampshade in the form of a stylized tin form;
- a hanging lampshade attached to the ceiling in a house or outdoor terrace;
- ceiling composition with a lampshade made of aluminum or tin cans.

Almost any type of lighting fixture can be made from tin cans. You can create the decor of the lamp that will fit into the interior of the room according to your taste.
To work with tin containers, we will prepare following materials and tools.
Materials:
- tin cans;
- flexible wire for fastening devices and decorating them;
- round flat candles;
- paint or decorative elements to your taste.
Tools:
- metal scissors, knife or can opener;
- awl;
- drill with a set of drills.
Making a lampshade from a tin can
A simple option, its implementation will take no more than an hour. We take an ordinary tin can, for example, from under canned peas or corn. In addition to this, you will need:
- towel or piece of cloth;
- hammer;
- nails;
- adhesive tape;
- sheet of paper;
- markers;
- candle.
Fill the jar completely with water and put it away freezer. The water should freeze in the container, which will avoid deformation of the can during further work with it.
While ice is forming in the jar, we make a template with a pattern. We use soft paper, cut it in length and width according to the dimensions of the circumference and height of the can, respectively.
We put the drawing on paper. We take into account that on the bank it will be in the form of small holes, which we will make in the bank according to the pattern of the drawing. We apply a drawing or ornament on paper with a pencil or marker.
We take out a jar of ice from the refrigerator and wrap it in paper with a pattern. We secure the paper with tape so that it cannot move. Place the container on a towel or rag, and carefully punch holes in the jar with nails or use a drill using different drills.
After we finish punching the pattern on the walls, place the container in warm water and allow the ice to finally melt.
After that, we bring beauty to the jar. You can use markers to draw a design on the walls, or you can paint the outside of the jar with acrylic paint of a suitable color.
We are waiting for the jar to dry completely. Place a candle at the bottom and light it. In the dark, the lampshade will glow beautifully and create a romantic illusion of a starry sky.
Lampshaded from tin can ready! To prevent the thin walls of the container and the bottom from overheating, place a porcelain or metal circle on the bottom under the candle for protection.
Holes on the thin walls of a tin can can also be made with an awl. The finished “shade” can be attached to a light bulb socket. Several of these lampshades will make a nice and original chandelier from tin cans.
Lampshade for table lamp
Using simple lids from aluminum beer or beverage cans, you can create interesting design lampshade for a floor lamp or table lamp. The design is reminiscent of chain mail and the device looks like an alien from the Middle Ages.
To make a table lamp, we use pull tabs from the lids of aluminum beer cans as a lampshade. One of the cans can be used as a leg for a tabletop lighting fixture.
The work flow is as follows:
- Using pliers, we separate the tabs and make cuts on each of them on top;
- Using the cuts, we intertwine the tabs with each other and combine them into a single fabric, bending the cuts with pliers. You can connect the parts together using thin and flexible wire.
- We cut out the bottom of the main can and place the lamp socket inside;
- We make a frame, attach “chain mail” to it, and attach the structure to the lamp leg.
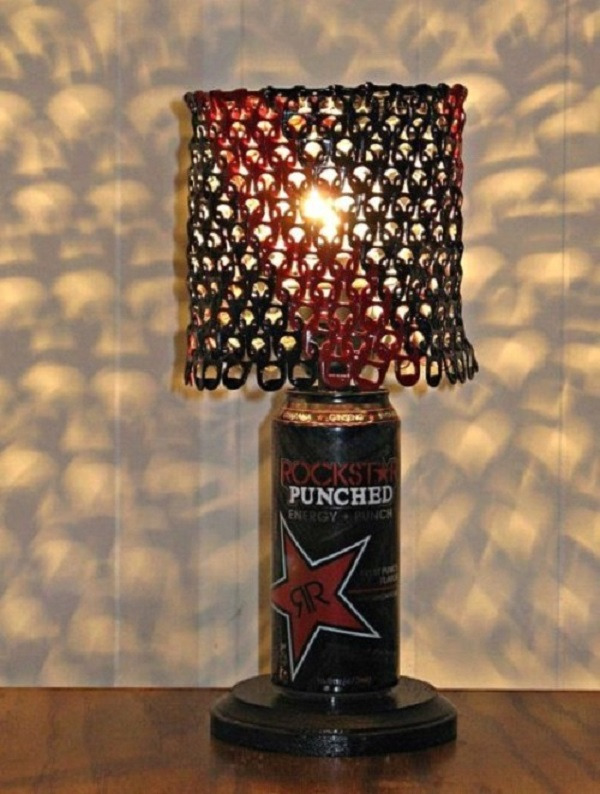
Aluminum can lampshade
You can try to make a beautiful thing from an ordinary aluminum drinks can.
To do this we use:
- jar;
- a thick and fairly long needle;
- candle.
Cut off the top of the can. Using a needle, we make slits in the jar along the contour of the design. We make cuts along the contours. Place a candle inside and light it.
As we see, from the ordinary glass containers, tin and aluminum cans, if desired, you can build beautiful lampshades and lamps, and create a variety of compositions from them. You can come up with your own and unique lampshade shapes using these items. We hope that our article helped you with this.
Lamp from a can
Today, there are simply a lot of different ideas for hand-made items, especially in terms of creating original and unique lighting fixtures. When creating your own lighting fixtures, you can use a wide variety of materials that are easy to find at home. In this article we will talk about creating lighting fixtures from tin cans.
Our master class will help you not only make a lamp from a tin can, but will also tell you how to design it yourself new look lighting device. Thanks to this, you can not only save money on buying a lighting fixture in a store, but also make something original and beautiful with your own hands.
Features of the material
To make a lamp with your own hands, you don’t need to buy it. expensive materials. You can even get by with a tin or beer can. Pay attention! In this situation, you need to use tin beer cans rather than plastic ones.
For small lamps, even tin cans can be used as a base. There is plenty of such goodness in the house, so it may be enough for a whole lampshade for a chandelier.
The main thing is to think everything through to the smallest detail. Special attention You should pay attention to the option of fastening the cans and their elements so that the lampshade you made yourself does not fall off on your head at a not very wonderful moment.
The advantages of using beer cans and cans are as follows:
- availability of material;
- presence of a wide variety of shapes and sizes. So, if you want to make a small lamp, use tin can. And for large appliances consisting of several “shades”, you can use cans of fruit cocktails. The beer mold will also make an excellent “shade light” or night light;
- ease of working with the material;
- the time spent on manufacturing the lighting fixture will be minimal;
- Extensive possibilities in terms of decoration to more correctly fit the product into the interior of the room.

Material for work
Lamps made from beer cans can be used in the following situations:
- lighting for picnics and evening gatherings in nature;
- lighting the children's room at night;
- How original lampshade in the kitchen;
- lighting fixture for any room in a private house.
As we see, even banks can get a second life in a completely new role.
Ideas for implementation
Using tins and tin cans you can make a wide variety of lamps:
- a portable table or floor lighting device that can easily be taken with you on an outdoor picnic or installed in a nursery as a night light;
- a wall lamp, the lampshade of which can be a stylized or decorated tin form;
- a hanging light source that will be attached using special fasteners to the ceiling in a house or outdoor gazebo;
- ceiling chandelier with a lampshade made of beer or tin cans.
Pay attention! A chandelier made from cans will be an excellent addition to the interior of a private country house.

Original lampshade
From these cans you can make any type of lighting fixture with your own hands. And the correct decor of the lamp will allow it to fit into the interior of any room.
What to work with
When you have decided what kind of lamp you will make from a beer can, you need to prepare everything necessary materials and tools. Without them, making such a lighting device with your own hands will be very problematic.
From the list of materials that you will almost certainly find at home, you will need:
- tin cans;
- wire for decorating jars or as a fastening element;
- candles. IN in this case It is better to use round flat candles. Their size is ideal for any shape size. Candles can be replaced with a small portable flashlight. This will make your lamp safer;
- scotch;
- paint or decorative elements for decorating jars. These can be various ropes, bows, appliqués, etc. It can also be a sketch of a drawing.

Decoration materials
In addition to the above materials, you will need the following tools:
- can, stationery opener or opener;
- screwdriver or awl;
- drill with a set of drills.
As you can see, the set is very simple and is likely to be found in its entirety in any home.
Execution options
Option No. 1. Lampshade made from cans.
You can make a beautiful and openwork lampshade as follows:
- clear the form of labels;
- cut off the top part of the product with a knife or opener;
- on the side edges we make marks according to the sketch of the drawing;
- Using the marks, we make holes with an awl or a screwdriver;
Pay attention! In order not to change the shape of the base, it should be compacted inside with paper.
- after this, the future lamp should be painted in desired color or decorate;
- then we attach the finished “shade” to the socket with the light bulb. Next, we repeat similar procedures for the remaining cans.

Ready lampshade
Option number 2. Table lamp.
With your own hands you can make not only a chandelier from a tin, but also table lamp. Here, as a lampshade, you need to use the reeds from aluminum beer cans. In this case, the can itself will serve as a leg for the future light source.
In this situation, it is necessary to act according to the following scheme:
- we prepare the sources for work - wash and dry them;
- we separate the tongues and combine them into a single fabric. To do this, we make cuts on top of them and weave them together;
- then we bend the cuts with pliers, tightly fixing the tabs to each other;
Pay attention! You can also fix the tongues together using thin wire.
- We cut off the bottom of the can and place the lamp socket inside;
- We attach the finished lampshade on top.

Ready-made device
Option number 3. Table lighting fixture.
This is the simplest manufacturing option. The instructions for assembling such a lighting device include the following stages of work:
- thoroughly wash the mold;
- Pour water into the prepared container and put it in the freezer overnight. The ice formed in this way will not allow the product to change shape while making holes on the side faces;
- transfer the sketch of the drawing to the side faces and make holes;
- place the product in hot water and dry;
- decorate the resulting product and place a flashlight or candle inside.

Ready-made device
You can make a lamp from a beer can or a tin quite easily yourself. At the same time, there are no restrictions regarding the shape and type of lighting fixture. Only your imagination and the number of cans will determine the final result of the work.
If, according to our instructions, you manage to make a lighting device, then in the future you will be able to make a more complex original design.
 Lamps in the form of flowers for stylish interior
 LED lamps with your own hands
With this simple master class you can make a simple and beautiful lamp from a jar with your own hands. We will take the most common and available materials, and we use a candle as a light element (although you can replace it with an LED if you wish). Even children and novice craftsmen can learn this lesson.
The idea of making a lamp from a jar should especially appeal to summer residents, because if you make a lot of these candlesticks and place them in a gazebo or on the terrace, your evenings will become romantic and very cozy. Also these homemade lamps will fit well into home interior. The obvious advantage of such an accessory is safety. Even if it turns over, the fire will not come out of the jar, but will simply go out.
What do we need?
- glass jar
- glass stones
- superglue
- candles
It is better to take a jar that is not too large. We recommend choosing a 0.5 liter container with a wide neck. Take flat candles, not long ones. Options with a metal candlestick, which most often come in sets of 6 or more pieces, are ideal. Before starting work, the jars need to be washed and dried.
Glass stones can be found in pet stores as stones for decorating aquariums. If this option does not suit you, look in the craft departments for glass or pearl half beads.
How to make a lamp?
It is most convenient to work with glass stones with tweezers. The easiest way is to coat the flat part of the bead with glue and then place it on the jar. If you have a glue gun, then it is convenient to apply glue to the jar, and then “sit” the decor on it.

When decorating a future lamp from a jar, we recommend moving from top to bottom. Make the layer below the neck first, gluing the glass stones as close together as possible. Bottom layer need to be done at a distance of approximately 0.5 cm from the bottom so that the lamp stands level.

Place a candle inside the jar. You don’t have to glue it, but simply put it on. To light candles, use only long matches. Take precautions when interacting with fire!
If you want to make the lamps pendant, drill the glass with a special drill or simply braid the neck with fireproof wire several times.
To make an LED glass light rather than a candle light, glue in inner part cans are a design that runs on batteries.

I really want to decorate my home or cottage with something special, made with love with my own hands. How great it would be if this decoration not only pleases the eye, but also brings benefits! A very simple way to diversify the monotony of everyday life and illuminate your evening is to make homemade lamps from cans and transparent decorative stones. It’s so easy to do that even a child can do it, and the effect will truly surprise you. After all, the light from the resulting lamps will shimmer beautifully and create bizarre effects.

You will need:
. glass" gems"(they can be purchased at a pet store; these are often used to decorate aquariums);
. glue gun;
. cans (it is better to use 0.5 liters);
. tea candles (according to the number of jars).

The first step is to coat one of the flat sides of each gemstone with glue.
Next, you need to attach the stones one by one to the surface of the jar. It is better to move from the bottom up and glue the pebbles as tightly as possible to each other so that they cover the jar with a dense layer.

The next step is to add tea lights. You just need to place them inside the resulting lamps and light them. In this case, it is better not to close the jar with a lid. The light coming from such a lamp is very warm, but not very bright. Perfect for decorating a room, veranda or garden, but not illuminating them.

To make the light brighter, you can use small battery-powered flashlights (sometimes they come in the shape of tealights). In this case, you can close the jar with a lid. Depending on the power of the light bulb, the brightness of the light may vary. If the lamp you are using is a lamp daylight, then the lamp will provide cooler and brighter lighting, more suitable for lighting small spaces.

Besides, decorative stones can be not only transparent (which we used), but also colored - green, blue, even red.

When using such pebbles, the achieved effect is very different. Because then the lamp produces a very interesting colored light. Also, multi-colored stones can be combined with each other, creating very interesting color combinations.

The Ferrari iPhone 4 case will help you not only decorate your phone, but also create an image for yourself. Here the brand name speaks for itself - a picture of a sports car instantly appears in your head, but Ferrari is not just a car brand, it is a lifestyle, fashionable, modern, active, high-quality, daring.
Readers have already become acquainted with numerous options for cozy candlesticks that you can make with your own hands from unnecessary glass jars of cream, coffee or homemade preparations. But you don’t have to stop there: within the framework of today’s fashionable eco-philosophy, you can use them to make both the usual chandeliers and lanterns, and a couple of ideas that do not require electricity at all. Well, shall we get started?
Night light without electricity
How to make an ordinary jar glow without a candle or light bulb? Maybe catch some fireflies and put them inside? - Not at all necessary! We take an ordinary 0.5 liter can and fill it with a highly carbonated drink (the authors of the master class posted on Youtube use “Mountain Dew” for these purposes). Add four teaspoons of regular baking soda, and then 12 teaspoons of 30% hydrogen peroxide. Close the jar and shake vigorously until it starts chemical reaction. The created substance is not explosive and glows very brightly in the dark. Thus, the old can, miraculously avoiding ending up in the trash, turns into a garden lantern or a romantic night light.
It must be admitted that not everyone can achieve the trick described above: there is an opinion that a lot depends on the composition of the sparkling water used (even the same brand of product is produced in our country using different recipes and technologies than in America or Europe). In case of failure, there is another simple recipe with which you can get luminous water at home. True, it requires more components: 20 ml of plain water, a little washing powder, 10 ml of hydrogen peroxide (3%), 5 ml of luminol solution (3%), several crystals of potassium permanganate and, of course, unnecessary glass containers.
Can chandelier
Architecture and design studio "Aidia Studio" presented its large-scale installation called "Milkywave" at the annual exhibition "Beijing Design Week" in Kitwe. This unusual art piece consists of 1,664 yogurt bottles, which are standard containers in any Beijing neighborhood and litter the city's streets along with many other discarded bottles and cans. Each of them is equipped with a light bulb and placed on different levels huge pendant lamp.
At home, you can make something smaller and simpler - but no less original. This good way emphasize your “green” thinking and draw the attention of guests to the opportunity reuse materials. It would seem like just household waste - but it looks luxurious!
Making a chandelier from glass jars is quite simple, but only jars with screw-on lids are suitable for this purpose. It will be necessary to drill holes in the covers for the wire and place required quantity cans in accordance with the chosen composition (bouquet, circle, spiral, etc.)
Banks can also be decorated in the same way as we talked about in the first part of the master class: paint them with stained glass paints or acrylics, apply patterns, or make individual inscriptions and patterns using glue gun. Finally, you can pour colored water into the bottom of each jar (about a third of its volume), as suggested by Italian designer Tommaso Guerra, and thus obtain the desired shade of light. Beautiful, functional and even shocking - but why not?
Oil lamp and matches container
You can even make oil lamps from glass jars (for emergency situations). Fill two-thirds of the jar (you can also take a bottle) with kerosene and close the lid. We place the rope inside and leave it for an hour until it is saturated with flammable liquid. Then we make a hole in the lid and pass a rope through it and, if necessary, light it. Speaking of matches: they can also be stored in a small jar by covering the outer surface of the lid with grater paper.
Garland in a jar
Approaching New Year- which means that soon we will be extracting multi-colored garlands from the depths of the mezzanine. As it turned out, they look good in company with glass jars. You can place the entire wire inside and place such a lamp near the outlet. And to get the effect as in the photo you will also need a strong rope or cord that will serve as a support for the entire structure. Don't forget about additional decor!