Installation of plastic slopes. How to make slopes with your own hands? How to make slopes on windows using plaster
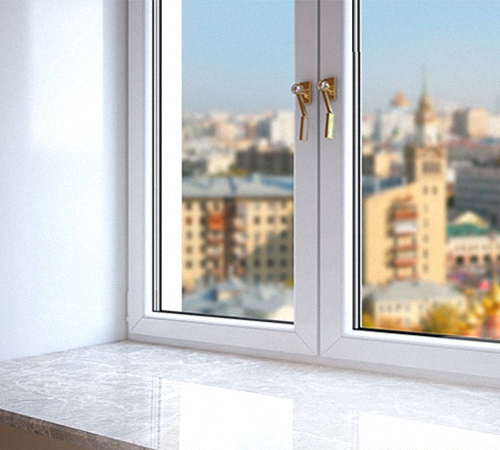
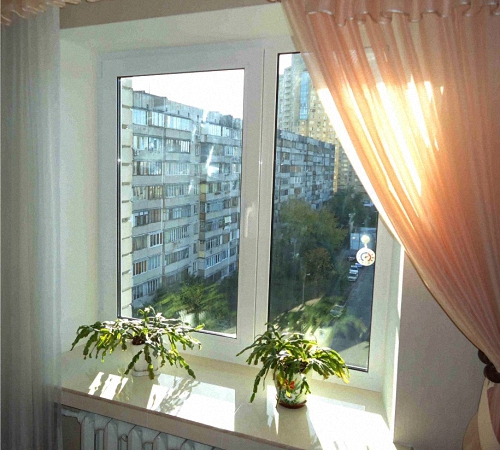
Important stage installations plastic windows- registration window openings. Slopes for plastic windows are made from the same material as the windows, or they are finished in a different way. However, nothing harmonizes better with the appearance of white PVC windows than carefully installed plastic slopes, hiding all defects in window openings, mounting foam and fasteners. Well-designed slopes give the windows an aesthetically finished appearance.
Why install plastic slopes?
Modern plastic windows can be considered ideally installed only if their slopes are carefully designed in compliance with the sealing rules. Carefully made slopes are aesthetically pleasing; they carry part of the thermal insulation load, preventing fogging of the assembly seams. If the finishing is not done correctly during the ventilation of windows, due to temperature changes, the structure of building materials is destroyed and the attractiveness of window openings is lost. It is important to install external and internal plastic slopes in stages, according to all the rules, in compliance with technology.

For those who are not very versed in terminology, let us remind you that slopes are side surfaces walls around the perimeter of the window opening, adjacent directly to the window frame. They can be internal, that is, installed on windows indoors, and external, facing the courtyard of the house. The lower horizontal is usually formed by a window sill. But the side parts of the walls and the upper plane near the window require careful finishing - plastic slopes.
Until recently, slopes were leveled and decorated with wood or whitewashed plaster. Modern windows made of PVC are in harmony with the same finish. Since much attention is paid to the quality of finishing today, they prefer to install thin plastic finishing on internal slopes.
Old plaster slopes cannot fully provide sound insulation and sealing, and cracks near the frame and under the window sill often leaked through, especially in winter time. Under the destructive influence of the external environment, the plaster and putty crumbled and became unusable, so everything had to be redone. With the introduction of new technologies quick installation sealed PVC windows, plastic slopes on windows with your own hands has become easier than decorating window openings in the old way.

One of the additional complications in poor quality windows condensation remains, which appears on the windows due to the temperature difference. When the joint between the wall and the window frame, then the double-glazed window is too cold, and the windows “cry”, forming dampness on the windowsill. Proper finishing of slopes will minimize this factor.
Before the production of plastic windows began, the problem of condensation due to insufficient sealing could be dealt with using slopes made of plasterboard and polyurethane foam. They were more effective than plaster under white paint the old fashioned way. This option was better suited for insulating the window opening. However, their main drawback is low moisture resistance, and the installation of plastic slopes solves this problem today.
Today, plastic slopes on PVC windows with double glazing - universal solution many problems. For their insulation, mineral wool is usually used to provide the window with effective hydro-, heat-, and sound insulation.

The main advantages of plastic slopes
If you compare plastic, plaster finishing or plasterboard slopes, then plastic has a lot of advantages:
- durable operation;
- perfectly smooth texture harmonizes with PVC windows;
- aesthetic appearance;
- the ability to effectively close all joint defects;
- it is possible to use flexible platbands;
- no need for additional finishing and painting of the window opening;
- moderate cost finishing works;
- effective thermal insulation of the opening;
- the ability to complete window finishing on the same day as installing PVC windows or delay finishing to complete certain construction and design tasks;
- clean work with quick installation;
- if you have a tool, you can do all the work yourself and quickly (in 2-3 hours);
- simple subsequent operation - the surface is easy to wash and clean;
- there is a choice color palette for any stylistic decision;
- does not require additional alignment of the window opening after dismantling the old frame;
- relatively low thermal conductivity;
- high moisture resistance and the ability to easily remove liquid;
- protection from freezing.

Insulation of plastic slopes
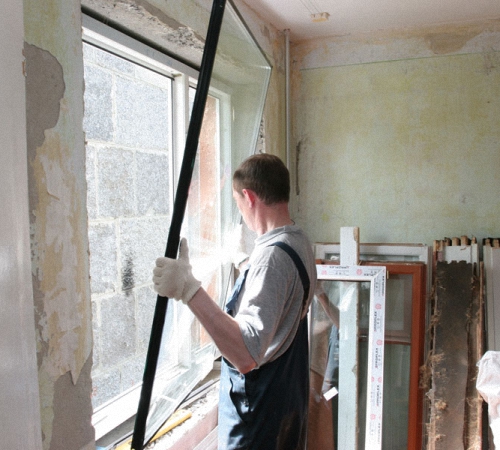
When changing old wooden windows dismantling can significantly destroy the window opening, so all the resulting voids must be filled in order to eliminate the slightest gaps. Sometimes the cracks are not visible, but cold is felt in the window area and mold appears, which indicates depressurization of the seams after installation or poor-quality installation of the window.
If you finish and install plastic slopes according to all the rules, then they must be properly insulated so as not to transfer a portion of low temperature into the room. Effective thermal insulation quite achieved in a simple way- under the layer of plastic, insulation is installed up to the area where the frame adjoins the window opening.
Several schemes have been developed for insulating the plastic slopes themselves and the area where the frame adjoins the opening. Insulation materials are used today different types, and this assortment is enough to provide reliable protection windows from negative external factors. The easiest way to solve the problem of effective window insulation is in 2 ways:
- fill the space with mineral wool or polystyrene foam inside windows;
- at the junction of the window opening and the frame, fill the PVC cracks polyurethane foam and close finishing materials from the street side.
The following materials are offered for insulation today:
- mineral wool;
- foam sheets;
- sandwich panels;
- extruded polystyrene foam;
- isover or fiberglass.

Attention: The choice of insulation should be dictated by the width of the gap and the surface features of the window opening and the joint with the PVC frame.
It is easier to insulate a small installation gap of 40-50 mm on a smooth surface with sheet foam, isover or polystyrene foam up to 2-3 cm. For small gaps and some unevenness, use mineral wool. From the outside of the window, the gaps are filled with ordinary mounting foam; it is also used for gross defects in the window opening after dismantling the old frames.
Multilayer walls, which are equipped with insulation approaching the window frame, provide sufficient protection from external factors. In this case, it is not necessary to insulate the plastic slopes themselves; it is enough to eliminate all the gaps with foam from the outside. If the building has cold single-layer walls without thermal insulation, then it is recommended to effectively insulate the slopes with thermal liners laid along the slopes.
The insulation layer is fixed over the entire surface of the window opening, without extending beyond the seams. When installing plastic slopes, the thermal insulation layer will be covered. Sometimes an additional layer of drywall is installed to level out the broken plaster. Extruded polystyrene foam sheets do not require additional processing when installing plastic slopes with your own hands.
When insulating slopes with foam plastic, the joint with the frame at the window opening is filled with cement mortar. Only after it has all dried well, flat surface You can glue a layer of foam up to 5 mm. The outside of the window is protected with extruded polystyrene foam or another method. Any type of insulation must fit tightly to the surface. At external thermal insulation window slopes, it is important to ensure moisture removal from assembly seam.
Attention: Insulation of slopes will not be effective if there is no thermal insulation around the perimeter of the window, and the insulation is laid fragmentarily, only in problem areas with surface defects.
To do this, you will need 8 mm sheet plastic, approximately 6 m, as well as a starting U-shaped and F-shaped strip of plastic or “F-ka”. They are conveniently mounted on a 10 - 15 mm wooden strip. The tools you need are a hammer drill or a drill, metal scissors, building level, square and pencil for marking. Don't forget about self-tapping screws, white sealants or silicone.

Self-installation of plastic slopes
There are several ways to install external slopes of plastic windows and prepare the slopes themselves.
There are 3 common methods for making plastic slopes:
- from sandwich panels;
- made of plasterboard covered with strong plastic;
- made of foam plastic.
Sandwich panels with a porous structure do not form condensation, are not afraid of moisture, retain heat and are quite durable. They are available in different types, including glossy and matte, as well as colored and laminated “wood”. Eat different ways securing external and internal slopes adjacent closely to PVC frames, and options for preparing a window opening with cutting parts for plastic slopes.
1. An electric saw or metal scissors are used to cut sandwich panels or plastic panels of small thickness. Start profile mounted with dowels in the window opening during window installation. The slopes are attached to this base. For installation, galvanized brackets and double-sided mounting tape. The brackets are fastened with self-tapping screws, and on their base the slopes are fixed close to the window sill. It is better to coat the corners with silicone sealant.
2. Slopes made of plasterboard lined with PVC sheets are mounted directly to the plasterboard " liquid nails" It is important to ensure that there are no defects or traces of deformation left on the plastic. Their special glossy surface susceptible to stains that are sometimes difficult to remove.
3. As an option, foamed PVC with a smooth front side is used. When cut, it can even be bent to the desired shape, using frequent radial cuts, they must be fixed assembly adhesive. Otherwise he has general rules installation with sandwich panels.

Installation of external slopes
Experts recommend external slopes PVC windows should be made from a sandwich panel, the reliability of which has been tested. The material easily withstands the external environment and is a reliable barrier against cold, precipitation and temperature changes.
Before starting the installation of external slopes, it is important to take accurate measurements to eliminate gaps and cracks. The height, width and length of the window openings are measured in order to transfer them to a sheet of plastic for cutting the panels. After cutting 3 pieces circular saw or using metal scissors you can begin installation.
First, the upper horizontal part (slope) is fixed, while its base is recessed as deep as possible, and the space in this niche is filled with polyurethane foam. You can’t let it in too much so as not to warp the plastic, which easily bends when the foam expands during hardening. The slope must be pressed to the top of the opening, secured with construction tape at the support points.
When the horizontality of the slope has been checked, you can mount the side parts in the same way, checking the parallelism and compliance with the verticals. Adjust the spacers. Plastic slopes are installed in the same way. wooden house, but it is better to fix them with self-tapping screws.
The structure must stand for a day or two for the polyurethane foam to completely harden. But if the plastic is dirty, it is better to immediately cut off the stains with a knife and wipe the slope with a rag soaked in a vinegar solution. After the foam has hardened, the mounting tape and spacers are removed. Next, the decorative corner is secured with sealant or transparent silicone.
Installation of internal slopes
Before installing plastic slopes indoors, it is advisable to complete the finishing of the walls. The plastic is mounted on a solid solid surface. If a plastered window opening crumbles in an old house when replacing a wooden window with PVC, then it is better to knock it down to the base of the wall, and then level it and fill it with insulation. There is no need to do this in new buildings.
Along the perimeter installed window By internal joint Wooden slats are secured with self-tapping screws. They are convenient to use for leveling walls adjacent to the opening. Plastic slopes will be attached to them. The most reliable fastening - according to the starting plastic profile. An F-shaped profile is also mounted on wooden slats, fixed with stapler staples.
Internal plastic slopes are installed on the finished base, starting from the upper horizontal, under which it is recommended to lay mineral wool. Installation is in many ways similar to the instructions described for external slopes, and gaps at the joints are also hidden with silicone or white sealant.

Attention: All work on the installation of plastic slopes is carried out on clean, dry surfaces with low or moderate room humidity!
Do-it-yourself installation of plastic slopes is not limited to the description of the above installation technologies; options are possible, for example, plastic slopes - video:
Hide
Do you want to replace/install slopes on plastic windows, but calling a specialist is expensive? Or is your goal to keep an eye on the “wow” installers? In any case, you need to be knowledgeable in this matter. See the main stages of work, explaining photos and videos.
Option 1: installation with initial profile
To make slopes on plastic windows in this way, to you materials will be needed: plastic panels or sandwich panels, plastic initial U-profile, mounting corners (or F-profile instead), wooden slats, construction adhesive, silicone sealant.
Also need tools: tape measure, construction marker, screwdriver, cutter knife (popularly just a wallpaper knife), screws for plastic panels- “fleas”, small dowel-nails.
Do-it-yourself installation of plastic slopes on windows takes place in several stages. They will seem simplest to you if you have ever installed plastic panels. If not, don’t miss it either!
1. Secure around the perimeter using self-tapping screws window profile initial profile - this is where you will insert the panels.
Then, using dowels, make a sheathing around the perimeter of the opening from wooden slats. You need to leave a gap of 8-10 mm between the top rail and the side ones - the panel will fit there.
2. Installation of slopes on plastic windows begins with the top panel. First, it is cut to length (and width, if necessary) with a cutter. Then one end is inserted into the profile, and the other is screwed to the rail using fleas at the protruding end (spike). Don’t worry about the appearance - you will hide the screw heads under the corner.
Afterwards, the side slopes of the plastic windows are installed.
To prevent the platbands from falling off, they are fixed with construction tape for a couple of hours.
4. The final stage of installing internal slopes is sealing the joints. The sealant is applied from a gun. And then level it with a small rubber spatula.
That's all the instructions - you can do it easily in half a day. And you’ll even have time to smoke 10 times!
If you need additional information, look video: Installation of slopes of plastic windows
Option 2: installation without initial profile
The first method of fastening the slopes of plastic windows has a disadvantage: the U-profile is very clearly visible after installation. And if you consider that it is sometimes very difficult to choose the colors of the slope and profile...

A slot in the foam - instead of the initial profile
1. Using a wallpaper knife, make a slot in the foam around the window frame. It should be 1 mm wide and 1 cm deep.
2. After constructing the sheathing, insert the panels with a tenon into the resulting nest. And fasten the opposite end with screws as well.
3. If you use panels without fasteners, for example, sandwich panels, you can make the tenon yourself.
To make a tenon, the sandwich panel is cut with a wallpaper knife, first across and then along - to separate the insulation and bottom layer
Homemade spike ready for attaching sandwich panels!
On the side of the panel that will be adjacent to the window, mark a 1 cm wide strip. Then carefully cut along the line to cut only top layer and insulation. Make a slot at the end and remove the “excess”. So, your bottom layer will remain intact. This is what is inserted into the homemade groove.
Otherwise, the technology for installing slopes No. 2 is similar to technology No. 1. So don't get confused.
The durability, reliability and stability of windows depends on the quality of installation of slopes. Slopes provide tightness, heat and sound insulation. If they are installed incorrectly, the window will not last long or be functional, and will soon have to be replaced. Therefore, it is very important to choose the right type of slopes that are suitable specifically for your windows, and install them correctly.
Types of window slopes, their advantages and disadvantages
Depending on the location of the slopes, they are divided into internal and external or external.
Internal slopes are located directly in the room and do not have a special functional role, except for tightness, and also act as a design for the joints between the window and the wall. In contrast, external slopes provide sound and heat insulation, protect the room from moisture, heat and temperature changes.

Depending on the material from which the slopes are made, there are:
- Plastering,
- Wooden,
- Plasterboard,
- Plastic,
- Sandwich panels.
1. Slopes made of plaster are classic version. It will take at least two days to install such slopes. Since the plaster must dry after application. And then it needs to be sanded to make it smooth. After grinding the internal slope, it is treated with a primer and painted with water-based paint.
2. Wooden slopes for windows. For windows made from natural wood, wooden slopes are ideal. At the same time, the design of the room will become more aristocratic and sophisticated. For the manufacture of such slopes they choose the best wood, thoroughly dried and processed. Therefore, wooden slopes will last as long as, for example, plastic ones. One of the significant advantages of wooden slopes is their environmental friendliness. After all, the tree is natural material, not highlighting toxic substances, unlike plastic.
3. Slopes for plasterboard windows. Drywall slopes are used for significant damage to window openings. They seal only internal openings. Plasterboard slopes allow you to get rid of additional moisture on the windows. First you need to beat all the plaster and cover it with a primer. Then sheets of moisture-resistant plasterboard are installed, and insulation is placed between them: polystyrene foam, polyurethane foam or mineral wool. Next, this slope is primed, painted or finished according to the interior design. And at the junction between the wall and the slope a corner is glued. The disadvantage of such slopes is that when wet for a long time, the plasterboard slopes swell.

4. Window slopes made of plastic. Plastic slopes are more expensive than plasterboard. Such slopes are ideal for plastic windows, since they have the same coefficient of thermal expansion when there is a temperature difference. This eliminates the possibility of gaps between the windows and slopes. Plastic slopes are suitable for finishing both internal and external slopes.
5. Sandwich panels - like a type of plastic slopes. Sandwich panels are a type of plastic slopes. Unlike plastic ones, sandwich panels consist of three layers, two sheets of plastic and insulation between them. Sandwich panels can withstand temperatures up to 45°C, thereby providing protection from moisture and cold. Of all the window slopes, they are the most expensive.
Installation of slopes on metal-plastic windows
There are three types of slopes suitable for PVC windows:
- Plastic,
- Plastering,
- Plasterboard.
For finishing plastic windows, slopes made of plastic or sandwich panels are best suited. Plastic slopes are used after installing plastic windows. To better understand the technology of their installation, let’s get acquainted with the tools that will be needed during the work process:
- Plastic panels,
- starting line,
- corner,
- Profile,
- Self-tapping screws,
- Insulation: polystyrene foam, mineral wool or polyurethane foam,
- Silicone gun,
- Screwdriver,
- Scotch,
- bubble level,
- Putty.

The technology for installing slopes of plastic windows is not too complicated if you carefully understand everything:
- To begin, remove all excess polyurethane foam from the outside. This can be done using a construction knife. Next, you need to fill all the cracks, using any mixture for external and internal work, depending on the type of slope.
- Using a level, measure the dimensions of the internal slopes. Install a wooden frame onto which our plastic slope will later be attached. The starting strip is installed at the bottom of the window frame.
- Attach the profile to the wooden frame. Using polystyrene foam, mineral wool or polyurethane foam insulate the slope.
- Now we install the plastic base. To do this, simply attach it to the profile and treat the joints with silicone. This technology for installing slopes on PVC windows for external and internal slopes is absolutely the same.
Watch the installation of slopes of plastic windows - video:
Advantages of installing plastic slopes:
- No serious contamination of the premises.
- Since plastic does an excellent job of thermal insulation, energy savings are guaranteed.
- Replacing a window does not require renovating the entire room.
- Plastic slopes are easy to clean and do not collect dust.
- The slope performs the function of absorbing moisture, thus preventing the appearance of mold.
- The plastic slope is made of the same material as the window, which means it will last the same amount of time.

Plaster slopes for metal-plastic windows
Plaster slopes are also installed on plastic windows, but have more disadvantages than advantages. Firstly, they do not retain heat well, which means that windows are guaranteed to fog up. Secondly, plaster slopes will not last as long as plastic ones, because they crack over time. Thirdly, installing plaster slopes will take a lot of time. Since such slopes are laid in multi-layers, and each layer requires at least two days to dry. The advantages of these slopes are low cost of operation and versatility.

To install plaster slopes we will need:
- Plaster mixture,
- Hammer,
- Hammer,
- Dowels,
- Self-tapping screws,
- Screwdriver,
- Level,
- Spatula,
- Square,
- Primer.
Installation steps:
- Before starting work, stick it on the windowsill protective film, do the same with the window if there is no special branded film on it.
- Use a paint knife to remove excess foam. Next we prime and insulate future slopes. We glue foam plastic around the perimeter of the slope.
- Next, you should install the beacons and dilute the plaster solution. It is recommended to use ready-made cement mortars based on gypsum or cement.
Tip: Before applying the solution, attach plaster mesh on top of the foam.

- The plaster should first be applied with a wide spatula at a right angle, and then level the surface at an angle of 45-50 degrees.
- Sanding, priming and painting
- We prime, putty and paint
Plasterboard slopes for metal-plastic windows
Plasterboard slopes are installed only indoors; the use of external plasterboard slopes is unacceptable.
To install plasterboard slopes on plastic windows we will need:
- Moisture-resistant drywall,
- Profiles and guides,
- Metal screws,
- Assembly knife,
- Dowels,
- Level,
- Insulation,
- Screwdriver,
- Perforated corner.
For correct installation When installing slopes on windows, you should perform a number of the following actions:
- We measure the distance from the window to the location of the future slope. Take into account the width of the plasterboard; plasterboard with a thickness of 12 mm is best suited.
- Once you have measured the distance, place marks on the wall.
- Install the guide profile. His outer side should follow the line, and the profile itself should be behind the line.
- Next, draw lines on the floor and ceiling and nail the next profile.
- When the frame is ready, we insulate the slope. The same as when installing a plastic slope, using polyurethane foam, polystyrene foam or mineral wool.
- Using the exposed profiles, we measure the slope and cut out the required dimensions with a mounting knife.
- The next step is the assembly of the plasterboard slope. We fasten the drywall using self-tapping screws.
- Using a perforated corner we check the corners.
- We glue fiberglass or non-woven fabric onto the drywall joints.
- Next we carry out finishing work: putty and paint.
Tip: when installing a plasterboard slope, choose moisture-resistant plasterboard, as moisture collects in the corners and mold forms.

There is another option for installing plasterboard slopes. This is gluing them to the surface of the slope. To do this, first remove excess polyurethane foam with a knife and prime the surface. Then we level the slope using putty. We measure and cut sheets of drywall required sizes. We glue them using special adhesive for drywall.
Tip: When gluing sheets of drywall, you also use finishing putty, which does not set as quickly as glue, so it is ideal will suit that who makes such slopes for the first time.
Installing slopes on wooden windows
For wooden windows, a wooden slope made from the same wood as the window itself is best suited. It is advisable to install the wooden slope on the second day after installing the window, so that the mounting foam has time to dry.
To install wooden slope we will need:
- Assembly knife,
- Primer,
- Screwdriver,
- Self-tapping screws,
- Wooden casing.
You need to measure the future slope in advance to prepare the casing of the required size. Next, trim off the excess foam and prime the surface. Then we install and attach the slope, connecting the slopes to each other using self-tapping screws.
Another type of slopes is suitable for wooden windows - these are cork slopes, made of plasterboard covered with cork oak bark.

Advantages:
- Installing such a slope does not take much time,
- Environmental friendliness,
- Excellent noise and heat insulators.
Flaws:
- Price.
- Very soft, easy to damage.
To install a cork slope, you need to install a profile and attach sheets of the required size to it. Next, insulate the space between the sheet and the window using polyurethane foam. Then treat the joints with silicone.
Plaster, plasterboard and plastic slopes are also suitable for wooden windows. The technology for installing slopes on windows, both plastic and wooden, in this case is the same.
Owners of apartments and private houses who have installed plastic windows often have a desire to organize the surfaces of window openings. Often this needs to be done due to damage to old slopes when dismantling previous windows. Finishing of slopes is also carried out to enhance the heat and sound insulation of window openings.
Finishing the slopes of your plastic windows can be done using several methods. Each has its own pros and cons, and can be carried out with the participation of insulation. PVC panels, plasterboard or plaster together with a putty mixture can be used to decorate window openings.
Panel slopes for plastic windows are very easy to fix with your own hands. For this, plastic lining and additional fittings are used, which are designed to hide the joints between the panels horizontally and vertically, and the gaps on the lines where they adjoin the window frame.
PVC panels are a popular way of finishing window openings
In addition to lining, residents often use sandwich panels produced specifically for finishing window openings. The panels are made from several smooth layers of plastic, between which there is foamed polystyrene. Installation of slopes made of this material will become a little easier, because you will not have to separately attach the insulation. This method also allows you to do without the use of some fittings.
Along with ordinary plastic lining, sandwich panels will help you quickly and accurately decorate your windows with your own hands. You can always choose not only the thickness, but also the color of the finish. A correctly selected shade will help highlight the window openings against the background of the overall interior of the room.
Before installing the products, as in the case of other types of finishing, you need to carefully study the instructions and adhere to them throughout the entire work.
Applying plaster to the surface of window openings is considered to be traditional method finishing. Properly applied material can last long time without losing the original appearance. At the same time, do not forget that “bare” plaster will not provide residents with protection from the cold, and installing thermal insulation materials in this case there is no possibility. Among the disadvantages of this method, the duration of finishing work stands out, since the material must be applied in several layers, each of which must dry completely. To make such internal slopes for your plastic windows, you must have experience in working with plaster. Otherwise, you risk making a mistake and ruining the entire opening.
Finishing with plaster is a rather “dirty” undertaking. Working with this material, you will be forced to clean the room almost daily or not use it at all for several weeks.
Often, property owners use drywall for finishing. Installing slopes on plastic windows made of this material is quite simple. The sheathing will last a long time, and thanks to the insulation, it will not allow cold air to seep into the room. At its core, drywall is dry plaster, but its installation will take much less time and effort. This method does not involve staining windows or wall trim and does not require any experience. It is enough to follow the instructions specified by the manufacturer.
There are several types of drywall on the market today. Green material marked “GKLV” is considered to be of the highest quality. It is resistant to high humidity.
The only disadvantage of this method is considered to be possible complications when finishing the material - priming and putty. Without them, drywall will quickly become unusable, as it has a fragile structure.
The panels on the sides of the window opening are also fixed using the same principle. If after installing the sandwich panels there are gaps between them, they need to be filled with polyurethane foam. As soon as it dries, excess pieces are cut off with a stationery knife. After this, the joints are closed with special profiles - platbands. To fix these elements, they are used.
Plastering window openings - how to do it yourself?
When making plaster slopes for plastic windows, you will need to install metal guides around the perimeter. They are better than wooden slats because they have low adhesion and will be much easier to remove. The guides must be secured with dowels so that they protrude beyond the corners of the window opening to the planned thickness of the plaster layer.
The other guide needs to be secured near the window frame. When installing, focus on the first guide, since the applied plaster will be aligned along the plane specified by both guides.
After this, start throwing plaster onto the surface. At this stage, try to do external corner as smooth as possible. Using the same principle, plaster is applied to the surface in the upper part of the window opening. Next, level the layer of plaster. At the same time, the main thing for you at this stage is not a perfectly smooth coating, but filling the edges of the slope and grooves with plaster. The surface leveling itself must be done after the solution has set on the walls of the opening. To do this, place the construction rule on the guides and carefully lift it up, thereby carefully leveling the scattered mortar. After this, remove excess plaster and leave the material until completely dry.
After this, you will need to remove the external guides and install painting corners with perforations in the corners. Then another one is applied to the dry surface. plaster layer, the height of which should correspond to the height of the painting corner.
The final third layer must be applied with a special finishing putty, and it must have a thickness of no more than 1 mm. It is best to apply the material with a wide spatula, lightly pressing it against the surface. Marks left by the tool must be smoothed out immediately.
The final step will be smoothing finishing special grout. To do this, place the product on the dry putty and start moving your hand in a circle counterclockwise. If you plan to paint the slopes in the future, you will need to prime them before doing so. The primer will prevent the paint from seeping into the putty, resulting in a more even coat of paint.
How to make slopes on windows? This question worries many who, after replacing window structures, are faced with such a problem. Indeed, serious work remains to be done to make the surfaces reliable and beautiful. It is worth considering that slopes are not only decorative, but also protective function. Therefore, it is necessary to approach this with utmost care. If you make mistakes or do the work poorly, a lot of troubles will arise.
Window slopes are an integral part of any room. Some believe that minimal attention can be paid to such a design. But this is a misconception that leads to aesthetic and practical problems. The fact is that internal slopes perform a number of important functions:
- Maintain a certain microclimate. Slopes prevent heat from escaping from the room to the outside, as well as preventing cold from penetrating inside. Naturally, protection from moisture, which leads to the formation of condensation, cannot be ruled out.
- Extend the service life of all structures. That is why such finishing should be carried out in short terms. Of course, you can still delay installation indoors, but outside, installing the slopes is required within a minimum time.
- They create an excellent decorative component. Installing slopes on windows can be considered one of the main components harmonious interior. You can install beautiful metal-plastic frames, but if they are not properly refined, they will lose their sophistication.

Therefore, when performing all the work yourself, you must comply with all technological nuances and rules. Then you can be sure that you will get a reliable and durable coating, which will please the eye.
Design Features
The design of slopes has its own characteristics. The fact is that it is necessary to take into account the main nuances that must be done when working with your own hands:
- The structure should be finished so that the edge of the frame is covered quite a bit.
- It is necessary to take into account the location of hinges and opening doors.
- The foam is trimmed flush with the frame. If you remove more of the substance than required, the structure may become distorted. Also, any bulging residue will interfere with the finishing process.
- Particular attention is paid to the installation seam. The option that will be used for cladding the window slopes depends on its thickness.
- The sealing process is very important point. All places must be well coated.

But how to finish the slopes, the location outside the room? The technology is almost completely consistent internal work. But the obligatory and most important rule will be to install a low tide.
Finish options
It is customary to distinguish two main cladding options, which differ in the materials used.
Cladding with panel products
This technology assumes that materials will be used that are cut into panels of the required size.

When choosing this method, the following features should be taken into account:
- Quality of material. It is necessary to carefully select the products used. The fact is that if you install a low-quality option, then problems will begin to arise during the installation process. For example, cheap plastic is characterized by the fact that it crumbles and cracks when cut, and after installation it does not retain its good appearance for long.
- Correct insulation and processing technology. When installing panel products, voids often arise, which can serve as an opportunity for the development of fungus and mold. Such places are a source of cold penetration. Therefore, surfaces require pre-treatment and installation of insulation, the choice of which depends on specific situation.
- Careful measurement. Main mistake, which can happen is inaccuracies in measurements. If you do not take into account the location of the parts, wide joints will form that cannot be hidden even with decorative moldings.
- Finishing. Installation of slopes made of panel products must be combined with correct selection decorative elements. For subsequent finishing, you can use special profiles and corners, as well as putty external joints. When installing overhead fragments, it is important to make the correct trim so that all joints are equal.
Note! To produce the most accurate parts for window slopes, two methods are used. The first is simply measuring and transferring data to the material, the second is creating stencils. This method is much more accurate, but requires more time, because it is necessary to perform a stencil at each stage of the work.
Application of the solution
Such work involves applying a certain layer of prepared mortar to the windows yourself, which completely covers the entire surface of the slopes. This option is considered the most traditional. His distinctive feature is cheapness.
Finishing can be carried out according to two main scenarios:
- Traditional. The surface is finished with a mixture that is leveled at a certain angle.
- With additional insulation. This technology involves the use of foam plastic, which serves as the base. In reality, this option can be fraught with many problems. Improper installation of insulation is a guarantee that numerous cracks and peelings will appear.

Preparatory activities
Before wondering how to properly make slopes, you should thorough preparation surfaces. The amount of work depends on the specific situation. There is a general order that must be followed:

Slope manufacturing technology
How to finish the slopes? There are basic materials that are used for such work:
- plastic PVC panels for walls;
- sandwich panels;
- plaster.
Each option is selected based on several reasons:
- Distance from wall to window frame. That is, the thickness of the assembly seam.
- Width of plots.
- Financial costs.
Considering that the master must perform all the work himself, the option that will be most acceptable is chosen.
PVC panels for walls
 PVC panels are the most popular material for finishing window slopes
 This material is used most often, especially if needed. There are several reasons for this:
- Cheapness. Modern technologies allow us to produce products that are accessible to everyone.
- Practicality. If you choose materials that do not belong to the category of economy, then they are unpretentious in operation and last quite a long time.
- Easy to install. The work is completed quickly, without the use of complex tools.
Installation of slopes made of plastic panels is carried out according to the following instructions:

But the window decoration is not finished yet. A number of finishing manipulations should be performed. They consist in the fact that all joints are well coated with sealant. Installed from the outside decorative corners. They must be trimmed correctly in order to join at an angle of 90 degrees.

When a dilemma arises about which slopes are better, many proposals and opinions may arise. But it is undeniable that it is better to make slopes from sandwich panels. They combine everything positive qualities PVC materials, but have additional advantages:
- The products include a reliable layer of protection (one or two), as well as a layer of insulation. This avoids the need to use additional material.
- They are resistant to various influences, due to which their service life is practically unlimited.
- Have excellent decorative look. Indeed, such panels are superior in appearance wall products. Besides this material can be made in a fairly wide size, which is ideal for large openings.
Making slopes on windows with your own hands using such products is quite simple. It must be taken into account that this option is excellent in cases where the thickness of the installation seam is minimal. Three-layer material is used for work.
Let's look at how to install slopes from sandwich panels. Everything is done as follows:

Using plaster
Previously, there were no questions about how to make slopes on windows. After all, there was only one option, which was to use plaster. This method quite convenient and practical, but requires skills. This need arises due to the fact that it is necessary to correctly display all the planes and maintain the angle of inclination. Although, if you practice a little and understand how best to apply the mixture, then plastering work will not cause any particular difficulties.
The general technology is as follows:

The result is an excellent coating that differs increased reliability. A definite plus This option is that each completed section can be repaired and the decorative layer can be changed.
Conclusion
Summarizing the above, we can conclude that there are various options finishing of window slopes, which depend on the specific situation and financial capabilities. The main thing is to initially carry out all the work efficiently, observing all the nuances.