Small sauna with your own hands. Do-it-yourself budget sauna Show how to build a sauna
A bathhouse made from timber is much lighter than logs, and accordingly, the installation process will be easier. Unlike rounded logs, timber has an affordable price. In the article we will tell you how to build a bathhouse from timber with your own hands, we will give step-by-step instructions, drawings, photos and video materials.
Creating a Project
The first stage in construction is design. A decision must be made regarding design features baths This might be the simplest one-story project or a house with an attic; a bathhouse can also be arranged together with a cozy veranda. Also pay attention to the choice of timber, as it can be profiled, planed or glued.
During the design process, it is determined how many rooms there will be in the building and what their size should be. The main indicator of the longevity of a bathhouse is a high-quality foundation. Therefore, even at the design stage it is necessary to create a diagram of the base of the structure.
Installing boxes during wall construction can be risky, as over time wooden building will shrink.

Now you should prepare the walls for the shrinkage period. On top of the last crowns of the walls, lay a row of boards up to 5.5 cm thick. Then cover them with roofing felt or slate. So, the bath should be left for six months.
Important to know:
Video: building a timber bathhouse from scratch
Photo


Drawings


 4x6
4x6

 6x6
6x6


For a Russian person, a bathhouse is not just a place where you can wash yourself. Her visit has become a tradition a long time ago. Here the Russian people relaxed, recovered their health and simply had a good time. Until now, the functions of the bathhouse have not changed. This place remains one of the favorites of our people. Dacha owners are trying to build this building on their site. Some people do it themselves, others hire a team of specialists.
Features of the bath
Since ancient times, so-called “purgatories” were built for noble persons, in which they renewed their spirit. The design of the Russian bathhouse is the same as that of other similar buildings. Visually, it is no different, for example, from a Finnish sauna. But there are some nuances that distinguish the Russian bathhouse from all others.
The main feature of this structure is the presence of light steam in it during use, while the humidity is at the level of 60%, and the temperature reaches 50–70 degrees.
For Russians, visiting a bathhouse is a whole ritual with its own customs and traditions.
To create a temperature regime in the bathhouse, a special stove-heater is used, which maintains the heat of the stones. They are located in a small compartment behind a metal door. Wet steam enters the steam room from the oven. The door is opened only to pour water onto the stones, causing it to turn into steam. Thus, the humidity in the bathhouse is maintained at the required level.
And, of course, what Russian bathhouse is complete without a broom? It is usually made from birch or fir. Due to the fact that the necessary humidity is achieved in the room, you can take a good steam bath with a broom. There will be no similar effect from the procedure if the air in the room is dry.
One of the most important conditions for creating a real Russian bath is a good stove, which must have certain qualities
It is believed that the main building material for the construction of a Russian bathhouse can only be wood. It is loved for its naturalness and environmental friendliness. True, the cost of a bathhouse will be noticeably higher than when using foam blocks or bricks for construction.
Choosing a site for construction
Choosing a place to build is a very important point. Highlight different types baths according to the method of kindling: “white” and “black”. The latter are currently erected very rarely. The first ones are built near the house. Sometimes a white bathhouse is made as an extension to a home, and it is necessary to obtain special permission from the fire service.
Previously, the bathhouse was erected on the banks of rivers and lakes, so that after all the procedures one could plunge into cool water. But today it is difficult to do this. A way out of this situation can be the construction of a small personal pond near a bathhouse or swimming pool.
Experts advise building a bathhouse at the highest point of the site. This way, precipitation will not be a problem for you.
Design
The bathhouse project is one of the most important elements preparatory work.
It must indicate the number of rooms in the building where communications and other similar information will be located. Most often, a steam room, a room for washing, relaxation and a corridor are built in a bathhouse. If the budget is limited, then sometimes the owners combine a steam room with a washing room, and a dressing room with a corridor. But this is not very convenient, because not everyone wants to wash in a heated room.
Bath design - important stage preparatory work
The size of the bathhouse is planned depending on how many people will visit it at the same time. If it is for one person, then you can make it small. But if you host a lot of people and love bath treatments, then you shouldn’t skimp on space. But remember that warm up to desired temperature steam room large size not easy. Usually it is made for 2 people. For this, 4 m2 is enough.
At the design stage, think about the furniture that you will place in the rest room. Make this room as comfortable as possible so that you can fully relax in it.
A well thought out and drawn up project will be an indispensable assistant during construction work
The corridor is necessary so that cold air from the street into winter period do not immediately enter premises where you will be in a semi-undressed state.
Stages of bathhouse construction
Conventionally, they can be divided into several:
- Construction of the foundation.
- Construction of walls and floors.
- Roof construction.
- Ceiling arrangement.
- Laying thermal insulation.
- Clean finish.
Construction of the foundation
Most often, a columnar or strip foundation is erected under the bathhouse. The latter option is more reliable, but its construction requires much more materials, and therefore the financial costs of its construction will increase.
Perform construction in the following sequence:
- Clear the area where the bathhouse will be built. Remove debris and vegetation. Can be removed top layer soil (200–300 mm) completely.
- Make markings using pegs and rope.
The evenness of the foundation depends on correctly executed markings
- Dig a trench around the perimeter of the future bathhouse. The depth of the foundation is selected based on the quality of the soil and the mass of the structure.
Most often, a strip foundation is erected for the construction of a bathhouse.
- Place a sand and crushed stone cushion at the bottom of the trench. Its ideal thickness is 250–300 mm.
- Now build the formwork. It can be made from moisture-resistant plywood or long boards, the thickness of which is 5 cm.
The foundation should be 200–300 mm larger than the thickness of the walls of the future building. It should be made 400–500 mm above the ground level.Edged boards can be used for formwork
- Construct a reinforcement frame from rods with a diameter of 1.2–1.5 cm. Fasten them to each other with metal rods with a cross-section of 6 mm. First, the construction of a vertical frame is carried out. Place it in corners and in places where the walls of the bathhouse intersect. Also, vertical rods must be placed under door and window openings. They should rise 300–350 mm above the base. After installing the vertical frame, proceed to the horizontal one using reinforcement of the same diameter.
- When the metal skeleton is ready, fill it in several stages cement mortar. The first layer is 300–500 mm. It should be the most liquid in consistency. Using a special vibrator or metal pin, compact the concrete layer by piercing it in several places so that the air remaining inside comes out. Thus, the quality and strength of the foundation is improved. Then pour the next layer of concrete. Repeat the procedure until the base is completely filled.
The foundation must be poured along the entire length of the formwork at the same time
- Cover freshly poured concrete with polyethylene to prevent precipitation from getting there. The base will completely harden in about a month. After this period, the formwork can be removed. Experts recommend giving the foundation another 2 weeks to settle so that it becomes stronger.
- The last stage is waterproofing the foundation.
Insulation and waterproofing of the base will make your bathhouse even better quality
Now you need to give the structure time to shrink.
Thermal insulation should not be neglected either. This process is optional, but recommended. In this way, you can increase the thermophysical qualities of the bath. Foam glass or polystyrene foam is suitable for this.
Walls and floor
It is best to use wood to build a bath structure. Her clear advantages are good heat retention and creation of a cozy atmosphere. You can also use timber to build a bathhouse.
Timber is one of the most common materials in construction
A building made from it shrinks less, and the material is easy to work with.
Incredible beautiful baths are obtained from logs
You can use logs. To build walls from them:
- Select material with the same diameter.
- Then trim the logs.
- First arrange the elements with large diameter. Connect them together using spikes, which must be deepened inward by 270–300 mm. No matter what is used for construction, it is recommended to treat the crowns of the structure with an antiseptic.
To ensure that the walls of the bathhouse are as airtight as possible, the gaps between wooden elements it is necessary to caulk with felt, hemp or moss.
This must be done at least twice. The first time is immediately after the walls are built. The second - after complete shrinkage of the structure. Punch all seams with wooden slats.
Use clay, concrete or wood to construct the floor.
Clay does not allow water to pass through. Liquid can stagnate in its cracks, resulting in an unpleasant aroma. Wooden floors absorb moisture, causing them to rot and collapse. Concrete covered with tiles is the most reliable option. For comfort, cork mats or a wooden frame are laid on it.
The best floor for a bath is concrete
To build the floor:
- First, arrange a sand cushion, the layer of which should be 100 mm. It must be thoroughly compacted.
The sand cushion must be compacted well
- Then lay the crushed stone. Level it out.
Layers of sand and gravel should be the same
- After this, lay down waterproofing material (roofing felt). It should overlap the walls of the bathhouse. AND last stage- cement screed.
You can use roofing felt to waterproof the floor.
There is no need to create a ventilation system in the steam room, since there must be wet steam in a Russian bath.
Roof arrangement
Even at the design stage, consider whether you will have an attic.
The roof of the bathhouse can be constructed in several ways
This roof is more attractive. Usually they are equipped with bathhouses, which are used year-round. If it is visited only in the summer, then there is no need to arrange the attic.
The roof consists of rafters, purlins, frame and hydro insulating material. For construction you need:

Ceiling
The ceiling in a Russian bath can be panel, floor or hemmed. In the latter option, for arrangement you need:

For small baths in which an attic is not provided, a flat version of the ceiling is usually constructed. For its construction:
- The boards are laid in increments of 2.5 m. Steam and heat insulating materials are laid on them.
- Then they are covered with boards.
This ceiling option is not very durable. If you build it for a large bathhouse with an attic, it can easily fail.
Panel ceilings are difficult to construct independently. The advantage of this option is that you can use leftover building materials to make it. That is why this ceiling is the cheapest. It is usually made from shields. For their manufacture, load-bearing bars are made, to which the internal lining, vapor barrier, thermal insulation, waterproofing and external drain are attached. To prevent heat loss, a sealant is placed between them when laying the panels. This can be felt or plastic film.
Work on thermal insulation and waterproofing of walls
Thermal insulation is necessary to preserve high level temperature and humidity.
In order to retain heat for as long as possible, thermal and waterproofing must be done at a high level
- mineral wool;
- expanded polystyrene;
- polyurethane foam;
- foam glass.
The most important quality for thermal insulation material, which will be installed indoors, is that it must withstand high temperatures and be fireproof. Mineral wool basalt based is ideal for this. It can withstand temperatures up to 1500 degrees.
Mineral wool is ideal for saunas
As waterproofing material For a bath, plastic film or roofing felt is usually used. It is attached to the walls under thermal insulation. A vapor barrier, such as glassine, is placed on it. Materials must be laid with an overlap of at least 100 mm.
After this, you need to build a wooden frame from bars, which are pre-treated with an antiseptic agent against rot. They are fastened in increments of 10–20 mm smaller than the width of the thermal insulation material.
After the insulation is laid, you need to make another layer of vapor barrier. Use aluminum foil for this, which reflects heat and protects all materials roofing pie from humidity. The foil is spread in a continuous layer and fixed with construction tape.
Thermal insulation of the ceiling is very important, because heat, according to the laws of physics, rises upward. And in order not to lose it, you don’t need to neglect this process.
Finishing work and room decoration
The last stage can be considered the finishing of the walls and ceiling. It is recommended to begin all work related to cladding only after the structure has completed its final shrinkage. There are many options finishing materials. Different decorative elements will perfectly complement the interior of the bathhouse. Personal preferences and financial capabilities of the owner play a key role in this matter. The most common finishing option is lining.
The interior arrangement of the bathhouse is left to the taste of the owner
Decorative tiles that line the stove, carved elements, unusual shelves made of wood, interesting ladles, etc. All this will help you create an original and unique interior.
To decorate the bath, you can use wooden lining
Video: construction of a Russian bathhouse
Building a sauna on your own is difficult, but possible. If you approach the theoretical part of design responsibly and correctly use the acquired knowledge in practice, the construction will seem exciting process. In addition, you can always tell your friends that this bathhouse was built with your own hands.
It's hard to imagine without an indispensable attribute– a hot bathhouse that lifts your vitality with the aromas of birch broom and eucalyptus steam. Bath procedures cure many diseases, relieve stress and provide an opportunity to communicate mentally with loved ones. So, no matter how you look at it, you can’t do without her, my dear. The topic of our research is a do-it-yourself bathhouse. , photos, important nuances and invaluable experience of practitioners - all this is in this material.
Read in the article
What is the basis for choosing the optimal location for building a bathhouse?
Perhaps it will be news to some that the bathhouse cannot be placed in any place. There are many official and practical principles which should be followed. Moreover, choosing the wrong location can lead to dire consequences. Let's look at all the rules.
Location of the bathhouse in the summer cottage
In the layout plan bath complex There are three main requirements for a garden plot:
| Distance from site boundary | The distance from the bath complex to is at least three meters. The building should not obscure the territory of the neighboring plot. This gap will protect the buildings from a possible fire, because the bathhouse is a fire hazard. Another important aspect is drainage. A three-meter zone, even if your bathhouse has the most primitive drainage system, will not allow dirty water penetrate into adjacent areas. For reliability, you can lay it along the fence filled with gravel. And a couple more important points: the distance to the neighbors’ residential building should be at least eight meters (six if the bathhouse is brick). When deciding where to build a facility, keep in mind that smoke from sauna stove should not reach the windows of the neighbor's house. |
| Distance to the reservoir | On the one hand, the location of the building on the banks of a river or lake is very advantageous. And it’s easier to collect water, and the pleasure of diving into the cool waves after a steam room is guaranteed. On the other hand, you should strictly follow the rules that protect the reservoir from negative influences. To do this, the structure must be located no closer than 15 meters from the shore. This distance will also protect the structures from being washed away during floods. The coastline should be strengthened with your own hands using wooden or concrete frames. |
| Gap to residential building | The Russian one is located on the leeward side of the house at a distance of at least twelve meters. This will prevent smoke from entering the rooms. It is advisable that there are no other easily flammable structures near the building. Experts recommend maintaining a four-meter distance from the barn. |

There are situations when, with the purchase of a summer cottage, a bathhouse is inherited, as they say. In this case, of course, it is not always possible to move it to a new place in accordance with the listed rules. But, with the help of competent reconstruction, you can achieve standards against fire safety.
How to attach a bathhouse to a house without damaging the main structure
The size of the plot does not always allow meeting all of the above requirements. There is only one way out - to attach a bath complex directly to the house. Let's consider the advantages and disadvantages of this solution:
- saving site area;
- In winter, it is more convenient to use a home bath, since there is no need to go outside;
- you can save significantly on, since one wall will be internal;
- you can use general and .
Advice! When purchasing material, make a small supply. It will come in handy if the part is damaged.
Step by step construction small bathhouse:

- For baths will do columnar, or foundation type. The base does not require reinforcement. Small wooden sauna does not exert a serious load;

- Considering high humidity in a bathhouse, it is necessary to protect the foundation with high quality. It is best to use mastic and two layers of roofing material;

- Before installation, the crown should be treated special composition or regular used machine oil. It is important to set the crown level and prevent bending;

- We make logs from 50x150 per edge. How to make floors will be discussed in detail below;

- There is no need to rack your brains about how to lay timber if you have profiled material at your disposal. Walls from it are assembled simply as children's construction set. For additional fastening, dowels made of wood or iron are used. How to build using dowels in the following video:

- doors and timber bath you can simply cut it out after laying and shrinking the walls;

- Before the final shrinkage of the walls, a rough roof is installed. After a year, you can make a regular one on the rafters.
Advice! The most environmentally friendly steam room is made from beams. Drawings and dimensions of structures with different layouts can be found freely available on the Internet.
A short video on how to build a sauna from timber:
Related article:
This technology is used to speed up the construction of not too heavy buildings and other architectural structures. In the article you will find step-by-step instructions for constructing the structure and useful tips specialists.
Frame bathhouse - cheap and cheerful
It may surprise you, but for a frame bath you won’t need any drawings or any expensive projects. Everything is quite simple - we start from the dimensions of a standard sheet and assemble the bathhouse, like a construction set, quickly and inexpensively. The foundation you will need is the simplest, columnar or on stilts. Lightweight design By frame technology does not shrink and assembles in a matter of days.
Pros and cons of such construction:
| Advantages | Flaws |
| Light weight of the finished structure | The need for outdoor and interior decoration |
| Excellent, in no way inferior to brick and wooden models | Comparative fragility of the design |
| Construction speed exceeds all other construction technologies | |
| Low cost of materials and labor make this design the cheapest | High fire hazard |
| Ease of assembly allows you to build such structures yourself |
How to make a high-quality structure based on ? It is necessary to provide reliable vapor barrier. The humid climate of the bathhouse and exposure to precipitation adversely affect wall material.

Insulation of the bathhouse is another aspect. It doesn't matter if you are building a 3x4 mini sauna or a full 6x6 sauna. From good insulation depends comfortable temperature in all rooms.

You can use metal or wood for the frame. The first option has virtually no disadvantages. It does not dry out or become deformed. Baths with metal frame easy to repair. The only disadvantages of metal structures are the need for detailed diagram and qualified. If the choice is made in favor wooden frame, make sure that the board and timber are made of larch or linden.
Natural lining is used for interior lining.

Internal structure frame baths are no different from other options. The only thing worth remembering is that you need high-quality insulation of the wiring and protection of the area around the furnace from accidental fire.
In general, reviews of frame structures are positive. On the Internet you can find detailed photo reports from home craftsmen about the construction. You can find construction plans for baths measuring 2x4, 3x5, 4x6 and larger.
Photo and video story about how to build a frame bathhouse:
We build a bathhouse with our own hands: an overview of the construction stages
Building a bathhouse at your dacha with your own hands begins with a project. Can be used finished project or order individual design in one of the companies specializing in such developments. It is not difficult to prepare a construction plan yourself; a simple village bathhouse has a simple layout.

- Where to start construction? Of course, with the construction of the foundation. This is the first stage, which must be approached very responsibly. To build a strong structure, you will need to install a foundation that matches the soil characteristics. In the old days wooden baths placed on large stone boulders.

Guided by the experience of our ancestors, small bathhouses should be installed on an elevated platform - on a pile or columnar foundation. Compact panel buildings made of OSB do not require a reinforced base. It's a different matter if construction is planned. In this case, you cannot do without a tape. It, unlike, will cost more and require more time to manufacture. How to properly install a strip reinforced foundation for a bathhouse - in the following video material:
- The next step is . In an ordinary Russian bathhouse, it is preferable to make floors from boards. They are less durable than concrete floors, but you can walk on such floors barefoot, they dry quickly from moisture and do not heat up to extreme temperatures in the steam room. But the logs should be made from asbestos-cement pipes; this little trick was suggested by professional builders. Concrete logs do not rot, they are strong and durable.
- The walls in the bathhouse complex can be made of logs, beams, and panels. They happen. You can assemble walls from sandwich panels. It all depends on your decision and financial capabilities. It is clear that building a brick sauna from scratch will be more expensive than, for example, frame structure.
- It is easier to assemble the roof rafters for a bathhouse complex on the ground, and then lift it and install it on the walls.

- The last stage is the installation of equipment for the bath. The inside of the walls is usually sheathed with birch or linden clapboard; the outside of the frame structure can be sheathed or an imitation of a log frame can be made from slabs.

This is what it looks like brief description main stages of construction. It's time to show each of them in more detail. We offer a step-by-step demonstration of the construction of a bathhouse complex and video instructions on how to build a bathhouse.
Do-it-yourself columnar foundation for a bathhouse: step-by-step instructions and video
In principle, a frame bath can be built without, for example, on a substrate made of car tires. But keep in mind that within a year or two the structure may become warped. And the lower trim will rot from exposure to flood waters.
The best option is a columnar foundation. It will withstand the lightweight structure perfectly. On it you can build not only a bathhouse, but also a home and others.


Advantages and disadvantages of a columnar foundation:
| Pros | Cons |
| It can be erected with your own hands, without the involvement of special workers. Installation of a frame structure on a foundation does not require special skills. | Not suitable for brick and block buildings |
| Suitable for almost any soil (including heaving) | |
| Compensates for differences in height on the site, does not require leveling | |
| Installs in one to two days | Does not provide for the arrangement of the ground floor or basement |
| Doesn't need | |
| Has a long service life | |
| Does not require capital investments |
The installation depth of the bases differs in:
- buried, installed below the soil freezing mark;
- shallow - from 40 to 70 centimeters deep;
- V drain hole
lined with brick or concrete. The pit is located in close proximity to the bathhouse structure and is periodically cleaned using a special machine; The drainage system for the bathhouse is laid at the stage of forming the foundation
It is necessary to dig a trench in advance for sewer pipes and bring them to the drainage point from the steam room and washing room. The pipe should be laid with an inclination of five degrees. To prevent the drain from freezing, you can insulate it yourself using heat-insulating materials.
A step-by-step guide to arranging a drainage well in the following video and photographic material:
Another significant point is the installation of floors in the steam room and sink. The simplest option is leaking floors. Water simply penetrates through the cracks between the boards. Under them there is a sealed receiving plane with a hole for drainage.

Advice! In non-leaking floors, the drain must have a water seal, otherwise unpleasant odors will spoil the pleasure of bath procedures.
You can also make completely concrete floors and cover them.

But it should be taken into account that it is easy to slip on the tiles, and in the steam room the ceramics heat up quickly, so you cannot enter it barefoot.
It remains to resolve the issue of water supply. In a separate building, it is better to carry out the water supply underground, in a protected enclosure. If your region has severe winters, it is worth considering heating the water supply to prevent the occurrence of emergency situations. Photo reports that are not difficult to find on the Internet will tell you how to install such a system.

Article

Advice! For a lightweight structure, you can use not concrete pipes, but plastic or wooden poles treated with resin to protect them from rotting.
Detailed video material on how to build a foundation for a 4x4 sauna with your own hands
Bathhouse with shower in the country: how to supply and drain water
A well-thought-out drainage system is an important point in the design of a bath complex. Proper drainage in the bathhouse will not only protect the base of the building from mold and rot, but will also save you from problems with neighbors in the area.
Where can you drain the sewer:
Availability own plot land provides an excellent opportunity to acquire your own bathhouse or sauna.
To ensure that the installation of such a building does not cause problems, in this article we will consider the stages of building a bathhouse with your own hands.
Progress of installation work
The first step is to choose a location for the future building. If your plot is small, then this is quite simple: you should lay the foundation where a residential building will not be built.
For larger areas, make your choice based on personal preference. However, compliance with the rules must also be adhered to.

Foundation
The construction of a bathhouse in stages with your own hands begins with the installation of the foundation. The bathhouse is not a large multi-story building and does not require the presence of heavy stationary furniture inside. Therefore, it makes no sense to fill a monolithic reinforced concrete slab and you can get by with a pile or strip foundation.

Although the pile model is somewhat cheaper, it is recommended to use it only in cases where the area for construction is sloping or low-lying.
The best choice would be to implement strip foundation because he:
- Has higher strength. It will come in handy if you want to add an attic in the future.
- Creates additional thermal insulation. This is an important advantage for a steam room.
- Provides the opportunity to organize a subfloor or cellar.
- We remove the vegetation layer from the site selected for development.
- Using pegs and a cord, we mark the future foundation.

- We dig a trench around the entire perimeter and in places where they will pass. Depth - 50 cm, width - 10 cm more than the intended walls.
Advice: in order to save money, it is allowed under internal walls lay the foundation level with them.
Since they still do not have a load-bearing load.

- We fill in a bed of gravel 15 cm thick and compact it thoroughly.
- There is a layer of waterproofing in the form of a polyethylene film.
- We install formwork on the sides of the ditch from knocked down boards, which should rise 20 cm above the freezing level of the soil.

- Mix the solution: gravel, sand and cement in proportions 5:2.5:1. We add water according to the situation for ease of kneading and making the mass fluid.
- We wait 28 days, after which we can begin further work.
Log house

Although the price of wood is higher than many modern building materials for a bath best option can't be found. Traditional wood with its warmth, smell and aesthetics appearance it is impossible to fully replace it with cheap cinder block or foam block.
Best suited for constructing a sauna body wooden beam cross section 15 cm by 15 cm.
There are two assembly methods:
- In the paw.

- Into the bowl.

During installation, the following nuances are observed:
- The optimal height for walls is 250 cm.
- Thermal insulation materials must be placed between the crowns.
- The wood is treated with antiseptics to protect against decay processes and pest attacks.
Advice: for the lower crowns, it makes sense to specifically purchase stronger and more reliable tree species, such as oak or larch.
They will be able to more successfully withstand the dampness coming from the ground.
Floor
- To maintain waterproofing, we lay a layer of roofing material on the concrete foundation.
- We install wooden beams on top.

- On the beams unedged board 15-20 mm thick, fixed with nails or self-tapping screws. This creates a rough layer of the floor.
- We install logs on the rough base.
- Between the lags.
What would be great for:
- foam;
- extruded polyurethane foam;
- basalt wool;

- expanded clay
- We must cover the insulating material on top waterproofing layer in the form of a polyethylene film three millimeters thick.
- We make the finishing layer from a three-centimeter tongue-and-groove board.

Tip: when installing the floor structure, provide a distance of a couple of centimeters between the insulation and fine coating For better ventilation air.
Ceiling
Now the step-by-step construction of a bathhouse with your own hands is approaching the arrangement of the ceiling, which has its own characteristics due to the presence of the most aggressive environment. After all, especially when operating in winter time From below the ceiling is affected by intense heat gathered from the entire steam room, and from above by severe frost.
Most suitable for bath conditions hemmed construction, which is executed as follows:
- Installed. As with the frame, you can use the paw and cup methods.

- We lay and secure an unedged board on top.
- WITH inside, standing on a stepladder plastic film for waterproofing with outlet on the side walls, covering the beam openings.
- We install insulation sheets between the beams:
- mineral wool;

- felt;
- penoizol;
- foam;
- polyurethane foam.
- Next we close everything. It serves for vapor barrier and reflection of thermal radiation. We fasten it with film to ensure sealing.
- We nail wooden planks through the foil to the beams.
- We attach tongue and groove boards to the installed slats.
In this case:
- We leave two-centimeter gaps between the ceiling paneling and the wall to ensure air conditioning.
- For fixation we use clamps.

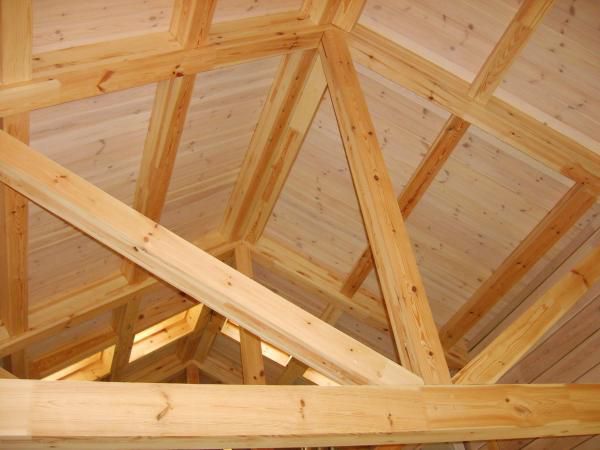
Roof
The roof structure can be either gable or single-pitch. The single-pitched one is certainly economical, but also less practical. If you want your sauna to serve you for a long time and reliably, it is recommended to install gable system. Moreover, it will also allow you to equip an attic utility room.

The roof consists of rafter system, sheathing and insulating coating material. If you do not have experience in the relevant work, then it is advisable to invite a specialist to carry out this stage.
Metal tiles are perfect for covering. And if the slopes on one side of the building are moved out by half a meter, then you can equip a wonderful woodpile.
Interior work
At this point, the ceiling and floor are already ready, therefore, the stages of finishing the bath now consist of covering the walls:
- Stuffing on inner surface parallel strips.
- We install insulating materials between them. Basalt wool, felt, polystyrene foam and extruded polyurethane also remain in demand.

- We cover the insulation with foil to reflect thermal radiation.
- We cover it with tongue and groove boards using clamps. This will eliminate the protruding heads of the screws, which can later cause burns.

That's it, the bathhouse is ready. All that remains is to install the furniture and the stove, after which you can start using the bathhouse.
Conclusion
Building a bathhouse with your own hands is certainly a troublesome task. But the result is worth it. It is not possible to single out the more important ones among all the stages of construction; all of them, one way or another, affect the quality of the future bathhouse.
- The wood that is used for the construction and finishing of the bathhouse is vulnerable to dampness and therefore it must be protected as much as possible by creating good ventilation and treating it with antiseptics.
- The steam room will only be of high quality and economical in terms of fuel consumption when maximum thermal insulation is ensured. Therefore, take your time special attention insulation of the building.

The video in this article will introduce you to additional materials on this topic. Happy construction!
Sometimes you really want to leave the hustle and bustle of the city and go to the country. Silence, walks, doing your favorite things - what could be better! If comfort is provided at the dacha, you want to come again and again. One of the comfortable living conditions at the dacha is a bathhouse.
Construction can, of course, be entrusted to professional builders. However, to build and improve a bathhouse on summer cottage quite capable on my own. This eliminates additional expenses and allows you to carry out finishing and landscaping in full accordance with your desires and preferences. Therefore, this task is not easy, but it is quite within the capabilities of a novice builder. A self-built bathhouse will delight the owners even more. So, how to build a bathhouse yourself?

Firstly, as with any construction, you first need to decide on the project and the materials from which the bathhouse will be built. The choice of base material for construction depends on geographical location and operating conditions, as well as on your own capabilities.
Baths are made of brick, aerated concrete and others stone materials, some prefer frame baths However, many novice builders prefer to build a bathhouse from wood. This one is light and durable material does not require a serious and expensive foundation, but has excellent characteristics. With proper care, operating the bathhouse will not cause much trouble.
And of course, preference should be given to timber - a bathhouse made of this material will retain all the advantages of a wooden structure and eliminate the problems and additional costs, which may arise during the construction of walls made of logs. Constructing walls from timber is similar to working with a constructor - it can have different geometric dimensions and cross-section (rectangle, square, semicircular), and also, in the case of profiled timber, there are grooves for fastening. Building from timber is easy and convenient - what could be better for a novice builder!
How to choose a place to build a bathhouse.
One of the most important points- choosing the location of the future building. The location must satisfy both existing legislation and ease of use. Basic recommendations that can help you make your choice:
- if there is a body of water nearby, you should not place the bathhouse too close to it, as the building will be in danger of flooding;
- it is necessary to decide how the bathhouse will be located relative to the house: a separate building or will it be attached to it, since each option has its own positive and negative sides;
- it is believed that it is better to build a bathhouse in the backyard, in relative privacy;
- It is necessary to provide for mandatory ventilation during construction, as well as to provide for wastewater disposal;
- It is highly not recommended to determine the location next to a nearby road;
- When placing a building, it is necessary to take into account the cardinal directions and wind direction: best place— the southern part of the site, protected from the wind so that it does not disturb vacationers; it is better to have windows facing west;
- It is desirable that the bathhouse be located at some distance from other buildings, and if it is an extension to the house, it is imperative that during construction it is necessary to comply with fire safety rules, as, indeed, when constructing a separate building;
- when determining the location of the bath and its size, it is necessary to observe established by rules distances from the boundaries of the site so that neighbors do not experience discomfort in the future and do not make claims to the owner;
- It is recommended to maintain a distance to the water intake (well or borehole) of no more than 20 meters.

At the beginning of construction, it is highly advisable to make a project that should, among other things, determine the optimal area of construction.

It is believed that the estimated area for 1 person should be approximately 5 sq.m. Thus, if the expected number of visitors to the bathhouse is 4 people, it total area should not be less than 20 sq.m.

The minimum composition of the premises is as follows: steam room, washing room, relaxation room and dressing room. It is important to determine the most convenient location of these rooms relative to each other, as well as their geometric dimensions.

First you need to complete several diagrams and drawings:
— general plan of the building;
— drawings of each room separately;
— diagram of the foundation;
- roofing diagram;
- plan for fastening and laying out timber;
— plan for the installation of the floor and ceiling of the bathhouse;
— diagram of the installation of the furnace, taking into account its design features.

All the necessary drawings can be completed independently, and can also be found in many open sources. As a rule, bathhouses made of timber have similar designs and you can easily choose the most suitable one. If you wish and have the necessary budget, you can entrust the design to a professional architect or builder.

Selection of building materials.
Below is a list of materials that will be needed to build a bathhouse from timber:
a) timber 150x150 mm, although it is possible to use timber with a cross-section of 100 mm or 200 mm;

b) batten(great fit edged board 150x50 mm 4 meters long);

c) hardwood boards for ceiling construction (usually lining with a width of 100 mm and a thickness of 20 mm or more is used);

d) material for wall decoration (as a rule, the same lining is used);

e) material for vapor barrier ( excellent option a vapor barrier film will be used);

e) waterproofing (it is advisable to use penofol, although polyethylene film is suitable);

g) ceiling insulation (mineral wool materials are a good option);

h) sheet asbestos for insulating wooden structures from temperature influences, including for walls near the stove and elements located next to the chimney;

i) cement, sand and crushed stone for foundation construction (recommendation - cement should be purchased before starting construction);

To) roofing material for the roof, which can be selected based on personal preferences and the main thing is that it fits organically into the surrounding roofs of other buildings;


l) insulation for the inter-crown space (it is better to use jute, although moss or tow are perfect).

The best time to start construction is spring, since after completion of the main construction work it is necessary for the timber to dry and shrink. This requires at least 6 months.
Do-it-yourself sauna - step-by-step instructions.
Step I – preparing the area for construction.
Before starting construction, it is necessary to clear the site - remove bushes, stumps, remove debris and everything that will interfere with the foundation work.


Step II - building the foundation.
It is best to build a bathhouse made of timber on a columnar foundation, which is inexpensive and excellent for the construction of small wooden and frame buildings.

When constructing it, you first need to dig the estimated number of holes for installing supports. Their number is calculated as follows: supports must be installed in the corners of the building and at the intersections of walls, as well as with a certain step along their perimeter.

The pitch is selected taking into account the type of soil and the calculated total weight structures. The depth of the holes should be 1-1.5 meters, although it may vary depending on the depth of soil freezing in a given area. To perform this type of foundation, in addition to the materials listed above, asbestos-cement pipes and fittings will be required.

At the bottom of the pit it is necessary to pour a mixture of sand and crushed stone 10-15 cm thick. Then install an asbestos-cement pipe into it, strictly vertically required length and secure. Several reinforcement bars should be placed inside the pipe.

After this, pour concrete solution into the pipe and into the free space between the walls of the pit and the pipe.


After pouring the solution, you need to wait a few days, then lay out a half-brick thick wall between the pillars.

Step III – erection of walls and arrangement of the roof.
The traditional material for the construction of bathhouse walls is timber measuring 150x150 mm. Before laying the first crown, it is imperative to put waterproofing on the foundation. The lower part of the crown must be treated with an antiseptic. Most often, the timber is laid out using the “paw” method.


The first crown must be carefully aligned geometric parameters- all angles must be exactly 90 degrees. After the first crown has been erected, they begin laying the beams for the set of walls. When laying out the walls, you need to make openings for future doors and windows and be sure to insulate each row with the selected thermal insulation material.

To connect the crowns, dowels are used - metal or wooden pins.
After the walls are removed, the roofing is installed. Depending on the chosen roof shape, it is necessary to fix the rafters, which are attached to the upper crown with brackets.

When installing a single-pitched sloping roof, the rafters are secured either by two external or one external and one internal supports. During construction gable roof It is necessary to securely support the rafters from below to the wall, and connect them together from above to form a roof ridge.

Sheathing boards are attached to the fixed rafters, then hydro- and vapor barriers and insulation are laid on them.

The roof installation is completed by installing the selected roofing material.

Step IV - interior finishing work.
Interior decoration must begin with the installation of communications - sewerage, water supply, electricity. You should worry about sewerage even when designing and constructing the foundation.

It is necessary to dig a drainage well next to the future bathhouse, which includes a sewer pipe buried in the ground with a slope to remove wastewater from the washing compartment.

After the sewerage installation is completed, a finishing floor is made, which is made of wood or concrete. Concrete floors are more durable and are most often covered with veneer. tiles or porcelain stoneware.
If a wooden floor is chosen for interior decoration, it is usually made to leak. To do this, floor boards are nailed to the installed joists with a small gap, or a small space is installed in the floor. drain hole, closed with bars.

In this case, the floor must be made with a slight slope towards the drain. Then the water that gets into the drain will be through sewer pipe discharged into a drainage well.

After installing the sewer system, it is necessary to perform insulation, hydro- and vapor barrier of the walls and ceiling using appropriate materials, install electricity and water supply.

After installing windows and doors, then finish the room using, for example, lining.

After finishing is completed, you need to install the necessary electrical appliances.

Step V - installation of the stove and shelves.
There are a great many options for placing shelves; you just need to follow the recommended dimensions and the fact that they should be made of hardwood. The installation principle is simple - a stable frame is mounted, usually made of timber, and boards are attached to it.
The stove must be installed in full compliance with fire safety requirements. Wooden structures must be isolated from exposure high temperatures working stove and chimney. If the furnace is heavy, it must be installed on a specially equipped foundation. This is determined on a case-by-case basis depending on the oven selected.

The stove is selected depending on the preferences of the owner. This can be a traditional wood-burning heater, a metal wood-burning or electric stove; sometimes it is advisable to choose a gas stove for a sauna.
Step VI - choosing accessories
There are many accessories for a bath.

The main ones are:
— brooms (oak, birch and others);
- containers (buckets, basins);
- a wooden ladle for adding water;
— wooden gratings on the floor and much more.

Can add additional personality interior decoration premises, which remains at the discretion of the owner - here, depending on desires and financial capabilities, you can give free rein to your imagination.

It should be added that all of the listed accessories can be made independently. Bathhouse is great place in order to spend time in a pleasant, friendly company or with your family. It will be much more pleasant to realize that all this was done with your own hands, including useful and necessary devices: for example, hangers, lamps or ventilation grilles.
Enjoy your steam!
Video about building a bathhouse yourself.