Make a quick jewelry stand out of... DIY jewelry stand
A stand for jewelry is extremely necessary for any fashionista who has large number earrings and beads, and who often changes them depending on her outfit and mood.
DIY jewelry stand
There is nothing easier than reclassifying coat hooks as jewelry hooks. You can use ordinary store-bought ones made of wood, plastic or metal, without making any special efforts to decorate, because beads and bracelets will successfully complete this task.
- Clothes hanger.
An ordinary hanger can, indeed, perform the function of storing jewelry with great success: earrings should be placed on additional hooks under the hangers, bracelets should be placed on a metal rod, and beads should be tied in a loop on the crossbar. It looks most aesthetically pleasing when hung with jewelry. If desired, it can be painted in some kind neutral color or decorate using decoupage technique.
- Grater.
The graters with their small holes along the entire perimeter seemed to be created just for this purpose - so that girls could insert the hooks and clasps of their earrings into them.
In fact, the grater is a rather old invention, which during its existence has rightfully deserved to be main theme for entire museums and the most interesting private collections. The first grater was invented in the mid-16th century by the Frenchman Francois Bouillet specifically to grind dried cheese, and then began to be used for all other products.
Thanks to four edges (or even more in modern models), can be easily placed on a grater huge amount decorations and, turning the pyramid, see and choose what is needed for today's situation.
Oddly enough, It’s best to use a Soviet grandmother’s grater for decoration, even if it’s bent or rusty in places. By spray painting it with any color that matches the interior, you can get not only an excellent holder for jewelry, but also a really interesting art object.
- Cups and saucers.
An elegant tea set of coffee cups and saucers, one of those that everyone has received at least once as a gift and for some reason hardly ever uses, will be a wonderful way to store jewelry. Filled with chains and rings, as well as earrings and beads, it can be placed right next to the mirror, or you can put it in a chest of drawers or a dressing table drawer, and open it every morning before going out, like a real treasury.
- Desk drawers.
Among other things, they are notable for the fact that wooden base It’s easy to hook earrings, and also attach pushpins or nail small nails and hang beads and chains on them. And the bracelets will fit perfectly on any stable cylinder, for example, empty bottle from a lemonade bottle or toilet paper roll.
Except wooden box You can use an old Soviet first aid kit in exactly the same way if you remove the door - don’t hide such beauty!
Holder for rings and bracelets made of plaster
The needlewomen certainly borrowed the idea of making a stand for jewelry from plaster from shops and showrooms, where mannequins are displayed at every turn, demonstrating not only clothes, but also all kinds of accessories in the best possible light.
Mannequin literally means “little man” and is considered one of the most ancient inventions of mankind, because already in the tomb of Tutankhamun a male torso with a set of clothes was discovered. Papier-mâché mannequins were only used for display and tailoring in the 18th century, and wax mannequins were used in shops in 19th-century Paris. This was extremely inconvenient and impractical, and only the advent of plastic finally solved this problem.
In order to make such a stand for jewelry, you will need:
- gypsum - 1 kg (gypsum in dry form is sold in construction stores and art salons);
- thick rubber glove of the smallest size;
- a smooth wooden board and a simple pencil;
- sandpaper;
- construction stapler;
- drill and jigsaw or hand saw.
How to make a plaster jewelry holder:
- It is necessary to measure the diameter of the wrist of the rubber glove and draw a corresponding circle on wooden surface, and then cut it out using tools. Next, sand the edges of the wooden board with sandpaper and attach the glove to this hole with a staple gun, as shown in the photo below.
- Next, you need to mix the plaster with water so as to obtain the consistency of sour cream, and carefully pour the resulting mixture into a glove attached to the board. It is important to ensure that the plaster fills the glove evenly without leaving any air bubbles. In this form, you need to let the plaster dry for two days.
- After two days, the glove is carefully removed, and plaster arm ready for rings and bracelets.
A holder for rings and bracelets made of plaster in the shape of a hand can become a non-trivial decoration for exquisite interior and will successfully fulfill the task of a beautiful and convenient device for storing jewelry.
Tree for decorations
Making a stand for jewelry in the shape of a branched fruit-bearing plant is a great idea, suggested by nature itself, especially since it is not so difficult to implement.
Trees for storing earrings can be made of several types:
- Made from real tree branches.
This is the simplest and most obvious option, for which you just need to choose a suitable strong branch and a stand for it, or simply nail the branch to the wall and hang your jewelry on it.
- Wire tree.
Twisted wire tree placed in decorative vase or framed, can look very unusual and conceptual. The main condition is to choose the right wire. It should curl well, keep its shape and not be brittle. Copper wire is best suited for these purposes.
Detailed master class: tree made of wire and papier-mâché for storing jewelry (video)
- A tree made of wooden or cardboard modules.
A tree made of two modules can be openwork, as in the photo, or primitive in shape, as in the master class on its manufacture, which can be seen below. One way or another, large number The edges of such a tree provide excellent opportunities for beautiful and convenient placement of jewelry.
What is needed to make such a tree:
- cardboard and scissors or fiberboard sheet, jigsaw and drill;
- liquid nails;
- dye.
Regardless of the material chosen for making wood for decorations, the procedure will be the same:
- Using the template presented below, draw two identical trees on a sheet of cardboard or fiberboard, cut or saw the trees along the contour and make slits at the top and bottom, as shown on the template, as well as small round holes(holes) where they are shown in the figure.
The basis for a jewelry holder can be:
- photo frames;
- a picture frame or from an old mirror;
- hoop.
The appearance of picture frames is associated with the designation of easel painting, when works fine arts they already wanted to observe it not only on the wall on which it appeared thanks to the efforts of ancient artists, but also to transport it from place to place, view it in a museum, or even have it in their own living room. This was in the 14th century and since then frames in various designs and variations have not lost their relevance and functionality.
You can fill frames and frames with any material with a large number of holes, so you can easily attach earrings to it:
- lace;
- mosquito net;
- tulle;
- plastic or metal grill.
A frame filled with lace and all kinds of earrings will adequately decorate any room, attract the attention of guests and help forever forget about the problem of lost or forgotten jewelry in a huge jewelry chest.
Frame for jewelry with mosquito net (video master class)
There are several ways to beautifully arrange decorations in a prominent place so that you always know what is available, and at the same time transform the room:
- hang hangers or hooks, a tree or a frame on the wall and fill them with jewelry;
- make a free-standing object by transforming ordinary things, for example, grandma's grater, or gluing together a tree from cardboard modules.
Whatever you choose, a jewelry stand with jewelry, chains and bracelets beautifully hung on it will now become the center of attention in your apartment or a priceless gift for a girl whose passion is jewelry.
We have known this book stand since our school days. Its use not only increases comfort during classes by freeing up space on a desk or table, but is also recommended by ophthalmologists to maintain healthy vision in children.
Why do you need reading stands?
In elementary grades, teachers often require book stands in class. School desks are small in size and cause inconvenience for a child if he needs to use a book and a notebook at the same time. That is why a small and practical stand will become an indispensable assistant child in all lessons.
Ophthalmologists approve of this decision and strongly support teachers junior classes. The vertical position of the book will not provoke severe eye fatigue during classes and will prevent changes in the structure of the eye lens.
In addition, book stands are school lifesavers, because with their help there is always space between the book and the eyes. optimal distance, which also greatly affects the state of vision. Proper seating of the child at the desk, maintaining straight posture and conservation correct distance between the eyes and a book or notebook will provide healthy development child and will relieve excess fatigue from the visual apparatus and spine.
What types of stands are there?
A stand for reading books can be metal, wood, or cardboard. Make this convenient device You can do it yourself. Metal stands are more practical; they can easily withstand the weight of a book and the need to constantly fold and unfold the device.

The most common stands consist of a plastic part on which a book or notebook is placed, a metal height adjuster and metal fasteners that hold the book in the desired position and prevent pages from turning. The table stand for books should be stable and create the correct tilt of the textbook.
Modern stands have a variety of shapes and designs, but the only thing that remains unchanged is their functional component. Placing textbooks in a vertical position promotes the correct position of the lens, which prevents its deformation and preserves vision even with increased strain on the eyes.
Storage stands
After a comfortable reading of the book, educational materials and the logs need to be stored somewhere. Perfect for this purpose plastic coasters. They provide storage of books in a vertical or horizontal position.
Such stands are very practical, lightweight and have an affordable price, so they can be used to organize the storage of books and magazines at home. The presence of partitions between departments allows you to sort books by genres, authors, sizes and other criteria.

A book stand is an indispensable thing in every home where a schoolchild or student grows up. In the workplace, such devices will also not be superfluous. They are very convenient for storing various documents and necessary papers.
How to make a stand with your own hands
For homemade coasters You can use small cardboard boxes. It is optimal to use cardboard boxes of cereals and milk porridges for this purpose. In this case, the book stand should be selected taking into account their size. Having measured the required width and height of the books, you can trim the boxes.
You need to trim as follows:

So that a self-made book stand has beautiful view, it can be covered with white or colored paper. Can be used self-adhesive film suitable colors or decorate the device with a beautiful patterned fabric. When decorating a stand, we advise you to use your imagination and tailor a practical item to the interior of the room.
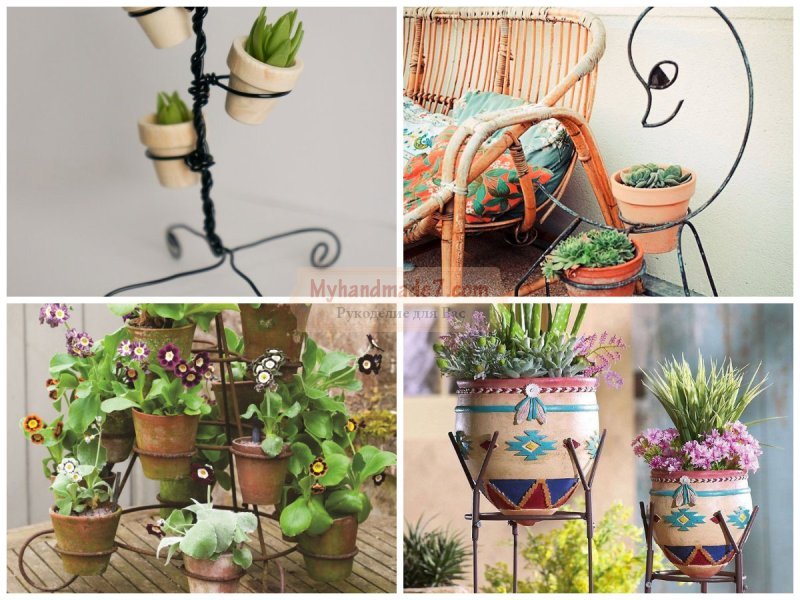
If you want to decorate your home with indoor plants, but space is limited, then you will definitely need DIY flower stand you can make it from wooden planks. Some creative ideas can be used to form original stands using only clay or plastic pots without additional structures. We have already made it with beads, satin ribbons and paper, but artificial flowers cannot fill the air in your room with the freshness and aroma of a flowering plant.
DIY flower stand
A green corner of the house is the dream of every housewife, because it is one of the main ways to create a warm and cozy home atmosphere; it is for this purpose that we also create. The only option for many housewives is to arrange flower pots on the windowsill, but then they will be hidden behind the curtain most of the time, which is why it can be used DIY wooden flower stand. Various stands can be found in stores that sell flower pots, but sometimes they do not meet your requirements at all, and then you decide to make them yourself. Perhaps to implement your creative idea you will need to master new instruments, some of which are even considered masculine. For example, you may need a jigsaw, saw, grinding machine. Don't worry, you won't encounter any difficulties when working with these tools, but the results will exceed all your expectations.

DIY flower stands for home can be suspended and floor-mounted, even multi-level. IN in this case we will make a hanging multi-level shelf that will decorate your home interior. A wooden shelf will perfectly complement the interior, where natural textures predominate.
Before you start making an accessory for your home, you need to go to specialty store and purchase wooden boards, but you can also take old shelves, which will get a second life and become a decoration for your home.

To form a hanging multi-level shelf, we will need a thick rope, whose natural color will fit perfectly into the interior, and for fastening suspended structure you need to prepare a metal ring. As for the tools, we will use a drill with a large-diameter drill, a jigsaw or a jigsaw. To process wood, you will definitely need a brush and paint (or varnish). Of course, when we're talking about about indoor plants, we need four ceramic pots, but you can use 2-5 pots for your design.
If you still do not dare to take on such complex tools, then you can create ones that will also decorate your home.

DIY wooden flower stand
We need not only to create a beautiful hanging shelf, but also to solve the issue of the strength of our structure. Therefore, when you consider the master class, how to make a flower stand with your own hands, please note that from the wall of the pot to the edge wooden stand must be at least two centimeters, otherwise the wooden plank may break.
We need to cut out squares or rectangles from the boards, the width of which will be 4-6 cm larger than the pot at its widest part. When the squares are ready, you need to draw a circle in the middle - circle the pot in its widest part, but not in the widest part, otherwise, when we insert the flowerpot into the hole, it will simply fall through. The hole should be slightly smaller than the base of the flowerpot, so the pot will be securely fixed in the wooden shelf. You can measure out the squares after the circle has been drawn in the center. Let us remind you once again that the diameter of the circle should be a couple of centimeters smaller than the diameter of the pot at its widest point.

The next stage how to make a flower stand with your own hands, the use of complex sawing tools is expected internal hole. First we will fix the square, and first of all we will make a hole in the very center with a drill. We will need this drilled hole to “penetrate” the center of the circle with a jigsaw for its subsequent cutting. You must work very carefully with a jigsaw so as not to go beyond the outlined boundaries, and it is desirable to get an even, neat circle. Thus, it is necessary to prepare all four blanks. Only when the holes in the center have been cut, it is necessary to drill holes along the edges (in the four corners), into which the ropes will be threaded, which will hold our multi-level structure. It should be noted that only those plants that hang down with vines should be placed on such shelves, as in other hanging structures. It is important to first make marks on all the squares in the corners, because on each board they should be located without displacement.

How to make a flower stand with your own hands
Further decoration DIY flower stands, photo which you see in the master class depends on your imagination. If the wood has a beautiful natural texture, then there is no need to hide it, but just highlight it by covering the wood with varnish. However, you can paint the wood any color you want to make the shelves fit into the interior of your home. Can be used to paint wood acrylic paint, for example, dark blue.

In order to give the paint an antique effect, two shades of paint are usually used: the lower one is darker (brown or burgundy), the upper one is light (sea green, turquoise, mint, blue). First, the surface is covered with dark paint, wait until it dries and then cover it with transparent varnish. After the varnish has dried, cover the surface with light paint. When dry top layer, use soft sandpaper to make “scuffs” in the corners. This way, you will artificially create the look of aged furniture, which will give the interior a vintage shine. Crocheted tablecloths and carved photo frames will fit perfectly into such decoration.
Even if you take plants whose branches hang down, you need to measure the height of the bush that rises in the pot in order to know what the distance between the shelves should be. It is advisable to make the same distance between all four shelves, then the whole structure will look neat and stylish.

At the next stage it will be formed DIY flower stand: four pieces of rope need to be cut same size and secure the pieces to a metal ring. Then the ropes must be threaded into the holes made in the first square. You need to tie knots on the ropes under the base, first aligning them so that they are at the same level. Next, you need to fasten all the other square planks step by step, making knots under each, which will be the main fastening. The knots are easy to adjust so that the planks are parallel to each other. The excess part of the rope from below can be cut off.
Note that one such hanging structure can accommodate four plants without taking up space since it can be hung near a window or anywhere on the wall. This solution will be ideal for small apartment, if you are the happy owner summer house, then in the summer months the structure can be hung on the veranda.

DIY floor flower stand
DIY floor stand for flowers formed from pots different diameters. The largest pot will be at the base, followed upward by four more medium-sized pots, and a small pot will complete the structure. At the base there will be iron reinforcement, onto which the remaining pots will be attached one after another, forming a pyramid. The length of the iron rod will determine the height of your future floor stand. The rod should be thick enough in diameter if you plan to mount large flower pots on it, but you can also make a decorative stand from miniature pots. You can use such a stand for decoration, then you should put sisal in each pot, forming a nest, and in it - a decorated decorative egg.

Pots can be pre-coated with spray paint to give the stand a decorative look: You can make them in one color or create an original color transition. Before painting flowerpots, they should be coated with several layers of primer. The paint is also applied in several layers after the previous ones have dried.
In four medium-sized pots, holes should be made at an angle: such a hole should pass through the bottom and wall, when you thread the reinforcement into this hole, the pot will be located at an angle. The largest flowerpot will be our base; we need to fix the fittings vertically in it, and then string three inclined containers and the last, smallest one. Flowerpots need to be filled with soil and homemade flowers should be planted. DIY floor flower stand can be located anywhere in your home, and this idea can also be used to form a flower bed in your garden.

DIY flower stands: photo
In the store you can find the most original racks for metal flowers, do it yourself it is quite difficult to perform them, because when working with metal, it is impossible to do without special hacksaws, welding machines and other tools that require special skills to operate.
Beautiful forged racks, despite their popularity, can “heavien” the interior, as designers say. Therefore, if you decide to buy such a stand for indoor plants, evaluate the space of your room, it is advisable to place them in spacious halls, and it is strictly forbidden to use them in cramped small apartments.
You can breathe life into old, seemingly unnecessary things, for example, iron legs from an old sewing machine or metal chairs that have long lost their decorative appearance.
How to give a gift to New Year with your own hands? One that is not only beautiful, but also practical. It is unlikely that anyone will dispute the benefits of hot mats. Today we will talk specifically about mug coasters. On...
Nobody likes wet circles on furniture or stains from hot utensils. Coasters, good and different, help us avoid all these troubles. Such a need can be easily done with your own hands, since there are options...
Winter is approaching - the time for hot soups and chocolate fondue. We cook with gusto, eat with pleasure, keep warm, but don’t warm the table, remember about its delicate coating and take care of the furniture. Of course, the most...
We bring to your attention fun summer cup holders. Making them is very simple: you need to take ordinary cork coasters and decorate them with acrylic paints. Under the photo you will find two master classes on making...
The morning hours at this time of year are beautiful - the waking rays of the sun, the singing of birds, and a light aroma blooming lilac, and just the warmth spreading inside, which gives the moments of calm before the onset of a new work...
Great idea - simple felt Easter eggs. They can become a practical stand for a mug in the form easter egg, and will serve a great gift for the holiday of Easter. This one is fast and practical option hand...
Burlap is a wonderful material that guarantees needlewomen two things: the cost of the product and the originality of the idea. With the first point, everything is probably clear: burlap decor will cost you pennies, even if...