How to fix a window: review of fastening hardware and a photo report of the installation completed. Technology for self-installation of PVC windows Correct installation of plastic windows with your own hands
If you are planning to replace or install new windows, you will need to learn the installation process. It all depends on how you will install the windows: either with your own hands or by hiring a third-party company. It takes approximately 4 hours to dismantle and install the structure if you do not have experience in this matter. For a company employee who does this often, such work will not take more than an hour. But installing tilt-and-turn windows yourself requires some construction skills.
Window system components
Before you begin installation, you need to understand the nuances and details. First, you should find out all the names of parts and materials. The main load-bearing part is the frame. In the version of plastic windows, its production is carried out from plastic profile, which can be single-chamber, double-chamber, etc. A special insert is placed in the center of the structure to ensure rigidity. IN plastic systems This insert is made of plastic; metal is used in metal-plastic ones.
The profile system is assembled from 2 or more chambers
In addition, the profile is divided into classes: premium, standard and economy. All profiles manufactured at the plant are subject to certain standards. If you want to make a choice in favor of good tilt-and-turn windows, take the standard class. In terms of color, white windows are most often found, but other colors can be used: wood, brown. Products made from colored profiles will be more expensive than white ones.
Components of a plastic window
 The main element of a window unit is the frame
 The design of a plastic window includes the following parts:
- frame – the main structural part;
- if you have a large window, most often it is divided by a vertical partition, there may be several of them - it all depends on the choice of design;
- the part that is motionless is called blind, and the part that opens is called the sash;
- double-glazed windows can have different properties, for example, tinted, energy-saving, reinforced, using inert gas. In addition, they are single-layer, two-layer, three-layer or multi-layer - the choice is great;
- In order for the glass to hold securely, they are pressed with a bead, which is a thin plastic strip. Used for sealing rubber seal, most often black;
- fittings are always used - this is a special set of tilt-and-turn mechanisms that help open and close the doors and provide various functionality;
- in addition, seals are needed to ensure the tightness of the entire structure;
- Ventilated holes for drainage are made on the inside of the frame, which are covered with caps. Moisture generated by differences temperature regime on the street and inside the room, gets out through them;
- another part of the structure is the ebb - it is mounted outside, and the window sill is installed from the inside;
- parts located on the side of the frame are finished with slopes.
Is it possible to install the window yourself?
There is an opinion that installing windows in a house or apartment is a rather complicated procedure. It must be said that this is not so. What do you need to know during installation? To perform these works you do not need special professional tools and equipment, vast experience. The procedure includes two main points:
- dismantling the old window unit;
- installation of a new window.
 Removing an old window takes an average of 1.5 hours
 If we talk about the time required to complete the work, the first stage will require approximately an hour and a half. Installing windows yourself will take less than three hours. It must be said that if you nevertheless decide to opt for the services of specialists, then you should demand certain guarantees from them.
If you installed the tilt and turn windows yourself, this will void your warranty. In this case, it is necessary to purchase structures directly from a manufacturer who has been working on the market for a long time, has good reviews from clients. If you decide to buy single-chamber or double-chamber windows in winter period, you can always count on a significant discount.
When a window is purchased from a company that carries out installation work, then the customer has a warranty on the fittings for about 5 years. If you install it yourself, you can get a warranty directly from the manufacturer, that is, at the place of purchase.
In order for the windows to be installed in brick house, cinder block, gas block or apartment, you must first order a tilt-and-turn or blind structure from the manufacturer, and this requires accurate measurements.
Step-by-step instructions for correct measurements
When you place an order, you will be asked to indicate the following dimensions: the width and height of the structure, the width and length of the slope and window sill.
 Before ordering a window, you must take correct measurements of the structure.
 Before you start measuring, don't miss important point– what type of opening do you have: with or without a quarter. Look carefully at the window opening: if the outer part is narrower, it means there is a quarter-sized opening in front of you. The measurement is carried out as follows: you need to measure the narrowest part, you will need to measure in several places, find the smallest value, add 3 cm to it. The height is indicated as it is. If your opening is even, then the measurements are done as follows: after measuring the width, subtract 3 cm; measuring the height, minus 5 cm. Read a detailed article about.
 Before taking measurements, you need to determine the type of window: with or without a quarter
 To determine the size of the window sill, you need to add about 10 cm to the width of the opening inside the window. For low tide, the same is done, only along the outer part of the window. Everyone chooses the width for the window sill for themselves: it is better if it protrudes slightly beyond the radiator.
In addition, when placing an order, you need to decide which components your design will be made: what options for two-, three- or single-leaf windows do you need, how they will open, on which side the capercaillie is located. Don’t forget to decide on the type of fittings (handles, locks, ventilation mechanisms).
If you order several designs at the same time, then the width of all openings may be different, but the height should be the same, you need to choose the most small size. Please note that window openings can be located from the floor to at different distances . In apartments, the distance from the floor to the window is approximately 80 cm, while on the balcony the windows can be from the floor. Accommodation in a private house can generally be anything at the discretion of the owners.
Features of measurements for glazing balconies
To determine the width of the glass structure, it is necessary to measure the length of the part of the balcony on which the balcony window will be installed, minus 7 cm on each side. This distance will be required for installation corner profile, to which the structures of the side elements of the balcony are attached. The height is calculated as the distance from the support to the roof on the balcony or loggia, and a tolerance of 3 cm must be subtracted for the gap.

How to correctly measure windows in a country house
To correctly measure the dimensions of a structure in a private house, knock out part of the slopes on both sides. Very often it turns out that the window opening is much larger than the window that is installed in it. This means that when the structure is dismantled, some of the materials with which the space was filled will also be removed.
Preparing to install a window structure
After you remove the old window, you will need to inspect the resulting opening, remove all parts that may fall off or collapse; if there are protruding elements, they should be knocked down. Then clean the opening from construction debris and dust. If there are large depressions, it is better to cover them with cement. You can also treat everything with primer.
 The base will need to be cleaned before installation.
 Having finished working with the opening, you need to prepare the PVC window, which is to be installed. To do this, you need to remove the window sashes; if it is solid, double-glazed windows. If your frame has small dimensions, then you can install it without removing the double-glazed windows and sashes. Outer part The frame should be freed from the film that protects it.
Installation Technology Guide
The finished plastic window is brought into the opening, placed on support blocks and aligned horizontally. After this, using a level, the window is aligned vertically and secured in this position with spacer blocks.

Installation of both fixed windows and opening sashes is the same. There are two options for installing windows: with and without expansion of the structure. When using the first option, holes are drilled through the frame, through which they are driven into the wall. anchor bolts. This method is more complex and more reliable.
 When installing a window using the unpacking method, holes are drilled in the frame and wall, into which anchors are then driven in.
  Places for attaching anchors and support blocks
 If the installation is carried out without unpacking the frame, the window is fastened using special ones, which are attached to the profile and then to the wall. This option is faster. However, it must be taken into account that under significant wind loads the frame structure may warp or it may sag. If you decide to mount it on a plate, you should choose thick, wide options. Please note that if the region in which you live has a strong wind load or windows will be installed at a height, then you should use the option of unsealing the frame.
 Installation on anchor plates
There are nuances to placing a window in the opening. If the walls are made of foam blocks, brick, cinder block, gas silicate or concrete, then the frame is placed 2/3 deep from the internal thickness of the opening. If the walls are insulated with foam plastic, then the fastening must be done before the insulating layer. When insulating and facing with bricks, the window is installed in the insulation zone.
 It is very important to choose the correct installation depth
 The installation sequence must be followed:
- Having inserted the frame, level it using support and spacer blocks;
- then attach it to the wall;
- after installing the structure, it is necessary to assemble the window;
- then you need to check the normal operation of the shutters and all mechanisms; to do this, open and close the window;
- after everything has been checked, the doors must be tightly closed and the gap around the structure must be sealed. For this purpose they use .
However, it must be remembered that in direct contact with sunlight and the external environment, the material loses its properties and is destroyed. To protect it, you need to create, this can be a special film that needs to be glued to the outside and inside of the window. After the foam has dried, it is necessary to finish the slopes on both sides (external, internal) of the structure. You can open the window a day after blowing the gap with foam.

To ensure proper installation on both windows and windows, follow these simple rules:
- we install the ebb from the outside in a special slot in the frame or attach it to it with self-tapping screws;
- the window sill is installed as follows: it is necessary to trim it from the edges so that it fits the width of the window opening and rests against the end of the stand profile;
- the level is leveled using special pads, after which the space under the window sill is blown with foam or filled with mortar.

According to the principle described above, windows are installed on a balcony or loggia, in brick or concrete walls. However, keep in mind that the entire weight of the window structure will be carried by the parapet, so you need to strengthen it.
Mistakes you can make when installing windows
There are a number of points that you should pay attention to when installing the structure so that it has a long service life:
- you cannot install the window with the glazing beads facing outward, as this reduces the structure’s burglary resistance, since the glazing bead can easily be pulled out and the glass unit removed;
- you need to be careful about leveling the structures when installing the window, otherwise opening and closing the sashes will be difficult;
- It is imperative to protect the polyurethane foam from direct contact sun rays to avoid its destruction;
- It would be wrong to choose to fix the frame structure only with foam: it is absolutely necessary to attach it to the wall, otherwise it may simply fall out.
By following all installation rules, you can successfully install the window structure yourself, and if you seek the services of professionals, you will be able to monitor their work at any stage.
Buying and installing new windows is not cheap, and a significant portion of the cost comes from installation fees. You can reduce costs by doing this part of the work yourself. We will tell you how to install a plastic window yourself, giving step by step instructions with photo.
Measurements required for the manufacture of a plastic window
The ease with which you will succeed or fail will subsequently depend on how correctly you take the measurements. After all, having made window unit larger size, you will be forced to increase the opening, and if you make a mistake with the dimensions on the smaller side, you will be forced to increase it.
It is necessary to determine the dimensions of the future frame based on the type of windows, which are:
- with a quarter, i.e. with a half-brick protrusion, which is located outside the opening and against which the window frame rests. Such windows are present in almost all typical buildings;
- ordinary, i.e. without protrusions. This design is used in buildings constructed according to individual projects.
Measurements of a regular window
Using a tape measure, measure the length and width of the window opening, add 5 cm to these figures (per polyurethane foam) and write down the data obtained. In addition to the dimensions of the window frame, you need to measure the depth of the slopes, as well as the depth and length of the window sill. The last parameter is calculated based on the distance between the boundaries of the vertical slopes, to which 8-10 cm are added.
Quarter window measurements
In this case, you will have to measure the distances between the horizontal and vertical edges of the protrusion and add 5 cm per polyurethane foam to the resulting figures.
The video will tell you more about the nuances of measurements:
Ordering metal-plastic window, do not forget to discuss with the manufacturer the number of double-glazed windows and the size of the profile, as well as the list and quantity of fittings and fasteners. If the climate of your area is not severe, and the windows do not face the roadway, feel free to order two double-glazed windows and a profile 6 cm wide. The lower the temperature outside the window and the more noise on the street, the greater the number of double-glazed windows and the size of the profile.
The procedure for dismantling the old frame
To install a plastic window yourself, you need to get rid of its wooden predecessor. Dismantling should be done carefully so as not to dismantle half of the wall, which will then have to be restored, wasting time, money and effort. At the same time, remember about safety precautions, because working with glass is very dangerous, and the slightest mistake can land you in a hospital bed.
First, remove the opening parts of the windows from their hinges. Remove the glass by first removing the glazing beads. Using a grinder or hacksaw, make cuts in the frame and other parts of the window unit.
Using a pry bar, remove the elements of the old structure from the opening, which is then thoroughly cleaned of construction debris and dust.
Now it's time to find out how to install a plastic window yourself.
Installing a plastic window with your own hands: instructions
To install a plastic window yourself, prepare the tools and materials you will need during installation:
- self-tapping screws (4x35 mm, 4x25 mm);
- screws (5x60 mm, 3.8x25 mm, 3.9x25 mm);
- anchor plates;
- polyurethane foam;
- waterproofing and vapor barrier tapes;
- mounting wedges;
- low tides;
- windowsill;
- plumb line;
- level;
- PSUL;
- perforator;
- screwdriver;
- screwdrivers;
- a hacksaw with a fine tooth for cutting the window sill;
- tin snips to trim the flashing.
Before installation, remove the sashes from the window block.

Install mounting plates. The procedure is as follows: place the plate along the end of the window block, then turn it with the other end towards the room, fix it with a self-tapping screw (4x35 mm).
Please note: the distance between the plates should not exceed 600 mm.

Before you begin installing the structure in the opening, you need to apply marks for fasteners and PSUL. Align the position of the structure in the opening (this is why a plumb line and level are needed), taking into account the following: the maximum deviation from the horizontal or vertical should not be within 1.5 mm per 1 m of the structure, but not exceed 3 mm over the entire length or width of the product. Secure the frame using mounting wedges.
Bend the plates and mark with a pencil the places on the slope where they will be attached.

If your window is a quarter window, then mark the outline of the adjacent opening on the outside of the frame.

Remove the frame and drill holes in the places you marked, where the anchor wedges will then be inserted.

Drive dowels into the resulting holes.

Use a brush and vacuum cleaner to get rid of dust. Apply sealing tape to the frame. In the case when you are dealing with a quarter window, the tape is glued to the outer part of the frame at a distance of 3-5 mm from the previously outlined opening contour.
In windows without a quarter, the outer seam is insulated using special moisture-proofing sealants after the structure has been installed.
Secure the window block in the opening using mounting wedges and remembering to check the correct position.

Fix one top side plate at a time and measure the diagonals of the window block. Their difference should be within the following limits:

Screw on the remaining plates and remove the wedges, leaving only the bottom and diagonal ones, then proceed to foaming.

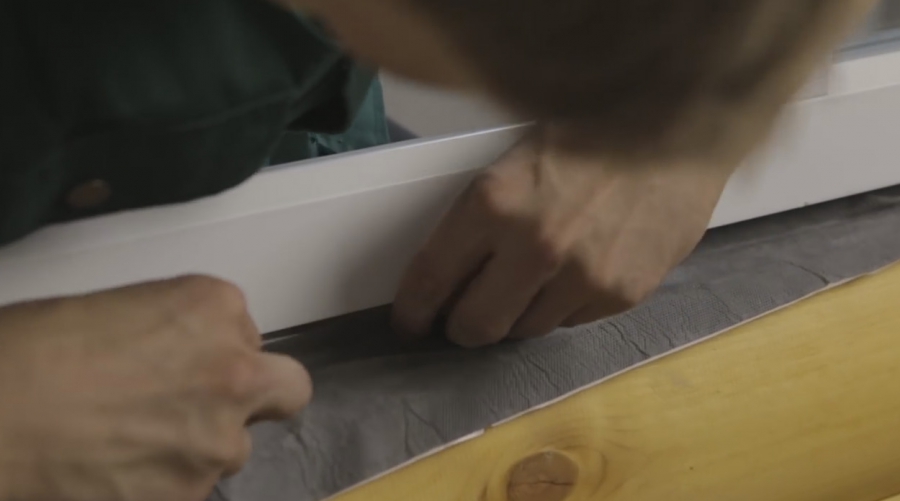
Trim off the excess foam and stick a vapor barrier tape on the side of the room, overlapping the wall by 10-20 mm.

Attach waterproofing tape to the outside.
Set the tide. Insert it into the groove and screw it using self-tapping screws (4x25 mm).

Hang the shutters and then install the window sill. Adjust the handles if necessary.
You see, install a plastic window yourself not that difficult. The main thing is to have the desire and follow our advice.
Take it for yourself and tell your friends!
Read also on our website:
Show more
Today I will tell you how to install 8 plastic windows and an entrance door with your own hands in one day. To perform this work you will not need special skills or expensive equipment. But, of course, there are many nuances that are definitely worth paying attention to. And of course there are several secrets on how to save money when ordering.
I used windows with optimal thermal characteristics with four-chamber window profile and double-glazed windows, as well as a reinforced entrance door. By the way, it was the door that made up almost half of the cost of the order. A general expenses amounted to 40 thousand rubles for the set and another 4.5 thousand rubles for delivery. How to buy windows at the same price is at the end of the article.
Let's get started!
2. We have a newly built aerated concrete house, in which we need to install 8 windows and one entrance door. First of all, we take all dimensions from the openings. As you remember, I made overhead quarters around the perimeter of the openings on three sides (a quarter is not needed at the bottom - the window sill will be there). For quarters I used standard ones aerated concrete blocks 5 cm thick, which were installed like all masonry on polyurethane foam. The recess of windows during installation should be at least 1/3 of the wall thickness. It is also worth noting that you should not try to make openings under standard sizes windows - their production technology is automated and there is no difference in cost between standard size or a custom window. We calculate the final window dimensions taking into account the following factors. On the side and top from the frame to the wall there should be a gap of 1 to 2 centimeters on each side, which will be filled with polyurethane foam. At the bottom of all windows from the factory there is a 3 centimeter high stand profile, which is needed for convenient installation window sill. Plus, under the delivery profile there should also be a gap of about 1 centimeter for the mounting foam. Total, roughly speaking from internal dimensions the opening needs to be subtracted 4 centimeters horizontally and 6 centimeters vertically. You shouldn’t get too carried away and push the frame into the opening without a gap, because... It will be extremely inconvenient to pour polyurethane foam into a gap of less than 5 mm.
3. It is important to know that opening sections greatly increase the cost of the construction of any window. Therefore, if the goal is to save money, you need to make the most of fixed, non-opening windows. In case of suburban one-story house there is no problem going outside to wash the windows, and for ventilation you can make an opening transom (due to the design features, it is several times cheaper than a tilt-and-turn mechanism, but at the same time its width should be significantly greater than its height, more precisely, its height cannot exceed 50 centimeters). The advantage of the blind section is also that you don’t lose usable area glazing. In my case, there are 5 blind windows measuring 60x60 cm, two blind panoramic windows 1.4x1.7 meters, one tilt-and-turn window 0.6x1.3 meters and an entrance door with partial glazing 0.9x2.3 meters. The above price includes the windows and door only (including hinges, handles and locks). Separately, I needed to purchase anchor plates, dowels, self-tapping screws, PSUL sealing tape, polyurethane foam, window sills and sills for a total amount of 3.5 thousand rubles.
4. We will need: a screwdriver with a drill for concrete, foam with a gun, PSUL tape, fastening plates, dowels for aerated concrete and self-tapping screws. Also, the bubble level was not included in the frame. Once again I want to draw your attention to the fact that measuring instrument You can't save money.
5. There are two ways to secure the window frame: through fastening with unpacking of double-glazed windows and using anchor plates. The first method requires more time and skills. In particular, you will need to carefully remove the glass unit from the frame and then install it in place. The glazing beads that hold it are usually fixed very firmly and in order not to scratch the edges you will need a special spatula and patience. Plus if we're talking about about installation with two hands, then with large windows the problem will be that the removed double-glazed window cannot be tilted, unlike the frame in which it is installed. In addition, through-mounting requires precise fixation when drilling and an assistant will definitely be required. Much easier installation carried out on mounting plates. Each such plate costs 10 rubles. They need to be installed at the rate of 1 plate for every 50 centimeters. The plate is installed by turning it in the groove of the frame and fixed using a self-tapping screw with a drill (to drill metal frame inside the frame).
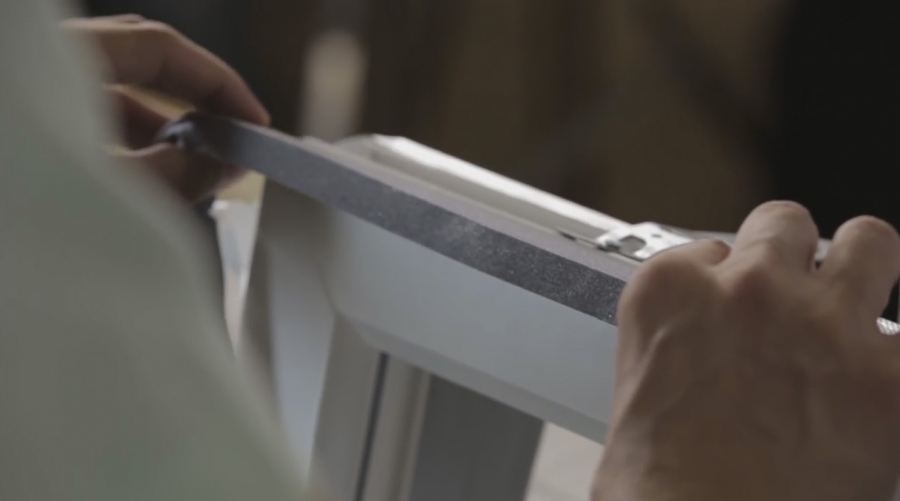
6. After this, PSUL tape - pre-compressed - is glued to the outside of the frame on all sides except the base sealing tape. It is used when installing a window in an opening with quarters. The purpose of the tape is to protect the polyurethane foam from ultraviolet radiation and, consequently, destruction. In the cold season, it is easier to install windows, because... the tape expands very slowly in the cold.
7. A six-meter roll of PSUL tape costs 140 rubles. When fixing the tape on the outside of the frame, it is preferable to step back 1-1.5 cm from the edge, especially if you have deep quarters. This should be done so that when pouring polyurethane foam between the frame and the wall, it does not get on the PSUL tape.
8. Now we move on to the window opening. His geometric dimensions ideal, and the base perfectly matches the horizon level. This happens naturally when building with aerated concrete if you follow the technology and level each next row of masonry to zero. I started the installation with small blind windows and they differ from the others in that they will not have window sills. Therefore, we will not use the stand profile. To support the frame on the base of the opening, I use a piece of laminate 7 mm thick.
9. Place the window and mark the location for the mounting holes. We drill and install special screw dowels for aerated concrete. It is worth paying special attention that you should not try to hammer them in with one blow, especially if they are located close to the edge of the block - there is a risk of breaking off a piece of the block. After this, we insert self-tapping screws through the mounting plates.
10. Our next task is to install the side window vertically. In the case of small windows this will not be difficult, because... there will be no skewing of the window diagonally and it is enough to take measurements at any point of the frame. After this, tighten the self-tapping screws on the fastening plates and remove the piece of laminate at the base. Any window must be fixed so firmly that it can be held in the opening solely by the mounting plates. Polyurethane foam is used primarily for filling voids and thermal insulation, and not for mechanically fixing the frame in the opening.
11. You will have to tinker with large windows. Each one weighs more than 80 kilograms and will not be easy to lift into the opening alone. I built a staircase from blocks and gradually raised the window 5 centimeters upward. I used 9 mounting plates for each window. 3 on each side, except the bottom. Here you need to pay closer attention to the verticality of the frame and apply a level in all corners. On large windows At the bottom there is a support profile in which the window sill will be installed. Directly below the support profile I also placed a laminate plate, which was removed immediately after fixing the anchor plates to the wall.
12. The tilt-and-turn window is 2 times smaller in size, but for it I decided to use 8 anchor plates, because an open sash will add load to the frame. On average, it takes about 30 minutes to install one window. And a very serious mistake that most people make - protective film must be removed from the frame immediately after installation. Even if you installed the windows at the beginning of the renovation, the film must be removed immediately. If this is not done, then it will be more difficult to tear it off, and the plastic will burn out unevenly (this is important for the outside of the frame).
13. Let's move on to front door. This is a reinforced door with 3 hinges with a full frame around the perimeter. Opening inward is much more convenient than opening outward. But most people have a stereotype that the door should be opened outwards. When installing door frame the most important thing is to ensure a uniform fit around the perimeter. I used 10 anchor plates to secure the door. Special attention It is worth paying attention to the verticality of the side walls of the door frame in two planes. For reliability, the fixation of each anchor plate can be supplemented with a second self-tapping screw. As with windows, the door should be fully functional when held in place by anchor plates only. It should not warp when opened and it should fit snugly around the perimeter when closed.
14. Now we take a gun with polyurethane foam. The presence of a pistol is mandatory because it allows you to regulate the volume of foam output. There are nuances with foam that you definitely need to know. First, the foam is afraid of ultraviolet radiation and needs to be protected from sunlight. For this purpose, there is PSUL tape on the outside of the window; on the inside, it is necessary to plaster the slopes or, as an option, paint over it. As for applying foam, it absolutely cannot be trimmed. The shell that has formed on it protects the internal open cellular structure from moisture absorption and subsequent destruction. Therefore, the seam between the frame and the wall should be filled exactly to the extent that the excess does not protrude outward. It is important not to overdo it with deepening the gun nozzle, because... do not forget that on the outside we have PSUL tape and it should not come into contact with fresh foam. Approximately 5-10 minutes after filling the seams with foam, you should visually check its condition and, if necessary, carefully compact it (before it hardens, this is easy to do). If work is carried out at temperatures below +5 degrees, it is imperative to use special winter foam.
15. Next, install the fittings and check how the windows open. If the window opens poorly or jams, this is a sign that mistakes were made when installing the window. Most likely, the frame is not strictly vertical in all corners. This can be corrected by adjusting the hinges and lock.
16. Done! The windows and door should be left for a day until the foam completely hardens. And we move on to the finishing stage.
17. Let's take it plastic window sills 20 centimeters deep. In total, I need 3 window sills: two 140 cm and one 70 cm. A finished window sill 150 cm long cost me only 200 rubles. We cut off the excess using a jigsaw and install it under the frame in the stand profile. It is worth keeping in mind that the depth of the window sills into the frame is 2 centimeters; this is important when choosing the depth. Before installation, do not forget to remove the protective film around the perimeter. We install the window sill either strictly horizontally or with a slight (1 degree) slope from the window.
18. We cover the edges with special plates, which should be glued with superglue. As a support when setting the level, you can use cuttings from the window sill itself or wooden block. After this, we weigh the window sill from above so that the mounting foam does not lift it up. And fill the entire plane of the base with foam from below. Just as with window frames, you should control the expansion of the foam and prevent it from having to be cut with a knife. Just tamp it down until it hardens.
19. The final chord is the installation of low tides. We cut it to length, fix it to the window frame using self-tapping screws (after having coated the joint silicone sealant), fill the base with polyurethane foam and load it.
20. Done! Don’t forget to remove the protective film from the frames, window sills and ebbs. There is nothing complicated about installing windows and you can handle this amount of work alone. By doing this work with my own hands, I saved more than 15 thousand rubles on installation.
Now comes the fun part. The Chertanovo office of the Okna Rosta company decided that there should be a discount on windows not only for me, but for all readers of my blog. Therefore, we made an exclusive promotion for ordering plastic windows. The minimum discount of 33% is relevant for everyone who is ready to independently measure and install plastic windows.
All the details are here -
Most homeowners choose to install plastic windows not only because of its excellent performance, but also because of the ease of installation. This process is simple due to the fact that the design provides very easy-to-install fasteners and additional parts that are included in the package of the window. Many people are interested in how exactly professional installers install windows. With the most minimal skills in using tools, any homeowner can install such windows.
Of course, as with the installation of any structural element, when installing PVC windows, you will need to observe a number of features and certain actions. It is advisable to carry out this kind of work with an assistant, even one who does not have any construction skills; when leveling the window, some difficulties may arise if you do this work alone. Proper execution of all installation nuances will help you complete the job accurately and save on the labor of hired workers.
Carrying out measurements and calculations

Before purchasing windows, you should take measurements of the openings - based on this data, you will place an order to the workshop. When taking measurements, you need to take into account whether they are a quarter or not. Foam concrete buildings are characterized by quarter openings, which greatly reduces heat loss. For an opening without a quarter, when ordering fiberglass windows, the length will be 5 cm less than the same parameter for the opening. 3 cm is subtracted from the value defined as the width of the opening. Gaps of 1.5 cm should be provided along the contour - they are necessary in order to carry out foaming. An additional 3.5 cm should be left at the bottom for installing the window sill. According to GOST, 2 cm should be left around the perimeter.
To take correct measurements for a quarter opening, measurements must be taken at the narrowest point. When ordering windows, add 3 cm to the measured width; the length does not change the value.

More often, PVC window structures are not installed in the middle of the opening, but at a depth of approximately 1/3 from the outer plane. But if you are going to install the structure yourself, you can move the window a little at your discretion. To order sills and window sills, you should definitely take these parameters into account. Add 5 cm to the widths calculated for the intended location of the windows.
When determining the width of the future window sill, it is necessary to take into account the battery - it should be covered by the window sill by about half. Add another 2 cm - the window sill will need to be placed under the base window frame. You need to leave a margin in length - at least 8 cm. But it will be much better if you add 15 cm - this allows you to cut the window sill more beautifully.
Plastic side plugs are usually included with ebb and window sills. You shouldn’t refuse them, although some masters do just that.
Return to contents
Window frame installation methods

The technology for installing polyvinyl chloride windows does not depend on how many internal chambers are in the metal-plastic profile, nor on the number of chambers in double-glazed windows. It will be necessary to take into account when developing the installation plan following points: the material from which the walls of the housing are made, and the dimensions of the plastic window structure. Depending on this, the method of fastening and the devices that will be used are determined.
Plastic window frames can be fixed in the opening using the following elements:
- using dowels, mounting anchors, which must be inserted into the walls through special through holes, which are made in the profile in advance;
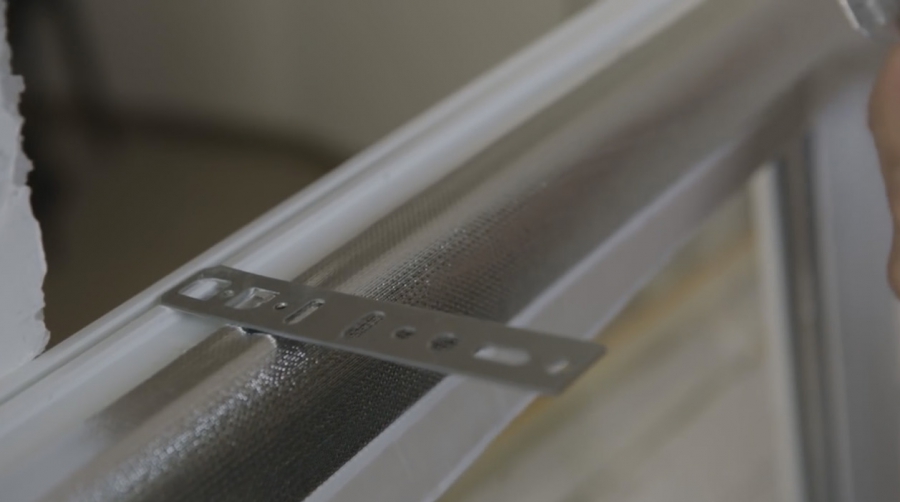
- Another option is special toothed plates pressed into the profile, which are not embedded in the wall, but are placed “off-the-cuff” and fixed with screws.
Option 1 is considered the more reliable of them. It is more often used in cases where it is necessary to perform installation window systems with considerable size and weight. Window frames with through fastening quite well resist various impact loads that can arise, for example, when operating PVC systems with sashes that open in different positions. Anchors passing through plastic frames through, allow you to more accurately adjust the structure during installation both vertically and horizontally.

Those who want to find out the method of correct installation of PVC windows that are small in size with fixed double-glazed windows may be interested in fixing the structure using anchor plates. Fastening elements will not spoil the appearance of the window - they are covered by slopes.
To install anchor plates in wall openings made of brick or concrete, you will need to make recesses. If you do not do them, you will need to apply an extra leveling layer before installing the internal slopes.
Sometimes installers try to combine these 2 methods. Anchors are inserted into the walls through the bottom profile, that is, the base of the window structure and the sides of the frame, and top part fixed with plates. If PVC windows are installed in a bathhouse built of wood, anchor plates should not be installed - they become loose during operation. In some cases, galvanized screws are used instead of anchors.
Return to contents
The nuances of installing plastic windows in wooden buildings

The installation process will be significantly influenced by the type of material from which the housing is built. For example, for walls made of hollow or solid bricks, foam concrete, the differences will only be in the depth to which the anchors are installed. But openings in walls made of logs or beams will require a special approach. Here you will need to take into account the installation method and choose the right time for this.
Install in walls made of wooden building materials Plastic windows can be installed only a year after the construction of the house. It’s even better to wait 2 years - during this time the shrinkage process will enter the stage in which subsequent operation will be longer and more reliable. For buildings made of laminated veneer lumber, the shrinkage period lasts the fastest.
Window installation should not be carried out immediately in the opening, as is sometimes done in villages.
A plastic window should only be inserted into wooden box, which will protect the window structure from distortion. The window unit itself must be free of any damage; the presence of defects and rot is unacceptable. Before starting work, it should be treated with an antiseptic composition.

After the PVC windows are installed in place, the shrinkage of the log house does not end. True, it will not continue as intensely. To prevent it from causing crushing damage to plastic structures, it is recommended to leave a gap of 3-7 cm between the top edge of the frame and the window frame. After the window is put in place, the gap is filled with jute insulation and closed on both sides with platbands.
There are no building codes precise recommendations regarding what materials should be used to install ebbs and window sills in wooden houses. As a rule, standard sills are installed, which are ordered in one set with the window design. Window sills can be made of wood or polymers. The bottom profile can be supported on a wooden window sill, that is, it can be installed before installing the window.
For those who are planning to install windows themselves, but do not have much experience in this matter, the following information may be useful. Since wood is highly permeable to moisture vapor, technical qualities the polyurethane foam used when installing the window is seriously reduced. To ensure that the foam blown around the perimeter of the structure is not exposed to moisture and does not get wet, a foil polyethylene tape should be applied to the window block along the line on which it is applied. This nuance is not specified in the regulations, but experienced installers highly recommend not neglecting such equipment when installing a window.
Return to contents
Standard methods for installing plastic windows

The technology for installing plastic window structures includes the use of polyurethane foam. In addition to providing insulation, it will add additional rigidity to the connection between the opening and the frame. Thus, a layer of polyurethane foam, obtained as a result of its polymerization, simultaneously protects the opening and fixes the structure. So that under the influence of unfavorable external influences the foam layer does not lose its technical properties, it is better to surround it with additional insulation.
As to when exactly to install PVC windows, the decision is made by homeowners. You can also come across the opinion that it is better to do the installation not in summer, but in winter - in this case, all installation flaws will appear immediately and can be corrected very quickly. When choosing polyurethane foam for work, pay attention to the information on the composition - it should indicate at what temperature this product can be used. The foam will only cure at the temperature indicated in its performance characteristics, so it should not be used for work in summer time foam intended for use in extreme cold conditions, and vice versa.
You can read about how to carry out foaming in the instructions that the manufacturer attaches to a specific product. Usually foam starts from the bottom, gradually moving upward. Movements should be rotary and circular. In order to use less expensive material, it is better to blow out the foam in several stages, calculating segments of approximately 25-30 cm.
To shift the dew point, it is better to perform foaming with different densities. In practice it looks like this: outer layer They try to compact the foam less than the layer facing inward. The foam must be poured around the perimeter of the window frame as evenly as possible, without gaps or voids.
Return to contents
How to prepare a window opening for work?

To install PVC windows, you will need to carry out preparatory work. Before installation, any contamination should be completely removed from the window opening: dust, construction waste, particles old paint. At independent execution craftsmen should know that when installing a new plastic structure in a used wooden window frame, top layer It's better to plan it completely. It is not reliable enough; it is better to remove it completely so as not to disturb the adhesion of the foam to the surface.
If the gap between the opening and window frame does not exceed 4 cm, they are filled only with foam. If the gaps are wider, it is better to partially fill them with other, cheaper materials. These can be pieces of timber, drywall, polystyrene foam, brick fragments and other construction waste.
If you or someone you know has previously used the services of companies installing double-glazed windows, then you know that installation can be normal and in accordance with GOST. The second option is more expensive, but if all the requirements are met, the quality will be much higher than in the first (you can read more about the standards in GOST 30971-02).
Consists of several stages.
Pay attention! Manufacturers do not provide a guarantee if the measurements were not carried out by their employees. If installed incorrectly, the windows will soon begin to freeze, and if even the slightest mistake was made in the calculations, the structure simply will not fit into the opening.
However, if you study all the intricacies of the process, then no difficulties will arise during installation. Moreover, this way you can save a decent amount of money.
Video - Installation of PVC windows according to GOST
Stage 1. Measurements
In most apartments there are openings without a quarter.
Pay attention! A quarter is an internal frame 6 cm wide (or ¼ brick, hence the name) that prevents the window from falling out and strengthens the structure as a whole.
If there is no quarter, then the frame will be installed on anchors, and the foam will be covered with special covers. Determining the presence of a quarter is quite simple: if the internal and external widths of the frame are different, then there is still a quarter.

- First, the width of the opening is determined (the distance between the slopes). It is recommended to remove the plaster for a more accurate result.
- Next, the height is measured (the distance between the slope above and the window sill).
Pay attention! The measurements must be repeated several times and the lowest result taken.
To determine the width of the window, two installation gaps are subtracted from the width of the opening. To determine the height, the same two gaps plus the height of the profile for the stand are subtracted from the height of the opening.

The symmetry and straightness of the opening are checked, for which a mounting level and plumb line are used. All defects and irregularities must be indicated in the drawing.
To determine the width of the drainage, add 5 cm to the existing drainage for bending. Also, the width of the insulation and cladding is taken into account (subject to subsequent finishing of the facade).

The dimensions of the window sill are determined as follows: the width of the opening is added to the size of the overhang, and the width of the frame is subtracted from the resulting figure. Regarding the offset, it should cover the heating radiator by a third.
Pay attention! measured after installation is complete.
Stage 2. Order
After measurements finished drawing should be taken to the window manufacturer, where all the necessary fittings will be selected. It is worth remembering that installation can be performed in one of two existing ways:

In the first option, you will have to pull the package out of the frame, insert it into the opening and install the glass back. In the second case, the entire structure is attached as a whole. Each option has disadvantages - if you pull out the package, it can; and vice versa, if the window is installed assembled, it can be damaged due to its heavy weight.
Prices for a popular line of windows
Stage 3. Preparation
This stage of installation begins only after delivery of the ordered windows. Released first workplace, all furniture is covered plastic film(there will be a lot of dust).


Step 1. If required, the glass unit is removed from the window. To do this, the glazing bead is slightly pryed with a staple and pulled out. First of all, the vertical beads are removed, then the horizontal ones. They must be numbered, otherwise gaps will form after installation.


Step 3. The bolts are unscrewed after the plugs are removed from the canopies. The handle is turned to the “ventilation mode” (in the center), the window is opened slightly and removed. All that remains is the frame with imposts.
Pay attention! Imposts are special jumpers designed to separate the sashes.
Then you need to make a marking for the anchors and make holes along it - two on the bottom/top and three on each side. To do this, you will need ø1 cm anchors and a drill of the required diameter.
If the material from which the walls are made is not dense (for example, cellular concrete), then the fastening is carried out using anchor suspensions. The latter should be fixed to the wall and frame with hardened self-tapping screws (eight pieces for each).
Pay attention! To avoid the formation of a thermal bridge in the window sill profile, it should be filled the day before installation. This way the element will not freeze.
Stage 4. Dismantling work
This procedure is recommended to be carried out immediately before installing a new window. In most cases, the old ones are thrown away, so the structure can be torn out along with the fastening, and if necessary, the frame can be sawed.


Step 1. First, the seal and thermal insulation are removed.
Step 3. The window sill is removed and the cement layer underneath is cleaned off.
Step 4. Adjacent surfaces are treated with a primer material (by the way, many installers forget about this). In the case of a wooden opening, a layer of waterproofing material is laid around the perimeter.


Pay attention! Installation can be carried out at a temperature not lower than -15ᵒС. Polyurethane foam must be frost-resistant.
Stage 5. Installation of a plastic window

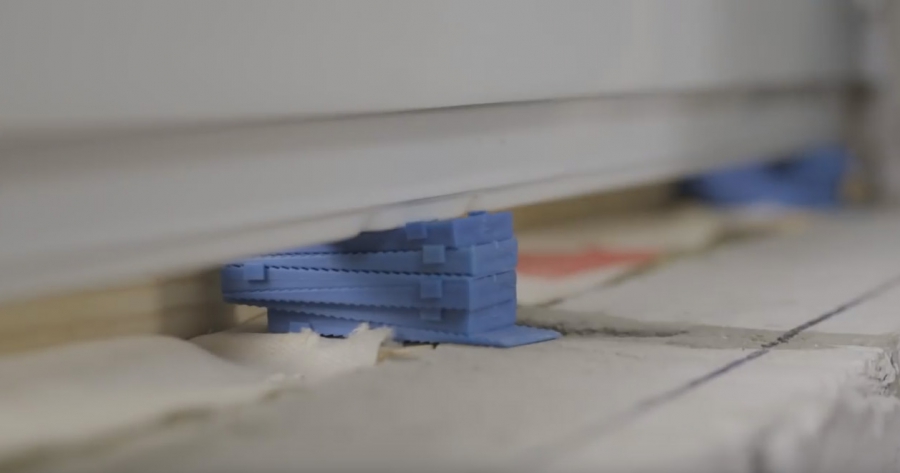
Step 1. First, wooden wedges are placed along the entire perimeter, a window is installed on them (this will make it easier to level the structure), only after this is it fastened to the wall. You can leave the backings - they will serve as additional fasteners.


Step 2. The absence of a support profile can be considered a gross violation of GOST standards, since it is not only needed for stability, but also makes it possible to install a low sill with a window sill. In the absence of a profile, they are attached directly to the frame, which violates its tightness.
The correct location of the stand profile is shown in the diagram.

Step 3. Next, the evenness of the window is checked in three planes, for which a mounting level and plumb line are used. It is characteristic that traditional bubble levels are not suitable for this due to insufficient measurement accuracy, so it is better to use.


Step 4. If the window is level, then it is secured with anchors. To do this, a wall is drilled using a hammer drill through pre-prepared holes in the structure (approximately 6-10 cm). The lower anchors are fixed (not completely), the evenness of the package is checked again, after which the remaining points are attached.
Pay attention! The final screed is made only after the final inspection. Do not tighten too much, otherwise the structure will “skew”.
Prices for mounting foams and cleaning gun cleaners
Polyurethane foams and cleaners for construction guns
Stage 6. Drainage

From the outside, the ebb is attached to the stand profile with self-tapping screws. The joints are carefully sealed with sealant to prevent moisture from penetrating into the structure.

The edges of the ebb are recessed several centimeters into the walls, having previously made indentations using a hammer drill.
Pay attention! Before installation, the bottom gap is also sealed.
Stage 7. Window assembly


After attaching the anchors, the glass unit is inserted back.
Step 1. The glass is inserted and fixed with glazing beads (the latter should snap into place, for which you can lightly tap them with a rubber hammer).
Step 2. The doors are opened and their tightness is checked. In the open position, arbitrary opening/closing of the sash cannot happen if the window is installed level.
Step 3. The sides are sealed installation seam. Polyurethane foam will provide high-quality waterproofing and prevent glass from fogging. Before and after sealing, the seams are sprayed with water to improve polymerization.
Pay attention! The seams are filled to no more than 90%, otherwise the structure will “lead.” If everything is done correctly, after drying the foam will protrude out a few centimeters.
Step 4. The perimeter of the window is glued with a special vapor barrier tape, and material with a foil surface is used underneath.
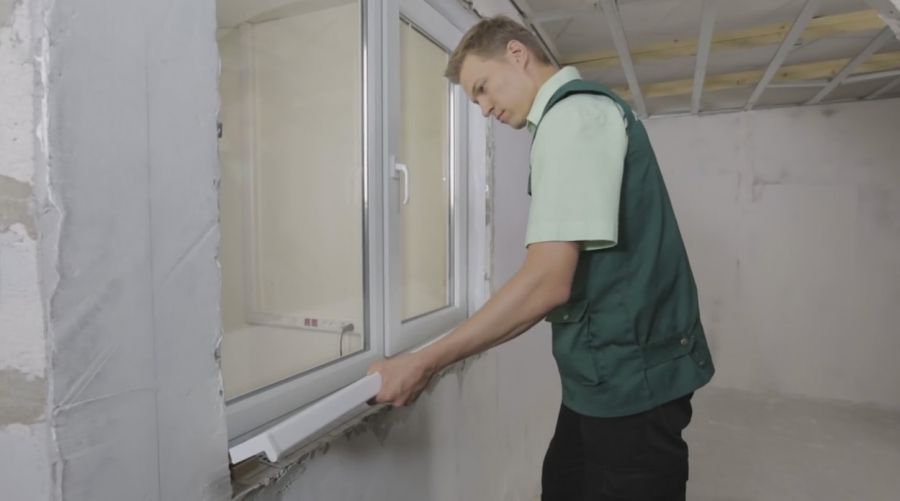
Stage 8. Installation of the window sill

Step 1. The window sill is cut so that it fits into the opening and at the same time rests against the lining profile. There remains a small gap (about 1 cm) for thermal expansion. Subsequently, the gap is hidden by plastic
Step 2. Wooden wedges are placed under the window sill. It needs to be laid with a slight slope towards the room, and then applied with something heavy until the foam dries. Additionally, the window sill can be fixed with anchor plates.

Video - Instructions for installing plastic windows
Conclusions
Now you know how plastic windows are installed, so you can safely get to work. The final check of all elements can be carried out only 24 hours after completion of installation (then the foam will have already “set”).
The described technology is also quite applicable to, although it also has its own nuances - such as, for example, installing a parapet to create a partition.


Find out how to do it correctly from our new article.