A bathroom in a private house - what should it be like? (95 design photos). Bathroom in the house - arrangement, ideas for choosing the best option and description of the layout (150 photos) Finishing the bathroom in the house
Arranging country house, in which they plan to live permanently, it is unlikely that anyone will agree to be left without amenities. Nowadays, any home must be equipped with a bathroom.
When planning your future home, you should pay attention to the following question: how to make a bathroom in the house? At the same time, it is important to properly plan, equip and decorate this room, based on the dimensions allocated for it.

How to make a bathroom in a private house comfortable and functional?
When building a private home, you can make the bathroom large, where a sauna or bathhouse or SPA area can be freely located. Large space will allow the owner country house get a variety of design options, placement of plumbing equipment and household appliances. For clues, they can turn to photos of the bathroom in the house, which are quite easy to find on the Internet.

But first, you should think about where to place the bathroom. If the building is large, you can equip a bathroom on each floor, which is convenient for large families. Typically, designers suggest placing this room next to a kitchen that has ventilation.


You should not place the bathroom on the upper floors above regular apartments. It is more convenient when such rooms are located one above the other. After all, in each of them it is necessary to install sewerage and water pipes, which are convenient to assemble in whole risers.
Beautiful and functional when plumbing room has a window. Then the owners save on electricity and receive additional ventilation. Naturally, such a window should overlook the courtyard.

In order to determine the size, you need to clearly know what kind of plumbing fixtures you want to see here, plus comply with the necessary requirements and standards that apply to the construction of residential buildings.

To equip a hygienic room in a private house, as opposed to an apartment in the city, it is necessary to provide communications: water supply and sewerage, electricity and ventilation.

If you have the necessary qualifications in these matters, then you can do a bathroom in a private house with your own hands; otherwise, you should turn to specialists.

Building materials for the bathroom
This room is characterized by high humidity, so it is worth choosing materials based on this. Ceramic tiles are often used here. It is not afraid of water, lasts a long time and has a wide variety of designs. It can be combined with waterproof paints and used together decorative plaster, panels made of plastic and wood, stone, giving the bathroom an unusually attractive look.


A budget option is PVC panels. They are practical, cheap, offered completely different colors, are easily replaced if damaged.

If the walls are perfectly smooth, you can use paint after priming them. To make the walls more original, you can use different shades and stencils.

Construction organizations can offer the use of glass and vinyl wallpaper, wood panels and lining. The latter should be treated with special compounds that protect against moisture.

Plumbing equipment and furnishings
To create a standard hygiene room, choose a bath or shower stall, if it is combined, add a toilet and bidet. The furniture is functional - these are various bedside tables, cabinets, shelves.

If the room is large enough, it can be divided into differently designed zones: shower, bath, sauna. It’s worth making a plan in advance so as not to overload the space and ensure a free approach to plumbing and household appliances.


Design ideas for the bathroom of a private house under construction are very diverse, because here you can provide niches and built-in wardrobes.

Floors
Flooring in a room with high humidity must have special characteristics.


The most expensive coating is porcelain stoneware; it is beautiful, moisture-resistant and long-lasting.

The varnished adhesive plug repels water, does not rot, its surface is warm and pleasant to the touch.

The most popular tiles are with large selection colors and sizes.

Linoleum is a budget covering. It is characterized by ease of installation and waterproofing properties. It is not durable, but since it is cheap, it can be replaced frequently.

Bathroom lighting
Bathrooms require basic bright lighting. Next to the mirror you can hang lamps with a convenient design that allows you to change the direction of the light. They provide additional lighting to illuminate certain areas.


Nice to have and natural light emanating from street window. On the top floor with sloping roof You can make a window in the ceiling.

Correct room layout color palette, finishing materials, high-quality selected plumbing fixtures will make the bathroom warm, cozy and functional.

Photo of a bathroom in a house


Until recently, making a bathroom in wooden house it was impossible. High humidity and high temperature air for very short term rendered any repair unusable. But today, the variety of modern building materials have made this problem less pressing. Information on how to properly arrange a bathroom in a wooden house, what materials allow renovation work quickly and efficiently, it will become very useful for those who set out to have such a blessing of civilization as a bathroom in a private wooden house.
Water supply installation
Choosing a method for draining water from the bathroom takes special meaning when it comes to the fact that the house is built from wooden beam. The fact is that a log house shrinks quite a lot. This feature must be taken into account when designing and installing a water supply system.
For these purposes, it is better to use metal-plastic pipes, as they are the most resistant to deformation. The laid pipeline must be secured with special rubberized clips or clamps for plumbing elements. Also, do not forget about protecting the pipeline from low temperatures. For this purpose it is used heat insulating material, which covers not only the pipes, but also the base of the floor in the bathroom.

Wood surfaces do not tolerate moisture very well - this is a fact. In order to protect the bathroom floor from premature deterioration, it is worth installing a special drain valve that will allow accumulated moisture to be drained into the sewer.
The best system for draining water in a wooden house is a drain with a dry seal. It is a plastic float that blocks the drain hole after the water has drained. This device is best suited for a bathroom in a wooden house in the country. It perfectly protects not only from the accumulation of excess moisture, but also from penetration unpleasant odors from the sewer to the interior.
Attention ! Assuming the presence of such a drain in the bathroom, the floor is laid at a slight slope.
Bathroom waterproofing
To prevent moisture from the bathroom from penetrating into the living areas wooden house, it is imperative to carry out waterproofing work, thereby creating a certain protective barrier from steam and moisture.
Waterproofing a bathroom in a wooden house requires compliance certain rules. Before you begin finishing the bathroom with waterproofing materials, the walls, ceiling, and floor must be cleaned and leveled.
The best protection against moisture is provided by roofing felt, liquid glass and self-leveling polymer floors. Installation of waterproofing the floor and ceiling of a bathroom in a wooden house should be carried out in one step.
Let's look at the two most popular ways to waterproof a room in a wooden house:
- Treatment of surfaces with special moisture-proof mixtures, which after drying form a durable, waterproof film;
- Installation roll material, forming a strong waterproofing layer. To prevent moisture from seeping through the seams of the material laid in rows, the canvases should be laid overlapping.
Attention ! If polyethylene film is used as waterproofing, it is laid in several layers over the entire area of the room.
When waterproofing a bathroom floor, wood flooring cover with a fairly dense layer bitumen mastic, on which they lay waterproofing material. You definitely need to know that the main condition for carrying out waterproofing work in the bathroom is that the floor level in this room should be lower than in other rooms.
After the waterproofing has been laid, if necessary, a reinforcing mesh is laid, which is covered with insulation. The final stage is pouring a cement concrete screed.
It is quite possible to do all the work on your own. The main thing is not to rush and strictly adhere to the work algorithm.

Bathroom ventilation
The most the best solution installation of ventilation for a bathroom in a wooden house supply and exhaust system. The installation technology is quite simple and quite accessible for DIY.

Let's consider step by step instructions arrangement of ventilation in the bathroom:
- Two air duct pipes are installed along the perimeter of the base of the future ceiling, one of which provides air inflow, and the other - its outlet.
- In each pipe, in the corners of the bathroom, special funnels are made, in one of which a fan will be installed in the future, and the second is closed with a decorative grille.
There are no special subtleties in the work, the main thing is to do everything carefully and strictly follow the prescribed plan.

Floor finishing
Wood, of course, differs in structure from brick or concrete blocks. Therefore, finishing a bathroom in a wooden house has its own specifics. You need to understand that the weight of plumbing elements is not constant. For example, a bathtub filled with water changes its mass, and the load on the floors of the house changes accordingly. Even if the bath is located on the first floor, such changes in loads can affect the integrity and density of the wooden floors.

In order to avoid a rather rapid destruction of the house, it is necessary to provide for the following nuances at the design stage:
- the thickness of the floors increases by 25%;
- cross-sectional area increases load-bearing beams;
- installation of beams is carried out in smaller increments and at a level of 20 cm lower than usual.
These conditions are mandatory, since the floor of a bathroom in a wooden house, in addition to a concrete screed and a waterproofing layer, is covered with tiles. If you do not take into account the necessary parameters for laying load-bearing beams and floors, you may end up with a discrepancy between the floor level of the bathroom and other living spaces.
As flooring In addition to ceramic tiles, you can use linoleum, moisture-resistant laminate, especially durable wood, cork or mosaic.
Wall decoration
When thinking about how to cover a bathroom in a wooden house, you should take into account the specifics of the construction of the house and characteristic features The main construction material is wood. It is important to remember that constant temperature changes and high humidity greatly affect the structure of wood. It can dry out or, on the contrary, crack, gaining moisture.
All this leads to quite serious troubles, in the form of deformation of the walls and distortion of the geometry of the entire room. To avoid such moments, before you start finishing the wooden walls of the bathroom, attach a protective false wall to them, and only then the finishing material.

Drywall is a good base for decor. False walls mounted from such material are perfect for any decoration. The only exception when the walls do not need to be covered with plasterboard is when the walls are covered with clapboard.
Very often an independent structure on a special moving frame is used. For this, a metal profile is used, which is attached to the wall with movable connectors. This method is very relevant for finishing wooden walls, since when the main structure shrinks, only the wooden walls move, and the lined surface remains indestructible.

Important ! When installing false walls, do not forget about the presence of a certain air gap between the wooden walls and the mounted tiled surface. It is necessary for natural ventilation and prevents the formation of condensation.
A good option would be to decorate wooden bathroom walls using a combined method. It involves finishing the walls with ceramic tiles in places closest to the water, and with other finishing materials in the remaining area. You can combine materials in a variety of planes. Alternate decor from the ceiling to the middle of the wall, and then to the floor. Or combine several finishing materials on two halves of the wall.

When choosing materials for finishing a bathroom in a wooden house, you should definitely take into account resistance to moisture, chemicals and household chemicals. detergents. Traditionally used ceramic tiles, mosaic, porcelain tiles, lining. The option cannot be ruled out when the walls remain in their original form, only in this case they must be saturated with moisture protective compounds.
The interior of a bathroom in a wooden house can be decorated in a wide variety of styles. Interiors in the style of Provence, classic, minimalism and eco-style look most advantageous.

Ceiling finishing
The ceiling in a bathroom in a wooden house should have the following characteristics:
- do not allow moisture to pass through;
- be resistant to fire;
- absorb extraneous sounds;
- do not emit unpleasant odors and substances.
The best option that suits everyone necessary requirements, is a suspended ceiling. In addition to excellent consumer qualities, it successfully hides all communications and a sufficient number of ventilation holes can be installed in it.

The choice of style, color and texture of the ceiling in the bathroom is limited only by personal taste and financial capabilities.
Bathroom lighting
Practical, modern and economical lamps that are most suitable for a bathroom in a wooden house are halogen spotlights. They provide good lighting over the entire surface and are very convenient to install at any point on the ceiling, thereby zoning the bathroom space.
Important ! All wiring must be reliably protected from moisture.

Selection of plumbing
A responsible, but very pleasant stage, signaling that the repair work is at the finish line. For the bathroom of a wooden house there are practically no restrictions on the installation of any plumbing equipment. Minimum set necessary elements consists of: washbasin, bath or shower, toilet (if the bathroom is combined). When choosing plumbing elements, you need to take into account only their weight, since large loads on wooden floors Houses.

Conclusion
Today, having a bathroom in a wooden house is not a luxury, it is prerequisite comfortable stay. To set it up, you don’t need to overcome super-complicated tasks. It is enough to adhere to a clear sequence of work, take your time, control the quality of the materials used and take into account their compatibility with the main material for building a house - wood.
We will learn more about how to decorate a bathroom in a wooden house in the next video.
August 15, 2016
Specialization: master of internal and exterior decoration(plaster, putty, tiles, drywall, lining, laminate and so on). In addition, plumbing, heating, electrical, conventional cladding and balcony extensions. That is, renovations in an apartment or house were done on a turnkey basis with all necessary types works
Now we will try to figure out how to arrange a bathroom in a private house; I am not proposing a specific project - the dimensions may be different. However, such a room will in any case have general characteristics, since there is water supply and sewerage.
In addition, 99% of the plumbing will use ceramic tiles. This is what I want to talk about and also show a video in this article.
Bathroom arrangement
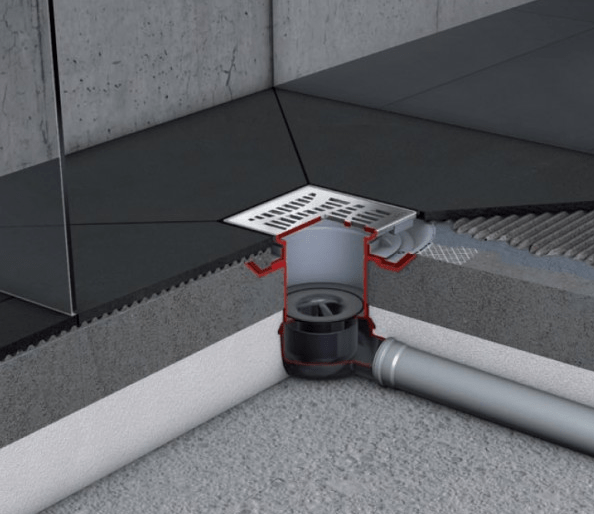
Stage 1 - sewerage

As a rule, you should start not with the water supply, but with the sewer:
- Regardless of the size of the bathroom in a private house, you need to take the sewer to the street, where you need to equip either storage tank, or a septic tank;
- When laying pipes, it is best to avoid right angles, as this creates a danger. Therefore, if there is a need to turn 90⁰, then you can use two fittings of 45⁰ or three of 30⁰;
- in addition, if the pipeline section exceeds 5-6 m, then an inspection must be installed on it. If in the house it is enough to insert a fitting, then on the street you will need a manhole;

Table of required slopes
- when laying a sewer system with your own hands, the instructions require observing a certain slope, which is indicated in the table above;
- the fact is that increasing or decreasing the slope leads to the fact that solid sediments will not be washed away - water will simply flow over them without being washed off the pipe wall;
- You noticed that the table does not include the 32nd pipe, which is used for dishwashers and washing machines. But in such cases, the flow will be forced, so if technically necessary, construction allows even a slight counter-slope;

- To drain, you can, of course, make do with a cesspool, but this is not hygienic, and the smells from it will spread throughout the estate;
- so I want to tell you how to equip homemade septic tank from concrete rings– it’s much cheaper than buying it in a store;
- the first two containers that you see in the schematic image serve as coarse filters - heavy particles simply settle to the bottom here;
- the third container is already, as it were, a fine filter - but it is best to bury it down to a layer of sand - there the wastewater will not bother you;

- if we are building a septic tank, then we should not forget that this is a potentially dangerous object for environment. In this regard, it must be installed at a certain distance from other objects;
- these distances are indicated in the schematic image above and if you adhere to them, then you will not have any problems with the sanitary and epidemiological station or with your neighbors;

- in addition to the distance of the septic tank from various objects, you should waterproof each tank, and it is best to do this with tar, in any case, it has the lowest price;
- if you live in the northern region of Russia, then you will most likely have a question about how to insulate pipes, since in some places the depth of soil freezing reaches more than two meters;
- stores sell special cylinders made of mineral wool, polystyrene foam and extruded polystyrene foam, but this is quite expensive. I prefer to simply wrap the pipes with mineral (basalt) wool, and cover the insulation with roofing felt on top for waterproofing .
When laying pipes in a trench, you should fill its bottom with sand, lay the pipeline at the desired slope and fill it with 50-100 mm of sand on top. After this, pour plenty of water on the sand, and it will immediately settle (in 20-30 minutes), after which the pipes can be filled with soil.
Stage 2 - water supply

For water intake (unless, of course, there is a centralized water supply near your house), you will need a submersible pump for a well or borehole. The power of such a unit will depend on the amount of water consumed in your family, but to roughly imagine the volumes, you can use the table below.
Water consumption per hour in different bathrooms

We will assume that you have chosen a pump of the power you need and have taken into account the well flow rate (dynamic level) to ensure an uninterrupted water supply. You will also need installation pumping station, where a reserve tank, sensors and automation will be installed.
The most convenient way to do this is in a pit, which can be installed in the house or in any of the outbuildings. So, you can hide the entire station so that it does not interfere.

Regardless of the distance of the well to the house and its depth, you will have to increase electrical cable For submersible pump. It is most convenient to use a terminal box with four inputs and outputs for splicing, as shown in the top photo.
But this is not always possible and sometimes you have to make the connection directly in the trench. To do this, heat shrinkage should be used - such insulation does not allow moisture to pass through and can be used underground with a clear conscience.
To connect the pump to the distribution unit, a polyethylene hose with a diameter of 32 mm is definitely used (some use metal plastic, but I do not recommend this). Great value has the size of a reserve tank - the larger its capacity, the fewer the number of engine starts and stops, but for domestic purposes you will not need more than 100 liters.
The factory settings of the sensor include starting the pump at 2 atmospheres and stopping it at 3 atmospheres. But if you want to increase this gap, then you can set the switch on to 1.5 atmospheres, and the switch off to 5 atmospheres.

| Section (mm) | Welding depth (mm) | Heating time (sec) | Cooling time (sec) |
| 20 | From 14 to 17 | 5-6 | 2-3 |
| 25 | From 15 to 19 | 6-7 | 3-4 |
| 32 | From 16 to 22 | 8-9 | 4-5 |
| 40 | From 18 to 24 | 12-13 | 5-6 |
| 50 | From 20 to 27 | 18-19 | 6-7 |
| 63 | From 24 to 30 | 24-25 | 7-8 |
| 75 | From 26 to 32 | 30-31 | 8-9 |
| 90 | From 29 to 35 | 40-41 | 9-10 |
Soldering depth and time depending on size
If used for heating polypropylene pipes up to 90 mm in diameter, then a 20th pipe is usually used for water supply. Pay attention to the welding depth and time indicated in the table above. This is very important, since insufficient depth and holding time will make the soldering weak, and too much of these parameters will lead to sagging in the middle of the pipe and a narrowing of its diameter.
All PPR pipes are divided into ordinary ones - these are PN-10 And PN-16(only intended for cold water) and reinforced – these are PN-20 And PN-25. Of course, you can use different labels for cold and hot water lines when remodeling your bathroom.
But the point is that PN-20 is a universal pipe, which can withstand a working pressure of 20 bar, 2 MPa or 20.4 kgf/cm2, with a nominal temperature of 80⁰C, therefore, it is suitable for both domestic hot water and heating. Personally, I use it for both cold and hot water– it is very convenient and reliable. Such a pipeline can be hidden under plaster or drywall without any fear.

The principle of fixing pipes: brown indicates the wall, gray indicates the groove, and red indicates the pipes. White - hangers, cross - screws
If there is plaster in the bathroom, then the pipes are hidden in grooves, as shown in the top image, since building a bathtub with beautiful design only possible with hidden communications. To hold the PPR in the channel, they are pressed with perforated tape hangers. But if you have drywall, then the groove is not needed, and the pipes can be pressed directly to the wall with the same hangers.
Stage 3 – electrical wiring

I’ll say right away that there is no such thing as optimal size for the bathroom does not exist - it all depends on the capabilities and desires of the owners. The quantity also depends on the size. lighting fixtures, which can be overhead and built-in, wall and ceiling.
Of course, recessed lamps look more beautiful, but for this you need a sufficient height of the room, which will allow you to make suspended ceilings 7-10 cm deep to accommodate the inside of the socket.
If in the bathroom there will be electric boiler, then the connection for it is made with a separate wire (copper with a cross-section of 2-2.5 squares is suitable for this) and exactly the same wire will be needed for the automatic washing machine.
Both of these devices should be protected automatic switches which are triggered by overload or short circuit. If washing machine plug it into the socket, then it is not needed for the boiler - an automatic machine is enough, since the socket after a while begins to melt due to loosening of the terminals.
Stage 4 – smooth walls

The principle of installing beacons - profiles are indicated in white, and threads are indicated in blue
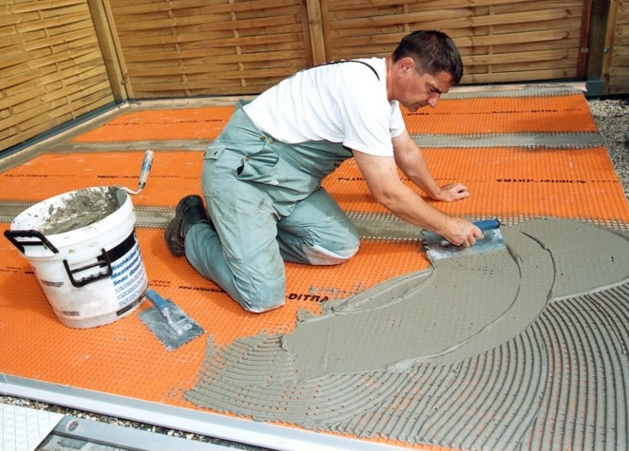
We continue to consider the topic of how to make a bathroom in a private house, and to lay the tiles we need a smooth rough surface - this can be either drywall or lighthouse plaster. In the diagram above you see the rules for installing beacons.
They are fixed to cement-sand mortar at a distance that is at least 15-20 cm less than the length of the building code that you will use at the moment. Nylon threads are stretched diagonally and horizontally so that they do not touch the profile crest (distance 0.5-1 mm).
The same principle can be used to install beacons on the floor, under a screed, as well as a frame made of CD profiles for drywall, only here the step will be 40 cm - 4 CDs per sheet. Under the tiles in the bathroom they use moisture-resistant sheets (GKLV - they have green), although, in extreme cases, wall sheets (GKLS) can also be used.

After installing the plaster beacons, you can start plastering the very next day. The main thing is that the cement-sand mortar sets, but not before, otherwise you will knock down the profiles with the rule.
The mixture is spread with a trowel or spatula between two beacons and then pulled together from the bottom up, cutting off the excess. But after passing, there will be pits and furrows that need to be immediately filled up and passed over again until the surface becomes smooth. There may be 5 or 10 such passes, but the better you sift the sand for the solution, the less their number will be.

Some craftsmen do not consider it necessary to grout the surface under the tile after plastering it, but I think this is wrong. After processing with a float or half-grater, it becomes smooth and convenient for further finishing.
Grouting is usually done the next day or after 4-5 hours - if any unevenness occurs, the crumbled mortar is picked up from the floor, slightly moistened and the errors are repaired. You don’t have to wait long to lay tiles - they can be installed immediately after grouting, but for screed you need to wait 5-6 days so that you can walk on them.

In the case of drywall, everything is somewhat simpler and faster, since there is no “wet” work, but problems arise with hanging cabinets, mirrors, a boiler or the same sink. Therefore, to create a solid base, you can use boards or OSB, as shown in the top photo.
The wood is fixed flush with the profiles and fasteners can be screwed into it. But for the boiler, due to its large mass, a more reliable fastening is needed, so here the board is screwed directly to the wall anchor bolts, but always flush with the profiles.
Stage 5 – finishing the walls, floor and ceiling

When choosing ceramic tiles, you should check their quality and this is not only appearance, but also the quality of the plane. That is, the tile must be perfectly flat.
To check these parameters, you need to press two tiles against each other with their front surfaces - if you find a gap of more than 1 mm, then you have a defective product. When laid, such tiles will have “teeth” - the edges will protrude, or it will turn out to be convex, which is also not very beautiful.

In addition, the diagonal of the tile may be knocked down. To check, apply two copies with the same surfaces to each other, place them end-to-end on flat surface(for example, on a table) and check the height of the corners.
If you notice a discrepancy of at least 1 mm, this means that the diagonals are knocked down and you will have to play with crosses when installing - the seam will not be very even. Of course, such errors are hidden very well by grout, but people have different requirements and a millimeter-scale failure can be a real problem for some.

Ceramic tiles are laid on tile adhesive such as “Master” or “Ceresit CM 11” and for this it is most convenient to use a comb trowel with a tooth depth of 10 mm (after installation, the layer is compressed to 5-6 mm). It’s best to start with the second row, calculating it so that the top row turns out uncut - it’s much more beautiful this way.
But bottom row it is best to install it after you have laid the floor - the cut pieces will overlap the edges of the floor, especially since you can install a special one there plastic corner or baseboard.

I would like to say that bathroom designs in a private house, as well as in an apartment building, allow the installation of ceramic tiles on the ceiling. To do this, it is best to use drywall as a rough surface, as in the top photo.
Of course, there will be a large load here, so it is best to install CD profiles not every 40 cm, but every 30 cm, that is, 5 pieces per sheet. Such a structure can easily cope with the load from ceramics and glue, which has been proven by my many years of experience.

Grouting the joints can be done immediately after you remove the spacer crosses, and it is done with a special soft rubber spatula, as shown in the top photo. After covering, run your finger along the seam - the mixture will sink slightly, and the seam will look smooth and beautiful. When you grout, you should wipe the tiles after 20-30 minutes - otherwise the solution will harden and it will be extremely difficult to remove it.

The ceiling can simply be puttied over the ceilings, but you can also make it suspended in order to use built-in ones. Suspended ceilings can be made of plasterboard, PVC panels or slats, as in the top image. In addition, they will look very good in the bathroom in combination with tiles. suspended ceilings made of PVC (matte, semi-matte or glossy).
Stage 6 - installation of plumbing units

The toilet should be selected according to the type of outlet, and this is directly related to the way you installed the faucet tee - from the wall or from the floor, at a right angle or obliquely. For connection, you can use a plastic (PVC) corner or corrugation.
It will depend on your desire, but for oblique releases, corrugation is more suitable. If you have laid ceramic tiles on the floor, you should not install the toilet earlier than after 5-6 days– when the solution is fresh, the tile may crack or the dowel simply will not hold, since there will be no expansion.

It is best to install the toilet on silicone - firstly, sand can get under the sole and it will creak and, secondly, the sole itself may be uneven and it will wobble.
To do this, you need to put the toilet in its original position, circle the base with a marker, and also mark the holes for the toilet dowels. After this, move the toilet to the side, apply silicone to the inner edge of the drawn oval and drill holes for the dowels.
Be careful when tightening the toilet bolts - you can squeeze them and the ceramic will crack.

There is no point in separately describing the installation of each plumbing unit - this is done quite simply. I just want to say that in cases where the bathtub is made of acrylic, it is best to install it on bricks, and not on its original legs - this way it will be most stable. To create rigidity, you should inflate the bricks with foam, install a bathtub on them and fill it with water so that the foam does not move it out of place.

A few more words about installing the shower stall - although this is not stated in the instructions from the manufacturer, it must be installed on silicone. That is, silicone is spread between the wall and the pallet, between the wall and the vertical guides of the door frame, and also between the pallet and the lower arc of the slide, as shown in the photo above. These precautions help avoid leaks.
Conclusion
In fact, such plumbing units in the private sector provide huge amount options, since there is scope for activity - the premises are usually quite large. Perhaps you have some interesting design option of your own - write about it in the comments.
August 15, 2016If you want to express gratitude, add a clarification or objection, or ask the author something - add a comment or say thank you!
The bathroom in a residential area usually occupies the smallest area.
And, if in an apartment it is given a clearly defined space, then in a private house you can arrange it in accordance with your tastes and wishes.

The bathroom in the house performs large number functions: adoption water procedures in the shower, relaxing in a bubble bath, washing household items, drying, tidying up your appearance before starting a new day or at the end of it.

Therefore, you need to thoughtfully approach the layout and arrangement of a bathroom in a private house.

If you are building new home, then you can make a bathroom in a private house almost anywhere and from any material.

After looking through the catalog with photos of bathrooms in a private house, you will find the best option for you, both from a material and aesthetic point of view.


First of all, this room should be:
- equipped with very reliable systems for supplying cold water, heating it to a hot state, sewerage system, ventilation;
- comfortable for visits, consider good insulation;
- illuminated by dim lamps;
- equipped with reliable plumbing;
- spacious for movement, leave about 1 m of free space to the washbasin or bathtub;
- finished with materials that are resistant to humidity and temperature changes.

Since the house is private, all work on connecting to the centralized sewerage system and water supply is carried out by the owner at his own expense.

But you can drill a well on the site, install an electric pump, and there will be no problems with the supply and drainage of water in the bathroom.


Pay very close attention to the output waste water. Of course, it's cheaper to build a regular one drain hole. But, if funds allow, it is better to purchase a good septic tank for water filtration.

Ventilation
You cannot do without solving problems with ventilation in the bathroom in a private house.

Every owner dreams of having a clean air, there were no various harmful fungi and molds present inside.

Installing a supply and exhaust ventilation system is simply necessary when arranging a bathroom in a private house.

The hood in the bathroom in a private house can be natural or forced.

Forced - this is powered by an electric fan that pumps in clean air or pushes out dirty exhaust air.


Natural exhaust hood works on the principle of temperature differences between indoors and outdoors.

For especially economical owners, you can install a recuperator, that is, a device for removing exhaust air from the room, drawing in fresh air from the street, and even equipped with a heat exchanger.

With this installation you will “kill two birds with one stone”: you will ventilate the room and heat it.


Insulation
Various materials are used to insulate bathroom walls.

Foam plastic
The simplest and inexpensive option. Working with him requires accurate calculations and accuracy during processing.


Cork
It is enough to simply use this material by gluing it on the walls and ceiling. But it must be treated with wax-based impregnation.

Mineral wool
It is a long-proven hygroscopic material. It is more convenient to use mineral wool slabs rather than its rolled version. It blocks condensation from appearing on the walls and ceiling of the bathroom.

Liquid polyurethane foam
This modern material, it is resistant to moisture, fire, sound and heat insulation. But to use it you need to involve specialists with equipment.

Bathroom floor
The bathroom floor in a private home needs a thoughtful solution. Of course, it must be moisture-resistant, non-slip and warm.

The most commonly used covering is tiles made of natural stone or ceramics. But the tiles must be thick and rough.


For these purposes, linoleum is also used (very budget option, but it is short-lived), the laminate is waterproof, cork.

For lovers of beauty and zest, you can use glass or mosaic.

Bathroom decoration
The design of a bathroom in a private house allows the owners’ imagination to flourish wildly. This room can become not only a multifunctional room, but simply delight the eyes of visitors.

First of all, the bathroom must be more or less spacious, and for this, all unnecessary objects must be removed.

Various photos of a bathroom in a private house will help you choose color scheme to decorate your room. Most neutral color for walls – white.

Against its background, a beautiful washbasin and various accessories stand out very favorably. Combinations of white with blue, light blue, sunny yellow, green, and gray are good for the bathroom.

To increase the space in the design of a bathroom in a private house, it is good to use a small washbasin in the corner, a sit-down bathtub or shower stall, or a compact washing machine.

It is better to use a sliding door. A large beautiful mirror on the wall will increase your space.

Lighting near the mirror or bathroom shelves will fill the entire space with additional light.

If the wall of the house allows, then the best option there will be a bathroom with a window in a private house. You can also cut a window in the ceiling.

Always use this feature in any room to improve lighting.

Photo of a bathroom in a private house


One of the most important stages arrangement of a residential building is the installation of a bathroom in it. Considering that the regime high humidity can negatively affect a building made of wood; for a house made of timber or logs, you will need to plan this work in advance. Thus, having selected suitable option bathroom installations, by using moisture-resistant materials and waterproofing the floor and ceiling, you can avoid many problems. For further arrangement of this room, you will need to choose a suitable beautiful and practical finish.
It is no secret that wooden structures under the influence of high humidity can swell, dry out and warp, and are susceptible to the appearance of fungus or mold. Not so long ago, furnishing a bathroom in a house built of wood (logs or beams) presented a real problem, because the presence of moisture and dampness in it significantly affected the microclimate of the entire building. Thanks to development modern technologies, any homeowner can design a comfortable and functional bathroom in a wooden house with their own hands.
If you want to install a bathtub in a house made of timber or logs, you should take into account its significant weight, on average about 200 kg (in addition, if you fill it with water, it can double). Protect yourself from possible problems it is possible by strengthening the structures of a wooden house - in this case, the significant weight of a bathtub filled with water will not constitute an excessive load on the floors of the building. Taking into account the peculiarities of the operation of wooden structures, plan how to properly build a bathroom in a wooden house, preferably starting with its construction. In this case, the design load on the floors should be increased from the standard to at least 460 kg/m2. To do this you need to use beams larger section, and also lay them in smaller increments. In addition, their level must be lowered by at least 0.1 m.
When planning a bathroom in a wooden house, you should also take into account that it is necessary to provide a floor level 20-25 cm lower than in neighboring rooms. As a result of subsequent screeding and laying of tiles, the difference in floor level will be smoothed out.
To equip a bathroom in a wooden house, it is necessary to implement the following stages of work:
- provide quality system ventilation;
- equip sewer system and drainage;
- perform reliable waterproofing of the room;
- install plumbing fixtures in the bathroom;
- carry out finishing work.
Careful implementation of such work will make the further use of the bathroom in a wooden house quite comfortable. By paying due attention to each of the above stages, you can significantly reduce the need for repairs and any alterations in the near future.
Water supply installation
Of particular importance in a wooden house is the method of drainage from the bathroom. As a rule, a house made of logs or timber exhibits noticeable shrinkage. This feature of wood should be taken into account when installing a water supply system. To drain water, you should use pipes that are resistant to deformation - plastic or metal-plastic is suitable for these purposes. The pipeline must be secured using special clips or clamps for plumbing pipes With rubber gaskets. You can protect the pipeline from winter frosts by insulating the pipes, as well as the base of the floor. In addition, in order to protect the wood in the bathroom from getting wet, you will need to install a drain valve through which the water that accumulates on the floor will be discharged from the room into the sewer.
Experts recommend paying attention to a drain system with a dry seal, which uses a plastic float to close the hole after removing excess moisture. This device The drain is optimally suited for a private home, allowing it to protect residents from the penetration of unpleasant odors from the sewer. To equip such a drain, you will need to lay the floor in the bathroom at an angle of 1.5°.
For the bathroom of a wooden house there are no restrictions on the installation of any plumbing equipment. In this room you can install baths of various sizes, showers, Jacuzzis, etc.
Ventilation system installation
Regardless of the choice of materials for finishing the room, it is necessary to ensure adequate ventilation in the bathroom of a wooden house. To do this, you will need to equip the bathroom sufficiently powerful system forced ventilation. It should be taken out into the attic of the house or laid under a false ceiling. It is worth considering that in order to fire safety in a wooden house it is necessary to use non-flammable materials for equipment of ventilation ducts, as well as a high-quality fan protected from fire. In addition, all ventilation system will need to be equipped fire dampers. The fan power should be selected based on the area of the bathroom.

You can arrange ventilation in the bathroom as follows:
- lay two air ducts under the ceiling to ensure air flow and removal. To do this, outlets should be made from the pipes in different corners of the bathroom;
- at their ends, in accordance with the planned level suspended ceiling, it is necessary to install funnels. After installing it, you will need to install a fan in one of them, the other should be decorated with a decorative grille.
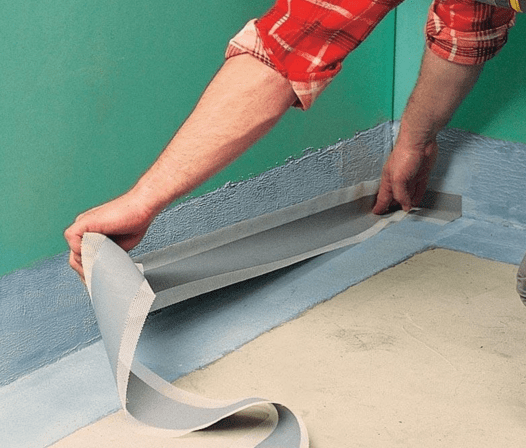
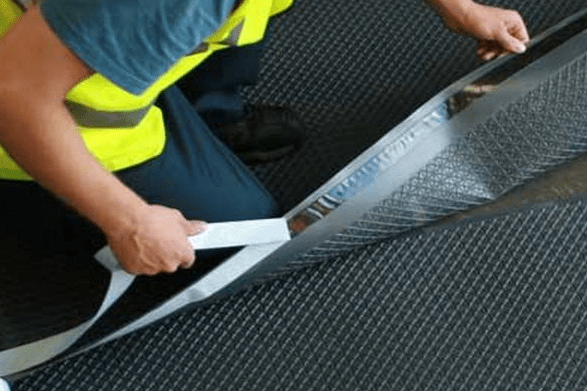
Waterproofing of floors and ceilings with their subsequent finishing
To equip a bathroom in a wooden house, you will need to waterproof the room, creating an effective waterproof barrier. When planning how to make a bathroom in a wooden house, special attention should be paid to waterproofing the floor and ceiling. It is worth considering that before carrying out such work it is necessary to clean and level the surface to be treated.
To ensure waterproofing of a bathroom in a wooden house, you can use roofing felt, liquid glass with concrete screed, self-leveling polymer floors. It should be noted that waterproofing the floor and ceiling in a given room must be carried out simultaneously.
There are two main ways to waterproof a bathroom in a wooden house with your own hands:
- applying a waterproofing mixture to the surface, creating a film impenetrable to moisture;
- pasting the surface with a layer of rolled material that protects from moisture (it should be laid overlapping).
When using film waterproofing material, it is usually laid in two layers on the floor around the entire perimeter of the room, also overlapping the surface of the walls to a height of at least 0.1-0.2 m.
To impart moisture resistance, the surface of wooden walls should be treated with special antiseptic protective compounds. In the bathroom of a wooden house you can install suspended ceiling – this design will hide the ventilation system, and in this way it is easy to organize effective lighting of the room. As more affordable option You can tiling the ceiling with tiles.

To waterproof the floor in the bathroom, you can lay a layer of bitumen mastic on a wooden floor and a roll of waterproofing material like Aquaizol on top. When carrying out work, it should be taken into account that an important condition for waterproofing the bathroom floor is the level difference - it is required that in this room it be lower than in other rooms.
If the waterproofing of the bathroom is done efficiently and reliably, the final floor covering can be made of almost anything. The following materials are most often used for laying bathroom floors in a wooden house:
- moisture-resistant types of laminate;
- linoleum;
- ceramic or porcelain tiles;
- adhesive cork coating;
- moisture-resistant types of wood.
It is quite possible to carry out these works independently, and the small errors that arise are unlikely to be noticeable and will in any way affect the beauty of the decoration of the room, in in this case, the main thing is to carefully adhere to the technology of performing the work.
Wall decoration in the bathroom
When decorating wooden walls in the bathroom, it is worth taking into account the characteristic features of working with this material. Due to its natural origin, under the influence of changes in temperature and humidity, wood is largely susceptible to drying out and shrinking. To avoid possible problems in the form of wall deformation, before carrying out finishing works a sheathing should be installed on them - a false wall and cladding on top are subsequently attached to it. It is easy to adapt the walls of a bathroom in a wooden house for subsequent finishing using moisture-resistant plasterboard. Constructed from this building material false walls are suitable for almost any final finishing of a bathroom in a wooden house. The exception is the situation if a decision is made to clad the walls with wooden slats - in this case there will be no need to construct false structures.

An independent structure for further finishing can be erected on a special sliding frame made of metal profile. It is attached to the wall using movable joints in the form of vertical grooves with screws inserted into them - if there is any deformation of the main walls, it is they that move, and the cladding is preserved in its original form. When constructing false walls, a gap for ventilation should be maintained between them and the wooden walls.
It is easy to successfully decorate the bathroom of a wooden house using a combined wall decoration - in this case, they are lined with wood, except for places that need to be protected from water (near the placement of a bathtub, washbasin, etc.) In addition, you can decorate the walls with tiles from below to a certain level of the walls. Materials for cladding should be selected taking into account their moisture resistance; in addition, their resistance to washing with detergents should be taken into account household chemicals, as well as exposure to aggressive chemicals. To decorate the walls of this room, any moisture-resistant finish is suitable, including ceramic tiles or artistic mosaics, porcelain tiles or lining. Wooden walls You can also leave them in their original form by treating them with a special impregnation to make the wood moisture resistant.
Owners wooden houses can decorate bathrooms in different styles. The most advantageous for this room are classic, country or Provence, art deco, minimalist and eco-style.
Bathroom in a wooden house - photo


