How to install fittings in a cistern with a side connection. Fittings for cisterns with bottom connections
The water connection to the toilet cistern can be made from below or from the side - this depends both on the design of the toilet itself and on the features of the water supply system. The fittings for a flush tank with a side connection are easy to maintain and reliable, and its price is at an affordable level. At the same time, it performs its functions fully, so when arranging an inexpensive bathroom, it is appropriate to choose it.
Functions of tank fittings:
- automatic dialing required quantity water;
- drain a certain amount water in the toilet;
- overflow protection.
The side supply is easier to connect to the water supply system, especially when we're talking about about old houses in which water sockets are designed for just such a connection. In modern universal fittings with lateral supply, the role of a drain element can be played by either a rod or a button.
Our offer
In Moscow, you can buy high-quality fittings with side connections in the Santekhkomplekt online store. We work with Russian brands “ANI Plast”, “Inkoer”, “RBM” and “Uklad”, whose products are highly valued for their stable high quality and affordable prices.
There are rod and push-button fittings on sale, including dual-mode ones. If you need help choosing or a hint on the characteristics of the model you like, call our managers and they will help you figure it out and place an order. You can find the number for your city at the top of the page.
The fittings of a toilet tank are a kind of “filling that ensures the collection, retention and drainage of water. The material for the manufacture of fittings can be plastic or metal (brass, steel).
In this article we will learn how to adjust the fittings in a toilet cistern, as well as its types and features.
Mostly modern models toilets are equipped plastic fittings. It is quite durable, not subject to corrosion processes and negative influence chemicals, present in water.
 The operation of the toilet is directly dependent on proper operation shut-off valves, which is responsible for draining and supplying water. Today, you can see many different models of this device on the plumbing market. Moreover, there are not many types, since the shut-off valves are of the same type, suitable for different modifications.
The design of the shut-off valves can be separate or combined.
 Previously, only a separate configuration was used to install a toilet. In it, the installation of the filler and drain valves is carried out separately, and they operate autonomously. The operation of the fill valve is controlled by a float.
When the water in the tank rises and is blocked by the float under the influence of traction.
The drain assembly is a neck with a valve.
The valve comes in two types - air and mechanical. Controlled by a pedal, button or key.
 The advantage of shut-off valves is that in the event of a breakdown, only the damaged unit can be replaced or repaired, rather than changing the entire system.
This affects family budget and facilitates installation and dismantling work. Therefore, the use of such systems is still relevant today.
 Elite class presents latest models products that use shut-off valves in a new design. In it general system connects the drain and fill valves.
Setting up this type of fittings is quite complicated. But when correct installation guarantees safe and flawless operation of the unit.
The disadvantage of this system is the need complete replacement in case of breakdown and difficult repairs.
Shut-off valves are also distinguished by the material they are made of.
 Mainly used for its production polymer materials. The quality of the materials that make up the plastic determines the quality of work and durability.
Metal fittings are distinguished as the most durable and durable. These materials are characterized by moisture resistance and resistance to mechanical stress.
Usage single shut-off metal valves provided by manufacturers only for elite models. Separate systems can be installed in any toilet.
Upper and lower shut-off valves for toilet
 Shut-off valves are divided according to characteristics such as installation location and method of water supply.
The design of the system will depend on which side of the barrel it is built in, which will definitely be taken into account when replacing damaged elements.
 There are differences in installation between fittings with top and bottom water supply. Both systems involve closing the valve by the action of a control rod, which is connected to a float, which is a container made of plastic or foam.
When installing fittings, it is necessary to carry out careful balancing. This is necessary for the productive operation of the system, which depends on the water level of the drain barrel.
 In domestic toilets, fittings with top water supply are installed.
This system is placed in the side of the tank.
The disadvantage of this design is the noise that the water supply system creates.
Toilets from foreign manufacturers are mainly equipped with shut-off valves with a bottom water supply. This design is silent, more comfortable and provides the model with a stylish look.
The upper system is installed after installation work in the tank, and the lower fittings are arranged before its location on the structure.
 The drain valve is much simpler than the water supply unit.
There are no locking mechanisms here, since this design does not need it. The drain valve is controlled by a rod.
It is a chain or barbell.
Previously, when installing a toilet, a lever located on the side or at the top of the cistern was commonly used.
 Nowadays, most models are equipped with a button.
This mechanism provides two modes of water drainage. With different intensity of pressing the button, either the tank can be completely drained or half can be drained.
By pressing the lever or button, the flap opens, which closes the upper fitting and the water drains into the toilet. Then, under the weight of the damper, it returns to its place and the valve closes.
The process of installing toilet shut-off valves
You can use separate fittings, but it will be better and easier to use branded systems that come with toilets. In this case, all elements will match exactly.
Materials that will be required to complete the work of installing the tank:

 Work on installing the tank should begin from the base of the drainage device. A rubber gasket is placed between the bottom and base of the tank. After the tanks, it is placed directly on the toilet, placing a rubber ring between them to prevent their surfaces from touching each other.
Screwing the tank to the toilet is done using bolts.
The most important thing here is good fixation rubber gasket to prevent leaks.
 These elements are not needed for the upper fittings, since it is located above the water. These units are also installed after the tank is installed.
Installation for one and the other type is basically the same. The tube is inserted through the hole in the tank and tightened on both sides using nuts.
The next step is to attach a flexible hose to the water supply riser, namely to the fitting, and install a tap that allows when carrying out repair work turn off the water in the toilet.
The modern hose is equipped with a nut-spacer clamp, which ensures reliable connection. But plumbers usually play it safe and use fume.
 Having brought the tank to the water supply, it will be necessary to adjust the float. The water level should be about fifteen centimeters lower than the edge of the tank.
The equipment involves installing a water drainage mechanism. The upper element is inserted through the hole in the lid and secured decorative element, covering the hole.
Cost of services
Several factors influence the price of toilet cistern valve replacement services.
Such as:
- nature of the work and level of difficulty;
- additional work.
The cost of dismantling and installing new fittings ranges from five hundred to eight hundred rubles, and you will have to pay about two thousand rubles to replace the drain tank.
 Many companies use an additional coefficient for installing expensive plumbing equipment. At all quality work for replacing the cistern and the price are in no way related. There are a huge number of companies and they all work in different price categories.
During the operation of the cistern, problems such as leakage or constant flow of water may arise. The reason may be in the draft or in the membrane, and they will need to be replaced.
 If it is difficult to fill the tank, you must first check the connections and supply hose.
If you do not understand this, then in order to avoid troubles it is better to seek help from qualified specialists.
Constantly gurgling water in the tank and, as a result, money paid for water supply flowing into the sewer system is a typical picture of a broken toilet. To solve this problem, you need to change the fittings for the flush tank. How to do this and how to choose the right one will be discussed in this article.
Everyone is familiar with the sound of water running in the toilet. This sound indicates that it is time to repair the toilet. At first glance, the problem is very serious and insoluble without the appropriate knowledge and skills. However, this is only at first glance. In fact, toilet repair most often means repairing or replacing broken cistern fittings. This procedure is simple and will not take you much time.
How is the flush cistern constructed? In fact, it contains two devices independent from each other - a fill valve (through which water enters the tank) and a drain column (it ensures the flow of water from the tank into the toilet and, accordingly, flushing). The combination of these two devices forms the fittings for the toilet flush cistern. Various manufacturers offer their models with some unique designs, in different forms and colors. Despite such diversity, it is important to understand that almost all of them are universal (the probability that a universal fitting purchased in a store will suit you is about 95%). That is, knowing your type, you can easily buy the fittings you need at any plumbing store. This article does not cover fittings for built-in tanks at all. The fact is that they just do not fall into the above 95% of universal options.

And so, all that remains is to find out what types of fittings there are and how you can independently determine which one is needed in your case.
Types of fittings for flush cistern
Since the fittings, as mentioned above, consist of two independent devices, the classification can be carried out according to:
- Fill valve type:
- with side supply - the valve is mounted on the side wall of the tank. Accordingly, the filler liner ( flexible hose from water pipe to the tank) fits from the side;
- with bottom supply - the valve is mounted on the bottom wall of the tank. In this case, the liner is connected from below.
- Type of drain column:
- with a button - to flush, you need to press the button on the tank lid;
- with a rod - to flush, a rod with a decorative element at the end jerks upward.

It should be noted that push-button speakers, in turn, are also divided into two subtypes:
- With single flush - one button. When pressed, all the water contained in the tank is drained.
- With dual flush - this type of speaker has a button divided into two parts. Pressing one flushes using only half of the water contained in the tank, while pressing the other causes a full flush.

Fittings for a dual-flush tank are considered more economical - you can choose the desired mode yourself. Columns with single and double flush are interchangeable, that is, nothing prevents you from buying and installing the one that suits you most, but it should be noted that the tanks have different capacities. For small volumes, a half flush may not be enough.
A hole was made in the tank lid for push-button fittings larger diameter than under the stock one. Therefore, in most cases, replacing a column of one type with a column of another will not work.
So, taking into account all the above, we get six types of valves: with a stem with a side connection, with a stem with a bottom connection, with a single button with a side connection, with a single button with a bottom connection, with a double button with a side connection and with a double button with a bottom connection .
Separately, it is worth dwelling on the old-style fittings. Nowadays there are still many cisterns installed on the toilet with such fittings, or cisterns mounted on the wall and connected to the toilet by a pipe, in which old-style fittings are also mounted. It consists of a column with a rod (vertical or lateral) and a side fill valve. In force design features and more relaxed requirements for efficiency, the drain column from such fittings cannot be replaced with a modern one. All that remains is to either repair and adjust the fittings for the tank so that it does not allow water to pass through, and this is very difficult to achieve, or simply buy a toilet with a modern tank, which is more preferable, especially if you have a water meter installed.
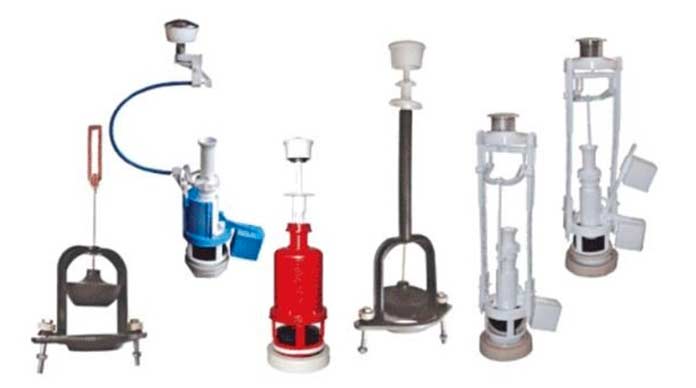
To summarize, we illustrate all types of fittings:
 Fill valves. From left to right: bottom supply, side supply, old style
 Drain columns. From left to right: push-button, with a rod, old style
How to choose fittings for a tank
Now let's move from theory to practice. When the question arises about purchasing new fittings for a flush cistern, a completely natural desire arises to save some money. It often leads to some typical errors:
- Despite the fact that the fittings are universal, their designs vary different manufacturers can differ very much. Therefore, it is wrong to try to look for only one broken part. Chances are you won't succeed and you'll just be wasting your time. Conclusion - buy only the whole thing. As a last resort, bring the entire fitting element (column or valve) with you to the store. There is a small chance that such a spare part will be found, for example, from defective fittings.
- It is wrong to look for fittings for your specific tank, that is, exactly as it was. This is where it is important to remember that they are universal, which means that knowing your type, with a high probability any universal the right type will suit you.
This raises the question, how to determine the type of fittings you have?
To determine the type of fill valve, just look at your tank, namely, where the flexible water supply hose is connected to it. If it’s on the side, then you have a valve with a side inlet. If there is no hose on the side, then the valve has a bottom supply. Look under the tank and see for yourself.

To determine the type of drain column, pay attention to what action is performed when flushing. If you press a button, then it’s a push-button one, if you pull the rod, then it’s a column with a rod.
Determine the type of your fittings and choose the name that corresponds to yours (one of those listed above) - this is what you will need to tell the seller when purchasing.
Most likely, the store will offer you a choice of several options from different manufacturers and, accordingly, with at different prices. What to choose?
The price range is quite wide - from 150 rubles. up to several thousand. To choose a quality one without overpaying, you should pay attention to several nuances:
- All connections of parts to each other must be strong. Detachable ones, as a rule, snap into place, should fit tightly into each other with a characteristic click. One-piece ones should not have any backlash.
- The gaskets must be good quality. Feel them. Soft, plastic and at the same time elastic, speak about the quality of both the gaskets themselves and, accordingly, the fittings as a whole.
- Equipment - fittings of acceptable quality include all the parts necessary for installation, including bolts securing the tank to the toilet. In some cases, the fittings are equipped with spare parts (usually gaskets). Pay attention to the quality of small items. Unscrupulous manufacturers do not pay due attention to it. As a result - low quality components. This should alert you.

Generally speaking, you need to know that the price of rod fittings of acceptable quality starts from 10 USD. e., for push-button ones - from 15 USD. e. At a price of 30 USD. That is, you can buy very good fittings with an increased service life (as a rule, this is reflected in an increased warranty period).
So, the fittings have been purchased, all that remains is to install them.
Replacement of fittings
Replacement of fittings begins with dismantling the old one. In some cases, there is no need to completely change the fittings. It is enough, for example, to change only the drain column or fill valve. If you change the column, you will have to completely remove the tank. Replacing the fill valve will not require this. In any case, you must first dismantle the old elements. Let's consider this process in full step by step using a specific example. Let's take this toilet as an experimental sample:

It can be seen that it has a one-button fitting with a bottom supply. The procedure for replacing any other one, including a rod one, for example, with a side supply, will differ little from that described. Differences in operations will be noted.
All work begins with shutting off the water at the inlet to the tank or the entire water supply branch. After this, you need to flush the water in the tank into the toilet.
1. Remove the button. In our case, it turns counterclockwise. It happens that the button is attached to the tank lid. The cover will then be removed without dismantling it. Then just move on to the second step. For rod fittings - unscrew the decorative knob on the rod and unscrew the cover that covers the hole in the tank through which the rod passes (of course, if it was screwed on).

2. Remove the cover and see this picture. In the center is a drain column. On the side there is a fill valve. If the length of the supply hose is sufficient to remove the tank and place it on top of the toilet, then move on to the next point. Otherwise, turn off the eyeliner.

3. The drain column is collapsible - consists of two parts. To make it easier to carry out work, we dismantle top part. To do this, turn it 90° (it will detach from the bottom part with a snap):

and take out:

The bottom of the column will remain inside. On the sides of it you can see the heads of the bolts securing the tank to the toilet.

4. Unscrew the fastening nuts under the tank. As a rule, this can be done simply by hand.

After draining there will be no large number water. When the nuts are unscrewed, this water will flow out. So put a rag on it.
5. Now nothing prevents you from lifting the tank up and placing it on the toilet for the convenience of subsequent work.


There is a sealing gasket left at the landing site:

6. In our case, dismantling the tank could be done without first disconnecting the liner. If it is necessary to change the filling valve, then we perform this operation now.

Flexible hoses can be twisted and unscrewed by hand. The key is used only when absolutely necessary.
7. Unscrew the column mounting nut:

and valve mounting nut:

8. Take everything out of the tank. Here, in fact, this is the dismantled fittings:

Now you can begin installing the new fittings. All operations are performed in the reverse order, the only caveat is that for convenience, it makes sense to put the gasket between the tank and the toilet on the fastening nut before installation.

The entire operation takes five to ten minutes. Threaded connections, as stated, are tightened by hand and only if necessary are tightened with a wrench.
You can endlessly try to repair old leaking fittings, being surprised every month by the huge bills for consumed water, or you can spend 10 minutes and radically solve the problem for a long time by simply replacing the fittings completely. Now you know how to do this.
The toilet is an integral household element of any apartment, and it is always designed for a long service life. In addition to its outer part, it has a drainage device, which is also called a fitting. It is this equipment that needs periodic maintenance, and sometimes under repair. In addition, during the initial installation of the toilet, it is very important to select all its elements correctly.
The outer part of the toilet consists of the following elements:
The toilet fittings perform the functions of draining and filling water into the tank. It consists of the following elements:
IN assembled form the fittings look like this.
Components and principle of operation of the drain system
- stand with tank;
- lid;
- button for flushing (nowadays 2 buttons are often used).
- a float that regulates the filling of water into the tank when the level is insufficient;
- a shutter that closes the hole in the tank when the flush is completed;
- traction in the form of a barbell or chain.
The toilet operating cycle is shown in the video.
A schematic representation of the toilet fittings in the figure below.

Pressing the siphon cover opens access to the pipe where the water drains. As a result, the water level in the tank drops, and the float filled with air drops.
The tank operates in 2 modes - draining and filling water.
- In flush mode, the toilet flushes waste away due to mechanical opening drain hole and supplying a large volume of water. In old mechanisms, a special handle is raised, in new ones, buttons (one or two) are pressed. If there are two buttons, then pressing them simultaneously gives a more complete pressure, while one button gives a standard pressure.
- In the mode of supplying water to the tank, it comes from the pipe through the side channel. The float lowers and water flows freely into the tank. When she reaches the required level, the current stops due to the raising of the float.
The operation of the device is based on the principle of a water seal - the drain pipe always has a curved appearance, due to which it always normally has a certain volume clean water. It blocks the access of odors from the sewer to the apartment. Excess water from the tank also flows into the same pipe, so it never overflows and floods the room. The water circulation is shown schematically in the figure.

In this case, water can enter the tank in two ways:
- The bottom feed mechanism involves water entering the tank from below. The float moves vertically and puts pressure on the device that closes the drain (membrane), as a result of which, when the optimal filling level is reached, the flow of water into the container stops.
- The top feed mechanism is more traditional - water comes from a special pipe due to the downward movement of the float, and then, when it reaches the optimal amount, the float rises and blocks access. This mechanism is simpler, but it is noisier than the first.
The operation of toilet fittings is discussed in detail in the video.
Thus, the toilet fittings work due to ordinary forces of attraction.
Types of toilets
There are quite a large number of types of toilets. This diversity is explained by different appearances and different fusion mechanisms. pressure force, etc.
So, due to the location drain pipe, highlight:
- toilets with horizontal flush;
- with oblique drain;
- with vertical drain.

Depending on the type of flush, toilets can be:
- horizontal (cascade);
- circular (shower).

In the first case, water enters the toilet sink directly and flushes away waste with a strong flow. The second option is more effective, since the pressure goes along inner surface rim, due to which turbulences of water are formed, which well carry all objects along with them. At the same time, a circular drain is quieter than a horizontal drain, since the water flows more evenly.
By appearance relative position The cistern and toilet bases are distinguished by the following types:
- compact;
- monoblock;
- angular;
- separated.

The first 3 varieties form a single whole with the tank and vary depending on the size of the toilet room. The second is separate, and the tank can often be hidden in the wall. These types are often installed in large shopping centers.

Also, toilets can be made of different materials:
- earthenware (in most cases);
- metal (for example, in train cars).
Vacuum toilet
There is a vacuum toilet in a separate row. It uses a different drain mechanism. In this case, the toilet fittings work not only due to the draft of water, but also with the help of air flow. Its main difference from ordinary ones is that it includes:
- valve that opens at the touch of a button;
- vacuum pump that provides low pressure in a sealed chamber.
When the button is pressed, the valve opens and air begins to be sucked into the toilet due to the greatly reduced pressure in the chamber. This air, along with water, provides strong pressure to remove residues. At the same time, a characteristic sound is produced, which has been heard by everyone who has used the toilet on long-distance trains - there they are in all cars.

IMPORTANT. If usually from 4 to 7-8 liters of water are used for flushing, then a vacuum toilet spends no more than 1.5-2. In fact, it saves 2-3 times more water than a conventional system. This is achieved by using air to create pressure. Therefore, vacuum toilets are often installed in apartments.
Types of toilet fittings
The toilet fittings are its most important component, the correct selection and installation of which determines the functioning of the system as a whole, as well as the duration of its trouble-free use.
The classification of fittings depends on their design. For example, according to the method of actuating the drain mechanism itself, it happens:
- exhaust fittings (rod) - to drain, simply lift the handle or pull the rope with the tip, the locking element opens the drain hole, and water flows into the bowl with waste;
- push-button (another name is push-button) - the most common option with a push-button drain.
Depending on the characteristics of the float device, there are:
- piston valves - the float is linked to the piston by a special lever, which moves the piston horizontally. A special gasket is glued to the lower end of the piston, which closes the water supply when the optimal level is reached;
- membrane - instead of a gasket, a membrane made of rubber or silicone is installed. It reliably blocks access to excess water volumes. It lasts a very long time, therefore it is considered the most correct choice;
- The Croydon valve ensures vertical movement of the piston; it is not used in modern toilets.

Perhaps the most important classification of toilet fittings is based on the principle of its operation.
Shut-off valves for toilet
This name describes the main function of this mechanism. It closes the water supply opening when there is enough liquid in the tank. And on the contrary, it opens a hole. when the waste was flushed. The constituent elements of such a system are:
- glass where the mechanism is located;
- valve with attached membrane;
- float;
- craving;
- guide

When flushing occurs, the float goes down following fallen level water, the draft presses on the valve and opens it, resulting in volumes new water enter the container. Water will be poured until the float returns up with it and the membrane reliably closes the valve.
Toilet flush fittings
Toilet flush fittings provide a direct flushing process for waste. In addition, it provides emergency water discharge when the tank is overfilled for some reason.

Drainage is ensured by opening the drain hole with a piston and closing it immediately after flushing due to gravity.
The toilet fittings must be optimally suited to each specific device and its technical parameters. One of these important indicators is the peculiarities of supplying new water to the toilet tank.

Fittings for toilet bowl with bottom connection
As mentioned, this is a more efficient and quieter way to deliver water. It is often installed in modern toilets. In these cases, fresh water is pumped from the water supply located below directly into the toilet tank.
This also creates a more aesthetic appearance of the device, since all communications are hidden from view.
In cases with bottom water supply special attention When purchasing toilet fittings, you should pay attention to sealing gaskets. The fact is that the forced supply of water from the bottom up creates constant pressure on the pipe, as a result of which leakage is often observed. However, reliable sealing of all connections makes it possible to practically eliminate this phenomenon.
Side eyeliner
This classic version, which can be found in any old apartment. Water is poured through a special hole on the side, and it is located above the water level.

In this case, the fittings are supplied directly to the water pipe, from where water flows. It has a push-button valve with a metal button.

You can learn more about the species in this video.
How to choose toilet fittings
If the question arises about replacing old fittings or purchasing a toilet and a device for flushing into new apartment, then before making a choice, you need to evaluate what parameters of the toilet bowl and cistern you are selecting the flush system for, how important water saving, noise and pressure, and aesthetics are to you.
IMPORTANT. The last thing you should pay attention to is the price factor. You can choose cheaper offers from various stores among a particular product, but choosing the cheapest model initially is more expensive for yourself. The fact is that poor-quality articulation of components does not durable material, from which they consist, will not allow the system to function as long as we would like. There will often be cases when a leak occurs or the flush becomes weaker, etc. Therefore, it is better to pay extra for quality than to waste time and money solving problems.
Models and prices
Manufacturers supply high-quality models to the market famous brands, such as Wirquin, Optima Siamp, AlcaPlast and some others. Approximate prices for them are presented in the table below.
Toilet fittings and its components are generally quite affordable, and installing them yourself is not difficult special labor. The cost increases not only depending on the initial quality of the parts. but also on the complexity of the mechanism. So, two-button flush systems are more expensive. Besides. Some of them are equipped with a manually controlled flush stop system - this allows you to save water consumption.
Replacing toilet fittings with your own hands
You can install the fittings by inviting a plumber, but if you figure it out well, you can do it yourself. Moreover, when purchased, the kit always comes with instructions that describe the installation algorithm in detail.
Video instructions for replacing toilet fittings
When installing the system with your own hands, the main elements with which you will work will be:
- float;
- twists - connect the float to the tap;
- supply fitting;
- float valve, which is attached to the fitting.
Schematically the system looks like this.

IN general view you need to carry out the following sequence of actions:
- If we are talking about replacing fittings, first carefully remove the old one. To do this, the water supply to the tank is shut off (usually there is a special control valve for this), and the nuts and screws supporting the piston struts are carefully unscrewed. All fitting connections are unscrewed and the system is removed.
- Elements of new fittings are assembled according to the instructions: drain mechanism installed on a special sealed gasket. Next, it is screwed into the tank with a plastic nut.
- The bolts are inserted into the holes, and on the other side they are screwed with nuts, and plastic washers are put on top.
- The tank with the assembled fittings for the toilet is attached to the bowl. This is usually done using the self-adhesive rubber that comes with the kit, as well as with bolts that are carefully tightened with nuts.
- Next, a hose is connected through which water will be supplied to the tank.
- If the fittings have additional mechanisms, they need to be adjusted to your needs. For example, you can choose the optimal position of the glass. by moving it up or down; You can also slightly change the position of the drain pipe. During the first days of operation, take a closer look at how much water is wasted. If too much of it is poured out, then you need to adjust the fittings so that less water enters the tank. More details can be found here

IMPORTANT. When assembling the entire system, pay special attention to tightness - carefully fasten all connections, fit rubber gaskets tightly. In the first week after installation, you need to be especially careful to check for leaks. If even small droplets form, the system must be disassembled and reassembled, since in the future the cracks will only increase.
Possible problems during operation
Over time, during the operation of any, even the highest quality toilet fittings, malfunctions in the system may occur:
- Water leaking from outside pipe Here the reason is obvious - a leaky gasket. Perhaps it was installed incorrectly, or it has already worn out and moved away from the surface. To begin with, you can try screwing the nut that connects the tank to the pipe until it stops. But if the leak continues, then you need to turn off the water and pull the gasket out from under the tank with careful movements. When it appears completely, you need to remove it by making several windings of fluoroplastic sealing material (fum).
- If the lever that drains the water does not work, then you need to replace its components, usually they are of universal sizes, and special difficulties this procedure will not work.
- If the water does not drain at all, then you need to adjust the angle of the lever to which the float is attached. This is done using a plastic screw.
- If the drainage occurs unevenly, sometimes in large or sometimes small portions, this indicates that the fastening of the lever has become looser. You need to tighten the bolt and in this position adjust the lever to the required level
- If too much water is poured in, it means the float is broken. It may be a little skewed or its mechanism may not be working. You either need to fix the spoke
- If, on the contrary, the drain has become weak and water flows out in small quantities, then most likely the pipe connecting the tank and the bowl is clogged. It needs to be cleaned.
- If limescale deposits form inside the tank, then you need to drain all the water, block access to fresh water and wipe off the deposits using citric acid, then rinse it off with water.
- If there is a sewer smell in the apartment, this indicates that due to a strong pressure drop in the sewer pipe, the water level in the elbow (flush) has dropped sharply - this can be seen with the naked eye. It is possible that the connection between the drain and the sewer was not installed correctly, in which case it needs to be redone, otherwise the smell will continue to flow. Another option is that the drain is dirty; it needs to be cleaned with a plunger or a plumbing cable.
How to save water for drainage
Properly selected and installed fittings not only ensure high-quality drainage, but also help save water.
You can experiment with saving if you notice that the drain is too strong and water is wasted. There is one simple option for this - to reduce the volume of water supplied to the tank after draining.
- Pour in plastic bottle volume of 1.5-2 liters, pour sand or small stones into it up to half the volume for weight, and then add water.
- Carefully place this bottle to the side so that it does not catch the moving mechanisms of the fittings.
- Close the toilet lid.
At first glance, a saving of 2 liters is small. But if you do even 7-8 flushes a day, you will save at least 300 liters of water per month, i.e. almost half a cubic meter. Convert it into money and feel the difference.
Another method involves using water from the sink to flush away waste.

In this case, of course, a re-equipment of the entire system is required. However, if we are talking about newly created communication, take a closer look at this idea. The fact is that the toilet consumes up to 25% of the total volume of water consumption, and such a measure can significantly save resources.
Another option is to purchase a water flush restrictor. Read more about it here.

With average consumption, the savings per year will be about 2,500 rubles.
Toilet care
And of course, we should not forget that in order to maintain cleanliness and prolong the service life of the toilet bowl and cistern, you need to follow simple rules for caring for them:


It is important not only to choose the right plumbing fixtures, but also to regularly care for them. Then it will serve you for a very long time.
Looking at the ingenious interweaving of sewer, water pipes, hoses, having “talked” enough with gentlemen plumbers from the housing department who arrived on a regular visit regarding an extraordinary blockage or leak, after a superficial study of the structure of the toilet, having re-read a bunch of responses and advice from experienced people, you come to Volence-Nolens I conclude that a toilet with a bottom water supply is the best option.
TO undoubted advantages include:
- neat, aesthetic appearance a toilet, thanks to which sewer and water pipes are not visible;
- the bottom line is practically silent and economical - the water does not “run”, since the flow water is coming from the bottom of the drain barrel;
- The lower line is reliable and rarely requires repairs.
There are also disadvantages:
- this type of liner is difficult to install;
- difficulties when replacing parts - it’s easier to completely replace the system.
Coefficient useful action sanitary equipment directly depends on the quality of cleaning sediment from the outlet pipe elbow; this function is performed by the fittings for the toilet flush cistern.
Tank drain device
The flush cistern consists of:
- a reservoir containing water;
- fittings;
- drainage systems;
- water flush buttons.

How to choose fittings for a cistern
Initially, the diameter of the water intake pipe is measured with a tape measure or ruler. At 1.5 cm the eyeliner is 3/8 inch, at 2.0 cm it is ½ inch.
It is better to buy fittings of the same model as the old one. To do this, dismantle the failed mechanism and show a sample to the sales consultant. Nowadays, fittings are often sold already assembled, which does not require additional effort. 
How the fittings for a toilet cistern with bottom supply are arranged
The materials from which the fittings are made are plastic, metal, bronze. Plastic is the most popular, but brittle material, the cost of a product made from it is low, bronze is a correspondingly more durable material and the cost of a product made from it is quite high. There is nothing complicated in the structure of the cistern fittings. Despite the variety of models, the principle of constructing reinforcement is the same. 
The fittings intended for the lower supply are divided into:
- The drain mechanism is secured in the tank with a union nut. To seal the joint, special seals are put on the drain pipe before installation, and a gasket is placed between the drain tank and the bowl to prevent water leakage. Water is drained by pressing a button or with a rod drain device, by lifting the lever up.
The push-button device, in turn, is divided into:
- a one-button device that provides complete drainage, that is, the entire tank is emptied;
- a two-button device in which complete and partial emptying of the tank is possible; accordingly, such a drain device has two valves.
- Also different designs could be a float:
- With a piston - a float is attached to the piston, when pressure is applied to the lever, the drain opens, when water fills, the valve closes;
- With a membrane, the mechanism of action is the same as with a piston.
- The shut-off valves consist of: a float, a water overflow tube, a push-button mechanism for draining water, a rod, a glass, and a membrane valve. Draining occurs as follows: after pressing the button, water flows out of the tank, the float goes down, the diaphragm valve opens with a pull, and water flows from the water pipe, which fills the flush tank. The float rises to a set level, which limits the draft. The diaphragm valve closes, preventing further water flow.
Materials and tools required for installation and replacement of fittings
- Tape measure, you can get by with a regular ruler.
- Adjustable wrench No. 1.
- Wrenches.
- Fittings.
Installation of fittings
Even a non-professional can install the mechanism in the flush cistern. Initially, you should read the instructions included with the kit; you shouldn’t neglect to study them.
- First, the filling valve is installed; adapters and gaskets are used for this. For some toilet models, the filler and inlet valves are installed simultaneously.
- The system can be installed in the flush cistern before the toilet is completely installed, for this purpose on top drain system put a rubber gasket. Place the mechanism directly into the flush tank and secure it with a nut.
- All fasteners intended to secure the mechanism are equipped with rubber gaskets on the inside and plastic gaskets on the outside. Rubber gaskets can be treated with sealant. It is advisable to carry out this procedure even for new membranes and gaskets. Replacing a failed gasket or membrane by disassembling and assembling the device.
- If the toilet is not monolithic, then the gasket located between the tank and the bowl is also treated with sealant.
- Parts of the fittings should not touch the inner walls of the tank; a gap of 0.5 cm should be left.
- Upon completion of installation, the flush tank is installed on the toilet.
- Place the lid on the tank and screw on the flush button.
- Add water and test the drain.
How to adjust toilet fittings
If the drain test gives poor results, adjustments should be made. The rod from the overflow pipe is disconnected, the drain system lock is released so that the glass can move easily. The position of the fittings is carefully adjusted to the required level - about 5 cm to the top of the cistern, fix it, insert the rod so that the water overflow tube is immersed in water by 2 cm. The flush mechanism can have the function of draining a full or half of the cistern. The system for draining half of the tank is adjusted by adjusting the float for the smaller drain. 
Dismantling of fittings
- Turn off the water and drain it from the tank.
- Unscrew the button counterclockwise, if it is attached directly to the tank lid, remove the lid.
- Unscrew the nut connecting the system to the water supply hose using a wrench.
- Remove the old mechanism.
Causes of valve failure
- The appearance of a leak outside when draining means the gasket is leaking. The nut connecting the pipe and the tank should be tightened. If the leak does not stop, then the access to water is blocked, remove the nut, pull out the pipe, remove the gasket and either replace it with a new one or wrap it with FUM tape. Ten windings of tape will be enough.
- The water stopped draining. First check the water level in the container. If it is lower than required, then adjust the float.
- Water has stopped flowing into the tank. The reason is a clogged valve. To eliminate it, drain the water, remove the valve, use a needle or thin wire to clean the hole through which water enters the tank, and then rinse.
- Water is constantly flowing. Check the float for distortion and depressurization. You can check the integrity of the float by removing it and lowering it into a container of water. If it starts to take on water and sink, then replace it.
- The drainage is uneven and jerky. Check the fasteners of the flush mechanism lever. If the rod does not rise, then most likely the fasteners have become loose. Tighten the bolt and adjust the lever.
- The release lever does not work and needs to be replaced.
- Appearance limescale– purchase special means to remove it or use citric acid.