The valley is a roofing element. Roof with a valley rafter system How to fix the valley on the roof
To install a valley roof from Ondulin, you need to use additional sheathing, which contains two cut boards with a width of at least 20 cm, and which are installed at a distance of 5 cm.
Procedure for installing a valley from Ondulin:
- A continuous sheathing is made for the valley. For this action, on both sides of the junction of the slopes, a flooring of 30 cm boards is installed on each side;
- Waterproofing is placed on the boards (most often, a valley carpet is used, which is impregnated with modified bitumen). Basalt coating is applied on top of the canvas, and sand on the bottom. Thanks to such a carpet, the joint is protected from moisture and provides strength to the joints. Fastening is carried out using nails, in steps of 20 cm;
- Installation of the lower valley is carried out using self-tapping screws to the sheathing (in increments of 30 cm). If the valley is made up of several parts, then it is laid from the bottom up, and the joints are lubricated with sealant;
- To give the entire structure a finished look, attach the top strip, mounting it from bottom to top, with an overlap of 10 cm. There is no need to install a seal between the decorative strip here.
The procedure for installing a metal tile roof:
- The lower plank is laid with an overlap of 10-15 cm and fastened with self-tapping screws to the sheathing;
- All sealed joints are fastened together;
- Cut sheets of metal tiles are laid on the bottom plank, with an overlap, and secured with special nails;
- On top of the sheets, at the joints of the slopes, lay the upper valley strip and secure it with hardware.
Installation of the roof structure made of metal tiles is carried out along the internal fracture line to continuous lathing, so she can get rid of the sagging of the roofing element. The water flow will flow along the lower bar of the valley, the upper one will only cover it.
We would like to inform you that some manufacturers do not recommend making through holes in the lower edge; it is better to attach them with strips of ears and fix them on the sheathing.
Roof valleys, as one of the structural elements, due attention is given during construction and repairs. They are attached to the joints between the tiles. There are 2 types of galvanized steel roofing products that are used under the bottom of the tiles and on top of the tiles one on top of the other.
Types of plates when finishing roofing with endovs
There are three main types of valleys: open, closed and intertwined. Each of them has its own advantages and disadvantages.
Closed options have earned their popularity due to their aesthetic qualities, as well as ease and speed of installation; do not require the use of a large number of different materials and additional stages of work, which is typical for the installation of open valleys. Installation of such products involves placing the tiles across the joint so that the planes intersect. Each new sheet of roofing tiles is placed on top of the valley.
Despite all the advantages of such a system, it is, at the same time, prone to the accumulation of precipitation, since due to the relief surface, snow and water melt and flow rather slowly. During periods of heavy rainfall and prolonged winter, this leads to the destruction of individual structural elements. And, although for some homeowners the aesthetic beauty that a closed product gives comes first, it is still worth considering that unreliable protection can lead to damage to roofing components. This, in turn, will require their restoration, for which a fairly impressive amount will have to be spent.
The open version is a metal sheet (steel, less often copper) that is attached to the roof. Such metal is usually treated with an additional protective coating, as well as a coloring agent, in order to optimally blend with the overall color scheme roofing material. After installation, the tile sheets at the intersection points are overlapped and sealed with a metal sheet of the valley.
If all the work is done correctly, then the open product system proves to be as reliable and durable as possible. Due to the fact that flat metal is used in its creation, water drains faster and does not accumulate on the surface. This in turn minimizes the risk of leaks and damage. Professionally installed elements roofs give the entire structure a unique aesthetic, especially if painted or copper sheets are used. Even if after some time problems with roof leaks or other damage are discovered, the open-type system allows replacement of elements, as well as repair work, easier and faster.
As for interlocking protection, it has significant similarities in its advantages and disadvantages with a closed system. With this arrangement, the roofing panels of the slopes at the points of contact are connected by binding.
Water protection device
The design of a product is largely determined by its type, so we will consider each of them separately.
Open type are installed so that its base remains open in front of the main layer of the roof. Open solutions are created from a combination of metal and protective coatings that prevent rain and melt water from entering.
In the standard open version:
- 1 row of water shield (valley carpet) is located in the center;
- a metal plate bent into a “W” or “V” shape is installed on top of the protective covering (carpet);
- the second row of carpet is cut in half and used on both sides of the metal;
- the part of the tile along the line created by the second layer of moisture protection and metal remains open for the passage of water from the roof;
- the resulting open gutter should gradually expand towards the bottom for the free flow of the increased volume of water approaching the edge.
Two basic forms of bending metal structure products suggest:
- “V” shaped bend, adjusted to the angle of the inclined slopes;
- "W" shaped bend with a rib in the center. This design detail prevents water from getting under the tiles in places adjacent to the slope.
Many roofers use galvanized metal or aluminum to create exposed solutions, eliminating the need for a protective carpet. However, high-quality work requires the use of more reliable material. One of them is heavy profiled galvanized metal sheets, calibrated in a "W" shape. The heavy calibrated metal element strip helps keep the slab line straight and the "W" shape provides better control of water passage and access. It is also mandatory to lay a protective valley carpet.
The standard closed version is covered on top with tiles or other basic roofing materials. An internal valley is created, which consists of:
- 1 layer of protective carpet, which is located in the center of the structure;
- the main roofing material installed on top.
The location of the tiles in a closed room is arranged according to one of two basic principles:
- overlapped structures in which shingles are overlapped on alternative slopes;
- closed structures in which the shingles are first installed on the lower adjacent wing sloped along a line and then on a higher slope across the line roofing structure. After which the ceiling on the higher slope is cut in a straight line, lengthwise.
Many craftsmen prefer a closed solution, justifying this by the fact that it requires a minimum of materials and relatively little labor. At the same time, you need to understand the features, as well as the advantages and disadvantages of such systems, in order to make an informed and informed decision about installing the system. If you are looking for an opportunity to save money, then such products will be the optimal solution here. However, to create a design that suits most roofing systems, and will also serve as long and reliably as possible, then it is better to use the open option.
The optimal arrangement option
The optimal solution for the arrangement of the product is the use of an open system made of heavy metal bent in the shape of a “W”. It is supplemented with 2 layers of valley carpet, which protects the entire structure from the penetration of precipitation. Although closed structural elements help save money, the metal (open version) is a solution that has been proven over the years and has the longest service life, extending the life of the ceiling made of any material.
Closed roofing elements, despite their affordability, are often the first section of the roof to be destroyed when a large volume of water passes through. Following them, other roofing building materials also succumb to the harmful effects of a humid environment.
Installation (installation) of panels
Installation of the product, like any other work, requires certain qualified knowledge and experience. Here it is necessary to comply with a number of requirements, without which the structure cannot last long. So one of the main rules concerns the location of fasteners. They are located at least 152 mm further from the center of the product. This condition must be observed for the installation of any materials, including those used to create roll coverings and roofs from bitumen shingles.
Open protection made of heavy metal with anti-corrosion coating is the most durable and expensive design option. It is recommended that a metal sunroof with an open valley be constructed from 26mm thick steel or non-corrosive metal.
The nails that grip the edges should go every 30-45 cm, this will help secure the material to the lid as firmly as possible.
The open valley lining has a width of 60 to 90 centimeters and no more than 250-300 centimeters in length to prevent the formation of bends from longitudinal expansion.
With the installation method, which involves installing the bottom layer of the structure, be it bitumen or metal, you need to start with a 15 centimeter layer (7.5 centimeters on the sides of the central part of the valley) and gradually increase the expansion by every 3 mm to install the next step. This approach will help ensure free passage of the increasing flow of water down the slope.
A product 4.5 meters long will have 15 centimeters on the outside and 20 centimeters at the bottom.
At the intersection of two roofing element strips, the top should overlap the bottom plate with a margin of 15 centimeters. This will help effectively seal the top of the valley.
In cases where the roof slopes are uneven or one part is larger than the other, you can use a crimp screw with a diameter of 2.5 to 4 cm. It is fixed in the center. Using this technique, craftsmen prevent uneven flow of water from one side of the slope.
The crimp also strengthens the structure. Additionally, it is necessary to place a substrate here, which will help retain overflow water without interfering with the sliding effect, and provide opportunities for secure fastening of nails.
Clamps and nails are selected from the same metal as the valley. This will prevent galvanic corrosion.
The encircling layer must overlap the cladding by at least 15 centimeters. In this roofing element, the nails should go at a distance of 15 centimeters from the center line.
Closed products combine some of the advantages of other types: their partially open design improves roof drainage compared to interlocking panels, and they are also quite tough-resisting.
A roof with a closed structure consists of a minimum of four layers: one layer of felt underlayment, the second layer of roll roofing with mineral coating, the other two are tiles.
For two-layer tiles, the minimum slope of the valley should be 12-30 centimeters. The closed one cannot be used when fixing single-layer tiles, since in this case there will not be enough space to accommodate additional fasteners.
Initial stage The closed version is laid in the same way. The first step of the shingles passes from both roof planes through the element, with sequential placement of fasteners from the larger or steeper plane to the shorter part.
Then you should move to a roofing surface with a lower slope, laying each row at least 30 centimeters higher from the center.
Place the shingles against the valley and drive a nail where fasteners are missing within 6 inches of the center of the valley, adding an additional nail at the end of each shingle that crosses the valley.
Then draw a chalk line 5 cm from the center on the opposite slope and hammer the other side, placing nails 15 cm further than the center.
Closed solutions are quick to install and provide aesthetically pleasing beautiful design(standard, laminated tiles). If parts of the roof at a negative angle are tightly closed, this will guarantee adequate protection of the entire structure.
The interlocking panels should be placed with an overlap of 10-30 centimeters or more above the mineral granule roofing layer. However, they have some disadvantages, the main one being the high likelihood of moss forming in the areas between the pebbles, which can significantly impede roof drainage.
In the first stage, tiles approaching the roof element from a larger or steeper roof plane overlap tiles from a smaller or less steep plane.
Extend the edge of each shingle at least 30 centimeters beyond the center line and do not place any joints near its center.
Press the shingles tightly against the roofing element when driving nails and do not place fasteners within 6 inches of the center. Add an extra nail at the end of each shingle that crosses the valley.
Continue similar actions to the top of the valley. Properly executed binding is extremely weather resistant and is better suited for high wind areas, but installation is quite slow.
Cost of products
To determine the total cost of products, it is necessary to look at several aspects. First of all, you should calculate the total length of the product. The standard useful length of one strip of the product is about 85 centimeters. Accordingly, the total figure should be divided by the size of one bar and multiplied by the cost of the product.
Most modern low-rise buildings have a rather complex roof structure; slopes are increasingly made of broken construction, with different angles tilt and location of the main axis. If the roof frame is built from several gable sections that have a common intersection line to form an internal corner, then you have to resort to constructing a valley.
In simple words, a valley is a line or angle of intersection of the planes of two slopes laid on adjacent sections of the roof.

The most complex roof device
Most roofers call the valley assembly the main headache of any roof; its installation takes as much time and effort as finishing an entire slope. Importance correct device The roof valley is determined by several circumstances:
- It accumulates and flows along the line of intersection of two slopes. greatest number rain and melt water, therefore, the normal functioning of the entire roof often depends on how well the gutter and waterproofing device is assembled;
- Due to the specific design of the internal corner, the valley gutter is the least likely to be blown by air currents, so snow and ice remain there the longest, which means there is a higher risk of getting wet roofing pie;
- In force design features The design of the valley angle is such that two surfaces of the roof covering, laid on different battens and rafter frames, are joined in one unit.
For your information! The reason for the violation of the tightness of the valley roof can be a number of factors, for example, strong wind alternating direction or improper snow removal.

Due to the unequal load on different parts of the roof, the edges of the roof covering, converging at the valley angle line, constantly make tiny, almost invisible movements relative to each other. Because of this, the construction of the junction line of adjacent slopes has to be done in a double, intertwined or open circuit.
Typical roof valley arrangement
There is a direct dependence of the design of the valley on the design of the rafter system. This also needs to be taken into account when planning the sheathing, otherwise the waterproofing sheet may be torn off under the weight of the snow cover. The second factor influencing the design of the valley is the selected type of roofing.

Experts distinguish three options for joining roofing coverings along the valley angle line:
- Installation of protective gutters, or open method devices. In this way, corners are collected when using rigid sheet roofing materials;
- Sealing the valley corner with the overlap of the soldered or guided roofing panels from the adjacent roof slopes.
All leading manufacturers of roofing materials produce standard kits that allow arranging a corner with the least effort. Even experienced builders prefer to use a ready-made set of parts for installing a valley.
Important! Using a standard roofing kit is the only way to ensure excellent appearance and reliable waterproofing.
For soft roofing coverings, a special underlay carpet based on polyester canvas. It is clear that before laying bitumen shingles on the roof, the valley line is filled with clapboard or plywood sheathing, as they say, “solidly” so that only a thin gap remains between the planes. Next, the lining material is laid on the corner, and only after that the bitumen shingles are glued on or the rolled roofing is soldered with an overlap. The result is a durable and at the same time flexible transitional section of the roof that can easily withstand snow pressure and vibrations of the rafter frame.

Valley device for thin-sheet metal roofing
Structurally, the valley device for corrugated sheeting or metal tiles consists of two gutters - lower and upper, lining tape and insulating gaskets with a wavy profile. The top gutter is considered decorative, and sometimes when installing a valley, its use is abandoned, since there is an opinion that an excess of gutters and overlays can distort the appearance of the roof. In this case, the valley design circuit is called open.

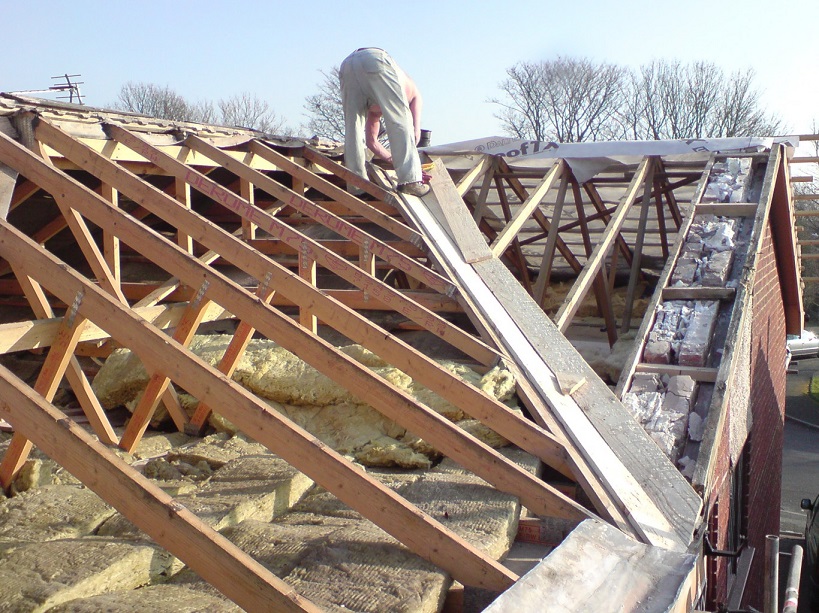
The process of installing a valley under metal tiles looks somewhat more complicated than in the case of a soft roofing covering. The specificity of the roof sheathing design is such that a “weak” zone always forms at the edges of the slope, where there are practically no power elements capable of supporting the valley structure. Therefore, before laying the gutter, the sheathing must be reinforced along the joint line. The corner is covered with clapboard or tongue-and-groove boards to a width of at least 300-350 mm on each side. This makes it possible to increase the rigidity of the base on which the gutter will be laid, and at the same time compensate for the pressure of water or snow cover.
After filling the lining or plywood, a lining tape is laid on the joint line. Its task is to heavy rain or condensation, prevent moisture from overflowing the sides of the gutter and penetrating into the thickness of the roofing pie. Usually such a lining is produced in a self-adhesive version, but you can also use a thick one plastic film, which is secured with a stapler.

Next comes the turn of the lower gutter. It is wide enough to withstand the most powerful flow of water. When constructing a valley gutter, it is laid on a lining and secured with staples. After this, the edges of the roofing are trimmed with scissors so that the gap width allows for the installation of the top decorative gutter. If the internal corner is constructed using an open pattern, the gap is cut to a width of at least 5 mm. This is enough to compensate for the thermal expansion of metal tiles. Glue or connect the cut line with any mechanically not recommended.
Conclusion
At the last stage, silicone gaskets are placed under the edge; they are usually made with self-adhesive tape, but in practice they are installed under the edge using silicone. The gaskets prevent the flow of melt water and the blowing of fine snow dust. If you follow the technology for constructing the internal corner in full, then the durability of the unit will be no less than the main roof covering of the roof.

Sergey Novozhilov - roofing materials expert with 9 years of experience practical work in the field of engineering solutions in construction.
The more complex a roof is from an engineering point of view, the more different elements it has and the more problematic it is to make it airtight. Multi-gable roofing options are considered the most original and beautiful, but at the same time they are also the most labor-intensive to manufacture. A large number of slopes of different area and geometry are joined at unequal angles, and during the operation of the roof, the most water and snow accumulate in these places, and dynamic and static loads are concentrated. Such joints are called valleys, and their installation has its own characteristics.
Endova - an internal angle formed by two conjugate slopes. This incomprehensible foreign word has a more pleasant Russian substitute - groove.

Strictly speaking, the valley itself is considered an element of the rafter system and has no varieties. Can of course be used various technologies its construction, but this does not change the purpose and functional tasks. The classification by type is very conditional and is used, in most cases, to characterize the appearance of roofing coverings in valley areas. In some cases, installation of a valley requires the use of additional and special materials.
Table. Types of valley roofs
| Type of valley | Brief description of features and performance characteristics |
|---|---|
| The simplest option for arranging a valley is currently used only on outbuildings. The junction of the slopes is closed with a metal strip, on top of which the roofing covering is mounted. The plank does not close, the appearance of the roof deteriorates, and an uneven cut of the roofing materials is visible. Modern developers are not satisfied with this roofing option. | |
| Unlike the option described above, here the cut of roofing materials is hidden by a special so-called external valley. It does not perform any technical tasks other than decorative ones. This is the most common way to design valleys. | |
| Can only be used on soft bitumen shingles. The open, functional metal valley is covered with shingles of material that are intertwined in an original way. The excess is then carefully trimmed off. The endova looks very beautiful and becomes a real decoration of the roof. The metal strip itself is used as an element of insurance; the main water is drained along interwoven flexible tiles. |
It must be remembered that the complex design of valleys creates difficulties when identifying leaks. They are often noticed too late, when the wooden structures of the rafter system have received critical damage. This means that the arrangement of valleys must be approached very carefully and responsibly; mistakes or deviations from the recommended technology are costly.

Repairing the valley is a complex and expensive process
Features of the design of valleys in rafter systems
In these places, the load-bearing elements have maximum loads, which should be taken into account at the stage of creating the rafter system. Instead of ordinary rafter legs, slanted rafters are installed; for their manufacture, double boards with a thickness of at least 50 mm each are used. It is recommended to replace nails with bolted connections and double the number of metal corners.

At the junction points only a continuous line is made, with a width of at least thirty centimeters. It will be further fixed to it waterproofing materials and metal strips. For waterproofing, special membranes are used, which are mounted on top of ordinary coatings. These are the so-called soft coverings; at the next stage they are closed with metal grooves.

Prices for various types of construction boards
Construction boards
Step-by-step instructions for arranging a valley
The unit requires increased attention during the construction of the rafter system, installation of under-roof insulation and roofing. How to lay waterproofing layers so that they provide maximum tightness?
Step 1. Start by installing a vapor barrier; it prevents the mineral wool from getting wet. The valley knot is very complex in geometry; here you need to be very careful about the placement of the membrane. The vapor barrier layer must be installed from the side attic space, do not spare the connecting tape, ensure that the membrane is tightly connected to the rafter. You can glue it with double-sided butyl rubber tape or single-sided acrylic. The first material is better, provides stronger adhesion, but is much more expensive.

Step 2. Nail or screw the support board for the eaves. Its dimensions may vary depending on technical characteristics roofing materials.

Step 3. Insulate the valley assembly. Here you need to trim all the mineral wool slabs at the corners. Take measurements accurately and avoid any gaps. If the dimensions are taken incorrectly, then the gaps between wooden structures and the insulation must be covered with small pieces of material or foamed with polyurethane foam.

It is important to correctly determine the thickness of the insulation. For the Moscow region, it should be at least 10 cm; in the northern regions of our country, the thickness increases to 15 cm. Always take this parameter into account, since if the thickness is insufficient, the effectiveness of thermal insulation will be too insignificant.
It is also very important to ensure that the mineral wool is completely sealed to prevent it from getting wet due to condensation penetration. Wet mineral wool has direct contact with the wooden elements of the rafter system for a long period of time, and the wood begins to rot, even despite protective treatment with various impregnations. Due to damage rafter system reduces its initial load-bearing capacity and requires complex repairs.
Step 4. Prepare the valley. First, secure the valley boards along the junction of the slopes. Board thickness 25 mm, width 200 mm.

Step 5. Screw support bars 40x40 mm to the ends of the boards. Fix wooden elements You can use screws or nails. Make sure that all lumber is tightly adjacent to each other.

Preparations for waterproofing the valley are complete. You can begin laying the membrane.
Installation of the valley membrane
Prices for popular models of screwdrivers
Screwdrivers
Films must be selected depending on the type of roof and the type of material for. In our case, the insulation is mineral wool; it is a very capricious material that requires special treatment. The waterproofing of the unit must perform the following tasks:

At the same time, these complex and very important tasks can only be performed by a special three-layer membrane.
Prices for PVC membranes for roofing
PVC membrane for roofing
Step 1. Lay the first layer of waterproof membrane parallel to the valley axis. Cut a piece of the required width from the roll and staple it to the boards. Start installation from the bottom and work your way up to the ridge. Layer overlaps at least ten centimeters wide. Do not allow wrinkles to appear; drive the staples into top part fabric, do not make unnecessary punctures in areas where water may flow.

Step 2. After the valley is waterproofed, you can begin installing the membrane along the entire roof slope. The work is carried out using conventional technology; there are some differences only in the area where the slopes adjoin. Here, the length of the overlaps from the valley axis on both sides of the valley should be at least 30 cm. As you remember, all other overlaps are made 10 cm.

Practical advice. To completely eliminate the possibility of leaks, the joints must be additionally taped with special tape. It is sold complete with a membrane. In order to save money, it is not recommended to replace the tape with ordinary tape; its technical parameters do not meet existing requirements.
Step 3. Reinstall the metal drippers. Use double-sided self-adhesive tape to secure the membrane to them.

Proceed to the next stage of arranging the valleys.
Installation of counter-lattice
As we have already mentioned, without effective natural ventilation, the valley assembly quickly fails due to a decrease in the load-bearing capacity of the wooden elements.
Step 1. Attach a special tape to one side of the counter-lattice to seal the hole from the staples. Screw the elements with self-tapping screws or fix them with nails. The thickness of the slats is at least five centimeters, otherwise the ventilation parameters do not meet the requirements of building codes and regulations.

Important. Do not bring the counter batten slats to the side bars of the valley by about 10 cm, this gap is needed for circulation air flow in the node.
Step 2. Install the sheathing. If the roofing material is soft, then the entire sheathing should be solid. OSB boards are usually used, less often glued plywood and very rarely edged boards. The choice of options is mainly influenced by cost; in terms of performance characteristics, the listed materials have almost no differences.

Installation of metal valley strips
Our roofing is made of metal tiles; additional elements are selected depending on the color scheme of the roofing material.
Step 1. Reinstall the bottom valley sheet. It is made of galvanized sheet steel with a thickness of 0.45 mm. To improve anti-corrosion protection surfaces are coated with durable polymer paints, which significantly increases service life and improves appearance. Before installation, a special profile is pre-cut in the lower part for a clear connection in the corner of the valley and drip. You must work with metal scissors; using a grinder with an abrasive disc is strictly prohibited. A grinder is sometimes used to cut profiled sheets, but only in those places that are subsequently covered and are not negatively affected by precipitation. In this case, the cut area is open; only scissors are allowed to be used.

Step 2. Secure the sheet with hardware, further installation is done from the bottom up. There are additional requirements for the joints of the slopes for the fastening of the valleys.
- The overlap of metal elements must be at least thirty centimeters. If in ordinary nodes it is 10 cm, then in valleys the parameter increases almost three times.
- At small angles of inclination of the assembly, it is recommended to use additional sealing of the overlap areas. Any composition can be used, it is not affected by ultraviolet rays, factory quality is maintained throughout the entire period of operation.
- Where metal roofing sheets enter the valley, a sealant must be installed. It prevents water from overflowing onto the wooden elements of the rafter system during a strong flow of water.

Step 3. Install the roof on slopes, trim the sheets at the valley locations. Follow the requirements of roofing material manufacturers.

Step 4. Attach the upper decorative element of the valley using self-tapping screws. It hides the nervousness of the cuts and protects the edges from getting wet with water. The decorative element significantly improves the appearance of the roof.

Self-tapping screws must be screwed into the upper waves of the metal coating. Do not overtighten the hardware, do not deform the surface of the decorative valley, strictly observe linearity. If the upper element is curved, has dents and bumps, then it does not decorate the roof, but, on the contrary, significantly worsens its appearance. Always remember this and work very carefully. If everything is done according to the developed technologies, the roof will turn out not only beautiful, but also strong and durable.

We have provided step-by-step instructions for arranging a valley under metal coatings. All other options have no fundamental differences; this unit can be called universal in terms of sealing technology. The appearance of the roof has almost no influence on construction technology.
Video - End of roof: what is it
The valley is an important, but far from the only element of the roof. The rafter system is a complex engineering structure, with a large number of individual architectural elements. Exactly what parts it consists of, their features and specific purpose - all this information is in the article on the pages.
The roof is the “crown” of the building. Owners of private houses strive to make it functional and practical, without forgetting its visual appeal. The classic gable roof with a ridge is gradually becoming a thing of the past. They are being replaced by complex architectural varieties consisting of roofing material and connecting elements - extensions. One of them is the valley.
What is a valley
The term "endova" is used in two meanings. In common parlance, this is an internal negative angle formed at the junction of two roof planes. It is one of the critical components of the roofing deck. The importance is explained by the increased load on the site. Snow layers accumulate here, the mass of which is several times greater than the weight of the snowdrifts on the rest of the roof area. If snow load on the slope it is 200–240 kg/m2, then in the corners it can reach 500 kg/m2.
How more complex form roofs, the more additions are required
The building element is named after a low bowl with a spout used for pouring liquids.
In construction practice, a narrow interpretation of the concept is used, according to which a valley is a plank bent inward to form the joint of slopes. Its second name is groove. For production, materials similar to the main coating are used. The slate is supplemented with asbestos-cement strips, and the corrugated sheets and metal tiles are complemented with galvanized steel sheets with polymer coating. The shade of the valley matches the color of the roof. This allows you to create the visual integrity of the roof, a harmonious combination of all elements of the device. In rare cases, you can find aluminum or copper products. All materials must have high mechanical strength, long service life and ability to withstand moisture.
The valley strip is coated with an anti-corrosion compound
Before it was invented separate element, the builders used cuttings of roofing materials and improvised means to protect the negative angles between the slopes.
The configuration of roofs requiring the installation of such extensions may be different. Valleys are mounted on multi-gable roofs and their particular varieties: T-shaped, L-shaped and cross-shaped. The element allows you to make roof bends formed by the projections of attic or dormer windows. How more complex design, the more grooves will be required.
Photo gallery: valley roofs
 Poor installation of valleys increases the risk of leaks
  The valley should fit snugly to the edges of the slope
  For cross-shaped roofs, the installation of planks is carried out from the eaves overhang to the ridge
  The outer valley is classified as decorative elements roofs
  The more valleys, the more expensive their maintenance
  It is advisable to select the same color solutions valleys and roofs
Design functions
Improper design or installation of the valley can lead to dire consequences, the most dangerous of which is roof collapse. This is possible if snow accumulates in the corners, creating a load greater than the maximum permissible.
A well-designed valley performs the following functions:
- connects adjacent inclined planes that form an internal angle at the junction;
- quickly transports and removes rainwater, flowing into drainage system along the groove;
- protects the roof from leaks and contamination;
- prevents debris (fallen leaves, tree branches) and insects from entering the under-roof space;
- gives an aesthetic, finished look to the roof.
Endova is the most vulnerable zone for precipitation
Types and arrangement of valleys
Structurally, the roof valley consists of several parts: a waterproofing layer, lower and upper planks. Each of these parts has its own purpose. The planks are available in various designs and geometric sizes. The parameters are determined depending on the slope of the slope, the type of roofing, wind and snow loads.
The valley strips are in direct contact with the atmosphere, so they must be made from high-quality materials
There are 3 varieties:
- Open valley. It is used where the joint of intersecting parts of the roof has a small gap. A gutter for water drainage is placed in this space. Suitable for roofs with a slight slope.
- Closed valley. A distinctive feature is that the slopes are adjacent to each other end-to-end, without open areas. Common among structures with a large angle of inclination. There is no top bar.
- Jointed or intertwined variation. It is characterized by the interweaving of two roofing sheets with each other at their intersection. Mounted on steep slopes and requires a waterproofing layer.
The disadvantage of closed and intertwined types of valleys is additional waterproofing
Table: comparison of different valleys
| View | Installation features | Functionality | Aesthetics |
| Open | Easy installation, no third-party specialists required | Water drains quickly and practically does not linger on the roof | Does not have decorative value or presentable appearance |
| Closed | Average complexity of work performed | Water removal is characterized by an average speed | High aesthetics, corner design does not affect the perception of the roof |
| Intertwined | Labor-intensive installation with low process productivity | Sediment is discharged at the same rate as in a closed valley | Beautiful appearance, the roof of intersecting slopes forms a single composition |
Photo gallery: varieties of valleys
 In an intertwined valley, roofing sheets are woven into a “pigtail”
  The most common construction solution is an open valley with a decorative strip
  The roofing on the slopes of the closed valley is tightly fitted to each other
  The open valley option is characterized high speed water flow
Bottom valley: purpose and characteristics
The lower, or false, strip is a wide strip or plate with a bend angle, equal to the angle connections of roof slopes. Along the edges of the shelves there are additional folds in the form of borders. The purpose of the lower element is to effectively remove moisture collecting in the corners of the roof and prevent liquids from entering the roof. It is this pad that takes the entire load. Installed before work begins.
To fix the valley, roofing screws or clamps are used, attached to the sheathing and sides. For effective sealing, a valley carpet is laid under the plank.
Since the bottom strip of the valley is hidden, it is allowed to use galvanized sheets without powder coating
Companies involved in the production of corrugated sheets and metal tiles offer to purchase metal gutters with shelves 100–600 mm wide. Often there are elements with bends of 298x298 mm. The smaller the width, the worse the valley copes with the large volume of discharged sediment. A narrow gutter should be used when the total length of the valley is no more than 4 m. Ideally, the overlap of the roofing sheet on the strip should be at least 250 mm.
Sheet thickness varies from 0.4 to 1.2 mm. If there is a non-continuous sheathing under the valley, then optimal thickness the bottom bar is 0.5–0.7 mm. The standard length is 2000 mm. The density of the zinc coating, which can resist corrosion, is not less than 275 g/m2.
The internal corner is adjusted to the customer’s dimensions: for this purpose, the angle formed by the joint of the roof is measured.
Trying to save money, many private homeowners use cheap, thin sheet metal, arguing that the bottom strip is hidden. Despite the fact that the internal valley does not participate in the aesthetics of the structure, the strength and rigidity of the roof depends on it. Therefore, saving is inappropriate here.
Manufacturers offer a wide selection of valley sizes to suit specific customer needs.
Features of mounting the bottom strip
Laying the bottom metal trim does not require special engineering or construction knowledge. Even a beginner can handle the process. Of course, before starting work it is necessary to study several technical nuances.
For installation you will need a set of cutting, fastening, measuring and auxiliary tools:

- Installation and fastening of additional valley sheathing. The special feature of the flooring is the continuous, gap-free joining of timber or boards. Produced after the main roof frame has been created. The material is an edged board with a width greater than the width of the bottom plank, and a thickness equal to the dimensions of the remaining bars of the roof sheathing. Nailed on top of the rafters. Wood must be treated with antiseptic agents.
Continuous valley sheathing allows you to evenly distribute the load over the entire area of the plank
- Waterproofing. There is always a valley along the gutter waterproofing layer
. It is used as a rolled valley carpet laid on top of the cushioning material. It consists of non-woven polyester fibers, bitumen impregnation and coating. This additional waterproofing guarantees 100% protection against moisture. The width of the covering should be 100–150 mm greater than the width of the plank. So, for a bottom strip with a shelf width of 200x200 mm, a waterproofing pad of 300x300 mm will be required. There are 2 methods of installing carpet:

- Installation of the bottom strip. Starts from the eaves and up to the ridge. It is carried out using self-tapping screws located at a distance of 300 mm. Screwing is done directly into the sheathing. Another method of fastening is with clamps that cling to the side of the plank. If the false beam consists of several parts, then each one is laid with an overlap of 300 mm in relation to the previous one. In this case, the section mounted below is placed under the one located above. Each joint is coated with sealant or bitumen mastic. A self-adhesive seal is installed on the fixed metal strip along its length to prevent clogging of the under-roof area. It reliably presses the roofing sheet to the strip.
From the point of view of tightness, the best method of fastening for the bottom bar is with clamps
- Laying material on top of the bottom strip. Metal tiles or corrugated sheets are cut along the edge, maintaining a size of 60–100 mm up to the valley bend. The roof is fixed in a standard way: for profiled materials, the lower wave serves as the fastening point. The recommended distance from the screws to the center of the strip is 250 mm. After installing the roof, the valley is ready, it can be used in open form. But to improve the attractiveness of the joint, the top strip is used to hide installation defects.
The roofing material is fastened with self-tapping screws
Upper valley: purpose and characteristics
The top bar is made in the form bent profile with flanging along the long side. A small depression is formed in the center to drain water. At the same time, the drain gutter plays the role of a stiffener. In principle, outer valley is not a required element. Purpose of the bar - additional protection joint from leakage, extending the service life of the bottom strip and decorative design of the valley. Unlike the internal one, it is attached on top of the roofing sheets.
You can refuse to install the upper valley strip in several justified cases:
- the open bottom bar provides greater capacity for water drainage, which is important for regions with frequent rainfall;
- the removal of melted snow containing branches and other debris is facilitated by installing only the lower bar;
- for roofs with a small slope angle.
The color of the valley is selected to match the roof tone according to the international RAL catalog
The top bar is made from rolled sheets with a thickness of 0.4–0.6 mm. The surface is covered with several protective layers made of aluminum and zinc. They protect the metal from the occurrence of corrosion spots even in drilling areas or strip cuts. The aesthetics of the product is imparted using polyester-based polymer enamel. The coating is resistant to ultraviolet radiation, mechanical scratches, chips and moisture. During the entire service life, the planks do not fade in the sun.
The size of the outer pad is not as critical as the bottom one. The main thing is that the dimensions overlap the sections of corrugated sheets or metal tiles. The width of the shelves varies in the range of 50–500 mm. Optimal height flanges - 20 mm. For the purpose of unification, manufacturers have adopted a standard length size of 2000 mm.
The dimensions of the valley are shown for informational purposes; custom production is possible
Features of installing the top bar
The final stage of valley installation is the installation of the top strip. The sequence of work resembles the installation of a lower valley.
Main stages:
- Installation of the top lining on the roof. It must be done from the bottom up, from the overhang to the ridge of the roof. The prefabricated valley planks should be joined together with an overlap of at least 100 mm. It is convenient to measure the required distance using a tape measure, and make the mark with a marker or chalk. The top bar should protrude above the bottom by a distance of 15–20 cm.
The top strip extends onto the roof on both sides
- Fastening the cover. Outer part screwed with self-tapping screws to the upper ridges of the profiled roofing sheet. It is very important to prevent screws from getting into the middle of the bottom strip. If the hardware breaks through the false roof, then the waterproofing in this place will be damaged. When carrying out work, you must remember that laying self-expanding seals between the decorative strip and the roof is not required. To seal overlaps, sealants are used, which are applied with a special gun or their tape analogues.
The tape is easy to use, just cut right size and glue to the required part
Video: valley installation
Caring for the valley
In order for the valley to serve for a long time and perform its tasks efficiently, it must be carefully looked after. Roof maintenance should become a habit for every homeowner.
- In the summer and autumn seasons, you should thoroughly clean the valley strips and the water intake funnel from accumulated debris, dirt, leaves and foreign objects. To do this, you can use a broom or a brush with soft bristles. Cleaning begins with the slopes, the valley is serviced last.
- Periodically, several times a year, inspect the condition of the planks, the tightness of fit to roofing material. If necessary, restore sealing tapes and sealing gaskets.
- In winter, it is important to promptly remove snow cover when it accumulates excessively. This will protect the valley strips from deformation, which results in leaks. The tool is a wooden shovel or scraper with a rubberized working edge. The longer the handle of the roofing scraper, the more convenient it is to work with.
The work is carried out in accordance with safety regulations
Video: attaching rafters to the valley
Installation of valleys is the final point in completing the construction of a house or other structure. The structure is installed at the junctions of slopes with negative angles. Only correct selection materials, high-quality waterproofing and constant maintenance of the finished element will ensure reliable protection from precipitation.